The Rust Programming Language
by Steve Klabnik and Carol Nichols, with contributions from the Rust Community
This version of the text assumes you’re using Rust 1.50 or later with
edition="2018" in Cargo.toml of all projects to use Rust 2018 Edition
idioms. See the “Installation” section of Chapter 1
to install or update Rust, and see the new Appendix E for information on editions.
The 2018 Edition of the Rust language includes a number of improvements that make Rust more ergonomic and easier to learn. This iteration of the book contains a number of changes to reflect those improvements:
- Chapter 7, “Managing Growing Projects with Packages, Crates, and Modules,” has been mostly rewritten. The module system and the way paths work in the 2018 Edition were made more consistent.
- Chapter 10 has new sections titled “Traits as Parameters” and “Returning
Types that Implement Traits” that explain the new
impl Traitsyntax. - Chapter 11 has a new section titled “Using
Result<T, E>in Tests” that shows how to write tests that use the?operator. - The “Advanced Lifetimes” section in Chapter 19 was removed because compiler improvements have made the constructs in that section even rarer.
- The previous Appendix D, “Macros,” has been expanded to include procedural macros and was moved to the “Macros” section in Chapter 19.
- Appendix A, “Keywords,” also explains the new raw identifiers feature that enables code written in the 2015 Edition and the 2018 Edition to interoperate.
- Appendix D is now titled “Useful Development Tools” and covers recently released tools that help you write Rust code.
- We fixed a number of small errors and imprecise wording throughout the book. Thank you to the readers who reported them!
Note that any code in earlier iterations of The Rust Programming Language
that compiled will continue to compile without edition="2018" in the
project’s Cargo.toml, even as you update the Rust compiler version you’re
using. That’s Rust’s backward compatibility guarantees at work!
The HTML format is available online at
https://doc.rust-lang.org/stable/book/
and offline with installations of Rust made with rustup; run rustup docs --book to open.
This text is available in paperback and ebook format from No Starch Press.
Foreword
It wasn’t always so clear, but the Rust programming language is fundamentally about empowerment: no matter what kind of code you are writing now, Rust empowers you to reach farther, to program with confidence in a wider variety of domains than you did before.
Take, for example, “systems-level” work that deals with low-level details of memory management, data representation, and concurrency. Traditionally, this realm of programming is seen as arcane, accessible only to a select few who have devoted the necessary years learning to avoid its infamous pitfalls. And even those who practice it do so with caution, lest their code be open to exploits, crashes, or corruption.
Rust breaks down these barriers by eliminating the old pitfalls and providing a friendly, polished set of tools to help you along the way. Programmers who need to “dip down” into lower-level control can do so with Rust, without taking on the customary risk of crashes or security holes, and without having to learn the fine points of a fickle toolchain. Better yet, the language is designed to guide you naturally towards reliable code that is efficient in terms of speed and memory usage.
Programmers who are already working with low-level code can use Rust to raise their ambitions. For example, introducing parallelism in Rust is a relatively low-risk operation: the compiler will catch the classical mistakes for you. And you can tackle more aggressive optimizations in your code with the confidence that you won’t accidentally introduce crashes or vulnerabilities.
But Rust isn’t limited to low-level systems programming. It’s expressive and ergonomic enough to make CLI apps, web servers, and many other kinds of code quite pleasant to write — you’ll find simple examples of both later in the book. Working with Rust allows you to build skills that transfer from one domain to another; you can learn Rust by writing a web app, then apply those same skills to target your Raspberry Pi.
This book fully embraces the potential of Rust to empower its users. It’s a friendly and approachable text intended to help you level up not just your knowledge of Rust, but also your reach and confidence as a programmer in general. So dive in, get ready to learn—and welcome to the Rust community!
— Nicholas Matsakis and Aaron Turon
Introduction
Note: This edition of the book is the same as The Rust Programming Language available in print and ebook format from No Starch Press.
Welcome to The Rust Programming Language, an introductory book about Rust. The Rust programming language helps you write faster, more reliable software. High-level ergonomics and low-level control are often at odds in programming language design; Rust challenges that conflict. Through balancing powerful technical capacity and a great developer experience, Rust gives you the option to control low-level details (such as memory usage) without all the hassle traditionally associated with such control.
Who Rust Is For
Rust is ideal for many people for a variety of reasons. Let’s look at a few of the most important groups.
Teams of Developers
Rust is proving to be a productive tool for collaborating among large teams of developers with varying levels of systems programming knowledge. Low-level code is prone to a variety of subtle bugs, which in most other languages can be caught only through extensive testing and careful code review by experienced developers. In Rust, the compiler plays a gatekeeper role by refusing to compile code with these elusive bugs, including concurrency bugs. By working alongside the compiler, the team can spend their time focusing on the program’s logic rather than chasing down bugs.
Rust also brings contemporary developer tools to the systems programming world:
- Cargo, the included dependency manager and build tool, makes adding, compiling, and managing dependencies painless and consistent across the Rust ecosystem.
- Rustfmt ensures a consistent coding style across developers.
- The Rust Language Server powers Integrated Development Environment (IDE) integration for code completion and inline error messages.
By using these and other tools in the Rust ecosystem, developers can be productive while writing systems-level code.
Students
Rust is for students and those who are interested in learning about systems concepts. Using Rust, many people have learned about topics like operating systems development. The community is very welcoming and happy to answer student questions. Through efforts such as this book, the Rust teams want to make systems concepts more accessible to more people, especially those new to programming.
Companies
Hundreds of companies, large and small, use Rust in production for a variety of tasks. Those tasks include command line tools, web services, DevOps tooling, embedded devices, audio and video analysis and transcoding, cryptocurrencies, bioinformatics, search engines, Internet of Things applications, machine learning, and even major parts of the Firefox web browser.
Open Source Developers
Rust is for people who want to build the Rust programming language, community, developer tools, and libraries. We’d love to have you contribute to the Rust language.
People Who Value Speed and Stability
Rust is for people who crave speed and stability in a language. By speed, we mean the speed of the programs that you can create with Rust and the speed at which Rust lets you write them. The Rust compiler’s checks ensure stability through feature additions and refactoring. This is in contrast to the brittle legacy code in languages without these checks, which developers are often afraid to modify. By striving for zero-cost abstractions, higher-level features that compile to lower-level code as fast as code written manually, Rust endeavors to make safe code be fast code as well.
The Rust language hopes to support many other users as well; those mentioned here are merely some of the biggest stakeholders. Overall, Rust’s greatest ambition is to eliminate the trade-offs that programmers have accepted for decades by providing safety and productivity, speed and ergonomics. Give Rust a try and see if its choices work for you.
Who This Book Is For
This book assumes that you’ve written code in another programming language but doesn’t make any assumptions about which one. We’ve tried to make the material broadly accessible to those from a wide variety of programming backgrounds. We don’t spend a lot of time talking about what programming is or how to think about it. If you’re entirely new to programming, you would be better served by reading a book that specifically provides an introduction to programming.
How to Use This Book
In general, this book assumes that you’re reading it in sequence from front to back. Later chapters build on concepts in earlier chapters, and earlier chapters might not delve into details on a topic; we typically revisit the topic in a later chapter.
You’ll find two kinds of chapters in this book: concept chapters and project chapters. In concept chapters, you’ll learn about an aspect of Rust. In project chapters, we’ll build small programs together, applying what you’ve learned so far. Chapters 2, 12, and 20 are project chapters; the rest are concept chapters.
Chapter 1 explains how to install Rust, how to write a “Hello, world!” program, and how to use Cargo, Rust’s package manager and build tool. Chapter 2 is a hands-on introduction to the Rust language. Here we cover concepts at a high level, and later chapters will provide additional detail. If you want to get your hands dirty right away, Chapter 2 is the place for that. At first, you might even want to skip Chapter 3, which covers Rust features similar to those of other programming languages, and head straight to Chapter 4 to learn about Rust’s ownership system. However, if you’re a particularly meticulous learner who prefers to learn every detail before moving on to the next, you might want to skip Chapter 2 and go straight to Chapter 3, returning to Chapter 2 when you’d like to work on a project applying the details you’ve learned.
Chapter 5 discusses structs and methods, and Chapter 6 covers enums, match
expressions, and the if let control flow construct. You’ll use structs and
enums to make custom types in Rust.
In Chapter 7, you’ll learn about Rust’s module system and about privacy rules for organizing your code and its public Application Programming Interface (API). Chapter 8 discusses some common collection data structures that the standard library provides, such as vectors, strings, and hash maps. Chapter 9 explores Rust’s error-handling philosophy and techniques.
Chapter 10 digs into generics, traits, and lifetimes, which give you the power
to define code that applies to multiple types. Chapter 11 is all about testing,
which even with Rust’s safety guarantees is necessary to ensure your program’s
logic is correct. In Chapter 12, we’ll build our own implementation of a subset
of functionality from the grep command line tool that searches for text
within files. For this, we’ll use many of the concepts we discussed in the
previous chapters.
Chapter 13 explores closures and iterators: features of Rust that come from functional programming languages. In Chapter 14, we’ll examine Cargo in more depth and talk about best practices for sharing your libraries with others. Chapter 15 discusses smart pointers that the standard library provides and the traits that enable their functionality.
In Chapter 16, we’ll walk through different models of concurrent programming and talk about how Rust helps you to program in multiple threads fearlessly. Chapter 17 looks at how Rust idioms compare to object-oriented programming principles you might be familiar with.
Chapter 18 is a reference on patterns and pattern matching, which are powerful ways of expressing ideas throughout Rust programs. Chapter 19 contains a smorgasbord of advanced topics of interest, including unsafe Rust, macros, and more about lifetimes, traits, types, functions, and closures.
In Chapter 20, we’ll complete a project in which we’ll implement a low-level multithreaded web server!
Finally, some appendices contain useful information about the language in a more reference-like format. Appendix A covers Rust’s keywords, Appendix B covers Rust’s operators and symbols, Appendix C covers derivable traits provided by the standard library, Appendix D covers some useful development tools, and Appendix E explains Rust editions.
There is no wrong way to read this book: if you want to skip ahead, go for it! You might have to jump back to earlier chapters if you experience any confusion. But do whatever works for you.
An important part of the process of learning Rust is learning how to read the error messages the compiler displays: these will guide you toward working code. As such, we’ll provide many examples that don’t compile along with the error message the compiler will show you in each situation. Know that if you enter and run a random example, it may not compile! Make sure you read the surrounding text to see whether the example you’re trying to run is meant to error. Ferris will also help you distinguish code that isn’t meant to work:
| Ferris | Meaning |
|---|---|
 | This code does not compile! |
 | This code panics! |
 | This code block contains unsafe code. |
 | This code does not produce the desired behavior. |
In most situations, we’ll lead you to the correct version of any code that doesn’t compile.
Source Code
The source files from which this book is generated can be found on GitHub.
Getting Started
Let’s start your Rust journey! There’s a lot to learn, but every journey starts somewhere. In this chapter, we’ll discuss:
- Installing Rust on Linux, macOS, and Windows
- Writing a program that prints
Hello, world! - Using
cargo, Rust’s package manager and build system
Installation
The first step is to install Rust. We’ll download Rust through rustup, a
command line tool for managing Rust versions and associated tools. You’ll need
an internet connection for the download.
Note: If you prefer not to use
rustupfor some reason, please see the Rust installation page for other options.
The following steps install the latest stable version of the Rust compiler. Rust’s stability guarantees ensure that all the examples in the book that compile will continue to compile with newer Rust versions. The output might differ slightly between versions, because Rust often improves error messages and warnings. In other words, any newer, stable version of Rust you install using these steps should work as expected with the content of this book.
Command Line Notation
In this chapter and throughout the book, we’ll show some commands used in the terminal. Lines that you should enter in a terminal all start with
$. You don’t need to type in the$character; it indicates the start of each command. Lines that don’t start with$typically show the output of the previous command. Additionally, PowerShell-specific examples will use>rather than$.
Installing rustup on Linux or macOS
If you’re using Linux or macOS, open a terminal and enter the following command:
$ curl --proto '=https' --tlsv1.2 https://sh.rustup.rs -sSf | sh
The command downloads a script and starts the installation of the rustup
tool, which installs the latest stable version of Rust. You might be prompted
for your password. If the install is successful, the following line will appear:
Rust is installed now. Great!
Additionally, you’ll need a linker of some kind. It’s likely one is already installed, but when you try to compile a Rust program and get errors indicating that a linker could not execute, that means a linker isn’t installed on your system and you’ll need to install one manually. C compilers usually come with the correct linker. Check your platform’s documentation for how to install a C compiler. Also, some common Rust packages depend on C code and will need a C compiler. Therefore, it might be worth installing one now.
Installing rustup on Windows
On Windows, go to https://www.rust-lang.org/tools/install and follow the instructions for installing Rust. At some point in the installation, you’ll receive a message explaining that you’ll also need the C++ build tools for Visual Studio 2013 or later. The easiest way to acquire the build tools is to install Build Tools for Visual Studio 2019. When asked which workloads to install make sure "C++ build tools" is selected and that the Windows 10 SDK and the English language pack components are included.
The rest of this book uses commands that work in both cmd.exe and PowerShell. If there are specific differences, we’ll explain which to use.
Updating and Uninstalling
After you’ve installed Rust via rustup, updating to the latest version is
easy. From your shell, run the following update script:
$ rustup update
To uninstall Rust and rustup, run the following uninstall script from your
shell:
$ rustup self uninstall
Troubleshooting
To check whether you have Rust installed correctly, open a shell and enter this line:
$ rustc --version
You should see the version number, commit hash, and commit date for the latest stable version that has been released in the following format:
rustc x.y.z (abcabcabc yyyy-mm-dd)
If you see this information, you have installed Rust successfully! If you don’t
see this information and you’re on Windows, check that Rust is in your %PATH%
system variable. If that’s all correct and Rust still isn’t working, there are
a number of places you can get help. The easiest is the #beginners channel on
the official Rust Discord. There, you can chat with other Rustaceans
(a silly nickname we call ourselves) who can help you out. Other great
resources include the Users forum and Stack Overflow.
Local Documentation
The installation of Rust also includes a copy of the documentation locally, so
you can read it offline. Run rustup doc to open the local documentation in
your browser.
Any time a type or function is provided by the standard library and you’re not sure what it does or how to use it, use the application programming interface (API) documentation to find out!
Hello, World!
Now that you’ve installed Rust, let’s write your first Rust program. It’s
traditional when learning a new language to write a little program that prints
the text Hello, world! to the screen, so we’ll do the same here!
Note: This book assumes basic familiarity with the command line. Rust makes no specific demands about your editing or tooling or where your code lives, so if you prefer to use an integrated development environment (IDE) instead of the command line, feel free to use your favorite IDE. Many IDEs now have some degree of Rust support; check the IDE’s documentation for details. Recently, the Rust team has been focusing on enabling great IDE support, and progress has been made rapidly on that front!
Creating a Project Directory
You’ll start by making a directory to store your Rust code. It doesn’t matter to Rust where your code lives, but for the exercises and projects in this book, we suggest making a projects directory in your home directory and keeping all your projects there.
Open a terminal and enter the following commands to make a projects directory and a directory for the “Hello, world!” project within the projects directory.
For Linux, macOS, and PowerShell on Windows, enter this:
$ mkdir ~/projects
$ cd ~/projects
$ mkdir hello_world
$ cd hello_world
For Windows CMD, enter this:
> mkdir "%USERPROFILE%\projects"
> cd /d "%USERPROFILE%\projects"
> mkdir hello_world
> cd hello_world
Writing and Running a Rust Program
Next, make a new source file and call it main.rs. Rust files always end with the .rs extension. If you’re using more than one word in your filename, use an underscore to separate them. For example, use hello_world.rs rather than helloworld.rs.
Now open the main.rs file you just created and enter the code in Listing 1-1.
Filename: main.rs
fn main() {
    println!("Hello, world!");
}
Listing 1-1: A program that prints Hello, world!
Save the file and go back to your terminal window. On Linux or macOS, enter the following commands to compile and run the file:
$ rustc main.rs
$ ./main
Hello, world!
On Windows, enter the command .\main.exe instead of ./main:
> rustc main.rs
> .\main.exe
Hello, world!
Regardless of your operating system, the string Hello, world! should print to
the terminal. If you don’t see this output, refer back to the
“Troubleshooting” part of the Installation
section for ways to get help.
If Hello, world! did print, congratulations! You’ve officially written a Rust
program. That makes you a Rust programmer—welcome!
Anatomy of a Rust Program
Let’s review in detail what just happened in your “Hello, world!” program. Here’s the first piece of the puzzle:
fn main() {

}
These lines define a function in Rust. The main function is special: it is
always the first code that runs in every executable Rust program. The first
line declares a function named main that has no parameters and returns
nothing. If there were parameters, they would go inside the parentheses, ().
Also, note that the function body is wrapped in curly brackets, {}. Rust
requires these around all function bodies. It’s good style to place the opening
curly bracket on the same line as the function declaration, adding one space in
between.
If you want to stick to a standard style across Rust projects, you can use an
automatic formatter tool called rustfmt to format your code in a particular
style. The Rust team has included this tool with the standard Rust distribution,
like rustc, so it should already be installed on your computer! Check the
online documentation for more details.
Inside the main function is the following code:
#![allow(unused)]
fn main() {
    println!("Hello, world!");
}
This line does all the work in this little program: it prints text to the screen. There are four important details to notice here.
First, Rust style is to indent with four spaces, not a tab.
Second, println! calls a Rust macro. If it called a function instead, it
would be entered as println (without the !). We’ll discuss Rust macros in
more detail in Chapter 19. For now, you just need to know that using a !
means that you’re calling a macro instead of a normal function.
Third, you see the "Hello, world!" string. We pass this string as an argument
to println!, and the string is printed to the screen.
Fourth, we end the line with a semicolon (;), which indicates that this
expression is over and the next one is ready to begin. Most lines of Rust code
end with a semicolon.
Compiling and Running Are Separate Steps
You’ve just run a newly created program, so let’s examine each step in the process.
Before running a Rust program, you must compile it using the Rust compiler by
entering the rustc command and passing it the name of your source file, like
this:
$ rustc main.rs
If you have a C or C++ background, you’ll notice that this is similar to gcc
or clang. After compiling successfully, Rust outputs a binary executable.
On Linux, macOS, and PowerShell on Windows, you can see the executable by
entering the ls command in your shell. On Linux and macOS, you’ll see two
files. With PowerShell on Windows, you’ll see the same three files that you
would see using CMD.
$ ls
main  main.rs
With CMD on Windows, you would enter the following:
> dir /B %= the /B option says to only show the file names =%
main.exe
main.pdb
main.rs
This shows the source code file with the .rs extension, the executable file (main.exe on Windows, but main on all other platforms), and, when using Windows, a file containing debugging information with the .pdb extension. From here, you run the main or main.exe file, like this:
$ ./main # or .\main.exe on Windows
If main.rs was your “Hello, world!” program, this line would print Hello, world! to your terminal.
If you’re more familiar with a dynamic language, such as Ruby, Python, or JavaScript, you might not be used to compiling and running a program as separate steps. Rust is an ahead-of-time compiled language, meaning you can compile a program and give the executable to someone else, and they can run it even without having Rust installed. If you give someone a .rb, .py, or .js file, they need to have a Ruby, Python, or JavaScript implementation installed (respectively). But in those languages, you only need one command to compile and run your program. Everything is a trade-off in language design.
Just compiling with rustc is fine for simple programs, but as your project
grows, you’ll want to manage all the options and make it easy to share your
code. Next, we’ll introduce you to the Cargo tool, which will help you write
real-world Rust programs.
Hello, Cargo!
Cargo is Rust’s build system and package manager. Most Rustaceans use this tool to manage their Rust projects because Cargo handles a lot of tasks for you, such as building your code, downloading the libraries your code depends on, and building those libraries. (We call libraries your code needs dependencies.)
The simplest Rust programs, like the one we’ve written so far, don’t have any dependencies. So if we had built the “Hello, world!” project with Cargo, it would only use the part of Cargo that handles building your code. As you write more complex Rust programs, you’ll add dependencies, and if you start a project using Cargo, adding dependencies will be much easier to do.
Because the vast majority of Rust projects use Cargo, the rest of this book assumes that you’re using Cargo too. Cargo comes installed with Rust if you used the official installers discussed in the “Installation” section. If you installed Rust through some other means, check whether Cargo is installed by entering the following into your terminal:
$ cargo --version
If you see a version number, you have it! If you see an error, such as command not found, look at the documentation for your method of installation to
determine how to install Cargo separately.
Creating a Project with Cargo
Let’s create a new project using Cargo and look at how it differs from our original “Hello, world!” project. Navigate back to your projects directory (or wherever you decided to store your code). Then, on any operating system, run the following:
$ cargo new hello_cargo
$ cd hello_cargo
The first command creates a new directory called hello_cargo. We’ve named our project hello_cargo, and Cargo creates its files in a directory of the same name.
Go into the hello_cargo directory and list the files. You’ll see that Cargo has generated two files and one directory for us: a Cargo.toml file and a src directory with a main.rs file inside.
It has also initialized a new Git repository along with a .gitignore file.
Git files won’t be generated if you run cargo new within an existing Git
repository; you can override this behavior by using cargo new --vcs=git.
Note: Git is a common version control system. You can change
cargo newto use a different version control system or no version control system by using the--vcsflag. Runcargo new --helpto see the available options.
Open Cargo.toml in your text editor of choice. It should look similar to the code in Listing 1-2.
Filename: Cargo.toml
[package]
name = "hello_cargo"
version = "0.1.0"
authors = ["Your Name <you@example.com>"]
edition = "2018"

[dependencies]
Listing 1-2: Contents of Cargo.toml generated by cargo new
This file is in the TOML (Tom’s Obvious, Minimal Language) format, which is Cargo’s configuration format.
The first line, [package], is a section heading that indicates that the
following statements are configuring a package. As we add more information to
this file, we’ll add other sections.
The next four lines set the configuration information Cargo needs to compile
your program: the name, the version, who wrote it, and the edition of Rust to
use. Cargo gets your name and email information from your environment, so if
that information is not correct, fix the information now and then save the
file. We’ll talk about the edition key in Appendix E.
The last line, [dependencies], is the start of a section for you to list any
of your project’s dependencies. In Rust, packages of code are referred to as
crates. We won’t need any other crates for this project, but we will in the
first project in Chapter 2, so we’ll use this dependencies section then.
Now open src/main.rs and take a look:
Filename: src/main.rs
fn main() {
    println!("Hello, world!");
}
Cargo has generated a “Hello, world!” program for you, just like the one we wrote in Listing 1-1! So far, the differences between our previous project and the project Cargo generates are that Cargo placed the code in the src directory, and we have a Cargo.toml configuration file in the top directory.
Cargo expects your source files to live inside the src directory. The top-level project directory is just for README files, license information, configuration files, and anything else not related to your code. Using Cargo helps you organize your projects. There’s a place for everything, and everything is in its place.
If you started a project that doesn’t use Cargo, as we did with the “Hello, world!” project, you can convert it to a project that does use Cargo. Move the project code into the src directory and create an appropriate Cargo.toml file.
Building and Running a Cargo Project
Now let’s look at what’s different when we build and run the “Hello, world!” program with Cargo! From your hello_cargo directory, build your project by entering the following command:
$ cargo build
   Compiling hello_cargo v0.1.0 (file:///projects/hello_cargo)
    Finished dev [unoptimized + debuginfo] target(s) in 2.85 secs
This command creates an executable file in target/debug/hello_cargo (or target\debug\hello_cargo.exe on Windows) rather than in your current directory. You can run the executable with this command:
$ ./target/debug/hello_cargo # or .\target\debug\hello_cargo.exe on Windows
Hello, world!
If all goes well, Hello, world! should print to the terminal. Running cargo build for the first time also causes Cargo to create a new file at the top
level: Cargo.lock. This file keeps track of the exact versions of
dependencies in your project. This project doesn’t have dependencies, so the
file is a bit sparse. You won’t ever need to change this file manually; Cargo
manages its contents for you.
We just built a project with cargo build and ran it with
./target/debug/hello_cargo, but we can also use cargo run to compile the
code and then run the resulting executable all in one command:
$ cargo run
    Finished dev [unoptimized + debuginfo] target(s) in 0.0 secs
     Running `target/debug/hello_cargo`
Hello, world!
Notice that this time we didn’t see output indicating that Cargo was compiling
hello_cargo. Cargo figured out that the files hadn’t changed, so it just ran
the binary. If you had modified your source code, Cargo would have rebuilt the
project before running it, and you would have seen this output:
$ cargo run
   Compiling hello_cargo v0.1.0 (file:///projects/hello_cargo)
    Finished dev [unoptimized + debuginfo] target(s) in 0.33 secs
     Running `target/debug/hello_cargo`
Hello, world!
Cargo also provides a command called cargo check. This command quickly checks
your code to make sure it compiles but doesn’t produce an executable:
$ cargo check
   Checking hello_cargo v0.1.0 (file:///projects/hello_cargo)
    Finished dev [unoptimized + debuginfo] target(s) in 0.32 secs
Why would you not want an executable? Often, cargo check is much faster than
cargo build, because it skips the step of producing an executable. If you’re
continually checking your work while writing the code, using cargo check will
speed up the process! As such, many Rustaceans run cargo check periodically
as they write their program to make sure it compiles. Then they run cargo build when they’re ready to use the executable.
Let’s recap what we’ve learned so far about Cargo:
- We can build a project using
cargo build. - We can build and run a project in one step using
cargo run. - We can build a project without producing a binary to check for errors using
cargo check. - Instead of saving the result of the build in the same directory as our code, Cargo stores it in the target/debug directory.
An additional advantage of using Cargo is that the commands are the same no matter which operating system you’re working on. So, at this point, we’ll no longer provide specific instructions for Linux and macOS versus Windows.
Building for Release
When your project is finally ready for release, you can use cargo build --release to compile it with optimizations. This command will create an
executable in target/release instead of target/debug. The optimizations
make your Rust code run faster, but turning them on lengthens the time it takes
for your program to compile. This is why there are two different profiles: one
for development, when you want to rebuild quickly and often, and another for
building the final program you’ll give to a user that won’t be rebuilt
repeatedly and that will run as fast as possible. If you’re benchmarking your
code’s running time, be sure to run cargo build --release and benchmark with
the executable in target/release.
Cargo as Convention
With simple projects, Cargo doesn’t provide a lot of value over just using
rustc, but it will prove its worth as your programs become more intricate.
With complex projects composed of multiple crates, it’s much easier to let
Cargo coordinate the build.
Even though the hello_cargo project is simple, it now uses much of the real
tooling you’ll use in the rest of your Rust career. In fact, to work on any
existing projects, you can use the following commands to check out the code
using Git, change to that project’s directory, and build:
$ git clone example.org/someproject
$ cd someproject
$ cargo build
For more information about Cargo, check out its documentation.
Summary
You’re already off to a great start on your Rust journey! In this chapter, you’ve learned how to:
- Install the latest stable version of Rust using
rustup - Update to a newer Rust version
- Open locally installed documentation
- Write and run a “Hello, world!” program using
rustcdirectly - Create and run a new project using the conventions of Cargo
This is a great time to build a more substantial program to get used to reading and writing Rust code. So, in Chapter 2, we’ll build a guessing game program. If you would rather start by learning how common programming concepts work in Rust, see Chapter 3 and then return to Chapter 2.
Programming a Guessing Game
Let’s jump into Rust by working through a hands-on project together! This
chapter introduces you to a few common Rust concepts by showing you how to use
them in a real program. You’ll learn about let, match, methods, associated
functions, using external crates, and more! The following chapters will explore
these ideas in more detail. In this chapter, you’ll practice the fundamentals.
We’ll implement a classic beginner programming problem: a guessing game. Here’s how it works: the program will generate a random integer between 1 and 100. It will then prompt the player to enter a guess. After a guess is entered, the program will indicate whether the guess is too low or too high. If the guess is correct, the game will print a congratulatory message and exit.
Setting Up a New Project
To set up a new project, go to the projects directory that you created in Chapter 1 and make a new project using Cargo, like so:
$ cargo new guessing_game
$ cd guessing_game
The first command, cargo new, takes the name of the project (guessing_game)
as the first argument. The second command changes to the new project’s
directory.
Look at the generated Cargo.toml file:
Filename: Cargo.toml
[package]
name = "guessing_game"
version = "0.1.0"
authors = ["Your Name <you@example.com>"]
edition = "2018"

# See more keys and their definitions at https://doc.rust-lang.org/cargo/reference/manifest.html

[dependencies]
If the author information that Cargo obtained from your environment is not correct, fix that in the file and save it again.
As you saw in Chapter 1, cargo new generates a “Hello, world!” program for
you. Check out the src/main.rs file:
Filename: src/main.rs
fn main() {
    println!("Hello, world!");
}
Now let’s compile this “Hello, world!” program and run it in the same step
using the cargo run command:
$ cargo run
   Compiling guessing_game v0.1.0 (file:///projects/guessing_game)
    Finished dev [unoptimized + debuginfo] target(s) in 1.50s
     Running `target/debug/guessing_game`
Hello, world!
The run command comes in handy when you need to rapidly iterate on a project,
as we’ll do in this game, quickly testing each iteration before moving on to
the next one.
Reopen the src/main.rs file. You’ll be writing all the code in this file.
Processing a Guess
The first part of the guessing game program will ask for user input, process that input, and check that the input is in the expected form. To start, we’ll allow the player to input a guess. Enter the code in Listing 2-1 into src/main.rs.
Filename: src/main.rs
use std::io;

fn main() {
    println!("Guess the number!");

    println!("Please input your guess.");

    let mut guess = String::new();

    io::stdin()
        .read_line(&mut guess)
        .expect("Failed to read line");

    println!("You guessed: {}", guess);
}
Listing 2-1: Code that gets a guess from the user and prints it
This code contains a lot of information, so let’s go over it line by line. To
obtain user input and then print the result as output, we need to bring the
io (input/output) library into scope. The io library comes from the
standard library (which is known as std):
use std::io;

fn main() {
    println!("Guess the number!");

    println!("Please input your guess.");

    let mut guess = String::new();

    io::stdin()
        .read_line(&mut guess)
        .expect("Failed to read line");

    println!("You guessed: {}", guess);
}
By default, Rust brings only a few types into the scope of every program in
the prelude. If a type you want to use isn’t in the
prelude, you have to bring that type into scope explicitly with a use
statement. Using the std::io library provides you with a number of useful
features, including the ability to accept user input.
As you saw in Chapter 1, the main function is the entry point into the
program:
use std::io;

fn main() {
    println!("Guess the number!");

    println!("Please input your guess.");

    let mut guess = String::new();

    io::stdin()
        .read_line(&mut guess)
        .expect("Failed to read line");

    println!("You guessed: {}", guess);
}
The fn syntax declares a new function, the parentheses, (), indicate there
are no parameters, and the curly bracket, {, starts the body of the function.
As you also learned in Chapter 1, println! is a macro that prints a string to
the screen:
use std::io;

fn main() {
    println!("Guess the number!");

    println!("Please input your guess.");

    let mut guess = String::new();

    io::stdin()
        .read_line(&mut guess)
        .expect("Failed to read line");

    println!("You guessed: {}", guess);
}
This code is printing a prompt stating what the game is and requesting input from the user.
Storing Values with Variables
Next, we’ll create a place to store the user input, like this:
use std::io;

fn main() {
    println!("Guess the number!");

    println!("Please input your guess.");

    let mut guess = String::new();

    io::stdin()
        .read_line(&mut guess)
        .expect("Failed to read line");

    println!("You guessed: {}", guess);
}
Now the program is getting interesting! There’s a lot going on in this little
line. Notice that this is a let statement, which is used to create a
variable. Here’s another example:
let foo = bar;
This line creates a new variable named foo and binds it to the value of the
bar variable. In Rust, variables are immutable by default. We’ll be
discussing this concept in detail in the “Variables and
Mutability” section in Chapter 3.
The following example shows how to use mut before the variable name to make
a variable mutable:
let foo = 5; // immutable
let mut bar = 5; // mutable
Note: The
//syntax starts a comment that continues until the end of the line. Rust ignores everything in comments, which are discussed in more detail in Chapter 3.
Let’s return to the guessing game program. You now know that let mut guess
will introduce a mutable variable named guess. On the other side of the equal
sign (=) is the value that guess is bound to, which is the result of
calling String::new, a function that returns a new instance of a String.
String is a string type provided by the standard
library that is a growable, UTF-8 encoded bit of text.
The :: syntax in the ::new line indicates that new is an associated
function of the String type. An associated function is implemented on a type,
in this case String, rather than on a particular instance of a String. Some
languages call this a static method.
This new function creates a new, empty string. You’ll find a new function
on many types, because it’s a common name for a function that makes a new value
of some kind.
To summarize, the let mut guess = String::new(); line has created a mutable
variable that is currently bound to a new, empty instance of a String. Whew!
Recall that we included the input/output functionality from the standard
library with use std::io; on the first line of the program. Now we’ll call
the stdin function from the io module:
use std::io;

fn main() {
    println!("Guess the number!");

    println!("Please input your guess.");

    let mut guess = String::new();

    io::stdin()
        .read_line(&mut guess)
        .expect("Failed to read line");

    println!("You guessed: {}", guess);
}
If we hadn’t put the use std::io line at the beginning of the program, we
could have written this function call as std::io::stdin. The stdin function
returns an instance of std::io::Stdin, which is a
type that represents a handle to the standard input for your terminal.
The next part of the code, .read_line(&mut guess), calls the
read_line method on the standard input handle to
get input from the user. We’re also passing one argument to read_line: &mut guess.
The job of read_line is to take whatever the user types into standard input
and append that into a string (without overwriting its contents), so it takes
that string as an argument. The string argument needs to be mutable so the
method can change the string’s content by adding the user input.
The & indicates that this argument is a reference, which gives you a way to
let multiple parts of your code access one piece of data without needing to
copy that data into memory multiple times. References are a complex feature,
and one of Rust’s major advantages is how safe and easy it is to use
references. You don’t need to know a lot of those details to finish this
program. For now, all you need to know is that like variables, references are
immutable by default. Hence, you need to write &mut guess rather than
&guess to make it mutable. (Chapter 4 will explain references more
thoroughly.)
Handling Potential Failure with the Result Type
We’re still working on this line of code. Although we’re now discussing a third line of text, it’s still part of a single logical line of code. The next part is this method:
use std::io;

fn main() {
    println!("Guess the number!");

    println!("Please input your guess.");

    let mut guess = String::new();

    io::stdin()
        .read_line(&mut guess)
        .expect("Failed to read line");

    println!("You guessed: {}", guess);
}
When you call a method with the .foo() syntax, it’s often wise to introduce a
newline and other whitespace to help break up long lines. We could have
written this code as:
io::stdin().read_line(&mut guess).expect("Failed to read line");
However, one long line is difficult to read, so it’s best to divide it. Now let’s discuss what this line does.
As mentioned earlier, read_line puts what the user types into the string
we’re passing it, but it also returns a value—in this case, an
io::Result. Rust has a number of types named
Result in its standard library: a generic Result
as well as specific versions for submodules, such as io::Result.
The Result types are enumerations, often referred
to as enums. An enumeration is a type that can have a fixed set of values,
and those values are called the enum’s variants. Chapter 6 will cover enums
in more detail.
For Result, the variants are Ok or Err. The Ok variant indicates the
operation was successful, and inside Ok is the successfully generated value.
The Err variant means the operation failed, and Err contains information
about how or why the operation failed.
The purpose of these Result types is to encode error-handling information.
Values of the Result type, like values of any type, have methods defined on
them. An instance of io::Result has an expect method that you can call. If this instance of io::Result is an Err value,
expect will cause the program to crash and display the message that you
passed as an argument to expect. If the read_line method returns an Err,
it would likely be the result of an error coming from the underlying operating
system. If this instance of io::Result is an Ok value, expect will take
the return value that Ok is holding and return just that value to you so you
can use it. In this case, that value is the number of bytes in what the user
entered into standard input.
If you don’t call expect, the program will compile, but you’ll get a warning:
$ cargo build
   Compiling guessing_game v0.1.0 (file:///projects/guessing_game)
warning: unused `std::result::Result` that must be used
  --> src/main.rs:10:5
   |
10 |     io::stdin().read_line(&mut guess);
   |     ^^^^^^^^^^^^^^^^^^^^^^^^^^^^^^^^^^
   |
   = note: `#[warn(unused_must_use)]` on by default
   = note: this `Result` may be an `Err` variant, which should be handled

warning: 1 warning emitted

    Finished dev [unoptimized + debuginfo] target(s) in 0.59s
Rust warns that you haven’t used the Result value returned from read_line,
indicating that the program hasn’t handled a possible error.
The right way to suppress the warning is to actually write error handling, but
because you just want to crash this program when a problem occurs, you can use
expect. You’ll learn about recovering from errors in Chapter 9.
Printing Values with println! Placeholders
Aside from the closing curly bracket, there’s only one more line to discuss in the code added so far, which is the following:
use std::io;

fn main() {
    println!("Guess the number!");

    println!("Please input your guess.");

    let mut guess = String::new();

    io::stdin()
        .read_line(&mut guess)
        .expect("Failed to read line");

    println!("You guessed: {}", guess);
}
This line prints the string we saved the user’s input in. The set of curly
brackets, {}, is a placeholder: think of {} as little crab pincers that
hold a value in place. You can print more than one value using curly brackets:
the first set of curly brackets holds the first value listed after the format
string, the second set holds the second value, and so on. Printing multiple
values in one call to println! would look like this:
#![allow(unused)]
fn main() {
let x = 5;
let y = 10;

println!("x = {} and y = {}", x, y);
}
This code would print x = 5 and y = 10.
Testing the First Part
Let’s test the first part of the guessing game. Run it using cargo run:
$ cargo run
   Compiling guessing_game v0.1.0 (file:///projects/guessing_game)
    Finished dev [unoptimized + debuginfo] target(s) in 6.44s
     Running `target/debug/guessing_game`
Guess the number!
Please input your guess.
6
You guessed: 6
At this point, the first part of the game is done: we’re getting input from the keyboard and then printing it.
Generating a Secret Number
Next, we need to generate a secret number that the user will try to guess. The
secret number should be different every time so the game is fun to play more
than once. Let’s use a random number between 1 and 100 so the game isn’t too
difficult. Rust doesn’t yet include random number functionality in its standard
library. However, the Rust team does provide a rand crate.
Using a Crate to Get More Functionality
Remember that a crate is a collection of Rust source code files.
The project we’ve been building is a binary crate, which is an executable.
The rand crate is a library crate, which contains code intended to be
used in other programs.
Cargo’s use of external crates is where it really shines. Before we can write
code that uses rand, we need to modify the Cargo.toml file to include the
rand crate as a dependency. Open that file now and add the following line to
the bottom beneath the [dependencies] section header that Cargo created for
you. Be sure to specify rand exactly as we have here, or the code examples in
this tutorial may not work.
Filename: Cargo.toml
[dependencies]
rand = "0.8.3"
In the Cargo.toml file, everything that follows a header is part of a section
that continues until another section starts. The [dependencies] section is
where you tell Cargo which external crates your project depends on and which
versions of those crates you require. In this case, we’ll specify the rand
crate with the semantic version specifier 0.8.3. Cargo understands Semantic
Versioning (sometimes called SemVer), which is a
standard for writing version numbers. The number 0.8.3 is actually shorthand
for ^0.8.3, which means any version that is at least 0.8.3 but below
0.9.0. Cargo considers these versions to have public APIs compatible with
version 0.8.3, and this specification ensures you'll get the latest patch
release that will still compile with the code in this chapter. Any version
0.9.0 or greater is not guaranteed to have the same API as what the following
examples use.
Now, without changing any of the code, let’s build the project, as shown in Listing 2-2.
$ cargo build
    Updating crates.io index
  Downloaded rand v0.8.3
  Downloaded libc v0.2.86
  Downloaded getrandom v0.2.2
  Downloaded cfg-if v1.0.0
  Downloaded ppv-lite86 v0.2.10
  Downloaded rand_chacha v0.3.0
  Downloaded rand_core v0.6.2
   Compiling rand_core v0.6.2
   Compiling libc v0.2.86
   Compiling getrandom v0.2.2
   Compiling cfg-if v1.0.0
   Compiling ppv-lite86 v0.2.10
   Compiling rand_chacha v0.3.0
   Compiling rand v0.8.3
   Compiling guessing_game v0.1.0 (file:///projects/guessing_game)
    Finished dev [unoptimized + debuginfo] target(s) in 2.53s
Listing 2-2: The output from running cargo build after
adding the rand crate as a dependency
You may see different version numbers (but they will all be compatible with the code, thanks to SemVer!), different lines (depending on the operating system), and the lines may be in a different order.
Now that we have an external dependency, Cargo fetches the latest versions of everything from the registry, which is a copy of data from Crates.io. Crates.io is where people in the Rust ecosystem post their open source Rust projects for others to use.
After updating the registry, Cargo checks the [dependencies] section and
downloads any crates you don’t have yet. In this case, although we only listed
rand as a dependency, Cargo also grabbed other crates that rand depends on
to work. After downloading the crates, Rust compiles them and then compiles the
project with the dependencies available.
If you immediately run cargo build again without making any changes, you
won’t get any output aside from the Finished line. Cargo knows it has already
downloaded and compiled the dependencies, and you haven’t changed anything
about them in your Cargo.toml file. Cargo also knows that you haven’t changed
anything about your code, so it doesn’t recompile that either. With nothing to
do, it simply exits.
If you open up the src/main.rs file, make a trivial change, and then save it and build again, you’ll only see two lines of output:
$ cargo build
   Compiling guessing_game v0.1.0 (file:///projects/guessing_game)
    Finished dev [unoptimized + debuginfo] target(s) in 2.53 secs
These lines show Cargo only updates the build with your tiny change to the src/main.rs file. Your dependencies haven’t changed, so Cargo knows it can reuse what it has already downloaded and compiled for those. It just rebuilds your part of the code.
Ensuring Reproducible Builds with the Cargo.lock File
Cargo has a mechanism that ensures you can rebuild the same artifact every time
you or anyone else builds your code: Cargo will use only the versions of the
dependencies you specified until you indicate otherwise. For example, what
happens if next week version 0.8.4 of the rand crate comes out and
contains an important bug fix but also contains a regression that will break
your code?
The answer to this problem is the Cargo.lock file, which was created the
first time you ran cargo build and is now in your guessing_game directory.
When you build a project for the first time, Cargo figures out all the
versions of the dependencies that fit the criteria and then writes them to
the Cargo.lock file. When you build your project in the future, Cargo will
see that the Cargo.lock file exists and use the versions specified there
rather than doing all the work of figuring out versions again. This lets you
have a reproducible build automatically. In other words, your project will
remain at 0.8.3 until you explicitly upgrade, thanks to the Cargo.lock
file.
Updating a Crate to Get a New Version
When you do want to update a crate, Cargo provides another command, update,
which will ignore the Cargo.lock file and figure out all the latest versions
that fit your specifications in Cargo.toml. If that works, Cargo will write
those versions to the Cargo.lock file.
But by default, Cargo will only look for versions greater than 0.8.3 and less
than 0.9.0. If the rand crate has released two new versions, 0.8.4 and
0.9.0, you would see the following if you ran cargo update:
$ cargo update
    Updating crates.io index
    Updating rand v0.8.3 -> v0.8.4
At this point, you would also notice a change in your Cargo.lock file noting
that the version of the rand crate you are now using is 0.8.4.
If you wanted to use rand version 0.9.0 or any version in the 0.9.x
series, you’d have to update the Cargo.toml file to look like this instead:
[dependencies]
rand = "0.9.0"
The next time you run cargo build, Cargo will update the registry of crates
available and reevaluate your rand requirements according to the new version
you have specified.
There’s a lot more to say about Cargo and its ecosystem which we’ll discuss in Chapter 14, but for now, that’s all you need to know. Cargo makes it very easy to reuse libraries, so Rustaceans are able to write smaller projects that are assembled from a number of packages.
Generating a Random Number
Now that you’ve added the rand crate to Cargo.toml, let’s start using
rand. The next step is to update src/main.rs, as shown in Listing 2-3.
Filename: src/main.rs
use std::io;
use rand::Rng;

fn main() {
    println!("Guess the number!");

    let secret_number = rand::thread_rng().gen_range(1..101);

    println!("The secret number is: {}", secret_number);

    println!("Please input your guess.");

    let mut guess = String::new();

    io::stdin()
        .read_line(&mut guess)
        .expect("Failed to read line");

    println!("You guessed: {}", guess);
}
Listing 2-3: Adding code to generate a random number
First, we add a use line: use rand::Rng. The Rng trait defines
methods that random number generators implement, and this trait must be in
scope for us to use those methods. Chapter 10 will cover traits in detail.
Next, we’re adding two lines in the middle. The rand::thread_rng function
will give us the particular random number generator that we’re going to use:
one that is local to the current thread of execution and seeded by the
operating system. Then we call the gen_range method on the random number
generator. This method is defined by the Rng trait that we brought into scope
with the use rand::Rng statement. The gen_range method takes a range
expression as an argument and generates a random number in the range. The kind
of range expression we’re using here takes the form start..end. It’s
inclusive on the lower bound but exclusive on the upper bound, so we need to
specify 1..101 to request a number between 1 and 100. Alternatively, we could
pass the range 1..=100, which is equivalent.
Note: You won’t just know which traits to use and which methods and functions to call from a crate. Instructions for using a crate are in each crate’s documentation. Another neat feature of Cargo is that you can run the
cargo doc --opencommand, which will build documentation provided by all of your dependencies locally and open it in your browser. If you’re interested in other functionality in therandcrate, for example, runcargo doc --openand clickrandin the sidebar on the left.
The second line that we added to the middle of the code prints the secret number. This is useful while we’re developing the program to be able to test it, but we’ll delete it from the final version. It’s not much of a game if the program prints the answer as soon as it starts!
Try running the program a few times:
$ cargo run
   Compiling guessing_game v0.1.0 (file:///projects/guessing_game)
    Finished dev [unoptimized + debuginfo] target(s) in 2.53s
     Running `target/debug/guessing_game`
Guess the number!
The secret number is: 7
Please input your guess.
4
You guessed: 4

$ cargo run
    Finished dev [unoptimized + debuginfo] target(s) in 0.02s
     Running `target/debug/guessing_game`
Guess the number!
The secret number is: 83
Please input your guess.
5
You guessed: 5
You should get different random numbers, and they should all be numbers between 1 and 100. Great job!
Comparing the Guess to the Secret Number
Now that we have user input and a random number, we can compare them. That step is shown in Listing 2-4. Note that this code won’t compile quite yet, as we will explain.
Filename: src/main.rs
use rand::Rng;
use std::cmp::Ordering;
use std::io;

fn main() {
    // --snip--
    println!("Guess the number!");

    let secret_number = rand::thread_rng().gen_range(1..101);

    println!("The secret number is: {}", secret_number);

    println!("Please input your guess.");

    let mut guess = String::new();

    io::stdin()
        .read_line(&mut guess)
        .expect("Failed to read line");

    println!("You guessed: {}", guess);

    match guess.cmp(&secret_number) {
        Ordering::Less => println!("Too small!"),
        Ordering::Greater => println!("Too big!"),
        Ordering::Equal => println!("You win!"),
    }
}
Listing 2-4: Handling the possible return values of comparing two numbers
The first new bit here is another use statement, bringing a type called
std::cmp::Ordering into scope from the standard library. Like Result,
Ordering is another enum, but the variants for Ordering are Less,
Greater, and Equal. These are the three outcomes that are possible when you
compare two values.
Then we add five new lines at the bottom that use the Ordering type. The
cmp method compares two values and can be called on anything that can be
compared. It takes a reference to whatever you want to compare with: here it’s
comparing the guess to the secret_number. Then it returns a variant of the
Ordering enum we brought into scope with the use statement. We use a
match expression to decide what to do next based on
which variant of Ordering was returned from the call to cmp with the values
in guess and secret_number.
A match expression is made up of arms. An arm consists of a pattern and
the code that should be run if the value given to the beginning of the match
expression fits that arm’s pattern. Rust takes the value given to match and
looks through each arm’s pattern in turn. The match construct and patterns
are powerful features in Rust that let you express a variety of situations your
code might encounter and make sure that you handle them all. These features
will be covered in detail in Chapter 6 and Chapter 18, respectively.
Let’s walk through an example of what would happen with the match expression
used here. Say that the user has guessed 50 and the randomly generated secret
number this time is 38. When the code compares 50 to 38, the cmp method will
return Ordering::Greater, because 50 is greater than 38. The match
expression gets the Ordering::Greater value and starts checking each arm’s
pattern. It looks at the first arm’s pattern, Ordering::Less, and sees that
the value Ordering::Greater does not match Ordering::Less, so it ignores
the code in that arm and moves to the next arm. The next arm’s pattern,
Ordering::Greater, does match Ordering::Greater! The associated code in
that arm will execute and print Too big! to the screen. The match
expression ends because it has no need to look at the last arm in this scenario.
However, the code in Listing 2-4 won’t compile yet. Let’s try it:
$ cargo build
   Compiling libc v0.2.86
   Compiling getrandom v0.2.2
   Compiling cfg-if v1.0.0
   Compiling ppv-lite86 v0.2.10
   Compiling rand_core v0.6.2
   Compiling rand_chacha v0.3.0
   Compiling rand v0.8.3
   Compiling guessing_game v0.1.0 (file:///projects/guessing_game)
error[E0308]: mismatched types
  --> src/main.rs:22:21
   |
22 |     match guess.cmp(&secret_number) {
   |                     ^^^^^^^^^^^^^^ expected struct `String`, found integer
   |
   = note: expected reference `&String`
              found reference `&{integer}`

error: aborting due to previous error

For more information about this error, try `rustc --explain E0308`.
error: could not compile `guessing_game`

To learn more, run the command again with --verbose.
The core of the error states that there are mismatched types. Rust has a
strong, static type system. However, it also has type inference. When we wrote
let mut guess = String::new(), Rust was able to infer that guess should be
a String and didn’t make us write the type. The secret_number, on the other
hand, is a number type. A few number types can have a value between 1 and 100:
i32, a 32-bit number; u32, an unsigned 32-bit number; i64, a 64-bit
number; as well as others. Rust defaults to an i32, which is the type of
secret_number unless you add type information elsewhere that would cause Rust
to infer a different numerical type. The reason for the error is that Rust
cannot compare a string and a number type.
Ultimately, we want to convert the String the program reads as input into a
real number type so we can compare it numerically to the secret number. We can
do that by adding another line to the main function body:
Filename: src/main.rs
use rand::Rng;
use std::cmp::Ordering;
use std::io;

fn main() {
    println!("Guess the number!");

    let secret_number = rand::thread_rng().gen_range(1..101);

    println!("The secret number is: {}", secret_number);

    println!("Please input your guess.");

    // --snip--

    let mut guess = String::new();

    io::stdin()
        .read_line(&mut guess)
        .expect("Failed to read line");

    let guess: u32 = guess.trim().parse().expect("Please type a number!");

    println!("You guessed: {}", guess);

    match guess.cmp(&secret_number) {
        Ordering::Less => println!("Too small!"),
        Ordering::Greater => println!("Too big!"),
        Ordering::Equal => println!("You win!"),
    }
}
The line is:
let guess: u32 = guess.trim().parse().expect("Please type a number!");
We create a variable named guess. But wait, doesn’t the program already have
a variable named guess? It does, but Rust allows us to shadow the previous
value of guess with a new one. This feature is often used in situations in
which you want to convert a value from one type to another type. Shadowing lets
us reuse the guess variable name rather than forcing us to create two unique
variables, such as guess_str and guess for example. (Chapter 3 covers
shadowing in more detail.)
We bind guess to the expression guess.trim().parse(). The guess in the
expression refers to the original guess that was a String with the input in
it. The trim method on a String instance will eliminate any whitespace at
the beginning and end. Although u32 can contain only numerical characters,
the user must press enter to satisfy
read_line. When the user presses enter, a
newline character is added to the string. For example, if the user types 5 and presses enter,
guess looks like this: 5\n. The \n represents “newline,” the result of
pressing enter (On Windows, pressing enter results in a carriage return and a newline,
\r\n). The trim method eliminates \n or \r\n, resulting in just 5.
The parse method on strings parses a string into some
kind of number. Because this method can parse a variety of number types, we
need to tell Rust the exact number type we want by using let guess: u32. The
colon (:) after guess tells Rust we’ll annotate the variable’s type. Rust
has a few built-in number types; the u32 seen here is an unsigned, 32-bit
integer. It’s a good default choice for a small positive number. You’ll learn
about other number types in Chapter 3. Additionally, the u32 annotation in
this example program and the comparison with secret_number means that Rust
will infer that secret_number should be a u32 as well. So now the
comparison will be between two values of the same type!
The call to parse could easily cause an error. If, for example, the string
contained A👍%, there would be no way to convert that to a number. Because it
might fail, the parse method returns a Result type, much as the read_line
method does (discussed earlier in “Handling Potential Failure with the
Result Type”). We’ll treat this Result the same way by using the expect method
again. If parse returns an Err Result variant because it couldn’t create
a number from the string, the expect call will crash the game and print the
message we give it. If parse can successfully convert the string to a number,
it will return the Ok variant of Result, and expect will return the
number that we want from the Ok value.
Let’s run the program now!
$ cargo run
   Compiling guessing_game v0.1.0 (file:///projects/guessing_game)
    Finished dev [unoptimized + debuginfo] target(s) in 0.43s
     Running `target/debug/guessing_game`
Guess the number!
The secret number is: 58
Please input your guess.
  76
You guessed: 76
Too big!
Nice! Even though spaces were added before the guess, the program still figured out that the user guessed 76. Run the program a few times to verify the different behavior with different kinds of input: guess the number correctly, guess a number that is too high, and guess a number that is too low.
We have most of the game working now, but the user can make only one guess. Let’s change that by adding a loop!
Allowing Multiple Guesses with Looping
The loop keyword creates an infinite loop. We’ll add that now to give users
more chances at guessing the number:
Filename: src/main.rs
use rand::Rng;
use std::cmp::Ordering;
use std::io;

fn main() {
    println!("Guess the number!");

    let secret_number = rand::thread_rng().gen_range(1..101);

    // --snip--

    println!("The secret number is: {}", secret_number);

    loop {
        println!("Please input your guess.");

        // --snip--


        let mut guess = String::new();

        io::stdin()
            .read_line(&mut guess)
            .expect("Failed to read line");

        let guess: u32 = guess.trim().parse().expect("Please type a number!");

        println!("You guessed: {}", guess);

        match guess.cmp(&secret_number) {
            Ordering::Less => println!("Too small!"),
            Ordering::Greater => println!("Too big!"),
            Ordering::Equal => println!("You win!"),
        }
    }
}
As you can see, we’ve moved everything into a loop from the guess input prompt onward. Be sure to indent the lines inside the loop another four spaces each and run the program again. Notice that there is a new problem because the program is doing exactly what we told it to do: ask for another guess forever! It doesn’t seem like the user can quit!
The user could always interrupt the program by using the keyboard shortcut ctrl-c. But there’s another way to escape this
insatiable monster, as mentioned in the parse discussion in “Comparing the
Guess to the Secret Number”: if the user enters a non-number answer, the program will crash. The
user can take advantage of that in order to quit, as shown here:
$ cargo run
   Compiling guessing_game v0.1.0 (file:///projects/guessing_game)
    Finished dev [unoptimized + debuginfo] target(s) in 1.50s
     Running `target/debug/guessing_game`
Guess the number!
The secret number is: 59
Please input your guess.
45
You guessed: 45
Too small!
Please input your guess.
60
You guessed: 60
Too big!
Please input your guess.
59
You guessed: 59
You win!
Please input your guess.
quit
thread 'main' panicked at 'Please type a number!: ParseIntError { kind: InvalidDigit }', src/main.rs:28:47
note: run with `RUST_BACKTRACE=1` environment variable to display a backtrace
Typing quit actually quits the game, but so will any other non-number input.
However, this is suboptimal to say the least. We want the game to automatically
stop when the correct number is guessed.
Quitting After a Correct Guess
Let’s program the game to quit when the user wins by adding a break statement:
Filename: src/main.rs
use rand::Rng;
use std::cmp::Ordering;
use std::io;

fn main() {
    println!("Guess the number!");

    let secret_number = rand::thread_rng().gen_range(1..101);

    println!("The secret number is: {}", secret_number);

    loop {
        println!("Please input your guess.");

        let mut guess = String::new();

        io::stdin()
            .read_line(&mut guess)
            .expect("Failed to read line");

        let guess: u32 = guess.trim().parse().expect("Please type a number!");

        println!("You guessed: {}", guess);

        // --snip--

        match guess.cmp(&secret_number) {
            Ordering::Less => println!("Too small!"),
            Ordering::Greater => println!("Too big!"),
            Ordering::Equal => {
                println!("You win!");
                break;
            }
        }
    }
}
Adding the break line after You win! makes the program exit the loop when
the user guesses the secret number correctly. Exiting the loop also means
exiting the program, because the loop is the last part of main.
Handling Invalid Input
To further refine the game’s behavior, rather than crashing the program when
the user inputs a non-number, let’s make the game ignore a non-number so the
user can continue guessing. We can do that by altering the line where guess
is converted from a String to a u32, as shown in Listing 2-5.
Filename: src/main.rs
use rand::Rng;
use std::cmp::Ordering;
use std::io;

fn main() {
    println!("Guess the number!");

    let secret_number = rand::thread_rng().gen_range(1..101);

    println!("The secret number is: {}", secret_number);

    loop {
        println!("Please input your guess.");

        let mut guess = String::new();

        // --snip--

        io::stdin()
            .read_line(&mut guess)
            .expect("Failed to read line");

        let guess: u32 = match guess.trim().parse() {
            Ok(num) => num,
            Err(_) => continue,
        };

        println!("You guessed: {}", guess);

        // --snip--

        match guess.cmp(&secret_number) {
            Ordering::Less => println!("Too small!"),
            Ordering::Greater => println!("Too big!"),
            Ordering::Equal => {
                println!("You win!");
                break;
            }
        }
    }
}
Listing 2-5: Ignoring a non-number guess and asking for another guess instead of crashing the program
Switching from an expect call to a match expression is how you generally
move from crashing on an error to handling the error. Remember that parse
returns a Result type and Result is an enum that has the variants Ok or
Err. We’re using a match expression here, as we did with the Ordering
result of the cmp method.
If parse is able to successfully turn the string into a number, it will
return an Ok value that contains the resulting number. That Ok value will
match the first arm’s pattern, and the match expression will just return the
num value that parse produced and put inside the Ok value. That number
will end up right where we want it in the new guess variable we’re creating.
If parse is not able to turn the string into a number, it will return an
Err value that contains more information about the error. The Err value
does not match the Ok(num) pattern in the first match arm, but it does
match the Err(_) pattern in the second arm. The underscore, _, is a
catchall value; in this example, we’re saying we want to match all Err
values, no matter what information they have inside them. So the program will
execute the second arm’s code, continue, which tells the program to go to the
next iteration of the loop and ask for another guess. So, effectively, the
program ignores all errors that parse might encounter!
Now everything in the program should work as expected. Let’s try it:
$ cargo run
   Compiling guessing_game v0.1.0 (file:///projects/guessing_game)
    Finished dev [unoptimized + debuginfo] target(s) in 4.45s
     Running `target/debug/guessing_game`
Guess the number!
The secret number is: 61
Please input your guess.
10
You guessed: 10
Too small!
Please input your guess.
99
You guessed: 99
Too big!
Please input your guess.
foo
Please input your guess.
61
You guessed: 61
You win!
Awesome! With one tiny final tweak, we will finish the guessing game. Recall
that the program is still printing the secret number. That worked well for
testing, but it ruins the game. Let’s delete the println! that outputs the
secret number. Listing 2-6 shows the final code.
Filename: src/main.rs
use rand::Rng;
use std::cmp::Ordering;
use std::io;

fn main() {
    println!("Guess the number!");

    let secret_number = rand::thread_rng().gen_range(1..101);

    loop {
        println!("Please input your guess.");

        let mut guess = String::new();

        io::stdin()
            .read_line(&mut guess)
            .expect("Failed to read line");

        let guess: u32 = match guess.trim().parse() {
            Ok(num) => num,
            Err(_) => continue,
        };

        println!("You guessed: {}", guess);

        match guess.cmp(&secret_number) {
            Ordering::Less => println!("Too small!"),
            Ordering::Greater => println!("Too big!"),
            Ordering::Equal => {
                println!("You win!");
                break;
            }
        }
    }
}
Listing 2-6: Complete guessing game code
Summary
At this point, you’ve successfully built the guessing game. Congratulations!
This project was a hands-on way to introduce you to many new Rust concepts:
let, match, methods, associated functions, the use of external crates, and
more. In the next few chapters, you’ll learn about these concepts in more
detail. Chapter 3 covers concepts that most programming languages have, such as
variables, data types, and functions, and shows how to use them in Rust.
Chapter 4 explores ownership, a feature that makes Rust different from other
languages. Chapter 5 discusses structs and method syntax, and Chapter 6
explains how enums work.
Common Programming Concepts
This chapter covers concepts that appear in almost every programming language and how they work in Rust. Many programming languages have much in common at their core. None of the concepts presented in this chapter are unique to Rust, but we’ll discuss them in the context of Rust and explain the conventions around using these concepts.
Specifically, you’ll learn about variables, basic types, functions, comments, and control flow. These foundations will be in every Rust program, and learning them early will give you a strong core to start from.
Keywords
The Rust language has a set of keywords that are reserved for use by the language only, much as in other languages. Keep in mind that you cannot use these words as names of variables or functions. Most of the keywords have special meanings, and you’ll be using them to do various tasks in your Rust programs; a few have no current functionality associated with them but have been reserved for functionality that might be added to Rust in the future. You can find a list of the keywords in Appendix A.
Variables and Mutability
As mentioned in Chapter 2, by default variables are immutable. This is one of many nudges Rust gives you to write your code in a way that takes advantage of the safety and easy concurrency that Rust offers. However, you still have the option to make your variables mutable. Let’s explore how and why Rust encourages you to favor immutability and why sometimes you might want to opt out.
When a variable is immutable, once a value is bound to a name, you can’t change
that value. To illustrate this, let’s generate a new project called variables
in your projects directory by using cargo new variables.
Then, in your new variables directory, open src/main.rs and replace its code with the following code that won’t compile just yet:
Filename: src/main.rs
fn main() {
    let x = 5;
    println!("The value of x is: {}", x);
    x = 6;
    println!("The value of x is: {}", x);
}
Save and run the program using cargo run. You should receive an error
message, as shown in this output:
$ cargo run
   Compiling variables v0.1.0 (file:///projects/variables)
error[E0384]: cannot assign twice to immutable variable `x`
 --> src/main.rs:4:5
  |
2 |     let x = 5;
  |         -
  |         |
  |         first assignment to `x`
  |         help: make this binding mutable: `mut x`
3 |     println!("The value of x is: {}", x);
4 |     x = 6;
  |     ^^^^^ cannot assign twice to immutable variable

error: aborting due to previous error

For more information about this error, try `rustc --explain E0384`.
error: could not compile `variables`

To learn more, run the command again with --verbose.
This example shows how the compiler helps you find errors in your programs. Even though compiler errors can be frustrating, they only mean your program isn’t safely doing what you want it to do yet; they do not mean that you’re not a good programmer! Experienced Rustaceans still get compiler errors.
The error message indicates that the cause of the error is that you cannot assign twice to immutable variable x, because you tried to assign a second
value to the immutable x variable.
It’s important that we get compile-time errors when we attempt to change a value that we previously designated as immutable because this very situation can lead to bugs. If one part of our code operates on the assumption that a value will never change and another part of our code changes that value, it’s possible that the first part of the code won’t do what it was designed to do. The cause of this kind of bug can be difficult to track down after the fact, especially when the second piece of code changes the value only sometimes.
In Rust, the compiler guarantees that when you state that a value won’t change, it really won’t change. That means that when you’re reading and writing code, you don’t have to keep track of how and where a value might change. Your code is thus easier to reason through.
But mutability can be very useful. Variables are immutable only by default; as
you did in Chapter 2, you can make them mutable by adding mut in front of the
variable name. In addition to allowing this value to change, mut conveys
intent to future readers of the code by indicating that other parts of the code
will be changing this variable’s value.
For example, let’s change src/main.rs to the following:
Filename: src/main.rs
fn main() {
    let mut x = 5;
    println!("The value of x is: {}", x);
    x = 6;
    println!("The value of x is: {}", x);
}
When we run the program now, we get this:
$ cargo run
   Compiling variables v0.1.0 (file:///projects/variables)
    Finished dev [unoptimized + debuginfo] target(s) in 0.30s
     Running `target/debug/variables`
The value of x is: 5
The value of x is: 6
We’re allowed to change the value that x binds to from 5 to 6 when mut
is used. In some cases, you’ll want to make a variable mutable because it makes
the code more convenient to write than if it had only immutable variables.
There are multiple trade-offs to consider in addition to the prevention of bugs. For example, in cases where you’re using large data structures, mutating an instance in place may be faster than copying and returning newly allocated instances. With smaller data structures, creating new instances and writing in a more functional programming style may be easier to think through, so lower performance might be a worthwhile penalty for gaining that clarity.
Differences Between Variables and Constants
Being unable to change the value of a variable might have reminded you of another programming concept that most other languages have: constants. Like immutable variables, constants are values that are bound to a name and are not allowed to change, but there are a few differences between constants and variables.
First, you aren’t allowed to use mut with constants. Constants aren’t just
immutable by default—they’re always immutable.
You declare constants using the const keyword instead of the let keyword,
and the type of the value must be annotated. We’re about to cover types and
type annotations in the next section, “Data Types,” so don’t worry about the details right now. Just know that you must always
annotate the type.
Constants can be declared in any scope, including the global scope, which makes them useful for values that many parts of code need to know about.
The last difference is that constants may be set only to a constant expression, not the result of a function call or any other value that could only be computed at runtime.
Here’s an example of a constant declaration where the constant’s name is
MAX_POINTS and its value is set to 100,000. (Rust’s naming convention for
constants is to use all uppercase with underscores between words, and
underscores can be inserted in numeric literals to improve readability):
#![allow(unused)]
fn main() {
const MAX_POINTS: u32 = 100_000;
}
Constants are valid for the entire time a program runs, within the scope they were declared in, making them a useful choice for values in your application domain that multiple parts of the program might need to know about, such as the maximum number of points any player of a game is allowed to earn or the speed of light.
Naming hardcoded values used throughout your program as constants is useful in conveying the meaning of that value to future maintainers of the code. It also helps to have only one place in your code you would need to change if the hardcoded value needed to be updated in the future.
Shadowing
As you saw in the guessing game tutorial in the “Comparing the Guess to the
Secret Number”
section in Chapter 2, you can declare a new variable with the same name as a
previous variable. Rustaceans say that the first variable is shadowed by the
second, which means that the second variable’s value is what appears when the
variable is used. We can shadow a variable by using the same variable’s name
and repeating the use of the let keyword as follows:
Filename: src/main.rs
fn main() {
    let x = 5;

    let x = x + 1;

    let x = x * 2;

    println!("The value of x is: {}", x);
}
This program first binds x to a value of 5. Then it shadows x by
repeating let x =, taking the original value and adding 1 so the value of
x is then 6. The third let statement also shadows x, multiplying the
previous value by 2 to give x a final value of 12. When we run this
program, it will output the following:
$ cargo run
   Compiling variables v0.1.0 (file:///projects/variables)
    Finished dev [unoptimized + debuginfo] target(s) in 0.31s
     Running `target/debug/variables`
The value of x is: 12
Shadowing is different from marking a variable as mut, because we’ll get a
compile-time error if we accidentally try to reassign to this variable without
using the let keyword. By using let, we can perform a few transformations
on a value but have the variable be immutable after those transformations have
been completed.
The other difference between mut and shadowing is that because we’re
effectively creating a new variable when we use the let keyword again, we can
change the type of the value but reuse the same name. For example, say our
program asks a user to show how many spaces they want between some text by
inputting space characters, but we really want to store that input as a number:
fn main() {
    let spaces = "   ";
    let spaces = spaces.len();
}
This construct is allowed because the first spaces variable is a string type
and the second spaces variable, which is a brand-new variable that happens to
have the same name as the first one, is a number type. Shadowing thus spares us
from having to come up with different names, such as spaces_str and
spaces_num; instead, we can reuse the simpler spaces name. However, if we
try to use mut for this, as shown here, we’ll get a compile-time error:
fn main() {
    let mut spaces = "   ";
    spaces = spaces.len();
}
The error says we’re not allowed to mutate a variable’s type:
$ cargo run
   Compiling variables v0.1.0 (file:///projects/variables)
error[E0308]: mismatched types
 --> src/main.rs:3:14
  |
3 |     spaces = spaces.len();
  |              ^^^^^^^^^^^^ expected `&str`, found `usize`

error: aborting due to previous error

For more information about this error, try `rustc --explain E0308`.
error: could not compile `variables`

To learn more, run the command again with --verbose.
Now that we’ve explored how variables work, let’s look at more data types they can have.
Data Types
Every value in Rust is of a certain data type, which tells Rust what kind of data is being specified so it knows how to work with that data. We’ll look at two data type subsets: scalar and compound.
Keep in mind that Rust is a statically typed language, which means that it
must know the types of all variables at compile time. The compiler can usually
infer what type we want to use based on the value and how we use it. In cases
when many types are possible, such as when we converted a String to a numeric
type using parse in the “Comparing the Guess to the Secret
Number” section in
Chapter 2, we must add a type annotation, like this:
#![allow(unused)]
fn main() {
let guess: u32 = "42".parse().expect("Not a number!");
}
If we don’t add the type annotation here, Rust will display the following error, which means the compiler needs more information from us to know which type we want to use:
$ cargo build
   Compiling no_type_annotations v0.1.0 (file:///projects/no_type_annotations)
error[E0282]: type annotations needed
 --> src/main.rs:2:9
  |
2 |     let guess = "42".parse().expect("Not a number!");
  |         ^^^^^ consider giving `guess` a type

error: aborting due to previous error

For more information about this error, try `rustc --explain E0282`.
error: could not compile `no_type_annotations`

To learn more, run the command again with --verbose.
You’ll see different type annotations for other data types.
Scalar Types
A scalar type represents a single value. Rust has four primary scalar types: integers, floating-point numbers, Booleans, and characters. You may recognize these from other programming languages. Let’s jump into how they work in Rust.
Integer Types
An integer is a number without a fractional component. We used one integer
type in Chapter 2, the u32 type. This type declaration indicates that the
value it’s associated with should be an unsigned integer (signed integer types
start with i, instead of u) that takes up 32 bits of space. Table 3-1 shows
the built-in integer types in Rust. Each variant in the Signed and Unsigned
columns (for example, i16) can be used to declare the type of an integer
value.
Table 3-1: Integer Types in Rust
| Length | Signed | Unsigned |
|---|---|---|
| 8-bit | i8 | u8 |
| 16-bit | i16 | u16 |
| 32-bit | i32 | u32 |
| 64-bit | i64 | u64 |
| 128-bit | i128 | u128 |
| arch | isize | usize |
Each variant can be either signed or unsigned and has an explicit size. Signed and unsigned refer to whether it’s possible for the number to be negative—in other words, whether the number needs to have a sign with it (signed) or whether it will only ever be positive and can therefore be represented without a sign (unsigned). It’s like writing numbers on paper: when the sign matters, a number is shown with a plus sign or a minus sign; however, when it’s safe to assume the number is positive, it’s shown with no sign. Signed numbers are stored using two’s complement representation.
Each signed variant can store numbers from -(2n - 1) to 2n -
1 - 1 inclusive, where n is the number of bits that variant uses. So an
i8 can store numbers from -(27) to 27 - 1, which equals
-128 to 127. Unsigned variants can store numbers from 0 to 2n - 1,
so a u8 can store numbers from 0 to 28 - 1, which equals 0 to 255.
Additionally, the isize and usize types depend on the kind of computer your
program is running on: 64 bits if you’re on a 64-bit architecture and 32 bits
if you’re on a 32-bit architecture.
You can write integer literals in any of the forms shown in Table 3-2. Note
that all number literals except the byte literal allow a type suffix, such as
57u8, and _ as a visual separator, such as 1_000.
Table 3-2: Integer Literals in Rust
| Number literals | Example |
|---|---|
| Decimal | 98_222 |
| Hex | 0xff |
| Octal | 0o77 |
| Binary | 0b1111_0000 |
Byte (u8 only) | b'A' |
So how do you know which type of integer to use? If you’re unsure, Rust’s
defaults are generally good choices, and integer types default to i32: this
type is generally the fastest, even on 64-bit systems. The primary situation in
which you’d use isize or usize is when indexing some sort of collection.
Integer Overflow
Let’s say you have a variable of type
u8that can hold values between 0 and 255. If you try to change the variable to a value outside of that range, such as 256, integer overflow will occur. Rust has some interesting rules involving this behavior. When you’re compiling in debug mode, Rust includes checks for integer overflow that cause your program to panic at runtime if this behavior occurs. Rust uses the term panicking when a program exits with an error; we’ll discuss panics in more depth in the “Unrecoverable Errors withpanic!” section in Chapter 9.When you’re compiling in release mode with the
--releaseflag, Rust does not include checks for integer overflow that cause panics. Instead, if overflow occurs, Rust performs two’s complement wrapping. In short, values greater than the maximum value the type can hold “wrap around” to the minimum of the values the type can hold. In the case of au8, 256 becomes 0, 257 becomes 1, and so on. The program won’t panic, but the variable will have a value that probably isn’t what you were expecting it to have. Relying on integer overflow’s wrapping behavior is considered an error.To explicitly handle the possibility of overflow, you can use these families of methods that the standard library provides on primitive numeric types:
- Wrap in all modes with the
wrapping_*methods, such aswrapping_add- Return the
Nonevalue if there is overflow with thechecked_*methods- Return the value and a boolean indicating whether there was overflow with the
overflowing_*methods- Saturate at the value's minimum or maximum values with
saturating_*methods
Floating-Point Types
Rust also has two primitive types for floating-point numbers, which are
numbers with decimal points. Rust’s floating-point types are f32 and f64,
which are 32 bits and 64 bits in size, respectively. The default type is f64
because on modern CPUs it’s roughly the same speed as f32 but is capable of
more precision.
Here’s an example that shows floating-point numbers in action:
Filename: src/main.rs
fn main() {
    let x = 2.0; // f64

    let y: f32 = 3.0; // f32
}
Floating-point numbers are represented according to the IEEE-754 standard. The
f32 type is a single-precision float, and f64 has double precision.
Numeric Operations
Rust supports the basic mathematical operations you’d expect for all of the
number types: addition, subtraction, multiplication, division, and remainder.
The following code shows how you’d use each one in a let statement:
Filename: src/main.rs
fn main() {
    // addition
    let sum = 5 + 10;

    // subtraction
    let difference = 95.5 - 4.3;

    // multiplication
    let product = 4 * 30;

    // division
    let quotient = 56.7 / 32.2;

    // remainder
    let remainder = 43 % 5;
}
Each expression in these statements uses a mathematical operator and evaluates to a single value, which is then bound to a variable. Appendix B contains a list of all operators that Rust provides.
The Boolean Type
As in most other programming languages, a Boolean type in Rust has two possible
values: true and false. Booleans are one byte in size. The Boolean type in
Rust is specified using bool. For example:
Filename: src/main.rs
fn main() {
    let t = true;

    let f: bool = false; // with explicit type annotation
}
The main way to use Boolean values is through conditionals, such as an if
expression. We’ll cover how if expressions work in Rust in the “Control
Flow” section.
The Character Type
So far we’ve worked only with numbers, but Rust supports letters too. Rust’s
char type is the language’s most primitive alphabetic type, and the following
code shows one way to use it. (Note that char literals are specified with
single quotes, as opposed to string literals, which use double quotes.)
Filename: src/main.rs
fn main() {
    let c = 'z';
    let z = 'ℤ';
    let heart_eyed_cat = '😻';
}
Rust’s char type is four bytes in size and represents a Unicode Scalar Value,
which means it can represent a lot more than just ASCII. Accented letters;
Chinese, Japanese, and Korean characters; emoji; and zero-width spaces are all
valid char values in Rust. Unicode Scalar Values range from U+0000 to
U+D7FF and U+E000 to U+10FFFF inclusive. However, a “character” isn’t
really a concept in Unicode, so your human intuition for what a “character” is
may not match up with what a char is in Rust. We’ll discuss this topic in
detail in “Storing UTF-8 Encoded Text with Strings”
in Chapter 8.
Compound Types
Compound types can group multiple values into one type. Rust has two primitive compound types: tuples and arrays.
The Tuple Type
A tuple is a general way of grouping together a number of values with a variety of types into one compound type. Tuples have a fixed length: once declared, they cannot grow or shrink in size.
We create a tuple by writing a comma-separated list of values inside parentheses. Each position in the tuple has a type, and the types of the different values in the tuple don’t have to be the same. We’ve added optional type annotations in this example:
Filename: src/main.rs
fn main() {
    let tup: (i32, f64, u8) = (500, 6.4, 1);
}
The variable tup binds to the entire tuple, because a tuple is considered a
single compound element. To get the individual values out of a tuple, we can
use pattern matching to destructure a tuple value, like this:
Filename: src/main.rs
fn main() {
    let tup = (500, 6.4, 1);

    let (x, y, z) = tup;

    println!("The value of y is: {}", y);
}
This program first creates a tuple and binds it to the variable tup. It then
uses a pattern with let to take tup and turn it into three separate
variables, x, y, and z. This is called destructuring, because it breaks
the single tuple into three parts. Finally, the program prints the value of
y, which is 6.4.
In addition to destructuring through pattern matching, we can access a tuple
element directly by using a period (.) followed by the index of the value we
want to access. For example:
Filename: src/main.rs
fn main() {
    let x: (i32, f64, u8) = (500, 6.4, 1);

    let five_hundred = x.0;

    let six_point_four = x.1;

    let one = x.2;
}
This program creates a tuple, x, and then makes new variables for each
element by using their respective indices. As with most programming languages,
the first index in a tuple is 0.
The Array Type
Another way to have a collection of multiple values is with an array. Unlike a tuple, every element of an array must have the same type. Arrays in Rust are different from arrays in some other languages because arrays in Rust have a fixed length, like tuples.
In Rust, the values going into an array are written as a comma-separated list inside square brackets:
Filename: src/main.rs
fn main() {
    let a = [1, 2, 3, 4, 5];
}
Arrays are useful when you want your data allocated on the stack rather than the heap (we will discuss the stack and the heap more in Chapter 4) or when you want to ensure you always have a fixed number of elements. An array isn’t as flexible as the vector type, though. A vector is a similar collection type provided by the standard library that is allowed to grow or shrink in size. If you’re unsure whether to use an array or a vector, you should probably use a vector. Chapter 8 discusses vectors in more detail.
An example of when you might want to use an array rather than a vector is in a program that needs to know the names of the months of the year. It’s very unlikely that such a program will need to add or remove months, so you can use an array because you know it will always contain 12 elements:
#![allow(unused)]
fn main() {
let months = ["January", "February", "March", "April", "May", "June", "July",
              "August", "September", "October", "November", "December"];
}
You would write an array’s type by using square brackets, and within the brackets include the type of each element, a semicolon, and then the number of elements in the array, like so:
#![allow(unused)]
fn main() {
let a: [i32; 5] = [1, 2, 3, 4, 5];
}
Here, i32 is the type of each element. After the semicolon, the number 5
indicates the array contains five elements.
Writing an array’s type this way looks similar to an alternative syntax for initializing an array: if you want to create an array that contains the same value for each element, you can specify the initial value, followed by a semicolon, and then the length of the array in square brackets, as shown here:
#![allow(unused)]
fn main() {
let a = [3; 5];
}
The array named a will contain 5 elements that will all be set to the value
3 initially. This is the same as writing let a = [3, 3, 3, 3, 3]; but in a
more concise way.
Accessing Array Elements
An array is a single chunk of memory allocated on the stack. You can access elements of an array using indexing, like this:
Filename: src/main.rs
fn main() {
    let a = [1, 2, 3, 4, 5];

    let first = a[0];
    let second = a[1];
}
In this example, the variable named first will get the value 1, because
that is the value at index [0] in the array. The variable named second will
get the value 2 from index [1] in the array.
Invalid Array Element Access
What happens if you try to access an element of an array that is past the end of the array? Say you change the example to the following, which uses code similar to the guessing game in Chapter 2 to get an array index from the user:
Filename: src/main.rs
use std::io;

fn main() {
    let a = [1, 2, 3, 4, 5];

    println!("Please enter an array index.");

    let mut index = String::new();

    io::stdin()
        .read_line(&mut index)
        .expect("Failed to read line");

    let index: usize = index
        .trim()
        .parse()
        .expect("Index entered was not a number");

    let element = a[index];

    println!(
        "The value of the element at index {} is: {}",
        index, element
    );
}
This code compiles successfully. If you run this code using cargo run and
enter 0, 1, 2, 3, or 4, the program will print out the corresponding value at
that index in the array. If you instead enter a number past the end of the
array, such as 10, you'll see output like this:
thread 'main' panicked at 'index out of bounds: the len is 5 but the index is 10', src/main.rs:19:19
note: run with `RUST_BACKTRACE=1` environment variable to display a backtrace
The program resulted in a runtime error at the point of using an invalid
value in the indexing operation. The program exited with an error message and
didn't execute the final println! statement. When you attempt to access an
element using indexing, Rust will check that the index you’ve specified is less
than the array length. If the index is greater than or equal to the length,
Rust will panic. This check has to happen at runtime, especially in this case,
because the compiler can't possibly know what value a user will enter when they
run the code later.
This is the first example of Rust’s safety principles in action. In many low-level languages, this kind of check is not done, and when you provide an incorrect index, invalid memory can be accessed. Rust protects you against this kind of error by immediately exiting instead of allowing the memory access and continuing. Chapter 9 discusses more of Rust’s error handling.
Functions
Functions are pervasive in Rust code. You’ve already seen one of the most
important functions in the language: the main function, which is the entry
point of many programs. You’ve also seen the fn keyword, which allows you to
declare new functions.
Rust code uses snake case as the conventional style for function and variable names. In snake case, all letters are lowercase and underscores separate words. Here’s a program that contains an example function definition:
Filename: src/main.rs
fn main() {
    println!("Hello, world!");

    another_function();
}

fn another_function() {
    println!("Another function.");
}
Function definitions in Rust start with fn and have a set of parentheses
after the function name. The curly brackets tell the compiler where the
function body begins and ends.
We can call any function we’ve defined by entering its name followed by a set
of parentheses. Because another_function is defined in the program, it can be
called from inside the main function. Note that we defined another_function
after the main function in the source code; we could have defined it before
as well. Rust doesn’t care where you define your functions, only that they’re
defined somewhere.
Let’s start a new binary project named functions to explore functions
further. Place the another_function example in src/main.rs and run it. You
should see the following output:
$ cargo run
   Compiling functions v0.1.0 (file:///projects/functions)
    Finished dev [unoptimized + debuginfo] target(s) in 0.28s
     Running `target/debug/functions`
Hello, world!
Another function.
The lines execute in the order in which they appear in the main function.
First, the “Hello, world!” message prints, and then another_function is
called and its message is printed.
Function Parameters
Functions can also be defined to have parameters, which are special variables that are part of a function’s signature. When a function has parameters, you can provide it with concrete values for those parameters. Technically, the concrete values are called arguments, but in casual conversation, people tend to use the words parameter and argument interchangeably for either the variables in a function’s definition or the concrete values passed in when you call a function.
The following rewritten version of another_function shows what parameters
look like in Rust:
Filename: src/main.rs
fn main() {
    another_function(5);
}

fn another_function(x: i32) {
    println!("The value of x is: {}", x);
}
Try running this program; you should get the following output:
$ cargo run
   Compiling functions v0.1.0 (file:///projects/functions)
    Finished dev [unoptimized + debuginfo] target(s) in 1.21s
     Running `target/debug/functions`
The value of x is: 5
The declaration of another_function has one parameter named x. The type of
x is specified as i32. When 5 is passed to another_function, the
println! macro puts 5 where the pair of curly brackets were in the format
string.
In function signatures, you must declare the type of each parameter. This is a deliberate decision in Rust’s design: requiring type annotations in function definitions means the compiler almost never needs you to use them elsewhere in the code to figure out what you mean.
When you want a function to have multiple parameters, separate the parameter declarations with commas, like this:
Filename: src/main.rs
fn main() {
    another_function(5, 6);
}

fn another_function(x: i32, y: i32) {
    println!("The value of x is: {}", x);
    println!("The value of y is: {}", y);
}
This example creates a function with two parameters, both of which are i32
types. The function then prints the values in both of its parameters. Note that
function parameters don’t all need to be the same type, they just happen to be
in this example.
Let’s try running this code. Replace the program currently in your functions
project’s src/main.rs file with the preceding example and run it using cargo run:
$ cargo run
   Compiling functions v0.1.0 (file:///projects/functions)
    Finished dev [unoptimized + debuginfo] target(s) in 0.31s
     Running `target/debug/functions`
The value of x is: 5
The value of y is: 6
Because we called the function with 5 as the value for x and 6 is passed
as the value for y, the two strings are printed with these values.
Function Bodies Contain Statements and Expressions
Function bodies are made up of a series of statements optionally ending in an expression. So far, we’ve only covered functions without an ending expression, but you have seen an expression as part of a statement. Because Rust is an expression-based language, this is an important distinction to understand. Other languages don’t have the same distinctions, so let’s look at what statements and expressions are and how their differences affect the bodies of functions.
We’ve actually already used statements and expressions. Statements are instructions that perform some action and do not return a value. Expressions evaluate to a resulting value. Let’s look at some examples.
Creating a variable and assigning a value to it with the let keyword is a
statement. In Listing 3-1, let y = 6; is a statement.
Filename: src/main.rs
fn main() {
    let y = 6;
}
Listing 3-1: A main function declaration containing one statement
Function definitions are also statements; the entire preceding example is a statement in itself.
Statements do not return values. Therefore, you can’t assign a let statement
to another variable, as the following code tries to do; you’ll get an error:
Filename: src/main.rs
fn main() {
    let x = (let y = 6);
}
When you run this program, the error you’ll get looks like this:
$ cargo run
   Compiling functions v0.1.0 (file:///projects/functions)
error[E0658]: `let` expressions in this position are experimental
 --> src/main.rs:2:14
  |
2 |     let x = (let y = 6);
  |              ^^^^^^^^^
  |
  = note: see issue #53667 <https://github.com/rust-lang/rust/issues/53667> for more information

error: expected expression, found statement (`let`)
 --> src/main.rs:2:14
  |
2 |     let x = (let y = 6);
  |              ^^^^^^^^^
  |
  = note: variable declaration using `let` is a statement

warning: unnecessary parentheses around assigned value
 --> src/main.rs:2:13
  |
2 |     let x = (let y = 6);
  |             ^^^^^^^^^^^ help: remove these parentheses
  |
  = note: `#[warn(unused_parens)]` on by default

error: aborting due to 2 previous errors; 1 warning emitted

For more information about this error, try `rustc --explain E0658`.
error: could not compile `functions`

To learn more, run the command again with --verbose.
The let y = 6 statement does not return a value, so there isn’t anything for
x to bind to. This is different from what happens in other languages, such as
C and Ruby, where the assignment returns the value of the assignment. In those
languages, you can write x = y = 6 and have both x and y have the value
6; that is not the case in Rust.
Expressions evaluate to something and make up most of the rest of the code that
you’ll write in Rust. Consider a simple math operation, such as 5 + 6, which
is an expression that evaluates to the value 11. Expressions can be part of
statements: in Listing 3-1, the 6 in the statement let y = 6; is an
expression that evaluates to the value 6. Calling a function is an
expression. Calling a macro is an expression. The block that we use to create
new scopes, {}, is an expression, for example:
Filename: src/main.rs
fn main() {
    let x = 5;

    let y = {
        let x = 3;
        x + 1
    };

    println!("The value of y is: {}", y);
}
This expression:
{
    let x = 3;
    x + 1
}
is a block that, in this case, evaluates to 4. That value gets bound to y
as part of the let statement. Note the x + 1 line without a semicolon at
the end, which is unlike most of the lines you’ve seen so far. Expressions do
not include ending semicolons. If you add a semicolon to the end of an
expression, you turn it into a statement, which will then not return a value.
Keep this in mind as you explore function return values and expressions next.
Functions with Return Values
Functions can return values to the code that calls them. We don’t name return
values, but we do declare their type after an arrow (->). In Rust, the return
value of the function is synonymous with the value of the final expression in
the block of the body of a function. You can return early from a function by
using the return keyword and specifying a value, but most functions return
the last expression implicitly. Here’s an example of a function that returns a
value:
Filename: src/main.rs
fn five() -> i32 {
    5
}

fn main() {
    let x = five();

    println!("The value of x is: {}", x);
}
There are no function calls, macros, or even let statements in the five
function—just the number 5 by itself. That’s a perfectly valid function in
Rust. Note that the function’s return type is specified too, as -> i32. Try
running this code; the output should look like this:
$ cargo run
   Compiling functions v0.1.0 (file:///projects/functions)
    Finished dev [unoptimized + debuginfo] target(s) in 0.30s
     Running `target/debug/functions`
The value of x is: 5
The 5 in five is the function’s return value, which is why the return type
is i32. Let’s examine this in more detail. There are two important bits:
first, the line let x = five(); shows that we’re using the return value of a
function to initialize a variable. Because the function five returns a 5,
that line is the same as the following:
#![allow(unused)]
fn main() {
let x = 5;
}
Second, the five function has no parameters and defines the type of the
return value, but the body of the function is a lonely 5 with no semicolon
because it’s an expression whose value we want to return.
Let’s look at another example:
Filename: src/main.rs
fn main() {
    let x = plus_one(5);

    println!("The value of x is: {}", x);
}

fn plus_one(x: i32) -> i32 {
    x + 1
}
Running this code will print The value of x is: 6. But if we place a
semicolon at the end of the line containing x + 1, changing it from an
expression to a statement, we’ll get an error.
Filename: src/main.rs
fn main() {
    let x = plus_one(5);

    println!("The value of x is: {}", x);
}

fn plus_one(x: i32) -> i32 {
    x + 1;
}
Compiling this code produces an error, as follows:
$ cargo run
   Compiling functions v0.1.0 (file:///projects/functions)
error[E0308]: mismatched types
 --> src/main.rs:7:24
  |
7 | fn plus_one(x: i32) -> i32 {
  |    --------            ^^^ expected `i32`, found `()`
  |    |
  |    implicitly returns `()` as its body has no tail or `return` expression
8 |     x + 1;
  |          - help: consider removing this semicolon

error: aborting due to previous error

For more information about this error, try `rustc --explain E0308`.
error: could not compile `functions`

To learn more, run the command again with --verbose.
The main error message, “mismatched types,” reveals the core issue with this
code. The definition of the function plus_one says that it will return an
i32, but statements don’t evaluate to a value, which is expressed by (),
an empty tuple. Therefore, nothing is returned, which contradicts the function
definition and results in an error. In this output, Rust provides a message to
possibly help rectify this issue: it suggests removing the semicolon, which
would fix the error.
Comments
All programmers strive to make their code easy to understand, but sometimes extra explanation is warranted. In these cases, programmers leave notes, or comments, in their source code that the compiler will ignore but people reading the source code may find useful.
Here’s a simple comment:
#![allow(unused)]
fn main() {
// hello, world
}
In Rust, the idiomatic comment style starts a comment with two slashes, and the
comment continues until the end of the line. For comments that extend beyond a
single line, you’ll need to include // on each line, like this:
#![allow(unused)]
fn main() {
// So we’re doing something complicated here, long enough that we need
// multiple lines of comments to do it! Whew! Hopefully, this comment will
// explain what’s going on.
}
Comments can also be placed at the end of lines containing code:
Filename: src/main.rs
fn main() {
    let lucky_number = 7; // I’m feeling lucky today
}
But you’ll more often see them used in this format, with the comment on a separate line above the code it’s annotating:
Filename: src/main.rs
fn main() {
    // I’m feeling lucky today
    let lucky_number = 7;
}
Rust also has another kind of comment, documentation comments, which we’ll discuss in the “Publishing a Crate to Crates.io” section of Chapter 14.
Control Flow
Deciding whether or not to run some code depending on if a condition is true
and deciding to run some code repeatedly while a condition is true are basic
building blocks in most programming languages. The most common constructs that
let you control the flow of execution of Rust code are if expressions and
loops.
if Expressions
An if expression allows you to branch your code depending on conditions. You
provide a condition and then state, “If this condition is met, run this block
of code. If the condition is not met, do not run this block of code.”
Create a new project called branches in your projects directory to explore
the if expression. In the src/main.rs file, input the following:
Filename: src/main.rs
fn main() {
    let number = 3;

    if number < 5 {
        println!("condition was true");
    } else {
        println!("condition was false");
    }
}
All if expressions start with the keyword if, which is followed by a
condition. In this case, the condition checks whether or not the variable
number has a value less than 5. The block of code we want to execute if the
condition is true is placed immediately after the condition inside curly
brackets. Blocks of code associated with the conditions in if expressions are
sometimes called arms, just like the arms in match expressions that we
discussed in the “Comparing the Guess to the Secret
Number” section of
Chapter 2.
Optionally, we can also include an else expression, which we chose
to do here, to give the program an alternative block of code to execute should
the condition evaluate to false. If you don’t provide an else expression and
the condition is false, the program will just skip the if block and move on
to the next bit of code.
Try running this code; you should see the following output:
$ cargo run
   Compiling branches v0.1.0 (file:///projects/branches)
    Finished dev [unoptimized + debuginfo] target(s) in 0.31s
     Running `target/debug/branches`
condition was true
Let’s try changing the value of number to a value that makes the condition
false to see what happens:
fn main() {
    let number = 7;

    if number < 5 {
        println!("condition was true");
    } else {
        println!("condition was false");
    }
}
Run the program again, and look at the output:
$ cargo run
   Compiling branches v0.1.0 (file:///projects/branches)
    Finished dev [unoptimized + debuginfo] target(s) in 0.31s
     Running `target/debug/branches`
condition was false
It’s also worth noting that the condition in this code must be a bool. If
the condition isn’t a bool, we’ll get an error. For example, try running the
following code:
Filename: src/main.rs
fn main() {
    let number = 3;

    if number {
        println!("number was three");
    }
}
The if condition evaluates to a value of 3 this time, and Rust throws an
error:
$ cargo run
   Compiling branches v0.1.0 (file:///projects/branches)
error[E0308]: mismatched types
 --> src/main.rs:4:8
  |
4 |     if number {
  |        ^^^^^^ expected `bool`, found integer

error: aborting due to previous error

For more information about this error, try `rustc --explain E0308`.
error: could not compile `branches`

To learn more, run the command again with --verbose.
The error indicates that Rust expected a bool but got an integer. Unlike
languages such as Ruby and JavaScript, Rust will not automatically try to
convert non-Boolean types to a Boolean. You must be explicit and always provide
if with a Boolean as its condition. If we want the if code block to run
only when a number is not equal to 0, for example, we can change the if
expression to the following:
Filename: src/main.rs
fn main() {
    let number = 3;

    if number != 0 {
        println!("number was something other than zero");
    }
}
Running this code will print number was something other than zero.
Handling Multiple Conditions with else if
You can have multiple conditions by combining if and else in an else if
expression. For example:
Filename: src/main.rs
fn main() {
    let number = 6;

    if number % 4 == 0 {
        println!("number is divisible by 4");
    } else if number % 3 == 0 {
        println!("number is divisible by 3");
    } else if number % 2 == 0 {
        println!("number is divisible by 2");
    } else {
        println!("number is not divisible by 4, 3, or 2");
    }
}
This program has four possible paths it can take. After running it, you should see the following output:
$ cargo run
   Compiling branches v0.1.0 (file:///projects/branches)
    Finished dev [unoptimized + debuginfo] target(s) in 0.31s
     Running `target/debug/branches`
number is divisible by 3
When this program executes, it checks each if expression in turn and executes
the first body for which the condition holds true. Note that even though 6 is
divisible by 2, we don’t see the output number is divisible by 2, nor do we
see the number is not divisible by 4, 3, or 2 text from the else block.
That’s because Rust only executes the block for the first true condition, and
once it finds one, it doesn’t even check the rest.
Using too many else if expressions can clutter your code, so if you have more
than one, you might want to refactor your code. Chapter 6 describes a powerful
Rust branching construct called match for these cases.
Using if in a let Statement
Because if is an expression, we can use it on the right side of a let
statement, as in Listing 3-2.
Filename: src/main.rs
fn main() {
    let condition = true;
    let number = if condition { 5 } else { 6 };

    println!("The value of number is: {}", number);
}
Listing 3-2: Assigning the result of an if expression
to a variable
The number variable will be bound to a value based on the outcome of the if
expression. Run this code to see what happens:
$ cargo run
   Compiling branches v0.1.0 (file:///projects/branches)
    Finished dev [unoptimized + debuginfo] target(s) in 0.30s
     Running `target/debug/branches`
The value of number is: 5
Remember that blocks of code evaluate to the last expression in them, and
numbers by themselves are also expressions. In this case, the value of the
whole if expression depends on which block of code executes. This means the
values that have the potential to be results from each arm of the if must be
the same type; in Listing 3-2, the results of both the if arm and the else
arm were i32 integers. If the types are mismatched, as in the following
example, we’ll get an error:
Filename: src/main.rs
fn main() {
    let condition = true;

    let number = if condition { 5 } else { "six" };

    println!("The value of number is: {}", number);
}
When we try to compile this code, we’ll get an error. The if and else arms
have value types that are incompatible, and Rust indicates exactly where to
find the problem in the program:
$ cargo run
   Compiling branches v0.1.0 (file:///projects/branches)
error[E0308]: `if` and `else` have incompatible types
 --> src/main.rs:4:44
  |
4 |     let number = if condition { 5 } else { "six" };
  |                                 -          ^^^^^ expected integer, found `&str`
  |                                 |
  |                                 expected because of this

error: aborting due to previous error

For more information about this error, try `rustc --explain E0308`.
error: could not compile `branches`

To learn more, run the command again with --verbose.
The expression in the if block evaluates to an integer, and the expression in
the else block evaluates to a string. This won’t work because variables must
have a single type. Rust needs to know at compile time what type the number
variable is, definitively, so it can verify at compile time that its type is
valid everywhere we use number. Rust wouldn’t be able to do that if the type
of number was only determined at runtime; the compiler would be more complex
and would make fewer guarantees about the code if it had to keep track of
multiple hypothetical types for any variable.
Repetition with Loops
It’s often useful to execute a block of code more than once. For this task, Rust provides several loops. A loop runs through the code inside the loop body to the end and then starts immediately back at the beginning. To experiment with loops, let’s make a new project called loops.
Rust has three kinds of loops: loop, while, and for. Let’s try each one.
Repeating Code with loop
The loop keyword tells Rust to execute a block of code over and over again
forever or until you explicitly tell it to stop.
As an example, change the src/main.rs file in your loops directory to look like this:
Filename: src/main.rs
fn main() {
    loop {
        println!("again!");
    }
}
When we run this program, we’ll see again! printed over and over continuously
until we stop the program manually. Most terminals support a keyboard shortcut,
ctrl-c, to interrupt a program that is stuck in
a continual loop. Give it a try:
$ cargo run
   Compiling loops v0.1.0 (file:///projects/loops)
    Finished dev [unoptimized + debuginfo] target(s) in 0.29s
     Running `target/debug/loops`
again!
again!
again!
again!
^Cagain!
The symbol ^C represents where you pressed ctrl-c
. You may or may not see the word again! printed after the ^C,
depending on where the code was in the loop when it received the interrupt
signal.
Fortunately, Rust provides another, more reliable way to break out of a loop.
You can place the break keyword within the loop to tell the program when to
stop executing the loop. Recall that we did this in the guessing game in the
“Quitting After a Correct Guess” section of Chapter 2 to exit the program when the user won the game by
guessing the correct number.
Returning Values from Loops
One of the uses of a loop is to retry an operation you know might fail, such
as checking whether a thread has completed its job. However, you might need to
pass the result of that operation to the rest of your code. To do this, you can
add the value you want returned after the break expression you use to stop
the loop; that value will be returned out of the loop so you can use it, as
shown here:
fn main() {
    let mut counter = 0;

    let result = loop {
        counter += 1;

        if counter == 10 {
            break counter * 2;
        }
    };

    println!("The result is {}", result);
}
Before the loop, we declare a variable named counter and initialize it to
0. Then we declare a variable named result to hold the value returned from
the loop. On every iteration of the loop, we add 1 to the counter variable,
and then check whether the counter is equal to 10. When it is, we use the
break keyword with the value counter * 2. After the loop, we use a
semicolon to end the statement that assigns the value to result. Finally, we
print the value in result, which in this case is 20.
Conditional Loops with while
It’s often useful for a program to evaluate a condition within a loop. While
the condition is true, the loop runs. When the condition ceases to be true, the
program calls break, stopping the loop. This loop type could be implemented
using a combination of loop, if, else, and break; you could try that
now in a program, if you’d like.
However, this pattern is so common that Rust has a built-in language construct
for it, called a while loop. Listing 3-3 uses while: the program loops
three times, counting down each time, and then, after the loop, it prints
another message and exits.
Filename: src/main.rs
fn main() {
    let mut number = 3;

    while number != 0 {
        println!("{}!", number);

        number -= 1;
    }

    println!("LIFTOFF!!!");
}
Listing 3-3: Using a while loop to run code while a
condition holds true
This construct eliminates a lot of nesting that would be necessary if you used
loop, if, else, and break, and it’s clearer. While a condition holds
true, the code runs; otherwise, it exits the loop.
Looping Through a Collection with for
You could use the while construct to loop over the elements of a collection,
such as an array. For example, let’s look at Listing 3-4.
Filename: src/main.rs
fn main() {
    let a = [10, 20, 30, 40, 50];
    let mut index = 0;

    while index < 5 {
        println!("the value is: {}", a[index]);

        index += 1;
    }
}
Listing 3-4: Looping through each element of a collection
using a while loop
Here, the code counts up through the elements in the array. It starts at index
0, and then loops until it reaches the final index in the array (that is,
when index < 5 is no longer true). Running this code will print every element
in the array:
$ cargo run
   Compiling loops v0.1.0 (file:///projects/loops)
    Finished dev [unoptimized + debuginfo] target(s) in 0.32s
     Running `target/debug/loops`
the value is: 10
the value is: 20
the value is: 30
the value is: 40
the value is: 50
All five array values appear in the terminal, as expected. Even though index
will reach a value of 5 at some point, the loop stops executing before trying
to fetch a sixth value from the array.
But this approach is error prone; we could cause the program to panic if the index length is incorrect. It’s also slow, because the compiler adds runtime code to perform the conditional check on every element on every iteration through the loop.
As a more concise alternative, you can use a for loop and execute some code
for each item in a collection. A for loop looks like the code in Listing 3-5.
Filename: src/main.rs
fn main() {
    let a = [10, 20, 30, 40, 50];

    for element in a.iter() {
        println!("the value is: {}", element);
    }
}
Listing 3-5: Looping through each element of a collection
using a for loop
When we run this code, we’ll see the same output as in Listing 3-4. More importantly, we’ve now increased the safety of the code and eliminated the chance of bugs that might result from going beyond the end of the array or not going far enough and missing some items.
For example, in the code in Listing 3-4, if you changed the definition of the
a array to have four elements but forgot to update the condition to while index < 4, the code would panic. Using the for loop, you wouldn’t need to
remember to change any other code if you changed the number of values in the
array.
The safety and conciseness of for loops make them the most commonly used loop
construct in Rust. Even in situations in which you want to run some code a
certain number of times, as in the countdown example that used a while loop
in Listing 3-3, most Rustaceans would use a for loop. The way to do that
would be to use a Range, which is a type provided by the standard library
that generates all numbers in sequence starting from one number and ending
before another number.
Here’s what the countdown would look like using a for loop and another method
we’ve not yet talked about, rev, to reverse the range:
Filename: src/main.rs
fn main() {
    for number in (1..4).rev() {
        println!("{}!", number);
    }
    println!("LIFTOFF!!!");
}
This code is a bit nicer, isn’t it?
Summary
You made it! That was a sizable chapter: you learned about variables, scalar
and compound data types, functions, comments, if expressions, and loops! If
you want to practice with the concepts discussed in this chapter, try building
programs to do the following:
- Convert temperatures between Fahrenheit and Celsius.
- Generate the nth Fibonacci number.
- Print the lyrics to the Christmas carol “The Twelve Days of Christmas,” taking advantage of the repetition in the song.
When you’re ready to move on, we’ll talk about a concept in Rust that doesn’t commonly exist in other programming languages: ownership.
Understanding Ownership
Ownership is Rust’s most unique feature, and it enables Rust to make memory safety guarantees without needing a garbage collector. Therefore, it’s important to understand how ownership works in Rust. In this chapter, we’ll talk about ownership as well as several related features: borrowing, slices, and how Rust lays data out in memory.
What Is Ownership?
Rust’s central feature is ownership. Although the feature is straightforward to explain, it has deep implications for the rest of the language.
All programs have to manage the way they use a computer’s memory while running. Some languages have garbage collection that constantly looks for no longer used memory as the program runs; in other languages, the programmer must explicitly allocate and free the memory. Rust uses a third approach: memory is managed through a system of ownership with a set of rules that the compiler checks at compile time. None of the ownership features slow down your program while it’s running.
Because ownership is a new concept for many programmers, it does take some time to get used to. The good news is that the more experienced you become with Rust and the rules of the ownership system, the more you’ll be able to naturally develop code that is safe and efficient. Keep at it!
When you understand ownership, you’ll have a solid foundation for understanding the features that make Rust unique. In this chapter, you’ll learn ownership by working through some examples that focus on a very common data structure: strings.
The Stack and the Heap
In many programming languages, you don’t have to think about the stack and the heap very often. But in a systems programming language like Rust, whether a value is on the stack or the heap has more of an effect on how the language behaves and why you have to make certain decisions. Parts of ownership will be described in relation to the stack and the heap later in this chapter, so here is a brief explanation in preparation.
Both the stack and the heap are parts of memory that are available to your code to use at runtime, but they are structured in different ways. The stack stores values in the order it gets them and removes the values in the opposite order. This is referred to as last in, first out. Think of a stack of plates: when you add more plates, you put them on top of the pile, and when you need a plate, you take one off the top. Adding or removing plates from the middle or bottom wouldn’t work as well! Adding data is called pushing onto the stack, and removing data is called popping off the stack.
All data stored on the stack must have a known, fixed size. Data with an unknown size at compile time or a size that might change must be stored on the heap instead. The heap is less organized: when you put data on the heap, you request a certain amount of space. The memory allocator finds an empty spot in the heap that is big enough, marks it as being in use, and returns a pointer, which is the address of that location. This process is called allocating on the heap and is sometimes abbreviated as just allocating. Pushing values onto the stack is not considered allocating. Because the pointer is a known, fixed size, you can store the pointer on the stack, but when you want the actual data, you must follow the pointer.
Think of being seated at a restaurant. When you enter, you state the number of people in your group, and the staff finds an empty table that fits everyone and leads you there. If someone in your group comes late, they can ask where you’ve been seated to find you.
Pushing to the stack is faster than allocating on the heap because the allocator never has to search for a place to store new data; that location is always at the top of the stack. Comparatively, allocating space on the heap requires more work, because the allocator must first find a big enough space to hold the data and then perform bookkeeping to prepare for the next allocation.
Accessing data in the heap is slower than accessing data on the stack because you have to follow a pointer to get there. Contemporary processors are faster if they jump around less in memory. Continuing the analogy, consider a server at a restaurant taking orders from many tables. It’s most efficient to get all the orders at one table before moving on to the next table. Taking an order from table A, then an order from table B, then one from A again, and then one from B again would be a much slower process. By the same token, a processor can do its job better if it works on data that’s close to other data (as it is on the stack) rather than farther away (as it can be on the heap). Allocating a large amount of space on the heap can also take time.
When your code calls a function, the values passed into the function (including, potentially, pointers to data on the heap) and the function’s local variables get pushed onto the stack. When the function is over, those values get popped off the stack.
Keeping track of what parts of code are using what data on the heap, minimizing the amount of duplicate data on the heap, and cleaning up unused data on the heap so you don’t run out of space are all problems that ownership addresses. Once you understand ownership, you won’t need to think about the stack and the heap very often, but knowing that managing heap data is why ownership exists can help explain why it works the way it does.
Ownership Rules
First, let’s take a look at the ownership rules. Keep these rules in mind as we work through the examples that illustrate them:
- Each value in Rust has a variable that’s called its owner.
- There can only be one owner at a time.
- When the owner goes out of scope, the value will be dropped.
Variable Scope
We’ve walked through an example of a Rust program already in Chapter 2. Now
that we’re past basic syntax, we won’t include all the fn main() { code in
examples, so if you’re following along, you’ll have to put the following
examples inside a main function manually. As a result, our examples will be a
bit more concise, letting us focus on the actual details rather than
boilerplate code.
As a first example of ownership, we’ll look at the scope of some variables. A scope is the range within a program for which an item is valid. Let’s say we have a variable that looks like this:
#![allow(unused)]
fn main() {
let s = "hello";
}
The variable s refers to a string literal, where the value of the string is
hardcoded into the text of our program. The variable is valid from the point at
which it’s declared until the end of the current scope. Listing 4-1 has
comments annotating where the variable s is valid.
fn main() {
    {                      // s is not valid here, it’s not yet declared
        let s = "hello";   // s is valid from this point forward

        // do stuff with s
    }                      // this scope is now over, and s is no longer valid
}
Listing 4-1: A variable and the scope in which it is valid
In other words, there are two important points in time here:
- When
scomes into scope, it is valid. - It remains valid until it goes out of scope.
At this point, the relationship between scopes and when variables are valid is
similar to that in other programming languages. Now we’ll build on top of this
understanding by introducing the String type.
The String Type
To illustrate the rules of ownership, we need a data type that is more complex than the ones we covered in the “Data Types” section of Chapter 3. The types covered previously are all stored on the stack and popped off the stack when their scope is over, but we want to look at data that is stored on the heap and explore how Rust knows when to clean up that data.
We’ll use String as the example here and concentrate on the parts of String
that relate to ownership. These aspects also apply to other complex data types,
whether they are provided by the standard library or created by you. We’ll
discuss String in more depth in Chapter 8.
We’ve already seen string literals, where a string value is hardcoded into our
program. String literals are convenient, but they aren’t suitable for every
situation in which we may want to use text. One reason is that they’re
immutable. Another is that not every string value can be known when we write
our code: for example, what if we want to take user input and store it? For
these situations, Rust has a second string type, String. This type is
allocated on the heap and as such is able to store an amount of text that is
unknown to us at compile time. You can create a String from a string literal
using the from function, like so:
#![allow(unused)]
fn main() {
let s = String::from("hello");
}
The double colon (::) is an operator that allows us to namespace this
particular from function under the String type rather than using some sort
of name like string_from. We’ll discuss this syntax more in the “Method
Syntax” section of Chapter 5 and when we talk
about namespacing with modules in “Paths for Referring to an Item in the
Module Tree” in Chapter 7.
This kind of string can be mutated:
fn main() {
    let mut s = String::from("hello");

    s.push_str(", world!"); // push_str() appends a literal to a String

    println!("{}", s); // This will print `hello, world!`
}
So, what’s the difference here? Why can String be mutated but literals
cannot? The difference is how these two types deal with memory.
Memory and Allocation
In the case of a string literal, we know the contents at compile time, so the text is hardcoded directly into the final executable. This is why string literals are fast and efficient. But these properties only come from the string literal’s immutability. Unfortunately, we can’t put a blob of memory into the binary for each piece of text whose size is unknown at compile time and whose size might change while running the program.
With the String type, in order to support a mutable, growable piece of text,
we need to allocate an amount of memory on the heap, unknown at compile time,
to hold the contents. This means:
- The memory must be requested from the memory allocator at runtime.
- We need a way of returning this memory to the allocator when we’re
done with our
String.
That first part is done by us: when we call String::from, its implementation
requests the memory it needs. This is pretty much universal in programming
languages.
However, the second part is different. In languages with a garbage collector
(GC), the GC keeps track and cleans up memory that isn’t being used anymore,
and we don’t need to think about it. Without a GC, it’s our responsibility to
identify when memory is no longer being used and call code to explicitly return
it, just as we did to request it. Doing this correctly has historically been a
difficult programming problem. If we forget, we’ll waste memory. If we do it
too early, we’ll have an invalid variable. If we do it twice, that’s a bug too.
We need to pair exactly one allocate with exactly one free.
Rust takes a different path: the memory is automatically returned once the
variable that owns it goes out of scope. Here’s a version of our scope example
from Listing 4-1 using a String instead of a string literal:
fn main() {
    {
        let s = String::from("hello"); // s is valid from this point forward

        // do stuff with s
    }                                  // this scope is now over, and s is no
                                       // longer valid
}
There is a natural point at which we can return the memory our String needs
to the allocator: when s goes out of scope. When a variable goes out of
scope, Rust calls a special function for us. This function is called drop,
and it’s where the author of String can put the code to return the memory.
Rust calls drop automatically at the closing curly bracket.
Note: In C++, this pattern of deallocating resources at the end of an item’s lifetime is sometimes called Resource Acquisition Is Initialization (RAII). The
dropfunction in Rust will be familiar to you if you’ve used RAII patterns.
This pattern has a profound impact on the way Rust code is written. It may seem simple right now, but the behavior of code can be unexpected in more complicated situations when we want to have multiple variables use the data we’ve allocated on the heap. Let’s explore some of those situations now.
Ways Variables and Data Interact: Move
Multiple variables can interact with the same data in different ways in Rust. Let’s look at an example using an integer in Listing 4-2.
fn main() {
    let x = 5;
    let y = x;
}
Listing 4-2: Assigning the integer value of variable x
to y
We can probably guess what this is doing: “bind the value 5 to x; then make
a copy of the value in x and bind it to y.” We now have two variables, x
and y, and both equal 5. This is indeed what is happening, because integers
are simple values with a known, fixed size, and these two 5 values are pushed
onto the stack.
Now let’s look at the String version:
fn main() {
    let s1 = String::from("hello");
    let s2 = s1;
}
This looks very similar to the previous code, so we might assume that the way
it works would be the same: that is, the second line would make a copy of the
value in s1 and bind it to s2. But this isn’t quite what happens.
Take a look at Figure 4-1 to see what is happening to String under the
covers. A String is made up of three parts, shown on the left: a pointer to
the memory that holds the contents of the string, a length, and a capacity.
This group of data is stored on the stack. On the right is the memory on the
heap that holds the contents.

Figure 4-1: Representation in memory of a String
holding the value "hello" bound to s1
The length is how much memory, in bytes, the contents of the String is
currently using. The capacity is the total amount of memory, in bytes, that the
String has received from the allocator. The difference between length
and capacity matters, but not in this context, so for now, it’s fine to ignore
the capacity.
When we assign s1 to s2, the String data is copied, meaning we copy the
pointer, the length, and the capacity that are on the stack. We do not copy the
data on the heap that the pointer refers to. In other words, the data
representation in memory looks like Figure 4-2.

Figure 4-2: Representation in memory of the variable s2
that has a copy of the pointer, length, and capacity of s1
The representation does not look like Figure 4-3, which is what memory would
look like if Rust instead copied the heap data as well. If Rust did this, the
operation s2 = s1 could be very expensive in terms of runtime performance if
the data on the heap were large.

Figure 4-3: Another possibility for what s2 = s1 might
do if Rust copied the heap data as well
Earlier, we said that when a variable goes out of scope, Rust automatically
calls the drop function and cleans up the heap memory for that variable. But
Figure 4-2 shows both data pointers pointing to the same location. This is a
problem: when s2 and s1 go out of scope, they will both try to free the
same memory. This is known as a double free error and is one of the memory
safety bugs we mentioned previously. Freeing memory twice can lead to memory
corruption, which can potentially lead to security vulnerabilities.
To ensure memory safety, there’s one more detail to what happens in this
situation in Rust. Instead of trying to copy the allocated memory, Rust
considers s1 to no longer be valid and, therefore, Rust doesn’t need to free
anything when s1 goes out of scope. Check out what happens when you try to
use s1 after s2 is created; it won’t work:
fn main() {
    let s1 = String::from("hello");
    let s2 = s1;

    println!("{}, world!", s1);
}
You’ll get an error like this because Rust prevents you from using the invalidated reference:
$ cargo run
   Compiling ownership v0.1.0 (file:///projects/ownership)
error[E0382]: borrow of moved value: `s1`
 --> src/main.rs:5:28
  |
2 |     let s1 = String::from("hello");
  |         -- move occurs because `s1` has type `String`, which does not implement the `Copy` trait
3 |     let s2 = s1;
  |              -- value moved here
4 |
5 |     println!("{}, world!", s1);
  |                            ^^ value borrowed here after move

error: aborting due to previous error

For more information about this error, try `rustc --explain E0382`.
error: could not compile `ownership`

To learn more, run the command again with --verbose.
If you’ve heard the terms shallow copy and deep copy while working with
other languages, the concept of copying the pointer, length, and capacity
without copying the data probably sounds like making a shallow copy. But
because Rust also invalidates the first variable, instead of being called a
shallow copy, it’s known as a move. In this example, we would say that
s1 was moved into s2. So what actually happens is shown in Figure 4-4.

Figure 4-4: Representation in memory after s1 has been
invalidated
That solves our problem! With only s2 valid, when it goes out of scope, it
alone will free the memory, and we’re done.
In addition, there’s a design choice that’s implied by this: Rust will never automatically create “deep” copies of your data. Therefore, any automatic copying can be assumed to be inexpensive in terms of runtime performance.
Ways Variables and Data Interact: Clone
If we do want to deeply copy the heap data of the String, not just the
stack data, we can use a common method called clone. We’ll discuss method
syntax in Chapter 5, but because methods are a common feature in many
programming languages, you’ve probably seen them before.
Here’s an example of the clone method in action:
fn main() {
    let s1 = String::from("hello");
    let s2 = s1.clone();

    println!("s1 = {}, s2 = {}", s1, s2);
}
This works just fine and explicitly produces the behavior shown in Figure 4-3, where the heap data does get copied.
When you see a call to clone, you know that some arbitrary code is being
executed and that code may be expensive. It’s a visual indicator that something
different is going on.
Stack-Only Data: Copy
There’s another wrinkle we haven’t talked about yet. This code using integers – part of which was shown in Listing 4-2 – works and is valid:
fn main() {
    let x = 5;
    let y = x;

    println!("x = {}, y = {}", x, y);
}
But this code seems to contradict what we just learned: we don’t have a call to
clone, but x is still valid and wasn’t moved into y.
The reason is that types such as integers that have a known size at compile
time are stored entirely on the stack, so copies of the actual values are quick
to make. That means there’s no reason we would want to prevent x from being
valid after we create the variable y. In other words, there’s no difference
between deep and shallow copying here, so calling clone wouldn’t do anything
different from the usual shallow copying and we can leave it out.
Rust has a special annotation called the Copy trait that we can place on
types like integers that are stored on the stack (we’ll talk more about traits
in Chapter 10). If a type implements the Copy trait, an older variable is
still usable after assignment. Rust won’t let us annotate a type with the
Copy trait if the type, or any of its parts, has implemented the Drop
trait. If the type needs something special to happen when the value goes out of
scope and we add the Copy annotation to that type, we’ll get a compile-time
error. To learn about how to add the Copy annotation to your type to
implement the trait, see “Derivable Traits”
in Appendix C.
So what types implement the Copy trait? You can check the documentation for
the given type to be sure, but as a general rule, any group of simple scalar
values can implement Copy, and nothing that requires allocation or is some
form of resource can implement Copy. Here are some of the types that
implement Copy:
- All the integer types, such as
u32. - The Boolean type,
bool, with valuestrueandfalse. - All the floating point types, such as
f64. - The character type,
char. - Tuples, if they only contain types that also implement
Copy. For example,(i32, i32)implementsCopy, but(i32, String)does not.
Ownership and Functions
The semantics for passing a value to a function are similar to those for assigning a value to a variable. Passing a variable to a function will move or copy, just as assignment does. Listing 4-3 has an example with some annotations showing where variables go into and out of scope.
Filename: src/main.rs
fn main() {
    let s = String::from("hello");  // s comes into scope

    takes_ownership(s);             // s's value moves into the function...
                                    // ... and so is no longer valid here

    let x = 5;                      // x comes into scope

    makes_copy(x);                  // x would move into the function,
                                    // but i32 is Copy, so it's okay to still
                                    // use x afterward

} // Here, x goes out of scope, then s. But because s's value was moved, nothing
  // special happens.

fn takes_ownership(some_string: String) { // some_string comes into scope
    println!("{}", some_string);
} // Here, some_string goes out of scope and `drop` is called. The backing
  // memory is freed.

fn makes_copy(some_integer: i32) { // some_integer comes into scope
    println!("{}", some_integer);
} // Here, some_integer goes out of scope. Nothing special happens.
Listing 4-3: Functions with ownership and scope annotated
If we tried to use s after the call to takes_ownership, Rust would throw a
compile-time error. These static checks protect us from mistakes. Try adding
code to main that uses s and x to see where you can use them and where
the ownership rules prevent you from doing so.
Return Values and Scope
Returning values can also transfer ownership. Listing 4-4 is an example with similar annotations to those in Listing 4-3.
Filename: src/main.rs
fn main() {
    let s1 = gives_ownership();         // gives_ownership moves its return
                                        // value into s1

    let s2 = String::from("hello");     // s2 comes into scope

    let s3 = takes_and_gives_back(s2);  // s2 is moved into
                                        // takes_and_gives_back, which also
                                        // moves its return value into s3
} // Here, s3 goes out of scope and is dropped. s2 goes out of scope but was
  // moved, so nothing happens. s1 goes out of scope and is dropped.

fn gives_ownership() -> String {             // gives_ownership will move its
                                             // return value into the function
                                             // that calls it

    let some_string = String::from("hello"); // some_string comes into scope

    some_string                              // some_string is returned and
                                             // moves out to the calling
                                             // function
}

// takes_and_gives_back will take a String and return one
fn takes_and_gives_back(a_string: String) -> String { // a_string comes into
                                                      // scope

    a_string  // a_string is returned and moves out to the calling function
}
Listing 4-4: Transferring ownership of return values
The ownership of a variable follows the same pattern every time: assigning a
value to another variable moves it. When a variable that includes data on the
heap goes out of scope, the value will be cleaned up by drop unless the data
has been moved to be owned by another variable.
Taking ownership and then returning ownership with every function is a bit tedious. What if we want to let a function use a value but not take ownership? It’s quite annoying that anything we pass in also needs to be passed back if we want to use it again, in addition to any data resulting from the body of the function that we might want to return as well.
It’s possible to return multiple values using a tuple, as shown in Listing 4-5.
Filename: src/main.rs
fn main() {
    let s1 = String::from("hello");

    let (s2, len) = calculate_length(s1);

    println!("The length of '{}' is {}.", s2, len);
}

fn calculate_length(s: String) -> (String, usize) {
    let length = s.len(); // len() returns the length of a String

    (s, length)
}
Listing 4-5: Returning ownership of parameters
But this is too much ceremony and a lot of work for a concept that should be common. Luckily for us, Rust has a feature for this concept, called references.
References and Borrowing
The issue with the tuple code in Listing 4-5 is that we have to return the
String to the calling function so we can still use the String after the
call to calculate_length, because the String was moved into
calculate_length.
Here is how you would define and use a calculate_length function that has a
reference to an object as a parameter instead of taking ownership of the
value:
Filename: src/main.rs
fn main() {
    let s1 = String::from("hello");

    let len = calculate_length(&s1);

    println!("The length of '{}' is {}.", s1, len);
}

fn calculate_length(s: &String) -> usize {
    s.len()
}
First, notice that all the tuple code in the variable declaration and the
function return value is gone. Second, note that we pass &s1 into
calculate_length and, in its definition, we take &String rather than
String.
These ampersands are references, and they allow you to refer to some value without taking ownership of it. Figure 4-5 shows a diagram.

Figure 4-5: A diagram of &String s pointing at String s1
Note: The opposite of referencing by using
&is dereferencing, which is accomplished with the dereference operator,*. We’ll see some uses of the dereference operator in Chapter 8 and discuss details of dereferencing in Chapter 15.
Let’s take a closer look at the function call here:
fn main() {
    let s1 = String::from("hello");

    let len = calculate_length(&s1);

    println!("The length of '{}' is {}.", s1, len);
}

fn calculate_length(s: &String) -> usize {
    s.len()
}
The &s1 syntax lets us create a reference that refers to the value of s1
but does not own it. Because it does not own it, the value it points to will
not be dropped when the reference goes out of scope.
Likewise, the signature of the function uses & to indicate that the type of
the parameter s is a reference. Let’s add some explanatory annotations:
fn main() {
    let s1 = String::from("hello");

    let len = calculate_length(&s1);

    println!("The length of '{}' is {}.", s1, len);
}

fn calculate_length(s: &String) -> usize { // s is a reference to a String
    s.len()
} // Here, s goes out of scope. But because it does not have ownership of what
  // it refers to, nothing happens.
The scope in which the variable s is valid is the same as any function
parameter’s scope, but we don’t drop what the reference points to when it goes
out of scope because we don’t have ownership. When functions have references as
parameters instead of the actual values, we won’t need to return the values in
order to give back ownership, because we never had ownership.
We call having references as function parameters borrowing. As in real life, if a person owns something, you can borrow it from them. When you’re done, you have to give it back.
So what happens if we try to modify something we’re borrowing? Try the code in Listing 4-6. Spoiler alert: it doesn’t work!
Filename: src/main.rs
fn main() {
    let s = String::from("hello");

    change(&s);
}

fn change(some_string: &String) {
    some_string.push_str(", world");
}
Listing 4-6: Attempting to modify a borrowed value
Here’s the error:
$ cargo run
   Compiling ownership v0.1.0 (file:///projects/ownership)
error[E0596]: cannot borrow `*some_string` as mutable, as it is behind a `&` reference
 --> src/main.rs:8:5
  |
7 | fn change(some_string: &String) {
  |                        ------- help: consider changing this to be a mutable reference: `&mut String`
8 |     some_string.push_str(", world");
  |     ^^^^^^^^^^^ `some_string` is a `&` reference, so the data it refers to cannot be borrowed as mutable

error: aborting due to previous error

For more information about this error, try `rustc --explain E0596`.
error: could not compile `ownership`

To learn more, run the command again with --verbose.
Just as variables are immutable by default, so are references. We’re not allowed to modify something we have a reference to.
Mutable References
We can fix the error in the code from Listing 4-6 with just a small tweak:
Filename: src/main.rs
fn main() {
    let mut s = String::from("hello");

    change(&mut s);
}

fn change(some_string: &mut String) {
    some_string.push_str(", world");
}
First, we had to change s to be mut. Then we had to create a mutable
reference with &mut s and accept a mutable reference with some_string: &mut String.
But mutable references have one big restriction: you can have only one mutable reference to a particular piece of data in a particular scope. This code will fail:
Filename: src/main.rs
fn main() {
    let mut s = String::from("hello");

    let r1 = &mut s;
    let r2 = &mut s;

    println!("{}, {}", r1, r2);
}
Here’s the error:
$ cargo run
   Compiling ownership v0.1.0 (file:///projects/ownership)
error[E0499]: cannot borrow `s` as mutable more than once at a time
 --> src/main.rs:5:14
  |
4 |     let r1 = &mut s;
  |              ------ first mutable borrow occurs here
5 |     let r2 = &mut s;
  |              ^^^^^^ second mutable borrow occurs here
6 |
7 |     println!("{}, {}", r1, r2);
  |                        -- first borrow later used here

error: aborting due to previous error

For more information about this error, try `rustc --explain E0499`.
error: could not compile `ownership`

To learn more, run the command again with --verbose.
This restriction allows for mutation but in a very controlled fashion. It’s something that new Rustaceans struggle with, because most languages let you mutate whenever you’d like.
The benefit of having this restriction is that Rust can prevent data races at compile time. A data race is similar to a race condition and happens when these three behaviors occur:
- Two or more pointers access the same data at the same time.
- At least one of the pointers is being used to write to the data.
- There’s no mechanism being used to synchronize access to the data.
Data races cause undefined behavior and can be difficult to diagnose and fix when you’re trying to track them down at runtime; Rust prevents this problem from happening because it won’t even compile code with data races!
As always, we can use curly brackets to create a new scope, allowing for multiple mutable references, just not simultaneous ones:
fn main() {
    let mut s = String::from("hello");

    {
        let r1 = &mut s;
    } // r1 goes out of scope here, so we can make a new reference with no problems.

    let r2 = &mut s;
}
A similar rule exists for combining mutable and immutable references. This code results in an error:
fn main() {
    let mut s = String::from("hello");

    let r1 = &s; // no problem
    let r2 = &s; // no problem
    let r3 = &mut s; // BIG PROBLEM

    println!("{}, {}, and {}", r1, r2, r3);
}
Here’s the error:
$ cargo run
   Compiling ownership v0.1.0 (file:///projects/ownership)
error[E0502]: cannot borrow `s` as mutable because it is also borrowed as immutable
 --> src/main.rs:6:14
  |
4 |     let r1 = &s; // no problem
  |              -- immutable borrow occurs here
5 |     let r2 = &s; // no problem
6 |     let r3 = &mut s; // BIG PROBLEM
  |              ^^^^^^ mutable borrow occurs here
7 |
8 |     println!("{}, {}, and {}", r1, r2, r3);
  |                                -- immutable borrow later used here

error: aborting due to previous error

For more information about this error, try `rustc --explain E0502`.
error: could not compile `ownership`

To learn more, run the command again with --verbose.
Whew! We also cannot have a mutable reference while we have an immutable one. Users of an immutable reference don’t expect the values to suddenly change out from under them! However, multiple immutable references are okay because no one who is just reading the data has the ability to affect anyone else’s reading of the data.
Note that a reference’s scope starts from where it is introduced and continues through the last time that reference is used. For instance, this code will compile because the last usage of the immutable references occurs before the mutable reference is introduced:
fn main() {
    let mut s = String::from("hello");

    let r1 = &s; // no problem
    let r2 = &s; // no problem
    println!("{} and {}", r1, r2);
    // r1 and r2 are no longer used after this point

    let r3 = &mut s; // no problem
    println!("{}", r3);
}
The scopes of the immutable references r1 and r2 end after the println!
where they are last used, which is before the mutable reference r3 is
created. These scopes don’t overlap, so this code is allowed.
Even though borrowing errors may be frustrating at times, remember that it’s the Rust compiler pointing out a potential bug early (at compile time rather than at runtime) and showing you exactly where the problem is. Then you don’t have to track down why your data isn’t what you thought it was.
Dangling References
In languages with pointers, it’s easy to erroneously create a dangling pointer, a pointer that references a location in memory that may have been given to someone else, by freeing some memory while preserving a pointer to that memory. In Rust, by contrast, the compiler guarantees that references will never be dangling references: if you have a reference to some data, the compiler will ensure that the data will not go out of scope before the reference to the data does.
Let’s try to create a dangling reference, which Rust will prevent with a compile-time error:
Filename: src/main.rs
fn main() {
    let reference_to_nothing = dangle();
}

fn dangle() -> &String {
    let s = String::from("hello");

    &s
}
Here’s the error:
$ cargo run
   Compiling ownership v0.1.0 (file:///projects/ownership)
error[E0106]: missing lifetime specifier
 --> src/main.rs:5:16
  |
5 | fn dangle() -> &String {
  |                ^ expected named lifetime parameter
  |
  = help: this function's return type contains a borrowed value, but there is no value for it to be borrowed from
help: consider using the `'static` lifetime
  |
5 | fn dangle() -> &'static String {
  |                ^^^^^^^^

error: aborting due to previous error

For more information about this error, try `rustc --explain E0106`.
error: could not compile `ownership`

To learn more, run the command again with --verbose.
This error message refers to a feature we haven’t covered yet: lifetimes. We’ll discuss lifetimes in detail in Chapter 10. But, if you disregard the parts about lifetimes, the message does contain the key to why this code is a problem:
this function's return type contains a borrowed value, but there is no value
for it to be borrowed from.
Let’s take a closer look at exactly what’s happening at each stage of our
dangle code:
Filename: src/main.rs
fn main() {
    let reference_to_nothing = dangle();
}

fn dangle() -> &String { // dangle returns a reference to a String

    let s = String::from("hello"); // s is a new String

    &s // we return a reference to the String, s
} // Here, s goes out of scope, and is dropped. Its memory goes away.
  // Danger!
Because s is created inside dangle, when the code of dangle is finished,
s will be deallocated. But we tried to return a reference to it. That means
this reference would be pointing to an invalid String. That’s no good! Rust
won’t let us do this.
The solution here is to return the String directly:
fn main() {
    let string = no_dangle();
}

fn no_dangle() -> String {
    let s = String::from("hello");

    s
}
This works without any problems. Ownership is moved out, and nothing is deallocated.
The Rules of References
Let’s recap what we’ve discussed about references:
- At any given time, you can have either one mutable reference or any number of immutable references.
- References must always be valid.
Next, we’ll look at a different kind of reference: slices.
The Slice Type
Another data type that does not have ownership is the slice. Slices let you reference a contiguous sequence of elements in a collection rather than the whole collection.
Here’s a small programming problem: write a function that takes a string and returns the first word it finds in that string. If the function doesn’t find a space in the string, the whole string must be one word, so the entire string should be returned.
Let’s think about the signature of this function:
fn first_word(s: &String) -> ?
This function, first_word, has a &String as a parameter. We don’t want
ownership, so this is fine. But what should we return? We don’t really have a
way to talk about part of a string. However, we could return the index of the
end of the word. Let’s try that, as shown in Listing 4-7.
Filename: src/main.rs
fn first_word(s: &String) -> usize {
    let bytes = s.as_bytes();

    for (i, &item) in bytes.iter().enumerate() {
        if item == b' ' {
            return i;
        }
    }

    s.len()
}

fn main() {}
Listing 4-7: The first_word function that returns a
byte index value into the String parameter
Because we need to go through the String element by element and check whether
a value is a space, we’ll convert our String to an array of bytes using the
as_bytes method:
fn first_word(s: &String) -> usize {
    let bytes = s.as_bytes();

    for (i, &item) in bytes.iter().enumerate() {
        if item == b' ' {
            return i;
        }
    }

    s.len()
}

fn main() {}
Next, we create an iterator over the array of bytes using the iter method:
fn first_word(s: &String) -> usize {
    let bytes = s.as_bytes();

    for (i, &item) in bytes.iter().enumerate() {
        if item == b' ' {
            return i;
        }
    }

    s.len()
}

fn main() {}
We’ll discuss iterators in more detail in Chapter 13. For now, know that iter
is a method that returns each element in a collection and that enumerate
wraps the result of iter and returns each element as part of a tuple instead.
The first element of the tuple returned from enumerate is the index, and the
second element is a reference to the element. This is a bit more convenient
than calculating the index ourselves.
Because the enumerate method returns a tuple, we can use patterns to
destructure that tuple, just like everywhere else in Rust. So in the for
loop, we specify a pattern that has i for the index in the tuple and &item
for the single byte in the tuple. Because we get a reference to the element
from .iter().enumerate(), we use & in the pattern.
Inside the for loop, we search for the byte that represents the space by
using the byte literal syntax. If we find a space, we return the position.
Otherwise, we return the length of the string by using s.len():
fn first_word(s: &String) -> usize {
    let bytes = s.as_bytes();

    for (i, &item) in bytes.iter().enumerate() {
        if item == b' ' {
            return i;
        }
    }

    s.len()
}

fn main() {}
We now have a way to find out the index of the end of the first word in the
string, but there’s a problem. We’re returning a usize on its own, but it’s
only a meaningful number in the context of the &String. In other words,
because it’s a separate value from the String, there’s no guarantee that it
will still be valid in the future. Consider the program in Listing 4-8 that
uses the first_word function from Listing 4-7.
Filename: src/main.rs
fn first_word(s: &String) -> usize {
    let bytes = s.as_bytes();

    for (i, &item) in bytes.iter().enumerate() {
        if item == b' ' {
            return i;
        }
    }

    s.len()
}

fn main() {
    let mut s = String::from("hello world");

    let word = first_word(&s); // word will get the value 5

    s.clear(); // this empties the String, making it equal to ""

    // word still has the value 5 here, but there's no more string that
    // we could meaningfully use the value 5 with. word is now totally invalid!
}
Listing 4-8: Storing the result from calling the
first_word function and then changing the String contents
This program compiles without any errors and would also do so if we used word
after calling s.clear(). Because word isn’t connected to the state of s
at all, word still contains the value 5. We could use that value 5 with
the variable s to try to extract the first word out, but this would be a bug
because the contents of s have changed since we saved 5 in word.
Having to worry about the index in word getting out of sync with the data in
s is tedious and error prone! Managing these indices is even more brittle if
we write a second_word function. Its signature would have to look like this:
fn second_word(s: &String) -> (usize, usize) {
Now we’re tracking a starting and an ending index, and we have even more values that were calculated from data in a particular state but aren’t tied to that state at all. We now have three unrelated variables floating around that need to be kept in sync.
Luckily, Rust has a solution to this problem: string slices.
String Slices
A string slice is a reference to part of a String, and it looks like this:
fn main() {
    let s = String::from("hello world");

    let hello = &s[0..5];
    let world = &s[6..11];
}
This is similar to taking a reference to the whole String but with the extra
[0..5] bit. Rather than a reference to the entire String, it’s a reference
to a portion of the String.
We can create slices using a range within brackets by specifying
[starting_index..ending_index], where starting_index is the first position
in the slice and ending_index is one more than the last position in the
slice. Internally, the slice data structure stores the starting position and
the length of the slice, which corresponds to ending_index minus
starting_index. So in the case of let world = &s[6..11];, world would be
a slice that contains a pointer to the 7th byte (counting from 1) of s with a length value of 5.
Figure 4-6 shows this in a diagram.

Figure 4-6: String slice referring to part of a
String
With Rust’s .. range syntax, if you want to start at the first index (zero),
you can drop the value before the two periods. In other words, these are equal:
#![allow(unused)]
fn main() {
let s = String::from("hello");

let slice = &s[0..2];
let slice = &s[..2];
}
By the same token, if your slice includes the last byte of the String, you
can drop the trailing number. That means these are equal:
#![allow(unused)]
fn main() {
let s = String::from("hello");

let len = s.len();

let slice = &s[3..len];
let slice = &s[3..];
}
You can also drop both values to take a slice of the entire string. So these are equal:
#![allow(unused)]
fn main() {
let s = String::from("hello");

let len = s.len();

let slice = &s[0..len];
let slice = &s[..];
}
Note: String slice range indices must occur at valid UTF-8 character boundaries. If you attempt to create a string slice in the middle of a multibyte character, your program will exit with an error. For the purposes of introducing string slices, we are assuming ASCII only in this section; a more thorough discussion of UTF-8 handling is in the “Storing UTF-8 Encoded Text with Strings” section of Chapter 8.
With all this information in mind, let’s rewrite first_word to return a
slice. The type that signifies “string slice” is written as &str:
Filename: src/main.rs
fn first_word(s: &String) -> &str {
    let bytes = s.as_bytes();

    for (i, &item) in bytes.iter().enumerate() {
        if item == b' ' {
            return &s[0..i];
        }
    }

    &s[..]
}

fn main() {}
We get the index for the end of the word in the same way as we did in Listing 4-7, by looking for the first occurrence of a space. When we find a space, we return a string slice using the start of the string and the index of the space as the starting and ending indices.
Now when we call first_word, we get back a single value that is tied to the
underlying data. The value is made up of a reference to the starting point of
the slice and the number of elements in the slice.
Returning a slice would also work for a second_word function:
fn second_word(s: &String) -> &str {
We now have a straightforward API that’s much harder to mess up, because the
compiler will ensure the references into the String remain valid. Remember
the bug in the program in Listing 4-8, when we got the index to the end of the
first word but then cleared the string so our index was invalid? That code was
logically incorrect but didn’t show any immediate errors. The problems would
show up later if we kept trying to use the first word index with an emptied
string. Slices make this bug impossible and let us know we have a problem with
our code much sooner. Using the slice version of first_word will throw a
compile-time error:
Filename: src/main.rs
fn first_word(s: &String) -> &str {
    let bytes = s.as_bytes();

    for (i, &item) in bytes.iter().enumerate() {
        if item == b' ' {
            return &s[0..i];
        }
    }

    &s[..]
}

fn main() {
    let mut s = String::from("hello world");

    let word = first_word(&s);

    s.clear(); // error!

    println!("the first word is: {}", word);
}
Here’s the compiler error:
$ cargo run
   Compiling ownership v0.1.0 (file:///projects/ownership)
error[E0502]: cannot borrow `s` as mutable because it is also borrowed as immutable
  --> src/main.rs:18:5
   |
16 |     let word = first_word(&s);
   |                           -- immutable borrow occurs here
17 |
18 |     s.clear(); // error!
   |     ^^^^^^^^^ mutable borrow occurs here
19 |
20 |     println!("the first word is: {}", word);
   |                                       ---- immutable borrow later used here

error: aborting due to previous error

For more information about this error, try `rustc --explain E0502`.
error: could not compile `ownership`

To learn more, run the command again with --verbose.
Recall from the borrowing rules that if we have an immutable reference to
something, we cannot also take a mutable reference. Because clear needs to
truncate the String, it needs to get a mutable reference. Rust disallows
this, and compilation fails. Not only has Rust made our API easier to use, but
it has also eliminated an entire class of errors at compile time!
String Literals Are Slices
Recall that we talked about string literals being stored inside the binary. Now that we know about slices, we can properly understand string literals:
#![allow(unused)]
fn main() {
let s = "Hello, world!";
}
The type of s here is &str: it’s a slice pointing to that specific point of
the binary. This is also why string literals are immutable; &str is an
immutable reference.
String Slices as Parameters
Knowing that you can take slices of literals and String values leads us to
one more improvement on first_word, and that’s its signature:
fn first_word(s: &String) -> &str {
A more experienced Rustacean would write the signature shown in Listing 4-9
instead because it allows us to use the same function on both &String values
and &str values.
fn first_word(s: &str) -> &str {
    let bytes = s.as_bytes();

    for (i, &item) in bytes.iter().enumerate() {
        if item == b' ' {
            return &s[0..i];
        }
    }

    &s[..]
}

fn main() {
    let my_string = String::from("hello world");

    // first_word works on slices of `String`s
    let word = first_word(&my_string[..]);

    let my_string_literal = "hello world";

    // first_word works on slices of string literals
    let word = first_word(&my_string_literal[..]);

    // Because string literals *are* string slices already,
    // this works too, without the slice syntax!
    let word = first_word(my_string_literal);
}
Listing 4-9: Improving the first_word function by using
a string slice for the type of the s parameter
If we have a string slice, we can pass that directly. If we have a String, we
can pass a slice of the entire String. Defining a function to take a string
slice instead of a reference to a String makes our API more general and useful
without losing any functionality:
Filename: src/main.rs
fn first_word(s: &str) -> &str {
    let bytes = s.as_bytes();

    for (i, &item) in bytes.iter().enumerate() {
        if item == b' ' {
            return &s[0..i];
        }
    }

    &s[..]
}

fn main() {
    let my_string = String::from("hello world");

    // first_word works on slices of `String`s
    let word = first_word(&my_string[..]);

    let my_string_literal = "hello world";

    // first_word works on slices of string literals
    let word = first_word(&my_string_literal[..]);

    // Because string literals *are* string slices already,
    // this works too, without the slice syntax!
    let word = first_word(my_string_literal);
}
Other Slices
String slices, as you might imagine, are specific to strings. But there’s a more general slice type, too. Consider this array:
#![allow(unused)]
fn main() {
let a = [1, 2, 3, 4, 5];
}
Just as we might want to refer to a part of a string, we might want to refer to part of an array. We’d do so like this:
#![allow(unused)]
fn main() {
let a = [1, 2, 3, 4, 5];

let slice = &a[1..3];

assert_eq!(slice, &[2, 3]);
}
This slice has the type &[i32]. It works the same way as string slices do, by
storing a reference to the first element and a length. You’ll use this kind of
slice for all sorts of other collections. We’ll discuss these collections in
detail when we talk about vectors in Chapter 8.
Summary
The concepts of ownership, borrowing, and slices ensure memory safety in Rust programs at compile time. The Rust language gives you control over your memory usage in the same way as other systems programming languages, but having the owner of data automatically clean up that data when the owner goes out of scope means you don’t have to write and debug extra code to get this control.
Ownership affects how lots of other parts of Rust work, so we’ll talk about
these concepts further throughout the rest of the book. Let’s move on to
Chapter 5 and look at grouping pieces of data together in a struct.
Using Structs to Structure Related Data
A struct, or structure, is a custom data type that lets you name and package together multiple related values that make up a meaningful group. If you’re familiar with an object-oriented language, a struct is like an object’s data attributes. In this chapter, we’ll compare and contrast tuples with structs, demonstrate how to use structs, and discuss how to define methods and associated functions to specify behavior associated with a struct’s data. Structs and enums (discussed in Chapter 6) are the building blocks for creating new types in your program’s domain to take full advantage of Rust’s compile time type checking.
Defining and Instantiating Structs
Structs are similar to tuples, which were discussed in Chapter 3. Like tuples, the pieces of a struct can be different types. Unlike with tuples, you’ll name each piece of data so it’s clear what the values mean. As a result of these names, structs are more flexible than tuples: you don’t have to rely on the order of the data to specify or access the values of an instance.
To define a struct, we enter the keyword struct and name the entire struct. A
struct’s name should describe the significance of the pieces of data being
grouped together. Then, inside curly brackets, we define the names and types of
the pieces of data, which we call fields. For example, Listing 5-1 shows a
struct that stores information about a user account.
struct User {
    username: String,
    email: String,
    sign_in_count: u64,
    active: bool,
}

fn main() {}
Listing 5-1: A User struct definition
To use a struct after we’ve defined it, we create an instance of that struct
by specifying concrete values for each of the fields. We create an instance by
stating the name of the struct and then add curly brackets containing key: value pairs, where the keys are the names of the fields and the values are the
data we want to store in those fields. We don’t have to specify the fields in
the same order in which we declared them in the struct. In other words, the
struct definition is like a general template for the type, and instances fill
in that template with particular data to create values of the type. For
example, we can declare a particular user as shown in Listing 5-2.
struct User {
    username: String,
    email: String,
    sign_in_count: u64,
    active: bool,
}

fn main() {
    let user1 = User {
        email: String::from("someone@example.com"),
        username: String::from("someusername123"),
        active: true,
        sign_in_count: 1,
    };
}
Listing 5-2: Creating an instance of the User
struct
To get a specific value from a struct, we can use dot notation. If we wanted
just this user’s email address, we could use user1.email wherever we wanted
to use this value. If the instance is mutable, we can change a value by using
the dot notation and assigning into a particular field. Listing 5-3 shows how
to change the value in the email field of a mutable User instance.
struct User {
    username: String,
    email: String,
    sign_in_count: u64,
    active: bool,
}

fn main() {
    let mut user1 = User {
        email: String::from("someone@example.com"),
        username: String::from("someusername123"),
        active: true,
        sign_in_count: 1,
    };

    user1.email = String::from("anotheremail@example.com");
}
Listing 5-3: Changing the value in the email field of a
User instance
Note that the entire instance must be mutable; Rust doesn’t allow us to mark only certain fields as mutable. As with any expression, we can construct a new instance of the struct as the last expression in the function body to implicitly return that new instance.
Listing 5-4 shows a build_user function that returns a User instance with
the given email and username. The active field gets the value of true, and
the sign_in_count gets a value of 1.
struct User {
    username: String,
    email: String,
    sign_in_count: u64,
    active: bool,
}

fn build_user(email: String, username: String) -> User {
    User {
        email: email,
        username: username,
        active: true,
        sign_in_count: 1,
    }
}

fn main() {
    let user1 = build_user(
        String::from("someone@example.com"),
        String::from("someusername123"),
    );
}
Listing 5-4: A build_user function that takes an email
and username and returns a User instance
It makes sense to name the function parameters with the same name as the struct
fields, but having to repeat the email and username field names and
variables is a bit tedious. If the struct had more fields, repeating each name
would get even more annoying. Luckily, there’s a convenient shorthand!
Using the Field Init Shorthand when Variables and Fields Have the Same Name
Because the parameter names and the struct field names are exactly the same in
Listing 5-4, we can use the field init shorthand syntax to rewrite
build_user so that it behaves exactly the same but doesn’t have the
repetition of email and username, as shown in Listing 5-5.
struct User {
    username: String,
    email: String,
    sign_in_count: u64,
    active: bool,
}

fn build_user(email: String, username: String) -> User {
    User {
        email,
        username,
        active: true,
        sign_in_count: 1,
    }
}

fn main() {
    let user1 = build_user(
        String::from("someone@example.com"),
        String::from("someusername123"),
    );
}
Listing 5-5: A build_user function that uses field init
shorthand because the email and username parameters have the same name as
struct fields
Here, we’re creating a new instance of the User struct, which has a field
named email. We want to set the email field’s value to the value in the
email parameter of the build_user function. Because the email field and
the email parameter have the same name, we only need to write email rather
than email: email.
Creating Instances From Other Instances With Struct Update Syntax
It’s often useful to create a new instance of a struct that uses most of an old instance’s values but changes some. You’ll do this using struct update syntax.
First, Listing 5-6 shows how we create a new User instance in user2 without
the update syntax. We set new values for email and username but otherwise
use the same values from user1 that we created in Listing 5-2.
struct User {
    username: String,
    email: String,
    sign_in_count: u64,
    active: bool,
}

fn main() {
    let user1 = User {
        email: String::from("someone@example.com"),
        username: String::from("someusername123"),
        active: true,
        sign_in_count: 1,
    };

    let user2 = User {
        email: String::from("another@example.com"),
        username: String::from("anotherusername567"),
        active: user1.active,
        sign_in_count: user1.sign_in_count,
    };
}
Listing 5-6: Creating a new User instance using some of
the values from user1
Using struct update syntax, we can achieve the same effect with less code, as
shown in Listing 5-7. The syntax .. specifies that the remaining fields not
explicitly set should have the same value as the fields in the given instance.
struct User {
    username: String,
    email: String,
    sign_in_count: u64,
    active: bool,
}

fn main() {
    let user1 = User {
        email: String::from("someone@example.com"),
        username: String::from("someusername123"),
        active: true,
        sign_in_count: 1,
    };

    let user2 = User {
        email: String::from("another@example.com"),
        username: String::from("anotherusername567"),
        ..user1
    };
}
Listing 5-7: Using struct update syntax to set new
email and username values for a User instance but use the rest of the
values from the fields of the instance in the user1 variable
The code in Listing 5-7 also creates an instance in user2 that has a
different value for email and username but has the same values for the
active and sign_in_count fields from user1.
Using Tuple Structs without Named Fields to Create Different Types
You can also define structs that look similar to tuples, called tuple structs. Tuple structs have the added meaning the struct name provides but don’t have names associated with their fields; rather, they just have the types of the fields. Tuple structs are useful when you want to give the whole tuple a name and make the tuple be a different type from other tuples, and naming each field as in a regular struct would be verbose or redundant.
To define a tuple struct, start with the struct keyword and the struct name
followed by the types in the tuple. For example, here are definitions and
usages of two tuple structs named Color and Point:
fn main() {
    struct Color(i32, i32, i32);
    struct Point(i32, i32, i32);

    let black = Color(0, 0, 0);
    let origin = Point(0, 0, 0);
}
Note that the black and origin values are different types, because they’re
instances of different tuple structs. Each struct you define is its own type,
even though the fields within the struct have the same types. For example, a
function that takes a parameter of type Color cannot take a Point as an
argument, even though both types are made up of three i32 values. Otherwise,
tuple struct instances behave like tuples: you can destructure them into their
individual pieces, you can use a . followed by the index to access an
individual value, and so on.
Unit-Like Structs Without Any Fields
You can also define structs that don’t have any fields! These are called
unit-like structs because they behave similarly to (), the unit type.
Unit-like structs can be useful in situations in which you need to implement a
trait on some type but don’t have any data that you want to store in the type
itself. We’ll discuss traits in Chapter 10.
Ownership of Struct Data
In the
Userstruct definition in Listing 5-1, we used the ownedStringtype rather than the&strstring slice type. This is a deliberate choice because we want instances of this struct to own all of its data and for that data to be valid for as long as the entire struct is valid.It’s possible for structs to store references to data owned by something else, but to do so requires the use of lifetimes, a Rust feature that we’ll discuss in Chapter 10. Lifetimes ensure that the data referenced by a struct is valid for as long as the struct is. Let’s say you try to store a reference in a struct without specifying lifetimes, like this, which won’t work:
Filename: src/main.rs
struct User {
    username: &str,
    email: &str,
    sign_in_count: u64,
    active: bool,
}

fn main() {
    let user1 = User {
        email: "someone@example.com",
        username: "someusername123",
        active: true,
        sign_in_count: 1,
    };
}
The compiler will complain that it needs lifetime specifiers:
$ cargo run
   Compiling structs v0.1.0 (file:///projects/structs)
error[E0106]: missing lifetime specifier
 --> src/main.rs:2:15
  |
2 |     username: &str,
  |               ^ expected named lifetime parameter
  |
help: consider introducing a named lifetime parameter
  |
1 | struct User<'a> {
2 |     username: &'a str,
  |

error[E0106]: missing lifetime specifier
 --> src/main.rs:3:12
  |
3 |     email: &str,
  |            ^ expected named lifetime parameter
  |
help: consider introducing a named lifetime parameter
  |
1 | struct User<'a> {
2 |     username: &str,
3 |     email: &'a str,
  |

error: aborting due to 2 previous errors

For more information about this error, try `rustc --explain E0106`.
error: could not compile `structs`

To learn more, run the command again with --verbose.
In Chapter 10, we’ll discuss how to fix these errors so you can store references in structs, but for now, we’ll fix errors like these using owned types like
Stringinstead of references like&str.
An Example Program Using Structs
To understand when we might want to use structs, let’s write a program that calculates the area of a rectangle. We’ll start with single variables, and then refactor the program until we’re using structs instead.
Let’s make a new binary project with Cargo called rectangles that will take the width and height of a rectangle specified in pixels and calculate the area of the rectangle. Listing 5-8 shows a short program with one way of doing exactly that in our project’s src/main.rs.
Filename: src/main.rs
fn main() {
    let width1 = 30;
    let height1 = 50;

    println!(
        "The area of the rectangle is {} square pixels.",
        area(width1, height1)
    );
}

fn area(width: u32, height: u32) -> u32 {
    width * height
}
Listing 5-8: Calculating the area of a rectangle specified by separate width and height variables
Now, run this program using cargo run:
$ cargo run
   Compiling rectangles v0.1.0 (file:///projects/rectangles)
    Finished dev [unoptimized + debuginfo] target(s) in 0.42s
     Running `target/debug/rectangles`
The area of the rectangle is 1500 square pixels.
Even though Listing 5-8 works and figures out the area of the rectangle by
calling the area function with each dimension, we can do better. The width
and the height are related to each other because together they describe one
rectangle.
The issue with this code is evident in the signature of area:
fn main() {
    let width1 = 30;
    let height1 = 50;

    println!(
        "The area of the rectangle is {} square pixels.",
        area(width1, height1)
    );
}

fn area(width: u32, height: u32) -> u32 {
    width * height
}
The area function is supposed to calculate the area of one rectangle, but the
function we wrote has two parameters. The parameters are related, but that’s
not expressed anywhere in our program. It would be more readable and more
manageable to group width and height together. We’ve already discussed one way
we might do that in “The Tuple Type” section
of Chapter 3: by using tuples.
Refactoring with Tuples
Listing 5-9 shows another version of our program that uses tuples.
Filename: src/main.rs
fn main() {
    let rect1 = (30, 50);

    println!(
        "The area of the rectangle is {} square pixels.",
        area(rect1)
    );
}

fn area(dimensions: (u32, u32)) -> u32 {
    dimensions.0 * dimensions.1
}
Listing 5-9: Specifying the width and height of the rectangle with a tuple
In one way, this program is better. Tuples let us add a bit of structure, and we’re now passing just one argument. But in another way, this version is less clear: tuples don’t name their elements, so our calculation has become more confusing because we have to index into the parts of the tuple.
It doesn’t matter if we mix up width and height for the area calculation, but
if we want to draw the rectangle on the screen, it would matter! We would have
to keep in mind that width is the tuple index 0 and height is the tuple
index 1. If someone else worked on this code, they would have to figure this
out and keep it in mind as well. It would be easy to forget or mix up these
values and cause errors, because we haven’t conveyed the meaning of our data in
our code.
Refactoring with Structs: Adding More Meaning
We use structs to add meaning by labeling the data. We can transform the tuple we’re using into a data type with a name for the whole as well as names for the parts, as shown in Listing 5-10.
Filename: src/main.rs
struct Rectangle {
    width: u32,
    height: u32,
}

fn main() {
    let rect1 = Rectangle {
        width: 30,
        height: 50,
    };

    println!(
        "The area of the rectangle is {} square pixels.",
        area(&rect1)
    );
}

fn area(rectangle: &Rectangle) -> u32 {
    rectangle.width * rectangle.height
}
Listing 5-10: Defining a Rectangle struct
Here we’ve defined a struct and named it Rectangle. Inside the curly
brackets, we defined the fields as width and height, both of which have
type u32. Then in main, we created a particular instance of Rectangle
that has a width of 30 and a height of 50.
Our area function is now defined with one parameter, which we’ve named
rectangle, whose type is an immutable borrow of a struct Rectangle
instance. As mentioned in Chapter 4, we want to borrow the struct rather than
take ownership of it. This way, main retains its ownership and can continue
using rect1, which is the reason we use the & in the function signature and
where we call the function.
The area function accesses the width and height fields of the Rectangle
instance. Our function signature for area now says exactly what we mean:
calculate the area of Rectangle, using its width and height fields. This
conveys that the width and height are related to each other, and it gives
descriptive names to the values rather than using the tuple index values of 0
and 1. This is a win for clarity.
Adding Useful Functionality with Derived Traits
It’d be nice to be able to print an instance of Rectangle while we’re
debugging our program and see the values for all its fields. Listing 5-11 tries
using the println! macro as we have used in previous chapters. This won’t
work, however.
Filename: src/main.rs
struct Rectangle {
    width: u32,
    height: u32,
}

fn main() {
    let rect1 = Rectangle {
        width: 30,
        height: 50,
    };

    println!("rect1 is {}", rect1);
}
Listing 5-11: Attempting to print a Rectangle
instance
When we compile this code, we get an error with this core message:
error[E0277]: `Rectangle` doesn't implement `std::fmt::Display`
The println! macro can do many kinds of formatting, and by default, the curly
brackets tell println! to use formatting known as Display: output intended
for direct end user consumption. The primitive types we’ve seen so far
implement Display by default, because there’s only one way you’d want to show
a 1 or any other primitive type to a user. But with structs, the way
println! should format the output is less clear because there are more
display possibilities: Do you want commas or not? Do you want to print the
curly brackets? Should all the fields be shown? Due to this ambiguity, Rust
doesn’t try to guess what we want, and structs don’t have a provided
implementation of Display.
If we continue reading the errors, we’ll find this helpful note:
   = help: the trait `std::fmt::Display` is not implemented for `Rectangle`
   = note: in format strings you may be able to use `{:?}` (or {:#?} for pretty-print) instead
Let’s try it! The println! macro call will now look like println!("rect1 is {:?}", rect1);. Putting the specifier :? inside the curly brackets tells
println! we want to use an output format called Debug. The Debug trait
enables us to print our struct in a way that is useful for developers so we can
see its value while we’re debugging our code.
Compile the code with this change. Drat! We still get an error:
error[E0277]: `Rectangle` doesn't implement `Debug`
But again, the compiler gives us a helpful note:
   = help: the trait `Debug` is not implemented for `Rectangle`
   = note: add `#[derive(Debug)]` or manually implement `Debug`
Rust does include functionality to print out debugging information, but we
have to explicitly opt in to make that functionality available for our struct.
To do that, we add the annotation #[derive(Debug)] just before the struct
definition, as shown in Listing 5-12.
Filename: src/main.rs
#[derive(Debug)]
struct Rectangle {
    width: u32,
    height: u32,
}

fn main() {
    let rect1 = Rectangle {
        width: 30,
        height: 50,
    };

    println!("rect1 is {:?}", rect1);
}
Listing 5-12: Adding the annotation to derive the Debug
trait and printing the Rectangle instance using debug formatting
Now when we run the program, we won’t get any errors, and we’ll see the following output:
$ cargo run
   Compiling rectangles v0.1.0 (file:///projects/rectangles)
    Finished dev [unoptimized + debuginfo] target(s) in 0.48s
     Running `target/debug/rectangles`
rect1 is Rectangle { width: 30, height: 50 }
Nice! It’s not the prettiest output, but it shows the values of all the fields
for this instance, which would definitely help during debugging. When we have
larger structs, it’s useful to have output that’s a bit easier to read; in
those cases, we can use {:#?} instead of {:?} in the println! string.
When we use the {:#?} style in the example, the output will look like this:
$ cargo run
   Compiling rectangles v0.1.0 (file:///projects/rectangles)
    Finished dev [unoptimized + debuginfo] target(s) in 0.48s
     Running `target/debug/rectangles`
rect1 is Rectangle {
    width: 30,
    height: 50,
}
Rust has provided a number of traits for us to use with the derive annotation
that can add useful behavior to our custom types. Those traits and their
behaviors are listed in Appendix C. We’ll cover how to
implement these traits with custom behavior as well as how to create your own
traits in Chapter 10.
Our area function is very specific: it only computes the area of rectangles.
It would be helpful to tie this behavior more closely to our Rectangle
struct, because it won’t work with any other type. Let’s look at how we can
continue to refactor this code by turning the area function into an area
method defined on our Rectangle type.
Method Syntax
Methods are similar to functions: they’re declared with the fn keyword and
their name, they can have parameters and a return value, and they contain some
code that is run when they’re called from somewhere else. However, methods are
different from functions in that they’re defined within the context of a struct
(or an enum or a trait object, which we cover in Chapters 6 and 17,
respectively), and their first parameter is always self, which represents the
instance of the struct the method is being called on.
Defining Methods
Let’s change the area function that has a Rectangle instance as a parameter
and instead make an area method defined on the Rectangle struct, as shown
in Listing 5-13.
Filename: src/main.rs
#[derive(Debug)]
struct Rectangle {
    width: u32,
    height: u32,
}

impl Rectangle {
    fn area(&self) -> u32 {
        self.width * self.height
    }
}

fn main() {
    let rect1 = Rectangle {
        width: 30,
        height: 50,
    };

    println!(
        "The area of the rectangle is {} square pixels.",
        rect1.area()
    );
}
Listing 5-13: Defining an area method on the
Rectangle struct
To define the function within the context of Rectangle, we start an impl
(implementation) block. Then we move the area function within the impl
curly brackets and change the first (and in this case, only) parameter to be
self in the signature and everywhere within the body. In main, where we
called the area function and passed rect1 as an argument, we can instead
use method syntax to call the area method on our Rectangle instance.
The method syntax goes after an instance: we add a dot followed by the method
name, parentheses, and any arguments.
In the signature for area, we use &self instead of rectangle: &Rectangle
because Rust knows the type of self is Rectangle due to this method’s being
inside the impl Rectangle context. Note that we still need to use the &
before self, just as we did in &Rectangle. Methods can take ownership of
self, borrow self immutably as we’ve done here, or borrow self mutably,
just as they can any other parameter.
We’ve chosen &self here for the same reason we used &Rectangle in the
function version: we don’t want to take ownership, and we just want to read the
data in the struct, not write to it. If we wanted to change the instance that
we’ve called the method on as part of what the method does, we’d use &mut self as the first parameter. Having a method that takes ownership of the
instance by using just self as the first parameter is rare; this technique is
usually used when the method transforms self into something else and you want
to prevent the caller from using the original instance after the transformation.
The main benefit of using methods instead of functions, in addition to using
method syntax and not having to repeat the type of self in every method’s
signature, is for organization. We’ve put all the things we can do with an
instance of a type in one impl block rather than making future users of our
code search for capabilities of Rectangle in various places in the library we
provide.
Where’s the
->Operator?In C and C++, two different operators are used for calling methods: you use
.if you’re calling a method on the object directly and->if you’re calling the method on a pointer to the object and need to dereference the pointer first. In other words, ifobjectis a pointer,object->something()is similar to(*object).something().Rust doesn’t have an equivalent to the
->operator; instead, Rust has a feature called automatic referencing and dereferencing. Calling methods is one of the few places in Rust that has this behavior.Here’s how it works: when you call a method with
object.something(), Rust automatically adds in&,&mut, or*soobjectmatches the signature of the method. In other words, the following are the same:#![allow(unused)] fn main() { #[derive(Debug,Copy,Clone)] struct Point { x: f64, y: f64, } impl Point { fn distance(&self, other: &Point) -> f64 { let x_squared = f64::powi(other.x - self.x, 2); let y_squared = f64::powi(other.y - self.y, 2); f64::sqrt(x_squared + y_squared) } } let p1 = Point { x: 0.0, y: 0.0 }; let p2 = Point { x: 5.0, y: 6.5 }; p1.distance(&p2); (&p1).distance(&p2); }The first one looks much cleaner. This automatic referencing behavior works because methods have a clear receiver—the type of
self. Given the receiver and name of a method, Rust can figure out definitively whether the method is reading (&self), mutating (&mut self), or consuming (self). The fact that Rust makes borrowing implicit for method receivers is a big part of making ownership ergonomic in practice.
Methods with More Parameters
Let’s practice using methods by implementing a second method on the Rectangle
struct. This time, we want an instance of Rectangle to take another instance
of Rectangle and return true if the second Rectangle can fit completely
within self; otherwise it should return false. That is, we want to be able
to write the program shown in Listing 5-14, once we’ve defined the can_hold
method.
Filename: src/main.rs
fn main() {
    let rect1 = Rectangle {
        width: 30,
        height: 50,
    };
    let rect2 = Rectangle {
        width: 10,
        height: 40,
    };
    let rect3 = Rectangle {
        width: 60,
        height: 45,
    };

    println!("Can rect1 hold rect2? {}", rect1.can_hold(&rect2));
    println!("Can rect1 hold rect3? {}", rect1.can_hold(&rect3));
}
Listing 5-14: Using the as-yet-unwritten can_hold
method
And the expected output would look like the following, because both dimensions
of rect2 are smaller than the dimensions of rect1 but rect3 is wider than
rect1:
Can rect1 hold rect2? true
Can rect1 hold rect3? false
We know we want to define a method, so it will be within the impl Rectangle
block. The method name will be can_hold, and it will take an immutable borrow
of another Rectangle as a parameter. We can tell what the type of the
parameter will be by looking at the code that calls the method:
rect1.can_hold(&rect2) passes in &rect2, which is an immutable borrow to
rect2, an instance of Rectangle. This makes sense because we only need to
read rect2 (rather than write, which would mean we’d need a mutable borrow),
and we want main to retain ownership of rect2 so we can use it again after
calling the can_hold method. The return value of can_hold will be a
Boolean, and the implementation will check whether the width and height of
self are both greater than the width and height of the other Rectangle,
respectively. Let’s add the new can_hold method to the impl block from
Listing 5-13, shown in Listing 5-15.
Filename: src/main.rs
#[derive(Debug)]
struct Rectangle {
    width: u32,
    height: u32,
}

impl Rectangle {
    fn area(&self) -> u32 {
        self.width * self.height
    }

    fn can_hold(&self, other: &Rectangle) -> bool {
        self.width > other.width && self.height > other.height
    }
}

fn main() {
    let rect1 = Rectangle {
        width: 30,
        height: 50,
    };
    let rect2 = Rectangle {
        width: 10,
        height: 40,
    };
    let rect3 = Rectangle {
        width: 60,
        height: 45,
    };

    println!("Can rect1 hold rect2? {}", rect1.can_hold(&rect2));
    println!("Can rect1 hold rect3? {}", rect1.can_hold(&rect3));
}
Listing 5-15: Implementing the can_hold method on
Rectangle that takes another Rectangle instance as a parameter
When we run this code with the main function in Listing 5-14, we’ll get our
desired output. Methods can take multiple parameters that we add to the
signature after the self parameter, and those parameters work just like
parameters in functions.
Associated Functions
Another useful feature of impl blocks is that we’re allowed to define
functions within impl blocks that don’t take self as a parameter. These
are called associated functions because they’re associated with the struct.
They’re still functions, not methods, because they don’t have an instance of
the struct to work with. You’ve already used the String::from associated
function.
Associated functions are often used for constructors that will return a new
instance of the struct. For example, we could provide an associated function
that would have one dimension parameter and use that as both width and height,
thus making it easier to create a square Rectangle rather than having to
specify the same value twice:
Filename: src/main.rs
#[derive(Debug)]
struct Rectangle {
    width: u32,
    height: u32,
}

impl Rectangle {
    fn square(size: u32) -> Rectangle {
        Rectangle {
            width: size,
            height: size,
        }
    }
}

fn main() {
    let sq = Rectangle::square(3);
}
To call this associated function, we use the :: syntax with the struct name;
let sq = Rectangle::square(3); is an example. This function is namespaced by
the struct: the :: syntax is used for both associated functions and
namespaces created by modules. We’ll discuss modules in Chapter 7.
Multiple impl Blocks
Each struct is allowed to have multiple impl blocks. For example, Listing
5-15 is equivalent to the code shown in Listing 5-16, which has each method
in its own impl block.
#[derive(Debug)]
struct Rectangle {
    width: u32,
    height: u32,
}

impl Rectangle {
    fn area(&self) -> u32 {
        self.width * self.height
    }
}

impl Rectangle {
    fn can_hold(&self, other: &Rectangle) -> bool {
        self.width > other.width && self.height > other.height
    }
}

fn main() {
    let rect1 = Rectangle {
        width: 30,
        height: 50,
    };
    let rect2 = Rectangle {
        width: 10,
        height: 40,
    };
    let rect3 = Rectangle {
        width: 60,
        height: 45,
    };

    println!("Can rect1 hold rect2? {}", rect1.can_hold(&rect2));
    println!("Can rect1 hold rect3? {}", rect1.can_hold(&rect3));
}
Listing 5-16: Rewriting Listing 5-15 using multiple impl
blocks
There’s no reason to separate these methods into multiple impl blocks here,
but this is valid syntax. We’ll see a case in which multiple impl blocks are
useful in Chapter 10, where we discuss generic types and traits.
Summary
Structs let you create custom types that are meaningful for your domain. By using structs, you can keep associated pieces of data connected to each other and name each piece to make your code clear. Methods let you specify the behavior that instances of your structs have, and associated functions let you namespace functionality that is particular to your struct without having an instance available.
But structs aren’t the only way you can create custom types: let’s turn to Rust’s enum feature to add another tool to your toolbox.
Enums and Pattern Matching
In this chapter we’ll look at enumerations, also referred to as enums.
Enums allow you to define a type by enumerating its possible variants. First,
we’ll define and use an enum to show how an enum can encode meaning along with
data. Next, we’ll explore a particularly useful enum, called Option, which
expresses that a value can be either something or nothing. Then we’ll look at
how pattern matching in the match expression makes it easy to run different
code for different values of an enum. Finally, we’ll cover how the if let
construct is another convenient and concise idiom available to you to handle
enums in your code.
Enums are a feature in many languages, but their capabilities differ in each language. Rust’s enums are most similar to algebraic data types in functional languages, such as F#, OCaml, and Haskell.
Defining an Enum
Let’s look at a situation we might want to express in code and see why enums are useful and more appropriate than structs in this case. Say we need to work with IP addresses. Currently, two major standards are used for IP addresses: version four and version six. These are the only possibilities for an IP address that our program will come across: we can enumerate all possible variants, which is where enumeration gets its name.
Any IP address can be either a version four or a version six address, but not both at the same time. That property of IP addresses makes the enum data structure appropriate, because enum values can only be one of its variants. Both version four and version six addresses are still fundamentally IP addresses, so they should be treated as the same type when the code is handling situations that apply to any kind of IP address.
We can express this concept in code by defining an IpAddrKind enumeration and
listing the possible kinds an IP address can be, V4 and V6. These are the
variants of the enum:
enum IpAddrKind {
    V4,
    V6,
}

fn main() {
    let four = IpAddrKind::V4;
    let six = IpAddrKind::V6;

    route(IpAddrKind::V4);
    route(IpAddrKind::V6);
}

fn route(ip_kind: IpAddrKind) {}
IpAddrKind is now a custom data type that we can use elsewhere in our code.
Enum Values
We can create instances of each of the two variants of IpAddrKind like this:
enum IpAddrKind {
    V4,
    V6,
}

fn main() {
    let four = IpAddrKind::V4;
    let six = IpAddrKind::V6;

    route(IpAddrKind::V4);
    route(IpAddrKind::V6);
}

fn route(ip_kind: IpAddrKind) {}
Note that the variants of the enum are namespaced under its identifier, and we
use a double colon to separate the two. The reason this is useful is that now
both values IpAddrKind::V4 and IpAddrKind::V6 are of the same type:
IpAddrKind. We can then, for instance, define a function that takes any
IpAddrKind:
enum IpAddrKind {
    V4,
    V6,
}

fn main() {
    let four = IpAddrKind::V4;
    let six = IpAddrKind::V6;

    route(IpAddrKind::V4);
    route(IpAddrKind::V6);
}

fn route(ip_kind: IpAddrKind) {}
And we can call this function with either variant:
enum IpAddrKind {
    V4,
    V6,
}

fn main() {
    let four = IpAddrKind::V4;
    let six = IpAddrKind::V6;

    route(IpAddrKind::V4);
    route(IpAddrKind::V6);
}

fn route(ip_kind: IpAddrKind) {}
Using enums has even more advantages. Thinking more about our IP address type, at the moment we don’t have a way to store the actual IP address data; we only know what kind it is. Given that you just learned about structs in Chapter 5, you might tackle this problem as shown in Listing 6-1.
fn main() {
    enum IpAddrKind {
        V4,
        V6,
    }

    struct IpAddr {
        kind: IpAddrKind,
        address: String,
    }

    let home = IpAddr {
        kind: IpAddrKind::V4,
        address: String::from("127.0.0.1"),
    };

    let loopback = IpAddr {
        kind: IpAddrKind::V6,
        address: String::from("::1"),
    };
}
Listing 6-1: Storing the data and IpAddrKind variant of
an IP address using a struct
Here, we’ve defined a struct IpAddr that has two fields: a kind field that
is of type IpAddrKind (the enum we defined previously) and an address field
of type String. We have two instances of this struct. The first, home, has
the value IpAddrKind::V4 as its kind with associated address data of
127.0.0.1. The second instance, loopback, has the other variant of
IpAddrKind as its kind value, V6, and has address ::1 associated with
it. We’ve used a struct to bundle the kind and address values together, so
now the variant is associated with the value.
We can represent the same concept in a more concise way using just an enum,
rather than an enum inside a struct, by putting data directly into each enum
variant. This new definition of the IpAddr enum says that both V4 and V6
variants will have associated String values:
fn main() { enum IpAddr { V4(String), V6(String), } let home = IpAddr::V4(String::from("127.0.0.1")); let loopback = IpAddr::V6(String::from("::1")); }
We attach data to each variant of the enum directly, so there is no need for an extra struct.
There’s another advantage to using an enum rather than a struct: each variant
can have different types and amounts of associated data. Version four type IP
addresses will always have four numeric components that will have values
between 0 and 255. If we wanted to store V4 addresses as four u8 values but
still express V6 addresses as one String value, we wouldn’t be able to with
a struct. Enums handle this case with ease:
fn main() { enum IpAddr { V4(u8, u8, u8, u8), V6(String), } let home = IpAddr::V4(127, 0, 0, 1); let loopback = IpAddr::V6(String::from("::1")); }
We’ve shown several different ways to define data structures to store version
four and version six IP addresses. However, as it turns out, wanting to store
IP addresses and encode which kind they are is so common that the standard
library has a definition we can use! Let’s look at how
the standard library defines IpAddr: it has the exact enum and variants that
we’ve defined and used, but it embeds the address data inside the variants in
the form of two different structs, which are defined differently for each
variant:
#![allow(unused)] fn main() { struct Ipv4Addr { // --snip-- } struct Ipv6Addr { // --snip-- } enum IpAddr { V4(Ipv4Addr), V6(Ipv6Addr), } }
This code illustrates that you can put any kind of data inside an enum variant: strings, numeric types, or structs, for example. You can even include another enum! Also, standard library types are often not much more complicated than what you might come up with.
Note that even though the standard library contains a definition for IpAddr,
we can still create and use our own definition without conflict because we
haven’t brought the standard library’s definition into our scope. We’ll talk
more about bringing types into scope in Chapter 7.
Let’s look at another example of an enum in Listing 6-2: this one has a wide variety of types embedded in its variants.
enum Message { Quit, Move { x: i32, y: i32 }, Write(String), ChangeColor(i32, i32, i32), } fn main() {}
Listing 6-2: A Message enum whose variants each store
different amounts and types of values
This enum has four variants with different types:
Quithas no data associated with it at all.Moveincludes an anonymous struct inside it.Writeincludes a singleString.ChangeColorincludes threei32values.
Defining an enum with variants such as the ones in Listing 6-2 is similar to
defining different kinds of struct definitions, except the enum doesn’t use the
struct keyword and all the variants are grouped together under the Message
type. The following structs could hold the same data that the preceding enum
variants hold:
struct QuitMessage; // unit struct struct MoveMessage { x: i32, y: i32, } struct WriteMessage(String); // tuple struct struct ChangeColorMessage(i32, i32, i32); // tuple struct fn main() {}
But if we used the different structs, which each have their own type, we
couldn’t as easily define a function to take any of these kinds of messages as
we could with the Message enum defined in Listing 6-2, which is a single type.
There is one more similarity between enums and structs: just as we’re able to
define methods on structs using impl, we’re also able to define methods on
enums. Here’s a method named call that we could define on our Message enum:
fn main() { enum Message { Quit, Move { x: i32, y: i32 }, Write(String), ChangeColor(i32, i32, i32), } impl Message { fn call(&self) { // method body would be defined here } } let m = Message::Write(String::from("hello")); m.call(); }
The body of the method would use self to get the value that we called the
method on. In this example, we’ve created a variable m that has the value
Message::Write(String::from("hello")), and that is what self will be in the
body of the call method when m.call() runs.
Let’s look at another enum in the standard library that is very common and
useful: Option.
The Option Enum and Its Advantages Over Null Values
In the previous section, we looked at how the IpAddr enum let us use Rust’s
type system to encode more information than just the data into our program.
This section explores a case study of Option, which is another enum defined
by the standard library. The Option type is used in many places because it
encodes the very common scenario in which a value could be something or it
could be nothing. Expressing this concept in terms of the type system means the
compiler can check whether you’ve handled all the cases you should be handling;
this functionality can prevent bugs that are extremely common in other
programming languages.
Programming language design is often thought of in terms of which features you include, but the features you exclude are important too. Rust doesn’t have the null feature that many other languages have. Null is a value that means there is no value there. In languages with null, variables can always be in one of two states: null or not-null.
In his 2009 presentation “Null References: The Billion Dollar Mistake,” Tony Hoare, the inventor of null, has this to say:
I call it my billion-dollar mistake. At that time, I was designing the first comprehensive type system for references in an object-oriented language. My goal was to ensure that all use of references should be absolutely safe, with checking performed automatically by the compiler. But I couldn’t resist the temptation to put in a null reference, simply because it was so easy to implement. This has led to innumerable errors, vulnerabilities, and system crashes, which have probably caused a billion dollars of pain and damage in the last forty years.
The problem with null values is that if you try to use a null value as a not-null value, you’ll get an error of some kind. Because this null or not-null property is pervasive, it’s extremely easy to make this kind of error.
However, the concept that null is trying to express is still a useful one: a null is a value that is currently invalid or absent for some reason.
The problem isn’t really with the concept but with the particular
implementation. As such, Rust does not have nulls, but it does have an enum
that can encode the concept of a value being present or absent. This enum is
Option<T>, and it is defined by the standard library
as follows:
#![allow(unused)] fn main() { enum Option<T> { Some(T), None, } }
The Option<T> enum is so useful that it’s even included in the prelude; you
don’t need to bring it into scope explicitly. In addition, so are its variants:
you can use Some and None directly without the Option:: prefix. The
Option<T> enum is still just a regular enum, and Some(T) and None are
still variants of type Option<T>.
The <T> syntax is a feature of Rust we haven’t talked about yet. It’s a
generic type parameter, and we’ll cover generics in more detail in Chapter 10.
For now, all you need to know is that <T> means the Some variant of the
Option enum can hold one piece of data of any type. Here are some examples of
using Option values to hold number types and string types:
fn main() { let some_number = Some(5); let some_string = Some("a string"); let absent_number: Option<i32> = None; }
If we use None rather than Some, we need to tell Rust what type of
Option<T> we have, because the compiler can’t infer the type that the Some
variant will hold by looking only at a None value.
When we have a Some value, we know that a value is present and the value is
held within the Some. When we have a None value, in some sense, it means
the same thing as null: we don’t have a valid value. So why is having
Option<T> any better than having null?
In short, because Option<T> and T (where T can be any type) are different
types, the compiler won’t let us use an Option<T> value as if it were
definitely a valid value. For example, this code won’t compile because it’s
trying to add an i8 to an Option<i8>:
fn main() {
let x: i8 = 5;
let y: Option<i8> = Some(5);
let sum = x + y;
}
If we run this code, we get an error message like this:
$ cargo run
Compiling enums v0.1.0 (file:///projects/enums)
error[E0277]: cannot add `Option<i8>` to `i8`
--> src/main.rs:5:17
|
5 | let sum = x + y;
| ^ no implementation for `i8 + Option<i8>`
|
= help: the trait `Add<Option<i8>>` is not implemented for `i8`
error: aborting due to previous error
For more information about this error, try `rustc --explain E0277`.
error: could not compile `enums`
To learn more, run the command again with --verbose.
Intense! In effect, this error message means that Rust doesn’t understand how
to add an i8 and an Option<i8>, because they’re different types. When we
have a value of a type like i8 in Rust, the compiler will ensure that we
always have a valid value. We can proceed confidently without having to check
for null before using that value. Only when we have an Option<i8> (or
whatever type of value we’re working with) do we have to worry about possibly
not having a value, and the compiler will make sure we handle that case before
using the value.
In other words, you have to convert an Option<T> to a T before you can
perform T operations with it. Generally, this helps catch one of the most
common issues with null: assuming that something isn’t null when it actually
is.
Not having to worry about incorrectly assuming a not-null value helps you to be
more confident in your code. In order to have a value that can possibly be
null, you must explicitly opt in by making the type of that value Option<T>.
Then, when you use that value, you are required to explicitly handle the case
when the value is null. Everywhere that a value has a type that isn’t an
Option<T>, you can safely assume that the value isn’t null. This was a
deliberate design decision for Rust to limit null’s pervasiveness and increase
the safety of Rust code.
So, how do you get the T value out of a Some variant when you have a value
of type Option<T> so you can use that value? The Option<T> enum has a large
number of methods that are useful in a variety of situations; you can check
them out in its documentation. Becoming familiar with
the methods on Option<T> will be extremely useful in your journey with Rust.
In general, in order to use an Option<T> value, you want to have code that
will handle each variant. You want some code that will run only when you have a
Some(T) value, and this code is allowed to use the inner T. You want some
other code to run if you have a None value, and that code doesn’t have a T
value available. The match expression is a control flow construct that does
just this when used with enums: it will run different code depending on which
variant of the enum it has, and that code can use the data inside the matching
value.
The match Control Flow Operator
Rust has an extremely powerful control flow operator called match that allows
you to compare a value against a series of patterns and then execute code based
on which pattern matches. Patterns can be made up of literal values, variable
names, wildcards, and many other things; Chapter 18 covers all the different
kinds of patterns and what they do. The power of match comes from the
expressiveness of the patterns and the fact that the compiler confirms that all
possible cases are handled.
Think of a match expression as being like a coin-sorting machine: coins slide
down a track with variously sized holes along it, and each coin falls through
the first hole it encounters that it fits into. In the same way, values go
through each pattern in a match, and at the first pattern the value “fits,”
the value falls into the associated code block to be used during execution.
Because we just mentioned coins, let’s use them as an example using match! We
can write a function that can take an unknown United States coin and, in a
similar way as the counting machine, determine which coin it is and return its
value in cents, as shown here in Listing 6-3.
enum Coin { Penny, Nickel, Dime, Quarter, } fn value_in_cents(coin: Coin) -> u8 { match coin { Coin::Penny => 1, Coin::Nickel => 5, Coin::Dime => 10, Coin::Quarter => 25, } } fn main() {}
Listing 6-3: An enum and a match expression that has
the variants of the enum as its patterns
Let’s break down the match in the value_in_cents function. First, we list
the match keyword followed by an expression, which in this case is the value
coin. This seems very similar to an expression used with if, but there’s a
big difference: with if, the expression needs to return a Boolean value, but
here, it can be any type. The type of coin in this example is the Coin enum
that we defined on line 1.
Next are the match arms. An arm has two parts: a pattern and some code. The
first arm here has a pattern that is the value Coin::Penny and then the =>
operator that separates the pattern and the code to run. The code in this case
is just the value 1. Each arm is separated from the next with a comma.
When the match expression executes, it compares the resulting value against
the pattern of each arm, in order. If a pattern matches the value, the code
associated with that pattern is executed. If that pattern doesn’t match the
value, execution continues to the next arm, much as in a coin-sorting machine.
We can have as many arms as we need: in Listing 6-3, our match has four arms.
The code associated with each arm is an expression, and the resulting value of
the expression in the matching arm is the value that gets returned for the
entire match expression.
Curly brackets typically aren’t used if the match arm code is short, as it is
in Listing 6-3 where each arm just returns a value. If you want to run multiple
lines of code in a match arm, you can use curly brackets. For example, the
following code would print “Lucky penny!” every time the method was called with
a Coin::Penny but would still return the last value of the block, 1:
enum Coin { Penny, Nickel, Dime, Quarter, } fn value_in_cents(coin: Coin) -> u8 { match coin { Coin::Penny => { println!("Lucky penny!"); 1 } Coin::Nickel => 5, Coin::Dime => 10, Coin::Quarter => 25, } } fn main() {}
Patterns that Bind to Values
Another useful feature of match arms is that they can bind to the parts of the values that match the pattern. This is how we can extract values out of enum variants.
As an example, let’s change one of our enum variants to hold data inside it.
From 1999 through 2008, the United States minted quarters with different
designs for each of the 50 states on one side. No other coins got state
designs, so only quarters have this extra value. We can add this information to
our enum by changing the Quarter variant to include a UsState value stored
inside it, which we’ve done here in Listing 6-4.
#[derive(Debug)] // so we can inspect the state in a minute enum UsState { Alabama, Alaska, // --snip-- } enum Coin { Penny, Nickel, Dime, Quarter(UsState), } fn main() {}
Listing 6-4: A Coin enum in which the Quarter variant
also holds a UsState value
Let’s imagine that a friend of ours is trying to collect all 50 state quarters. While we sort our loose change by coin type, we’ll also call out the name of the state associated with each quarter so if it’s one our friend doesn’t have, they can add it to their collection.
In the match expression for this code, we add a variable called state to the
pattern that matches values of the variant Coin::Quarter. When a
Coin::Quarter matches, the state variable will bind to the value of that
quarter’s state. Then we can use state in the code for that arm, like so:
#[derive(Debug)] enum UsState { Alabama, Alaska, // --snip-- } enum Coin { Penny, Nickel, Dime, Quarter(UsState), } fn value_in_cents(coin: Coin) -> u8 { match coin { Coin::Penny => 1, Coin::Nickel => 5, Coin::Dime => 10, Coin::Quarter(state) => { println!("State quarter from {:?}!", state); 25 } } } fn main() { value_in_cents(Coin::Quarter(UsState::Alaska)); }
If we were to call value_in_cents(Coin::Quarter(UsState::Alaska)), coin
would be Coin::Quarter(UsState::Alaska). When we compare that value with each
of the match arms, none of them match until we reach Coin::Quarter(state). At
that point, the binding for state will be the value UsState::Alaska. We can
then use that binding in the println! expression, thus getting the inner
state value out of the Coin enum variant for Quarter.
Matching with Option<T>
In the previous section, we wanted to get the inner T value out of the Some
case when using Option<T>; we can also handle Option<T> using match as we
did with the Coin enum! Instead of comparing coins, we’ll compare the
variants of Option<T>, but the way that the match expression works remains
the same.
Let’s say we want to write a function that takes an Option<i32> and, if
there’s a value inside, adds 1 to that value. If there isn’t a value inside,
the function should return the None value and not attempt to perform any
operations.
This function is very easy to write, thanks to match, and will look like
Listing 6-5.
fn main() { fn plus_one(x: Option<i32>) -> Option<i32> { match x { None => None, Some(i) => Some(i + 1), } } let five = Some(5); let six = plus_one(five); let none = plus_one(None); }
Listing 6-5: A function that uses a match expression on
an Option<i32>
Let’s examine the first execution of plus_one in more detail. When we call
plus_one(five), the variable x in the body of plus_one will have the
value Some(5). We then compare that against each match arm.
fn main() {
fn plus_one(x: Option<i32>) -> Option<i32> {
match x {
None => None,
Some(i) => Some(i + 1),
}
}
let five = Some(5);
let six = plus_one(five);
let none = plus_one(None);
}
The Some(5) value doesn’t match the pattern None, so we continue to the
next arm.
fn main() {
fn plus_one(x: Option<i32>) -> Option<i32> {
match x {
None => None,
Some(i) => Some(i + 1),
}
}
let five = Some(5);
let six = plus_one(five);
let none = plus_one(None);
}
Does Some(5) match Some(i)? Why yes it does! We have the same variant. The
i binds to the value contained in Some, so i takes the value 5. The
code in the match arm is then executed, so we add 1 to the value of i and
create a new Some value with our total 6 inside.
Now let’s consider the second call of plus_one in Listing 6-5, where x is
None. We enter the match and compare to the first arm.
fn main() {
fn plus_one(x: Option<i32>) -> Option<i32> {
match x {
None => None,
Some(i) => Some(i + 1),
}
}
let five = Some(5);
let six = plus_one(five);
let none = plus_one(None);
}
It matches! There’s no value to add to, so the program stops and returns the
None value on the right side of =>. Because the first arm matched, no other
arms are compared.
Combining match and enums is useful in many situations. You’ll see this
pattern a lot in Rust code: match against an enum, bind a variable to the
data inside, and then execute code based on it. It’s a bit tricky at first, but
once you get used to it, you’ll wish you had it in all languages. It’s
consistently a user favorite.
Matches Are Exhaustive
There’s one other aspect of match we need to discuss. Consider this version
of our plus_one function that has a bug and won’t compile:
fn main() {
fn plus_one(x: Option<i32>) -> Option<i32> {
match x {
Some(i) => Some(i + 1),
}
}
let five = Some(5);
let six = plus_one(five);
let none = plus_one(None);
}
We didn’t handle the None case, so this code will cause a bug. Luckily, it’s
a bug Rust knows how to catch. If we try to compile this code, we’ll get this
error:
$ cargo run
Compiling enums v0.1.0 (file:///projects/enums)
error[E0004]: non-exhaustive patterns: `None` not covered
--> src/main.rs:3:15
|
3 | match x {
| ^ pattern `None` not covered
|
= help: ensure that all possible cases are being handled, possibly by adding wildcards or more match arms
= note: the matched value is of type `Option<i32>`
error: aborting due to previous error
For more information about this error, try `rustc --explain E0004`.
error: could not compile `enums`
To learn more, run the command again with --verbose.
Rust knows that we didn’t cover every possible case and even knows which
pattern we forgot! Matches in Rust are exhaustive: we must exhaust every last
possibility in order for the code to be valid. Especially in the case of
Option<T>, when Rust prevents us from forgetting to explicitly handle the
None case, it protects us from assuming that we have a value when we might
have null, thus making the billion-dollar mistake discussed earlier impossible.
The _ Placeholder
Rust also has a pattern we can use when we don’t want to list all possible
values. For example, a u8 can have valid values of 0 through 255. If we only
care about the values 1, 3, 5, and 7, we don’t want to have to list out 0, 2,
4, 6, 8, 9 all the way up to 255. Fortunately, we don’t have to: we can use the
special pattern _ instead:
fn main() { let some_u8_value = 0u8; match some_u8_value { 1 => println!("one"), 3 => println!("three"), 5 => println!("five"), 7 => println!("seven"), _ => (), } }
The _ pattern will match any value. By putting it after our other arms, the
_ will match all the possible cases that aren’t specified before it. The ()
is just the unit value, so nothing will happen in the _ case. As a result, we
can say that we want to do nothing for all the possible values that we don’t
list before the _ placeholder.
However, the match expression can be a bit wordy in a situation in which we
care about only one of the cases. For this situation, Rust provides if let.
More about patterns and matching can be found in chapter 18.
Concise Control Flow with if let
The if let syntax lets you combine if and let into a less verbose way to
handle values that match one pattern while ignoring the rest. Consider the
program in Listing 6-6 that matches on an Option<u8> value but only wants to
execute code if the value is 3.
fn main() { let some_u8_value = Some(0u8); match some_u8_value { Some(3) => println!("three"), _ => (), } }
Listing 6-6: A match that only cares about executing
code when the value is Some(3)
We want to do something with the Some(3) match but do nothing with any other
Some<u8> value or the None value. To satisfy the match expression, we
have to add _ => () after processing just one variant, which is a lot of
boilerplate code to add.
Instead, we could write this in a shorter way using if let. The following
code behaves the same as the match in Listing 6-6:
fn main() { let some_u8_value = Some(0u8); if let Some(3) = some_u8_value { println!("three"); } }
The syntax if let takes a pattern and an expression separated by an equal
sign. It works the same way as a match, where the expression is given to the
match and the pattern is its first arm.
Using if let means less typing, less indentation, and less boilerplate code.
However, you lose the exhaustive checking that match enforces. Choosing
between match and if let depends on what you’re doing in your particular
situation and whether gaining conciseness is an appropriate trade-off for
losing exhaustive checking.
In other words, you can think of if let as syntax sugar for a match that
runs code when the value matches one pattern and then ignores all other values.
We can include an else with an if let. The block of code that goes with the
else is the same as the block of code that would go with the _ case in the
match expression that is equivalent to the if let and else. Recall the
Coin enum definition in Listing 6-4, where the Quarter variant also held a
UsState value. If we wanted to count all non-quarter coins we see while also
announcing the state of the quarters, we could do that with a match
expression like this:
#[derive(Debug)] enum UsState { Alabama, Alaska, // --snip-- } enum Coin { Penny, Nickel, Dime, Quarter(UsState), } fn main() { let coin = Coin::Penny; let mut count = 0; match coin { Coin::Quarter(state) => println!("State quarter from {:?}!", state), _ => count += 1, } }
Or we could use an if let and else expression like this:
#[derive(Debug)] enum UsState { Alabama, Alaska, // --snip-- } enum Coin { Penny, Nickel, Dime, Quarter(UsState), } fn main() { let coin = Coin::Penny; let mut count = 0; if let Coin::Quarter(state) = coin { println!("State quarter from {:?}!", state); } else { count += 1; } }
If you have a situation in which your program has logic that is too verbose to
express using a match, remember that if let is in your Rust toolbox as well.
Summary
We’ve now covered how to use enums to create custom types that can be one of a
set of enumerated values. We’ve shown how the standard library’s Option<T>
type helps you use the type system to prevent errors. When enum values have
data inside them, you can use match or if let to extract and use those
values, depending on how many cases you need to handle.
Your Rust programs can now express concepts in your domain using structs and enums. Creating custom types to use in your API ensures type safety: the compiler will make certain your functions get only values of the type each function expects.
In order to provide a well-organized API to your users that is straightforward to use and only exposes exactly what your users will need, let’s now turn to Rust’s modules.
Managing Growing Projects with Packages, Crates, and Modules
As you write large programs, organizing your code will be important because keeping track of your entire program in your head will become impossible. By grouping related functionality and separating code with distinct features, you’ll clarify where to find code that implements a particular feature and where to go to change how a feature works.
The programs we’ve written so far have been in one module in one file. As a project grows, you can organize code by splitting it into multiple modules and then multiple files. A package can contain multiple binary crates and optionally one library crate. As a package grows, you can extract parts into separate crates that become external dependencies. This chapter covers all these techniques. For very large projects of a set of interrelated packages that evolve together, Cargo provides workspaces, which we’ll cover in the “Cargo Workspaces” section in Chapter 14.
In addition to grouping functionality, encapsulating implementation details lets you reuse code at a higher level: once you’ve implemented an operation, other code can call that code via the code’s public interface without knowing how the implementation works. The way you write code defines which parts are public for other code to use and which parts are private implementation details that you reserve the right to change. This is another way to limit the amount of detail you have to keep in your head.
A related concept is scope: the nested context in which code is written has a set of names that are defined as “in scope.” When reading, writing, and compiling code, programmers and compilers need to know whether a particular name at a particular spot refers to a variable, function, struct, enum, module, constant, or other item and what that item means. You can create scopes and change which names are in or out of scope. You can’t have two items with the same name in the same scope; tools are available to resolve name conflicts.
Rust has a number of features that allow you to manage your code’s organization, including which details are exposed, which details are private, and what names are in each scope in your programs. These features, sometimes collectively referred to as the module system, include:
- Packages: A Cargo feature that lets you build, test, and share crates
- Crates: A tree of modules that produces a library or executable
- Modules and use: Let you control the organization, scope, and privacy of paths
- Paths: A way of naming an item, such as a struct, function, or module
In this chapter, we’ll cover all these features, discuss how they interact, and explain how to use them to manage scope. By the end, you should have a solid understanding of the module system and be able to work with scopes like a pro!
Packages and Crates
The first parts of the module system we’ll cover are packages and crates. A crate is a binary or library. The crate root is a source file that the Rust compiler starts from and makes up the root module of your crate (we’ll explain modules in depth in the “Defining Modules to Control Scope and Privacy” section). A package is one or more crates that provide a set of functionality. A package contains a Cargo.toml file that describes how to build those crates.
Several rules determine what a package can contain. A package must contain zero or one library crates, and no more. It can contain as many binary crates as you’d like, but it must contain at least one crate (either library or binary).
Let’s walk through what happens when we create a package. First, we enter the
command cargo new:
$ cargo new my-project
Created binary (application) `my-project` package
$ ls my-project
Cargo.toml
src
$ ls my-project/src
main.rs
When we entered the command, Cargo created a Cargo.toml file, giving us a
package. Looking at the contents of Cargo.toml, there’s no mention of
src/main.rs because Cargo follows a convention that src/main.rs is the
crate root of a binary crate with the same name as the package. Likewise, Cargo
knows that if the package directory contains src/lib.rs, the package contains
a library crate with the same name as the package, and src/lib.rs is its
crate root. Cargo passes the crate root files to rustc to build the library
or binary.
Here, we have a package that only contains src/main.rs, meaning it only
contains a binary crate named my-project. If a package contains src/main.rs
and src/lib.rs, it has two crates: a library and a binary, both with the same
name as the package. A package can have multiple binary crates by placing files
in the src/bin directory: each file will be a separate binary crate.
A crate will group related functionality together in a scope so the
functionality is easy to share between multiple projects. For example, the
rand crate we used in Chapter 2 provides functionality
that generates random numbers. We can use that functionality in our own
projects by bringing the rand crate into our project’s scope. All the
functionality provided by the rand crate is accessible through the crate’s
name, rand.
Keeping a crate’s functionality in its own scope clarifies whether particular
functionality is defined in our crate or the rand crate and prevents
potential conflicts. For example, the rand crate provides a trait named
Rng. We can also define a struct named Rng in our own crate. Because a
crate’s functionality is namespaced in its own scope, when we add rand as a
dependency, the compiler isn’t confused about what the name Rng refers to. In
our crate, it refers to the struct Rng that we defined. We would access the
Rng trait from the rand crate as rand::Rng.
Let’s move on and talk about the module system!
Defining Modules to Control Scope and Privacy
In this section, we’ll talk about modules and other parts of the module system,
namely paths that allow you to name items; the use keyword that brings a
path into scope; and the pub keyword to make items public. We’ll also discuss
the as keyword, external packages, and the glob operator. For now, let’s
focus on modules!
Modules let us organize code within a crate into groups for readability and easy reuse. Modules also control the privacy of items, which is whether an item can be used by outside code (public) or is an internal implementation detail and not available for outside use (private).
As an example, let’s write a library crate that provides the functionality of a restaurant. We’ll define the signatures of functions but leave their bodies empty to concentrate on the organization of the code, rather than actually implement a restaurant in code.
In the restaurant industry, some parts of a restaurant are referred to as front of house and others as back of house. Front of house is where customers are; this is where hosts seat customers, servers take orders and payment, and bartenders make drinks. Back of house is where the chefs and cooks work in the kitchen, dishwashers clean up, and managers do administrative work.
To structure our crate in the same way that a real restaurant works, we can
organize the functions into nested modules. Create a new library named
restaurant by running cargo new --lib restaurant; then put the code in
Listing 7-1 into src/lib.rs to define some modules and function signatures.
Filename: src/lib.rs
mod front_of_house {
mod hosting {
fn add_to_waitlist() {}
fn seat_at_table() {}
}
mod serving {
fn take_order() {}
fn serve_order() {}
fn take_payment() {}
}
}
Listing 7-1: A front_of_house module containing other
modules that then contain functions
We define a module by starting with the mod keyword and then specify the
name of the module (in this case, front_of_house) and place curly brackets
around the body of the module. Inside modules, we can have other modules, as in
this case with the modules hosting and serving. Modules can also hold
definitions for other items, such as structs, enums, constants, traits, or—as
in Listing 7-1—functions.
By using modules, we can group related definitions together and name why they’re related. Programmers using this code would have an easier time finding the definitions they wanted to use because they could navigate the code based on the groups rather than having to read through all the definitions. Programmers adding new functionality to this code would know where to place the code to keep the program organized.
Earlier, we mentioned that src/main.rs and src/lib.rs are called crate
roots. The reason for their name is that the contents of either of these two
files form a module named crate at the root of the crate’s module structure,
known as the module tree.
Listing 7-2 shows the module tree for the structure in Listing 7-1.
crate
└── front_of_house
├── hosting
│ ├── add_to_waitlist
│ └── seat_at_table
└── serving
├── take_order
├── serve_order
└── take_payment
Listing 7-2: The module tree for the code in Listing 7-1
This tree shows how some of the modules nest inside one another (for example,
hosting nests inside front_of_house). The tree also shows that some modules
are siblings to each other, meaning they’re defined in the same module
(hosting and serving are defined within front_of_house). To continue the
family metaphor, if module A is contained inside module B, we say that module A
is the child of module B and that module B is the parent of module A.
Notice that the entire module tree is rooted under the implicit module named
crate.
The module tree might remind you of the filesystem’s directory tree on your computer; this is a very apt comparison! Just like directories in a filesystem, you use modules to organize your code. And just like files in a directory, we need a way to find our modules.
Paths for Referring to an Item in the Module Tree
To show Rust where to find an item in a module tree, we use a path in the same way we use a path when navigating a filesystem. If we want to call a function, we need to know its path.
A path can take two forms:
- An absolute path starts from a crate root by using a crate name or a
literal
crate. - A relative path starts from the current module and uses
self,super, or an identifier in the current module.
Both absolute and relative paths are followed by one or more identifiers
separated by double colons (::).
Let’s return to the example in Listing 7-1. How do we call the
add_to_waitlist function? This is the same as asking, what’s the path of the
add_to_waitlist function? In Listing 7-3, we simplified our code a bit by
removing some of the modules and functions. We’ll show two ways to call the
add_to_waitlist function from a new function eat_at_restaurant defined in
the crate root. The eat_at_restaurant function is part of our library crate’s
public API, so we mark it with the pub keyword. In the ”Exposing Paths with
the pub Keyword” section, we’ll go into more detail
about pub. Note that this example won’t compile just yet; we’ll explain why
in a bit.
Filename: src/lib.rs
mod front_of_house {
mod hosting {
fn add_to_waitlist() {}
}
}
pub fn eat_at_restaurant() {
// Absolute path
crate::front_of_house::hosting::add_to_waitlist();
// Relative path
front_of_house::hosting::add_to_waitlist();
}
Listing 7-3: Calling the add_to_waitlist function using
absolute and relative paths
The first time we call the add_to_waitlist function in eat_at_restaurant,
we use an absolute path. The add_to_waitlist function is defined in the same
crate as eat_at_restaurant, which means we can use the crate keyword to
start an absolute path.
After crate, we include each of the successive modules until we make our way
to add_to_waitlist. You can imagine a filesystem with the same structure, and
we’d specify the path /front_of_house/hosting/add_to_waitlist to run the
add_to_waitlist program; using the crate name to start from the crate root
is like using / to start from the filesystem root in your shell.
The second time we call add_to_waitlist in eat_at_restaurant, we use a
relative path. The path starts with front_of_house, the name of the module
defined at the same level of the module tree as eat_at_restaurant. Here the
filesystem equivalent would be using the path
front_of_house/hosting/add_to_waitlist. Starting with a name means that the
path is relative.
Choosing whether to use a relative or absolute path is a decision you’ll make
based on your project. The decision should depend on whether you’re more likely
to move item definition code separately from or together with the code that
uses the item. For example, if we move the front_of_house module and the
eat_at_restaurant function into a module named customer_experience, we’d
need to update the absolute path to add_to_waitlist, but the relative path
would still be valid. However, if we moved the eat_at_restaurant function
separately into a module named dining, the absolute path to the
add_to_waitlist call would stay the same, but the relative path would need to
be updated. Our preference is to specify absolute paths because it’s more
likely to move code definitions and item calls independently of each other.
Let’s try to compile Listing 7-3 and find out why it won’t compile yet! The error we get is shown in Listing 7-4.
$ cargo build
Compiling restaurant v0.1.0 (file:///projects/restaurant)
error[E0603]: module `hosting` is private
--> src/lib.rs:9:28
|
9 | crate::front_of_house::hosting::add_to_waitlist();
| ^^^^^^^ private module
|
note: the module `hosting` is defined here
--> src/lib.rs:2:5
|
2 | mod hosting {
| ^^^^^^^^^^^
error[E0603]: module `hosting` is private
--> src/lib.rs:12:21
|
12 | front_of_house::hosting::add_to_waitlist();
| ^^^^^^^ private module
|
note: the module `hosting` is defined here
--> src/lib.rs:2:5
|
2 | mod hosting {
| ^^^^^^^^^^^
error: aborting due to 2 previous errors
For more information about this error, try `rustc --explain E0603`.
error: could not compile `restaurant`
To learn more, run the command again with --verbose.
Listing 7-4: Compiler errors from building the code in Listing 7-3
The error messages say that module hosting is private. In other words, we
have the correct paths for the hosting module and the add_to_waitlist
function, but Rust won’t let us use them because it doesn’t have access to the
private sections.
Modules aren’t useful only for organizing your code. They also define Rust’s privacy boundary: the line that encapsulates the implementation details external code isn’t allowed to know about, call, or rely on. So, if you want to make an item like a function or struct private, you put it in a module.
The way privacy works in Rust is that all items (functions, methods, structs, enums, modules, and constants) are private by default. Items in a parent module can’t use the private items inside child modules, but items in child modules can use the items in their ancestor modules. The reason is that child modules wrap and hide their implementation details, but the child modules can see the context in which they’re defined. To continue with the restaurant metaphor, think of the privacy rules as being like the back office of a restaurant: what goes on in there is private to restaurant customers, but office managers can see and do everything in the restaurant in which they operate.
Rust chose to have the module system function this way so that hiding inner
implementation details is the default. That way, you know which parts of the
inner code you can change without breaking outer code. But you can expose inner
parts of child modules' code to outer ancestor modules by using the pub
keyword to make an item public.
Exposing Paths with the pub Keyword
Let’s return to the error in Listing 7-4 that told us the hosting module is
private. We want the eat_at_restaurant function in the parent module to have
access to the add_to_waitlist function in the child module, so we mark the
hosting module with the pub keyword, as shown in Listing 7-5.
Filename: src/lib.rs
mod front_of_house {
pub mod hosting {
fn add_to_waitlist() {}
}
}
pub fn eat_at_restaurant() {
// Absolute path
crate::front_of_house::hosting::add_to_waitlist();
// Relative path
front_of_house::hosting::add_to_waitlist();
}
Listing 7-5: Declaring the hosting module as pub to
use it from eat_at_restaurant
Unfortunately, the code in Listing 7-5 still results in an error, as shown in Listing 7-6.
$ cargo build
Compiling restaurant v0.1.0 (file:///projects/restaurant)
error[E0603]: function `add_to_waitlist` is private
--> src/lib.rs:9:37
|
9 | crate::front_of_house::hosting::add_to_waitlist();
| ^^^^^^^^^^^^^^^ private function
|
note: the function `add_to_waitlist` is defined here
--> src/lib.rs:3:9
|
3 | fn add_to_waitlist() {}
| ^^^^^^^^^^^^^^^^^^^^
error[E0603]: function `add_to_waitlist` is private
--> src/lib.rs:12:30
|
12 | front_of_house::hosting::add_to_waitlist();
| ^^^^^^^^^^^^^^^ private function
|
note: the function `add_to_waitlist` is defined here
--> src/lib.rs:3:9
|
3 | fn add_to_waitlist() {}
| ^^^^^^^^^^^^^^^^^^^^
error: aborting due to 2 previous errors
For more information about this error, try `rustc --explain E0603`.
error: could not compile `restaurant`
To learn more, run the command again with --verbose.
Listing 7-6: Compiler errors from building the code in Listing 7-5
What happened? Adding the pub keyword in front of mod hosting makes the
module public. With this change, if we can access front_of_house, we can
access hosting. But the contents of hosting are still private; making the
module public doesn’t make its contents public. The pub keyword on a module
only lets code in its ancestor modules refer to it.
The errors in Listing 7-6 say that the add_to_waitlist function is private.
The privacy rules apply to structs, enums, functions, and methods as well as
modules.
Let’s also make the add_to_waitlist function public by adding the pub
keyword before its definition, as in Listing 7-7.
Filename: src/lib.rs
mod front_of_house {
pub mod hosting {
pub fn add_to_waitlist() {}
}
}
pub fn eat_at_restaurant() {
// Absolute path
crate::front_of_house::hosting::add_to_waitlist();
// Relative path
front_of_house::hosting::add_to_waitlist();
}
Listing 7-7: Adding the pub keyword to mod hosting
and fn add_to_waitlist lets us call the function from
eat_at_restaurant
Now the code will compile! Let’s look at the absolute and the relative path and
double-check why adding the pub keyword lets us use these paths in
add_to_waitlist with respect to the privacy rules.
In the absolute path, we start with crate, the root of our crate’s module
tree. Then the front_of_house module is defined in the crate root. The
front_of_house module isn’t public, but because the eat_at_restaurant
function is defined in the same module as front_of_house (that is,
eat_at_restaurant and front_of_house are siblings), we can refer to
front_of_house from eat_at_restaurant. Next is the hosting module marked
with pub. We can access the parent module of hosting, so we can access
hosting. Finally, the add_to_waitlist function is marked with pub and we
can access its parent module, so this function call works!
In the relative path, the logic is the same as the absolute path except for the
first step: rather than starting from the crate root, the path starts from
front_of_house. The front_of_house module is defined within the same module
as eat_at_restaurant, so the relative path starting from the module in which
eat_at_restaurant is defined works. Then, because hosting and
add_to_waitlist are marked with pub, the rest of the path works, and this
function call is valid!
Starting Relative Paths with super
We can also construct relative paths that begin in the parent module by using
super at the start of the path. This is like starting a filesystem path with
the .. syntax. Why would we want to do this?
Consider the code in Listing 7-8 that models the situation in which a chef
fixes an incorrect order and personally brings it out to the customer. The
function fix_incorrect_order calls the function serve_order by specifying
the path to serve_order starting with super:
Filename: src/lib.rs
fn serve_order() {}
mod back_of_house {
fn fix_incorrect_order() {
cook_order();
super::serve_order();
}
fn cook_order() {}
}
Listing 7-8: Calling a function using a relative path
starting with super
The fix_incorrect_order function is in the back_of_house module, so we can
use super to go to the parent module of back_of_house, which in this case
is crate, the root. From there, we look for serve_order and find it.
Success! We think the back_of_house module and the serve_order function are
likely to stay in the same relationship to each other and get moved together
should we decide to reorganize the crate’s module tree. Therefore, we used
super so we’ll have fewer places to update code in the future if this code
gets moved to a different module.
Making Structs and Enums Public
We can also use pub to designate structs and enums as public, but there are a
few extra details. If we use pub before a struct definition, we make the
struct public, but the struct’s fields will still be private. We can make each
field public or not on a case-by-case basis. In Listing 7-9, we’ve defined a
public back_of_house::Breakfast struct with a public toast field but a
private seasonal_fruit field. This models the case in a restaurant where the
customer can pick the type of bread that comes with a meal, but the chef
decides which fruit accompanies the meal based on what’s in season and in
stock. The available fruit changes quickly, so customers can’t choose the fruit
or even see which fruit they’ll get.
Filename: src/lib.rs
mod back_of_house {
pub struct Breakfast {
pub toast: String,
seasonal_fruit: String,
}
impl Breakfast {
pub fn summer(toast: &str) -> Breakfast {
Breakfast {
toast: String::from(toast),
seasonal_fruit: String::from("peaches"),
}
}
}
}
pub fn eat_at_restaurant() {
// Order a breakfast in the summer with Rye toast
let mut meal = back_of_house::Breakfast::summer("Rye");
// Change our mind about what bread we'd like
meal.toast = String::from("Wheat");
println!("I'd like {} toast please", meal.toast);
// The next line won't compile if we uncomment it; we're not allowed
// to see or modify the seasonal fruit that comes with the meal
// meal.seasonal_fruit = String::from("blueberries");
}
Listing 7-9: A struct with some public fields and some private fields
Because the toast field in the back_of_house::Breakfast struct is public,
in eat_at_restaurant we can write and read to the toast field using dot
notation. Notice that we can’t use the seasonal_fruit field in
eat_at_restaurant because seasonal_fruit is private. Try uncommenting the
line modifying the seasonal_fruit field value to see what error you get!
Also, note that because back_of_house::Breakfast has a private field, the
struct needs to provide a public associated function that constructs an
instance of Breakfast (we’ve named it summer here). If Breakfast didn’t
have such a function, we couldn’t create an instance of Breakfast in
eat_at_restaurant because we couldn’t set the value of the private
seasonal_fruit field in eat_at_restaurant.
In contrast, if we make an enum public, all of its variants are then public. We
only need the pub before the enum keyword, as shown in Listing 7-10.
Filename: src/lib.rs
mod back_of_house {
pub enum Appetizer {
Soup,
Salad,
}
}
pub fn eat_at_restaurant() {
let order1 = back_of_house::Appetizer::Soup;
let order2 = back_of_house::Appetizer::Salad;
}
Listing 7-10: Designating an enum as public makes all its variants public
Because we made the Appetizer enum public, we can use the Soup and Salad
variants in eat_at_restaurant. Enums aren’t very useful unless their variants
are public; it would be annoying to have to annotate all enum variants with
pub in every case, so the default for enum variants is to be public. Structs
are often useful without their fields being public, so struct fields follow the
general rule of everything being private by default unless annotated with pub.
There’s one more situation involving pub that we haven’t covered, and that is
our last module system feature: the use keyword. We’ll cover use by itself
first, and then we’ll show how to combine pub and use.
Bringing Paths into Scope with the use Keyword
It might seem like the paths we’ve written to call functions so far are
inconveniently long and repetitive. For example, in Listing 7-7, whether we
chose the absolute or relative path to the add_to_waitlist function, every
time we wanted to call add_to_waitlist we had to specify front_of_house and
hosting too. Fortunately, there’s a way to simplify this process. We can
bring a path into a scope once and then call the items in that path as if
they’re local items with the use keyword.
In Listing 7-11, we bring the crate::front_of_house::hosting module into the
scope of the eat_at_restaurant function so we only have to specify
hosting::add_to_waitlist to call the add_to_waitlist function in
eat_at_restaurant.
Filename: src/lib.rs
mod front_of_house {
pub mod hosting {
pub fn add_to_waitlist() {}
}
}
use crate::front_of_house::hosting;
pub fn eat_at_restaurant() {
hosting::add_to_waitlist();
hosting::add_to_waitlist();
hosting::add_to_waitlist();
}
Listing 7-11: Bringing a module into scope with
use
Adding use and a path in a scope is similar to creating a symbolic link in
the filesystem. By adding use crate::front_of_house::hosting in the crate
root, hosting is now a valid name in that scope, just as though the hosting
module had been defined in the crate root. Paths brought into scope with use
also check privacy, like any other paths.
You can also bring an item into scope with use and a relative path. Listing
7-12 shows how to specify a relative path to get the same behavior as in
Listing 7-11.
Filename: src/lib.rs
mod front_of_house {
pub mod hosting {
pub fn add_to_waitlist() {}
}
}
use self::front_of_house::hosting;
pub fn eat_at_restaurant() {
hosting::add_to_waitlist();
hosting::add_to_waitlist();
hosting::add_to_waitlist();
}
Listing 7-12: Bringing a module into scope with use and
a relative path
Creating Idiomatic use Paths
In Listing 7-11, you might have wondered why we specified use crate::front_of_house::hosting and then called hosting::add_to_waitlist in
eat_at_restaurant rather than specifying the use path all the way out to
the add_to_waitlist function to achieve the same result, as in Listing 7-13.
Filename: src/lib.rs
mod front_of_house {
pub mod hosting {
pub fn add_to_waitlist() {}
}
}
use crate::front_of_house::hosting::add_to_waitlist;
pub fn eat_at_restaurant() {
add_to_waitlist();
add_to_waitlist();
add_to_waitlist();
}
Listing 7-13: Bringing the add_to_waitlist function
into scope with use, which is unidiomatic
Although both Listing 7-11 and 7-13 accomplish the same task, Listing 7-11 is
the idiomatic way to bring a function into scope with use. Bringing the
function’s parent module into scope with use so we have to specify the parent
module when calling the function makes it clear that the function isn’t locally
defined while still minimizing repetition of the full path. The code in Listing
7-13 is unclear as to where add_to_waitlist is defined.
On the other hand, when bringing in structs, enums, and other items with use,
it’s idiomatic to specify the full path. Listing 7-14 shows the idiomatic way
to bring the standard library’s HashMap struct into the scope of a binary
crate.
Filename: src/main.rs
use std::collections::HashMap; fn main() { let mut map = HashMap::new(); map.insert(1, 2); }
Listing 7-14: Bringing HashMap into scope in an
idiomatic way
There’s no strong reason behind this idiom: it’s just the convention that has emerged, and folks have gotten used to reading and writing Rust code this way.
The exception to this idiom is if we’re bringing two items with the same name
into scope with use statements, because Rust doesn’t allow that. Listing 7-15
shows how to bring two Result types into scope that have the same name but
different parent modules and how to refer to them.
Filename: src/lib.rs
use std::fmt;
use std::io;
fn function1() -> fmt::Result {
// --snip--
Ok(())
}
fn function2() -> io::Result<()> {
// --snip--
Ok(())
}
Listing 7-15: Bringing two types with the same name into the same scope requires using their parent modules.
As you can see, using the parent modules distinguishes the two Result types.
If instead we specified use std::fmt::Result and use std::io::Result, we’d
have two Result types in the same scope and Rust wouldn’t know which one we
meant when we used Result.
Providing New Names with the as Keyword
There’s another solution to the problem of bringing two types of the same name
into the same scope with use: after the path, we can specify as and a new
local name, or alias, for the type. Listing 7-16 shows another way to write the
code in Listing 7-15 by renaming one of the two Result types using as.
Filename: src/lib.rs
use std::fmt::Result;
use std::io::Result as IoResult;
fn function1() -> Result {
// --snip--
Ok(())
}
fn function2() -> IoResult<()> {
// --snip--
Ok(())
}
Listing 7-16: Renaming a type when it’s brought into
scope with the as keyword
In the second use statement, we chose the new name IoResult for the
std::io::Result type, which won’t conflict with the Result from std::fmt
that we’ve also brought into scope. Listing 7-15 and Listing 7-16 are
considered idiomatic, so the choice is up to you!
Re-exporting Names with pub use
When we bring a name into scope with the use keyword, the name available in
the new scope is private. To enable the code that calls our code to refer to
that name as if it had been defined in that code’s scope, we can combine pub
and use. This technique is called re-exporting because we’re bringing
an item into scope but also making that item available for others to bring into
their scope.
Listing 7-17 shows the code in Listing 7-11 with use in the root module
changed to pub use.
Filename: src/lib.rs
mod front_of_house {
pub mod hosting {
pub fn add_to_waitlist() {}
}
}
pub use crate::front_of_house::hosting;
pub fn eat_at_restaurant() {
hosting::add_to_waitlist();
hosting::add_to_waitlist();
hosting::add_to_waitlist();
}
Listing 7-17: Making a name available for any code to use
from a new scope with pub use
By using pub use, external code can now call the add_to_waitlist function
using hosting::add_to_waitlist. If we hadn’t specified pub use, the
eat_at_restaurant function could call hosting::add_to_waitlist in its
scope, but external code couldn’t take advantage of this new path.
Re-exporting is useful when the internal structure of your code is different
from how programmers calling your code would think about the domain. For
example, in this restaurant metaphor, the people running the restaurant think
about “front of house” and “back of house.” But customers visiting a restaurant
probably won’t think about the parts of the restaurant in those terms. With
pub use, we can write our code with one structure but expose a different
structure. Doing so makes our library well organized for programmers working on
the library and programmers calling the library.
Using External Packages
In Chapter 2, we programmed a guessing game project that used an external
package called rand to get random numbers. To use rand in our project, we
added this line to Cargo.toml:
Filename: Cargo.toml
[dependencies]
rand = "0.8.3"
Adding rand as a dependency in Cargo.toml tells Cargo to download the
rand package and any dependencies from crates.io and
make rand available to our project.
Then, to bring rand definitions into the scope of our package, we added a
use line starting with the name of the crate, rand, and listed the items
we wanted to bring into scope. Recall that in the “Generating a Random
Number” section in Chapter 2, we brought the Rng trait
into scope and called the rand::thread_rng function:
use std::io;
use rand::Rng;
fn main() {
println!("Guess the number!");
let secret_number = rand::thread_rng().gen_range(1..101);
println!("The secret number is: {}", secret_number);
println!("Please input your guess.");
let mut guess = String::new();
io::stdin()
.read_line(&mut guess)
.expect("Failed to read line");
println!("You guessed: {}", guess);
}
Members of the Rust community have made many packages available at
crates.io, and pulling any of them into your package
involves these same steps: listing them in your package’s Cargo.toml file and
using use to bring items from their crates into scope.
Note that the standard library (std) is also a crate that’s external to our
package. Because the standard library is shipped with the Rust language, we
don’t need to change Cargo.toml to include std. But we do need to refer to
it with use to bring items from there into our package’s scope. For example,
with HashMap we would use this line:
#![allow(unused)] fn main() { use std::collections::HashMap; }
This is an absolute path starting with std, the name of the standard library
crate.
Using Nested Paths to Clean Up Large use Lists
If we’re using multiple items defined in the same crate or same module,
listing each item on its own line can take up a lot of vertical space in our
files. For example, these two use statements we had in the Guessing Game in
Listing 2-4 bring items from std into scope:
Filename: src/main.rs
use rand::Rng;
// --snip--
use std::cmp::Ordering;
use std::io;
// --snip--
fn main() {
println!("Guess the number!");
let secret_number = rand::thread_rng().gen_range(1..101);
println!("The secret number is: {}", secret_number);
println!("Please input your guess.");
let mut guess = String::new();
io::stdin()
.read_line(&mut guess)
.expect("Failed to read line");
println!("You guessed: {}", guess);
match guess.cmp(&secret_number) {
Ordering::Less => println!("Too small!"),
Ordering::Greater => println!("Too big!"),
Ordering::Equal => println!("You win!"),
}
}
Instead, we can use nested paths to bring the same items into scope in one line. We do this by specifying the common part of the path, followed by two colons, and then curly brackets around a list of the parts of the paths that differ, as shown in Listing 7-18.
Filename: src/main.rs
use rand::Rng;
// --snip--
use std::{cmp::Ordering, io};
// --snip--
fn main() {
println!("Guess the number!");
let secret_number = rand::thread_rng().gen_range(1..101);
println!("The secret number is: {}", secret_number);
println!("Please input your guess.");
let mut guess = String::new();
io::stdin()
.read_line(&mut guess)
.expect("Failed to read line");
let guess: u32 = guess.trim().parse().expect("Please type a number!");
println!("You guessed: {}", guess);
match guess.cmp(&secret_number) {
Ordering::Less => println!("Too small!"),
Ordering::Greater => println!("Too big!"),
Ordering::Equal => println!("You win!"),
}
}
Listing 7-18: Specifying a nested path to bring multiple items with the same prefix into scope
In bigger programs, bringing many items into scope from the same crate or
module using nested paths can reduce the number of separate use statements
needed by a lot!
We can use a nested path at any level in a path, which is useful when combining
two use statements that share a subpath. For example, Listing 7-19 shows two
use statements: one that brings std::io into scope and one that brings
std::io::Write into scope.
Filename: src/lib.rs
use std::io;
use std::io::Write;
Listing 7-19: Two use statements where one is a subpath
of the other
The common part of these two paths is std::io, and that’s the complete first
path. To merge these two paths into one use statement, we can use self in
the nested path, as shown in Listing 7-20.
Filename: src/lib.rs
use std::io::{self, Write};
Listing 7-20: Combining the paths in Listing 7-19 into
one use statement
This line brings std::io and std::io::Write into scope.
The Glob Operator
If we want to bring all public items defined in a path into scope, we can
specify that path followed by *, the glob operator:
#![allow(unused)] fn main() { use std::collections::*; }
This use statement brings all public items defined in std::collections into
the current scope. Be careful when using the glob operator! Glob can make it
harder to tell what names are in scope and where a name used in your program
was defined.
The glob operator is often used when testing to bring everything under test
into the tests module; we’ll talk about that in the “How to Write
Tests” section in Chapter 11. The glob operator
is also sometimes used as part of the prelude pattern: see the standard
library documentation
for more information on that pattern.
Separating Modules into Different Files
So far, all the examples in this chapter defined multiple modules in one file. When modules get large, you might want to move their definitions to a separate file to make the code easier to navigate.
For example, let’s start from the code in Listing 7-17 and move the
front_of_house module to its own file src/front_of_house.rs by changing the
crate root file so it contains the code shown in Listing 7-21. In this case,
the crate root file is src/lib.rs, but this procedure also works with binary
crates whose crate root file is src/main.rs.
Filename: src/lib.rs
mod front_of_house;
pub use crate::front_of_house::hosting;
pub fn eat_at_restaurant() {
hosting::add_to_waitlist();
hosting::add_to_waitlist();
hosting::add_to_waitlist();
}
Listing 7-21: Declaring the front_of_house module whose
body will be in src/front_of_house.rs
And src/front_of_house.rs gets the definitions from the body of the
front_of_house module, as shown in Listing 7-22.
Filename: src/front_of_house.rs
pub mod hosting {
pub fn add_to_waitlist() {}
}
Listing 7-22: Definitions inside the front_of_house
module in src/front_of_house.rs
Using a semicolon after mod front_of_house rather than using a block tells
Rust to load the contents of the module from another file with the same name as
the module. To continue with our example and extract the hosting module to
its own file as well, we change src/front_of_house.rs to contain only the
declaration of the hosting module:
Filename: src/front_of_house.rs
pub mod hosting;
Then we create a src/front_of_house directory and a file
src/front_of_house/hosting.rs to contain the definitions made in the
hosting module:
Filename: src/front_of_house/hosting.rs
#![allow(unused)] fn main() { pub fn add_to_waitlist() {} }
The module tree remains the same, and the function calls in eat_at_restaurant
will work without any modification, even though the definitions live in
different files. This technique lets you move modules to new files as they grow
in size.
Note that the pub use crate::front_of_house::hosting statement in
src/lib.rs also hasn’t changed, nor does use have any impact on what files
are compiled as part of the crate. The mod keyword declares modules, and Rust
looks in a file with the same name as the module for the code that goes into
that module.
Summary
Rust lets you split a package into multiple crates and a crate into modules
so you can refer to items defined in one module from another module. You can do
this by specifying absolute or relative paths. These paths can be brought into
scope with a use statement so you can use a shorter path for multiple uses of
the item in that scope. Module code is private by default, but you can make
definitions public by adding the pub keyword.
In the next chapter, we’ll look at some collection data structures in the standard library that you can use in your neatly organized code.
Common Collections
Rust’s standard library includes a number of very useful data structures called collections. Most other data types represent one specific value, but collections can contain multiple values. Unlike the built-in array and tuple types, the data these collections point to is stored on the heap, which means the amount of data does not need to be known at compile time and can grow or shrink as the program runs. Each kind of collection has different capabilities and costs, and choosing an appropriate one for your current situation is a skill you’ll develop over time. In this chapter, we’ll discuss three collections that are used very often in Rust programs:
- A vector allows you to store a variable number of values next to each other.
- A string is a collection of characters. We’ve mentioned the
Stringtype previously, but in this chapter we’ll talk about it in depth. - A hash map allows you to associate a value with a particular key. It’s a particular implementation of the more general data structure called a map.
To learn about the other kinds of collections provided by the standard library, see the documentation.
We’ll discuss how to create and update vectors, strings, and hash maps, as well as what makes each special.
Storing Lists of Values with Vectors
The first collection type we’ll look at is Vec<T>, also known as a vector.
Vectors allow you to store more than one value in a single data structure that
puts all the values next to each other in memory. Vectors can only store values
of the same type. They are useful when you have a list of items, such as the
lines of text in a file or the prices of items in a shopping cart.
Creating a New Vector
To create a new, empty vector, we can call the Vec::new function, as shown in
Listing 8-1.
fn main() { let v: Vec<i32> = Vec::new(); }
Listing 8-1: Creating a new, empty vector to hold values
of type i32
Note that we added a type annotation here. Because we aren’t inserting any
values into this vector, Rust doesn’t know what kind of elements we intend to
store. This is an important point. Vectors are implemented using generics;
we’ll cover how to use generics with your own types in Chapter 10. For now,
know that the Vec<T> type provided by the standard library can hold any type,
and when a specific vector holds a specific type, the type is specified within
angle brackets. In Listing 8-1, we’ve told Rust that the Vec<T> in v will
hold elements of the i32 type.
In more realistic code, Rust can often infer the type of value you want to
store once you insert values, so you rarely need to do this type annotation.
It’s more common to create a Vec<T> that has initial values, and Rust
provides the vec! macro for convenience. The macro will create a new vector
that holds the values you give it. Listing 8-2 creates a new Vec<i32> that
holds the values 1, 2, and 3. The integer type is i32 because that’s
the default integer type, as we discussed in the “Data Types” section of Chapter 3.
fn main() { let v = vec![1, 2, 3]; }
Listing 8-2: Creating a new vector containing values
Because we’ve given initial i32 values, Rust can infer that the type of v
is Vec<i32>, and the type annotation isn’t necessary. Next, we’ll look at how
to modify a vector.
Updating a Vector
To create a vector and then add elements to it, we can use the push method,
as shown in Listing 8-3.
fn main() { let mut v = Vec::new(); v.push(5); v.push(6); v.push(7); v.push(8); }
Listing 8-3: Using the push method to add values to a
vector
As with any variable, if we want to be able to change its value, we need to
make it mutable using the mut keyword, as discussed in Chapter 3. The numbers
we place inside are all of type i32, and Rust infers this from the data, so
we don’t need the Vec<i32> annotation.
Dropping a Vector Drops Its Elements
Like any other struct, a vector is freed when it goes out of scope, as
annotated in Listing 8-4.
fn main() { { let v = vec![1, 2, 3, 4]; // do stuff with v } // <- v goes out of scope and is freed here }
Listing 8-4: Showing where the vector and its elements are dropped
When the vector gets dropped, all of its contents are also dropped, meaning those integers it holds will be cleaned up. This may seem like a straightforward point but can get a bit more complicated when you start to introduce references to the elements of the vector. Let’s tackle that next!
Reading Elements of Vectors
Now that you know how to create, update, and destroy vectors, knowing how to read their contents is a good next step. There are two ways to reference a value stored in a vector. In the examples, we’ve annotated the types of the values that are returned from these functions for extra clarity.
Listing 8-5 shows both methods of accessing a value in a vector, either with
indexing syntax or the get method.
fn main() { let v = vec![1, 2, 3, 4, 5]; let third: &i32 = &v[2]; println!("The third element is {}", third); match v.get(2) { Some(third) => println!("The third element is {}", third), None => println!("There is no third element."), } }
Listing 8-5: Using indexing syntax or the get method to
access an item in a vector
Note two details here. First, we use the index value of 2 to get the third
element: vectors are indexed by number, starting at zero. Second, the two ways
to get the third element are by using & and [], which gives us a reference,
or by using the get method with the index passed as an argument, which gives
us an Option<&T>.
Rust has two ways to reference an element so you can choose how the program behaves when you try to use an index value that the vector doesn’t have an element for. As an example, let’s see what a program will do if it has a vector that holds five elements and then tries to access an element at index 100, as shown in Listing 8-6.
fn main() { let v = vec![1, 2, 3, 4, 5]; let does_not_exist = &v[100]; let does_not_exist = v.get(100); }
Listing 8-6: Attempting to access the element at index 100 in a vector containing five elements
When we run this code, the first [] method will cause the program to panic
because it references a nonexistent element. This method is best used when you
want your program to crash if there’s an attempt to access an element past the
end of the vector.
When the get method is passed an index that is outside the vector, it returns
None without panicking. You would use this method if accessing an element
beyond the range of the vector happens occasionally under normal circumstances.
Your code will then have logic to handle having either Some(&element) or
None, as discussed in Chapter 6. For example, the index could be coming from
a person entering a number. If they accidentally enter a number that’s too
large and the program gets a None value, you could tell the user how many
items are in the current vector and give them another chance to enter a valid
value. That would be more user-friendly than crashing the program due to a typo!
When the program has a valid reference, the borrow checker enforces the ownership and borrowing rules (covered in Chapter 4) to ensure this reference and any other references to the contents of the vector remain valid. Recall the rule that states you can’t have mutable and immutable references in the same scope. That rule applies in Listing 8-7, where we hold an immutable reference to the first element in a vector and try to add an element to the end, which won’t work if we also try to refer to that element later in the function:
fn main() {
let mut v = vec![1, 2, 3, 4, 5];
let first = &v[0];
v.push(6);
println!("The first element is: {}", first);
}
Listing 8-7: Attempting to add an element to a vector while holding a reference to an item
Compiling this code will result in this error:
$ cargo run
Compiling collections v0.1.0 (file:///projects/collections)
error[E0502]: cannot borrow `v` as mutable because it is also borrowed as immutable
--> src/main.rs:6:5
|
4 | let first = &v[0];
| - immutable borrow occurs here
5 |
6 | v.push(6);
| ^^^^^^^^^ mutable borrow occurs here
7 |
8 | println!("The first element is: {}", first);
| ----- immutable borrow later used here
error: aborting due to previous error
For more information about this error, try `rustc --explain E0502`.
error: could not compile `collections`
To learn more, run the command again with --verbose.
The code in Listing 8-7 might look like it should work: why should a reference to the first element care about what changes at the end of the vector? This error is due to the way vectors work: adding a new element onto the end of the vector might require allocating new memory and copying the old elements to the new space, if there isn’t enough room to put all the elements next to each other where the vector currently is. In that case, the reference to the first element would be pointing to deallocated memory. The borrowing rules prevent programs from ending up in that situation.
Note: For more on the implementation details of the
Vec<T>type, see “The Rustonomicon”.
Iterating over the Values in a Vector
If we want to access each element in a vector in turn, we can iterate through
all of the elements rather than use indices to access one at a time. Listing
8-8 shows how to use a for loop to get immutable references to each element
in a vector of i32 values and print them.
fn main() { let v = vec![100, 32, 57]; for i in &v { println!("{}", i); } }
Listing 8-8: Printing each element in a vector by
iterating over the elements using a for loop
We can also iterate over mutable references to each element in a mutable vector
in order to make changes to all the elements. The for loop in Listing 8-9
will add 50 to each element.
fn main() { let mut v = vec![100, 32, 57]; for i in &mut v { *i += 50; } }
Listing 8-9: Iterating over mutable references to elements in a vector
To change the value that the mutable reference refers to, we have to use the
dereference operator (*) to get to the value in i before we can use the
+= operator. We’ll talk more about the dereference operator in the
“Following the Pointer to the Value with the Dereference Operator”
section of Chapter 15.
Using an Enum to Store Multiple Types
At the beginning of this chapter, we said that vectors can only store values that are the same type. This can be inconvenient; there are definitely use cases for needing to store a list of items of different types. Fortunately, the variants of an enum are defined under the same enum type, so when we need to store elements of a different type in a vector, we can define and use an enum!
For example, say we want to get values from a row in a spreadsheet in which some of the columns in the row contain integers, some floating-point numbers, and some strings. We can define an enum whose variants will hold the different value types, and then all the enum variants will be considered the same type: that of the enum. Then we can create a vector that holds that enum and so, ultimately, holds different types. We’ve demonstrated this in Listing 8-10.
fn main() { enum SpreadsheetCell { Int(i32), Float(f64), Text(String), } let row = vec![ SpreadsheetCell::Int(3), SpreadsheetCell::Text(String::from("blue")), SpreadsheetCell::Float(10.12), ]; }
Listing 8-10: Defining an enum to store values of
different types in one vector
Rust needs to know what types will be in the vector at compile time so it knows
exactly how much memory on the heap will be needed to store each element. A
secondary advantage is that we can be explicit about what types are allowed in
this vector. If Rust allowed a vector to hold any type, there would be a chance
that one or more of the types would cause errors with the operations performed
on the elements of the vector. Using an enum plus a match expression means
that Rust will ensure at compile time that every possible case is handled, as
discussed in Chapter 6.
When you’re writing a program, if you don’t know the exhaustive set of types the program will get at runtime to store in a vector, the enum technique won’t work. Instead, you can use a trait object, which we’ll cover in Chapter 17.
Now that we’ve discussed some of the most common ways to use vectors, be sure
to review the API documentation for all the many useful methods defined on
Vec<T> by the standard library. For example, in addition to push, a pop
method removes and returns the last element. Let’s move on to the next
collection type: String!
Storing UTF-8 Encoded Text with Strings
We talked about strings in Chapter 4, but we’ll look at them in more depth now. New Rustaceans commonly get stuck on strings for a combination of three reasons: Rust’s propensity for exposing possible errors, strings being a more complicated data structure than many programmers give them credit for, and UTF-8. These factors combine in a way that can seem difficult when you’re coming from other programming languages.
It’s useful to discuss strings in the context of collections because strings
are implemented as a collection of bytes, plus some methods to provide useful
functionality when those bytes are interpreted as text. In this section, we’ll
talk about the operations on String that every collection type has, such as
creating, updating, and reading. We’ll also discuss the ways in which String
is different from the other collections, namely how indexing into a String is
complicated by the differences between how people and computers interpret
String data.
What Is a String?
We’ll first define what we mean by the term string. Rust has only one string
type in the core language, which is the string slice str that is usually seen
in its borrowed form &str. In Chapter 4, we talked about string slices,
which are references to some UTF-8 encoded string data stored elsewhere. String
literals, for example, are stored in the program’s binary and are therefore
string slices.
The String type, which is provided by Rust’s standard library rather than
coded into the core language, is a growable, mutable, owned, UTF-8 encoded
string type. When Rustaceans refer to “strings” in Rust, they usually mean the
String and the string slice &str types, not just one of those types.
Although this section is largely about String, both types are used heavily in
Rust’s standard library, and both String and string slices are UTF-8 encoded.
Rust’s standard library also includes a number of other string types, such as
OsString, OsStr, CString, and CStr. Library crates can provide even
more options for storing string data. See how those names all end in String
or Str? They refer to owned and borrowed variants, just like the String and
str types you’ve seen previously. These string types can store text in
different encodings or be represented in memory in a different way, for
example. We won’t discuss these other string types in this chapter; see their
API documentation for more about how to use them and when each is appropriate.
Creating a New String
Many of the same operations available with Vec<T> are available with String
as well, starting with the new function to create a string, shown in Listing
8-11.
fn main() { let mut s = String::new(); }
Listing 8-11: Creating a new, empty String
This line creates a new empty string called s, which we can then load data
into. Often, we’ll have some initial data that we want to start the string
with. For that, we use the to_string method, which is available on any type
that implements the Display trait, as string literals do. Listing 8-12 shows
two examples.
fn main() { let data = "initial contents"; let s = data.to_string(); // the method also works on a literal directly: let s = "initial contents".to_string(); }
Listing 8-12: Using the to_string method to create a
String from a string literal
This code creates a string containing initial contents.
We can also use the function String::from to create a String from a string
literal. The code in Listing 8-13 is equivalent to the code from Listing 8-12
that uses to_string.
fn main() { let s = String::from("initial contents"); }
Listing 8-13: Using the String::from function to create
a String from a string literal
Because strings are used for so many things, we can use many different generic
APIs for strings, providing us with a lot of options. Some of them can seem
redundant, but they all have their place! In this case, String::from and
to_string do the same thing, so which you choose is a matter of style.
Remember that strings are UTF-8 encoded, so we can include any properly encoded data in them, as shown in Listing 8-14.
fn main() { let hello = String::from("السلام عليكم"); let hello = String::from("Dobrý den"); let hello = String::from("Hello"); let hello = String::from("שָׁלוֹם"); let hello = String::from("नमस्ते"); let hello = String::from("こんにちは"); let hello = String::from("안녕하세요"); let hello = String::from("你好"); let hello = String::from("Olá"); let hello = String::from("Здравствуйте"); let hello = String::from("Hola"); }
Listing 8-14: Storing greetings in different languages in strings
All of these are valid String values.
Updating a String
A String can grow in size and its contents can change, just like the contents
of a Vec<T>, if you push more data into it. In addition, you can conveniently
use the + operator or the format! macro to concatenate String values.
Appending to a String with push_str and push
We can grow a String by using the push_str method to append a string slice,
as shown in Listing 8-15.
fn main() { let mut s = String::from("foo"); s.push_str("bar"); }
Listing 8-15: Appending a string slice to a String
using the push_str method
After these two lines, s will contain foobar. The push_str method takes a
string slice because we don’t necessarily want to take ownership of the
parameter. For example, the code in Listing 8-16 shows that it would be
unfortunate if we weren’t able to use s2 after appending its contents to s1.
fn main() { let mut s1 = String::from("foo"); let s2 = "bar"; s1.push_str(s2); println!("s2 is {}", s2); }
Listing 8-16: Using a string slice after appending its
contents to a String
If the push_str method took ownership of s2, we wouldn’t be able to print
its value on the last line. However, this code works as we’d expect!
The push method takes a single character as a parameter and adds it to the
String. Listing 8-17 shows code that adds the letter "l" to a String using
the push method.
fn main() { let mut s = String::from("lo"); s.push('l'); }
Listing 8-17: Adding one character to a String value
using push
As a result of this code, s will contain lol.
Concatenation with the + Operator or the format! Macro
Often, you’ll want to combine two existing strings. One way is to use the +
operator, as shown in Listing 8-18.
fn main() { let s1 = String::from("Hello, "); let s2 = String::from("world!"); let s3 = s1 + &s2; // note s1 has been moved here and can no longer be used }
Listing 8-18: Using the + operator to combine two
String values into a new String value
The string s3 will contain Hello, world! as a result of this code. The
reason s1 is no longer valid after the addition and the reason we used a
reference to s2 has to do with the signature of the method that gets called
when we use the + operator. The + operator uses the add method, whose
signature looks something like this:
fn add(self, s: &str) -> String {
This isn’t the exact signature that’s in the standard library: in the standard
library, add is defined using generics. Here, we’re looking at the signature
of add with concrete types substituted for the generic ones, which is what
happens when we call this method with String values. We’ll discuss generics
in Chapter 10. This signature gives us the clues we need to understand the
tricky bits of the + operator.
First, s2 has an &, meaning that we’re adding a reference of the second
string to the first string because of the s parameter in the add function:
we can only add a &str to a String; we can’t add two String values
together. But wait—the type of &s2 is &String, not &str, as specified in
the second parameter to add. So why does Listing 8-18 compile?
The reason we’re able to use &s2 in the call to add is that the compiler
can coerce the &String argument into a &str. When we call the add
method, Rust uses a deref coercion, which here turns &s2 into &s2[..].
We’ll discuss deref coercion in more depth in Chapter 15. Because add does
not take ownership of the s parameter, s2 will still be a valid String
after this operation.
Second, we can see in the signature that add takes ownership of self,
because self does not have an &. This means s1 in Listing 8-18 will be
moved into the add call and no longer be valid after that. So although let s3 = s1 + &s2; looks like it will copy both strings and create a new one, this
statement actually takes ownership of s1, appends a copy of the contents of
s2, and then returns ownership of the result. In other words, it looks like
it’s making a lot of copies but isn’t; the implementation is more efficient
than copying.
If we need to concatenate multiple strings, the behavior of the + operator
gets unwieldy:
fn main() { let s1 = String::from("tic"); let s2 = String::from("tac"); let s3 = String::from("toe"); let s = s1 + "-" + &s2 + "-" + &s3; }
At this point, s will be tic-tac-toe. With all of the + and "
characters, it’s difficult to see what’s going on. For more complicated string
combining, we can use the format! macro:
fn main() { let s1 = String::from("tic"); let s2 = String::from("tac"); let s3 = String::from("toe"); let s = format!("{}-{}-{}", s1, s2, s3); }
This code also sets s to tic-tac-toe. The format! macro works in the same
way as println!, but instead of printing the output to the screen, it returns
a String with the contents. The version of the code using format! is much
easier to read and doesn’t take ownership of any of its parameters.
Indexing into Strings
In many other programming languages, accessing individual characters in a
string by referencing them by index is a valid and common operation. However,
if you try to access parts of a String using indexing syntax in Rust, you’ll
get an error. Consider the invalid code in Listing 8-19.
fn main() {
let s1 = String::from("hello");
let h = s1[0];
}
Listing 8-19: Attempting to use indexing syntax with a String
This code will result in the following error:
$ cargo run
Compiling collections v0.1.0 (file:///projects/collections)
error[E0277]: the type `String` cannot be indexed by `{integer}`
--> src/main.rs:3:13
|
3 | let h = s1[0];
| ^^^^^ `String` cannot be indexed by `{integer}`
|
= help: the trait `Index<{integer}>` is not implemented for `String`
error: aborting due to previous error
For more information about this error, try `rustc --explain E0277`.
error: could not compile `collections`
To learn more, run the command again with --verbose.
The error and the note tell the story: Rust strings don’t support indexing. But why not? To answer that question, we need to discuss how Rust stores strings in memory.
Internal Representation
A String is a wrapper over a Vec<u8>. Let’s look at some of our properly
encoded UTF-8 example strings from Listing 8-14. First, this one:
fn main() { let hello = String::from("السلام عليكم"); let hello = String::from("Dobrý den"); let hello = String::from("Hello"); let hello = String::from("שָׁלוֹם"); let hello = String::from("नमस्ते"); let hello = String::from("こんにちは"); let hello = String::from("안녕하세요"); let hello = String::from("你好"); let hello = String::from("Olá"); let hello = String::from("Здравствуйте"); let hello = String::from("Hola"); }
In this case, len will be 4, which means the vector storing the string “Hola”
is 4 bytes long. Each of these letters takes 1 byte when encoded in UTF-8. But
what about the following line? (Note that this string begins with the capital
Cyrillic letter Ze, not the Arabic number 3.)
fn main() { let hello = String::from("السلام عليكم"); let hello = String::from("Dobrý den"); let hello = String::from("Hello"); let hello = String::from("שָׁלוֹם"); let hello = String::from("नमस्ते"); let hello = String::from("こんにちは"); let hello = String::from("안녕하세요"); let hello = String::from("你好"); let hello = String::from("Olá"); let hello = String::from("Здравствуйте"); let hello = String::from("Hola"); }
Asked how long the string is, you might say 12. However, Rust’s answer is 24: that’s the number of bytes it takes to encode “Здравствуйте” in UTF-8, because each Unicode scalar value in that string takes 2 bytes of storage. Therefore, an index into the string’s bytes will not always correlate to a valid Unicode scalar value. To demonstrate, consider this invalid Rust code:
let hello = "Здравствуйте";
let answer = &hello[0];
What should the value of answer be? Should it be З, the first letter? When
encoded in UTF-8, the first byte of З is 208 and the second is 151, so
answer should in fact be 208, but 208 is not a valid character on its
own. Returning 208 is likely not what a user would want if they asked for the
first letter of this string; however, that’s the only data that Rust has at
byte index 0. Users generally don’t want the byte value returned, even if the
string contains only Latin letters: if &"hello"[0] were valid code that
returned the byte value, it would return 104, not h. To avoid returning an
unexpected value and causing bugs that might not be discovered immediately,
Rust doesn’t compile this code at all and prevents misunderstandings early in
the development process.
Bytes and Scalar Values and Grapheme Clusters! Oh My!
Another point about UTF-8 is that there are actually three relevant ways to look at strings from Rust’s perspective: as bytes, scalar values, and grapheme clusters (the closest thing to what we would call letters).
If we look at the Hindi word “नमस्ते” written in the Devanagari script, it is
stored as a vector of u8 values that looks like this:
[224, 164, 168, 224, 164, 174, 224, 164, 184, 224, 165, 141, 224, 164, 164,
224, 165, 135]
That’s 18 bytes and is how computers ultimately store this data. If we look at
them as Unicode scalar values, which are what Rust’s char type is, those
bytes look like this:
['न', 'म', 'स', '्', 'त', 'े']
There are six char values here, but the fourth and sixth are not letters:
they’re diacritics that don’t make sense on their own. Finally, if we look at
them as grapheme clusters, we’d get what a person would call the four letters
that make up the Hindi word:
["न", "म", "स्", "ते"]
Rust provides different ways of interpreting the raw string data that computers store so that each program can choose the interpretation it needs, no matter what human language the data is in.
A final reason Rust doesn’t allow us to index into a String to get a
character is that indexing operations are expected to always take constant time
(O(1)). But it isn’t possible to guarantee that performance with a String,
because Rust would have to walk through the contents from the beginning to the
index to determine how many valid characters there were.
Slicing Strings
Indexing into a string is often a bad idea because it’s not clear what the
return type of the string-indexing operation should be: a byte value, a
character, a grapheme cluster, or a string slice. Therefore, Rust asks you to
be more specific if you really need to use indices to create string slices. To
be more specific in your indexing and indicate that you want a string slice,
rather than indexing using [] with a single number, you can use [] with a
range to create a string slice containing particular bytes:
#![allow(unused)] fn main() { let hello = "Здравствуйте"; let s = &hello[0..4]; }
Here, s will be a &str that contains the first 4 bytes of the string.
Earlier, we mentioned that each of these characters was 2 bytes, which means
s will be Зд.
What would happen if we used &hello[0..1]? The answer: Rust would panic at
runtime in the same way as if an invalid index were accessed in a vector:
$ cargo run
Compiling collections v0.1.0 (file:///projects/collections)
Finished dev [unoptimized + debuginfo] target(s) in 0.43s
Running `target/debug/collections`
thread 'main' panicked at 'byte index 1 is not a char boundary; it is inside 'З' (bytes 0..2) of `Здравствуйте`', src/main.rs:4:14
note: run with `RUST_BACKTRACE=1` environment variable to display a backtrace
You should use ranges to create string slices with caution, because doing so can crash your program.
Methods for Iterating Over Strings
Fortunately, you can access elements in a string in other ways.
If you need to perform operations on individual Unicode scalar values, the best
way to do so is to use the chars method. Calling chars on “नमस्ते” separates
out and returns six values of type char, and you can iterate over the result
to access each element:
#![allow(unused)] fn main() { for c in "नमस्ते".chars() { println!("{}", c); } }
This code will print the following:
न
म
स
्
त
े
The bytes method returns each raw byte, which might be appropriate for your
domain:
#![allow(unused)] fn main() { for b in "नमस्ते".bytes() { println!("{}", b); } }
This code will print the 18 bytes that make up this String:
224
164
// --snip--
165
135
But be sure to remember that valid Unicode scalar values may be made up of more than 1 byte.
Getting grapheme clusters from strings is complex, so this functionality is not provided by the standard library. Crates are available on crates.io if this is the functionality you need.
Strings Are Not So Simple
To summarize, strings are complicated. Different programming languages make
different choices about how to present this complexity to the programmer. Rust
has chosen to make the correct handling of String data the default behavior
for all Rust programs, which means programmers have to put more thought into
handling UTF-8 data upfront. This trade-off exposes more of the complexity of
strings than is apparent in other programming languages, but it prevents you
from having to handle errors involving non-ASCII characters later in your
development life cycle.
Let’s switch to something a bit less complex: hash maps!
Storing Keys with Associated Values in Hash Maps
The last of our common collections is the hash map. The type HashMap<K, V>
stores a mapping of keys of type K to values of type V. It does this via a
hashing function, which determines how it places these keys and values into
memory. Many programming languages support this kind of data structure, but
they often use a different name, such as hash, map, object, hash table,
dictionary, or associative array, just to name a few.
Hash maps are useful when you want to look up data not by using an index, as you can with vectors, but by using a key that can be of any type. For example, in a game, you could keep track of each team’s score in a hash map in which each key is a team’s name and the values are each team’s score. Given a team name, you can retrieve its score.
We’ll go over the basic API of hash maps in this section, but many more goodies
are hiding in the functions defined on HashMap<K, V> by the standard library.
As always, check the standard library documentation for more information.
Creating a New Hash Map
You can create an empty hash map with new and add elements with insert. In
Listing 8-20, we’re keeping track of the scores of two teams whose names are
Blue and Yellow. The Blue team starts with 10 points, and the Yellow team
starts with 50.
fn main() { use std::collections::HashMap; let mut scores = HashMap::new(); scores.insert(String::from("Blue"), 10); scores.insert(String::from("Yellow"), 50); }
Listing 8-20: Creating a new hash map and inserting some keys and values
Note that we need to first use the HashMap from the collections portion of
the standard library. Of our three common collections, this one is the least
often used, so it’s not included in the features brought into scope
automatically in the prelude. Hash maps also have less support from the
standard library; there’s no built-in macro to construct them, for example.
Just like vectors, hash maps store their data on the heap. This HashMap has
keys of type String and values of type i32. Like vectors, hash maps are
homogeneous: all of the keys must have the same type, and all of the values
must have the same type.
Another way of constructing a hash map is by using iterators and the collect
method on a vector of tuples, where each tuple consists of a key and its value.
We’ll be going into more detail about iterators and their associated methods in
the ”Processing a Series of Items with Iterators” section of Chapter
13. The collect method gathers data into a number
of collection types, including HashMap. For example, if we had the team names
and initial scores in two separate vectors, we could use the zip method to
create a vector of tuples where “Blue” is paired with 10, and so forth. Then we
could use the collect method to turn that vector of tuples into a hash map,
as shown in Listing 8-21.
fn main() { use std::collections::HashMap; let teams = vec![String::from("Blue"), String::from("Yellow")]; let initial_scores = vec![10, 50]; let mut scores: HashMap<_, _> = teams.into_iter().zip(initial_scores.into_iter()).collect(); }
Listing 8-21: Creating a hash map from a list of teams and a list of scores
The type annotation HashMap<_, _> is needed here because it’s possible to
collect into many different data structures and Rust doesn’t know which you
want unless you specify. For the parameters for the key and value types,
however, we use underscores, and Rust can infer the types that the hash map
contains based on the types of the data in the vectors. In Listing 8-21, the
key type will be String and the value type will be i32, just as the types
were in Listing 8-20.
Hash Maps and Ownership
For types that implement the Copy trait, like i32, the values are copied
into the hash map. For owned values like String, the values will be moved and
the hash map will be the owner of those values, as demonstrated in Listing 8-22.
fn main() { use std::collections::HashMap; let field_name = String::from("Favorite color"); let field_value = String::from("Blue"); let mut map = HashMap::new(); map.insert(field_name, field_value); // field_name and field_value are invalid at this point, try using them and // see what compiler error you get! }
Listing 8-22: Showing that keys and values are owned by the hash map once they’re inserted
We aren’t able to use the variables field_name and field_value after
they’ve been moved into the hash map with the call to insert.
If we insert references to values into the hash map, the values won’t be moved into the hash map. The values that the references point to must be valid for at least as long as the hash map is valid. We’ll talk more about these issues in the “Validating References with Lifetimes” section in Chapter 10.
Accessing Values in a Hash Map
We can get a value out of the hash map by providing its key to the get
method, as shown in Listing 8-23.
fn main() { use std::collections::HashMap; let mut scores = HashMap::new(); scores.insert(String::from("Blue"), 10); scores.insert(String::from("Yellow"), 50); let team_name = String::from("Blue"); let score = scores.get(&team_name); }
Listing 8-23: Accessing the score for the Blue team stored in the hash map
Here, score will have the value that’s associated with the Blue team, and the
result will be Some(&10). The result is wrapped in Some because get
returns an Option<&V>; if there’s no value for that key in the hash map,
get will return None. The program will need to handle the Option in one
of the ways that we covered in Chapter 6.
We can iterate over each key/value pair in a hash map in a similar manner as we
do with vectors, using a for loop:
fn main() { use std::collections::HashMap; let mut scores = HashMap::new(); scores.insert(String::from("Blue"), 10); scores.insert(String::from("Yellow"), 50); for (key, value) in &scores { println!("{}: {}", key, value); } }
This code will print each pair in an arbitrary order:
Yellow: 50
Blue: 10
Updating a Hash Map
Although the number of keys and values is growable, each key can only have one value associated with it at a time. When you want to change the data in a hash map, you have to decide how to handle the case when a key already has a value assigned. You could replace the old value with the new value, completely disregarding the old value. You could keep the old value and ignore the new value, only adding the new value if the key doesn’t already have a value. Or you could combine the old value and the new value. Let’s look at how to do each of these!
Overwriting a Value
If we insert a key and a value into a hash map and then insert that same key
with a different value, the value associated with that key will be replaced.
Even though the code in Listing 8-24 calls insert twice, the hash map will
only contain one key/value pair because we’re inserting the value for the Blue
team’s key both times.
fn main() { use std::collections::HashMap; let mut scores = HashMap::new(); scores.insert(String::from("Blue"), 10); scores.insert(String::from("Blue"), 25); println!("{:?}", scores); }
Listing 8-24: Replacing a value stored with a particular key
This code will print {"Blue": 25}. The original value of 10 has been
overwritten.
Only Inserting a Value If the Key Has No Value
It’s common to check whether a particular key has a value and, if it doesn’t,
insert a value for it. Hash maps have a special API for this called entry
that takes the key you want to check as a parameter. The return value of the
entry method is an enum called Entry that represents a value that might or
might not exist. Let’s say we want to check whether the key for the Yellow team
has a value associated with it. If it doesn’t, we want to insert the value 50,
and the same for the Blue team. Using the entry API, the code looks like
Listing 8-25.
fn main() { use std::collections::HashMap; let mut scores = HashMap::new(); scores.insert(String::from("Blue"), 10); scores.entry(String::from("Yellow")).or_insert(50); scores.entry(String::from("Blue")).or_insert(50); println!("{:?}", scores); }
Listing 8-25: Using the entry method to only insert if
the key does not already have a value
The or_insert method on Entry is defined to return a mutable reference to
the value for the corresponding Entry key if that key exists, and if not,
inserts the parameter as the new value for this key and returns a mutable
reference to the new value. This technique is much cleaner than writing the
logic ourselves and, in addition, plays more nicely with the borrow checker.
Running the code in Listing 8-25 will print {"Yellow": 50, "Blue": 10}. The
first call to entry will insert the key for the Yellow team with the value
50 because the Yellow team doesn’t have a value already. The second call to
entry will not change the hash map because the Blue team already has the
value 10.
Updating a Value Based on the Old Value
Another common use case for hash maps is to look up a key’s value and then update it based on the old value. For instance, Listing 8-26 shows code that counts how many times each word appears in some text. We use a hash map with the words as keys and increment the value to keep track of how many times we’ve seen that word. If it’s the first time we’ve seen a word, we’ll first insert the value 0.
fn main() { use std::collections::HashMap; let text = "hello world wonderful world"; let mut map = HashMap::new(); for word in text.split_whitespace() { let count = map.entry(word).or_insert(0); *count += 1; } println!("{:?}", map); }
Listing 8-26: Counting occurrences of words using a hash map that stores words and counts
This code will print {"world": 2, "hello": 1, "wonderful": 1}. The
or_insert method actually returns a mutable reference (&mut V) to the value
for this key. Here we store that mutable reference in the count variable, so
in order to assign to that value, we must first dereference count using the
asterisk (*). The mutable reference goes out of scope at the end of the for
loop, so all of these changes are safe and allowed by the borrowing rules.
Hashing Functions
By default, HashMap uses a hashing function called SipHash that can provide
resistance to Denial of Service (DoS) attacks involving hash tables1. This
is not the fastest hashing algorithm available, but the trade-off for better
security that comes with the drop in performance is worth it. If you profile
your code and find that the default hash function is too slow for your
purposes, you can switch to another function by specifying a different
hasher. A hasher is a type that implements the BuildHasher trait. We’ll
talk about traits and how to implement them in Chapter 10. You don’t
necessarily have to implement your own hasher from scratch;
crates.io has libraries shared by other Rust users that
provide hashers implementing many common hashing algorithms.
Summary
Vectors, strings, and hash maps will provide a large amount of functionality necessary in programs when you need to store, access, and modify data. Here are some exercises you should now be equipped to solve:
- Given a list of integers, use a vector and return the mean (the average value), median (when sorted, the value in the middle position), and mode (the value that occurs most often; a hash map will be helpful here) of the list.
- Convert strings to pig latin. The first consonant of each word is moved to the end of the word and “ay” is added, so “first” becomes “irst-fay.” Words that start with a vowel have “hay” added to the end instead (“apple” becomes “apple-hay”). Keep in mind the details about UTF-8 encoding!
- Using a hash map and vectors, create a text interface to allow a user to add employee names to a department in a company. For example, “Add Sally to Engineering” or “Add Amir to Sales.” Then let the user retrieve a list of all people in a department or all people in the company by department, sorted alphabetically.
The standard library API documentation describes methods that vectors, strings, and hash maps have that will be helpful for these exercises!
We’re getting into more complex programs in which operations can fail, so, it’s a perfect time to discuss error handling. We’ll do that next!
Error Handling
Rust’s commitment to reliability extends to error handling. Errors are a fact of life in software, so Rust has a number of features for handling situations in which something goes wrong. In many cases, Rust requires you to acknowledge the possibility of an error and take some action before your code will compile. This requirement makes your program more robust by ensuring that you’ll discover errors and handle them appropriately before you’ve deployed your code to production!
Rust groups errors into two major categories: recoverable and unrecoverable errors. For a recoverable error, such as a file not found error, it’s reasonable to report the problem to the user and retry the operation. Unrecoverable errors are always symptoms of bugs, like trying to access a location beyond the end of an array.
Most languages don’t distinguish between these two kinds of errors and handle
both in the same way, using mechanisms such as exceptions. Rust doesn’t have
exceptions. Instead, it has the type Result<T, E> for recoverable errors and
the panic! macro that stops execution when the program encounters an
unrecoverable error. This chapter covers calling panic! first and then talks
about returning Result<T, E> values. Additionally, we’ll explore
considerations when deciding whether to try to recover from an error or to stop
execution.
Unrecoverable Errors with panic!
Sometimes, bad things happen in your code, and there’s nothing you can do about
it. In these cases, Rust has the panic! macro. When the panic! macro
executes, your program will print a failure message, unwind and clean up the
stack, and then quit. This most commonly occurs when a bug of some kind has
been detected and it’s not clear to the programmer how to handle the error.
Unwinding the Stack or Aborting in Response to a Panic
By default, when a panic occurs, the program starts unwinding, which means Rust walks back up the stack and cleans up the data from each function it encounters. But this walking back and cleanup is a lot of work. The alternative is to immediately abort, which ends the program without cleaning up. Memory that the program was using will then need to be cleaned up by the operating system. If in your project you need to make the resulting binary as small as possible, you can switch from unwinding to aborting upon a panic by adding
panic = 'abort'to the appropriate[profile]sections in your Cargo.toml file. For example, if you want to abort on panic in release mode, add this:[profile.release] panic = 'abort'
Let’s try calling panic! in a simple program:
Filename: src/main.rs
fn main() { panic!("crash and burn"); }
When you run the program, you’ll see something like this:
$ cargo run
Compiling panic v0.1.0 (file:///projects/panic)
Finished dev [unoptimized + debuginfo] target(s) in 0.25s
Running `target/debug/panic`
thread 'main' panicked at 'crash and burn', src/main.rs:2:5
note: run with `RUST_BACKTRACE=1` environment variable to display a backtrace
The call to panic! causes the error message contained in the last two lines.
The first line shows our panic message and the place in our source code where
the panic occurred: src/main.rs:2:5 indicates that it’s the second line,
fifth character of our src/main.rs file.
In this case, the line indicated is part of our code, and if we go to that
line, we see the panic! macro call. In other cases, the panic! call might
be in code that our code calls, and the filename and line number reported by
the error message will be someone else’s code where the panic! macro is
called, not the line of our code that eventually led to the panic! call. We
can use the backtrace of the functions the panic! call came from to figure
out the part of our code that is causing the problem. We’ll discuss what a
backtrace is in more detail next.
Using a panic! Backtrace
Let’s look at another example to see what it’s like when a panic! call comes
from a library because of a bug in our code instead of from our code calling
the macro directly. Listing 9-1 has some code that attempts to access an
element by index in a vector.
Filename: src/main.rs
fn main() { let v = vec![1, 2, 3]; v[99]; }
Listing 9-1: Attempting to access an element beyond the
end of a vector, which will cause a call to panic!
Here, we’re attempting to access the 100th element of our vector (which is at
index 99 because indexing starts at zero), but it has only 3 elements. In this
situation, Rust will panic. Using [] is supposed to return an element, but if
you pass an invalid index, there’s no element that Rust could return here that
would be correct.
In C, attempting to read beyond the end of a data structure is undefined behavior. You might get whatever is at the location in memory that would correspond to that element in the data structure, even though the memory doesn’t belong to that structure. This is called a buffer overread and can lead to security vulnerabilities if an attacker is able to manipulate the index in such a way as to read data they shouldn’t be allowed to that is stored after the data structure.
To protect your program from this sort of vulnerability, if you try to read an element at an index that doesn’t exist, Rust will stop execution and refuse to continue. Let’s try it and see:
$ cargo run
Compiling panic v0.1.0 (file:///projects/panic)
Finished dev [unoptimized + debuginfo] target(s) in 0.27s
Running `target/debug/panic`
thread 'main' panicked at 'index out of bounds: the len is 3 but the index is 99', src/main.rs:4:5
note: run with `RUST_BACKTRACE=1` environment variable to display a backtrace
This error points at line 4 of our main.rs where we attempt to access index
99. The next note line tells us that we can set the RUST_BACKTRACE
environment variable to get a backtrace of exactly what happened to cause the
error. A backtrace is a list of all the functions that have been called to
get to this point. Backtraces in Rust work as they do in other languages: the
key to reading the backtrace is to start from the top and read until you see
files you wrote. That’s the spot where the problem originated. The lines above
the lines mentioning your files are code that your code called; the lines below
are code that called your code. These lines might include core Rust code,
standard library code, or crates that you’re using. Let’s try getting a
backtrace by setting the RUST_BACKTRACE environment variable to any value
except 0. Listing 9-2 shows output similar to what you’ll see.
$ RUST_BACKTRACE=1 cargo run
thread 'main' panicked at 'index out of bounds: the len is 3 but the index is 99', src/main.rs:4:5
stack backtrace:
0: rust_begin_unwind
at /rustc/7eac88abb2e57e752f3302f02be5f3ce3d7adfb4/library/std/src/panicking.rs:483
1: core::panicking::panic_fmt
at /rustc/7eac88abb2e57e752f3302f02be5f3ce3d7adfb4/library/core/src/panicking.rs:85
2: core::panicking::panic_bounds_check
at /rustc/7eac88abb2e57e752f3302f02be5f3ce3d7adfb4/library/core/src/panicking.rs:62
3: <usize as core::slice::index::SliceIndex<[T]>>::index
at /rustc/7eac88abb2e57e752f3302f02be5f3ce3d7adfb4/library/core/src/slice/index.rs:255
4: core::slice::index::<impl core::ops::index::Index<I> for [T]>::index
at /rustc/7eac88abb2e57e752f3302f02be5f3ce3d7adfb4/library/core/src/slice/index.rs:15
5: <alloc::vec::Vec<T> as core::ops::index::Index<I>>::index
at /rustc/7eac88abb2e57e752f3302f02be5f3ce3d7adfb4/library/alloc/src/vec.rs:1982
6: panic::main
at ./src/main.rs:4
7: core::ops::function::FnOnce::call_once
at /rustc/7eac88abb2e57e752f3302f02be5f3ce3d7adfb4/library/core/src/ops/function.rs:227
note: Some details are omitted, run with `RUST_BACKTRACE=full` for a verbose backtrace.
Listing 9-2: The backtrace generated by a call to
panic! displayed when the environment variable RUST_BACKTRACE is set
That’s a lot of output! The exact output you see might be different depending
on your operating system and Rust version. In order to get backtraces with this
information, debug symbols must be enabled. Debug symbols are enabled by
default when using cargo build or cargo run without the --release flag,
as we have here.
In the output in Listing 9-2, line 6 of the backtrace points to the line in our project that’s causing the problem: line 4 of src/main.rs. If we don’t want our program to panic, the location pointed to by the first line mentioning a file we wrote is where we should start investigating. In Listing 9-1, where we deliberately wrote code that would panic in order to demonstrate how to use backtraces, the way to fix the panic is to not request an element at index 99 from a vector that only contains 3 items. When your code panics in the future, you’ll need to figure out what action the code is taking with what values to cause the panic and what the code should do instead.
We’ll come back to panic! and when we should and should not use panic! to
handle error conditions in the “To panic! or Not to
panic!” section later in this
chapter. Next, we’ll look at how to recover from an error using Result.
Recoverable Errors with Result
Most errors aren’t serious enough to require the program to stop entirely. Sometimes, when a function fails, it’s for a reason that you can easily interpret and respond to. For example, if you try to open a file and that operation fails because the file doesn’t exist, you might want to create the file instead of terminating the process.
Recall from “Handling Potential Failure with the Result
Type” in Chapter 2 that the Result enum is
defined as having two variants, Ok and Err, as follows:
#![allow(unused)] fn main() { enum Result<T, E> { Ok(T), Err(E), } }
The T and E are generic type parameters: we’ll discuss generics in more
detail in Chapter 10. What you need to know right now is that T represents
the type of the value that will be returned in a success case within the Ok
variant, and E represents the type of the error that will be returned in a
failure case within the Err variant. Because Result has these generic type
parameters, we can use the Result type and the functions that the standard
library has defined on it in many different situations where the successful
value and error value we want to return may differ.
Let’s call a function that returns a Result value because the function could
fail. In Listing 9-3 we try to open a file.
Filename: src/main.rs
use std::fs::File; fn main() { let f = File::open("hello.txt"); }
Listing 9-3: Opening a file
How do we know File::open returns a Result? We could look at the standard
library API documentation, or we could ask
the compiler! If we give f a type annotation that we know is not the return
type of the function and then try to compile the code, the compiler will tell
us that the types don’t match. The error message will then tell us what the
type of f is. Let’s try it! We know that the return type of File::open
isn’t of type u32, so let’s change the let f statement to this:
use std::fs::File;
fn main() {
let f: u32 = File::open("hello.txt");
}
Attempting to compile now gives us the following output:
$ cargo run
Compiling error-handling v0.1.0 (file:///projects/error-handling)
error[E0308]: mismatched types
--> src/main.rs:4:18
|
4 | let f: u32 = File::open("hello.txt");
| --- ^^^^^^^^^^^^^^^^^^^^^^^ expected `u32`, found enum `std::result::Result`
| |
| expected due to this
|
= note: expected type `u32`
found enum `std::result::Result<File, std::io::Error>`
error: aborting due to previous error
For more information about this error, try `rustc --explain E0308`.
error: could not compile `error-handling`
To learn more, run the command again with --verbose.
This tells us the return type of the File::open function is a Result<T, E>.
The generic parameter T has been filled in here with the type of the success
value, std::fs::File, which is a file handle. The type of E used in the
error value is std::io::Error.
This return type means the call to File::open might succeed and return a file
handle that we can read from or write to. The function call also might fail:
for example, the file might not exist, or we might not have permission to
access the file. The File::open function needs to have a way to tell us
whether it succeeded or failed and at the same time give us either the file
handle or error information. This information is exactly what the Result enum
conveys.
In the case where File::open succeeds, the value in the variable f will be
an instance of Ok that contains a file handle. In the case where it fails,
the value in f will be an instance of Err that contains more information
about the kind of error that happened.
We need to add to the code in Listing 9-3 to take different actions depending
on the value File::open returns. Listing 9-4 shows one way to handle the
Result using a basic tool, the match expression that we discussed in
Chapter 6.
Filename: src/main.rs
use std::fs::File; fn main() { let f = File::open("hello.txt"); let f = match f { Ok(file) => file, Err(error) => panic!("Problem opening the file: {:?}", error), }; }
Listing 9-4: Using a match expression to handle the
Result variants that might be returned
Note that, like the Option enum, the Result enum and its variants have been
brought into scope by the prelude, so we don’t need to specify Result::
before the Ok and Err variants in the match arms.
Here we tell Rust that when the result is Ok, return the inner file value
out of the Ok variant, and we then assign that file handle value to the
variable f. After the match, we can use the file handle for reading or
writing.
The other arm of the match handles the case where we get an Err value from
File::open. In this example, we’ve chosen to call the panic! macro. If
there’s no file named hello.txt in our current directory and we run this
code, we’ll see the following output from the panic! macro:
$ cargo run
Compiling error-handling v0.1.0 (file:///projects/error-handling)
Finished dev [unoptimized + debuginfo] target(s) in 0.73s
Running `target/debug/error-handling`
thread 'main' panicked at 'Problem opening the file: Os { code: 2, kind: NotFound, message: "No such file or directory" }', src/main.rs:8:23
note: run with `RUST_BACKTRACE=1` environment variable to display a backtrace
As usual, this output tells us exactly what has gone wrong.
Matching on Different Errors
The code in Listing 9-4 will panic! no matter why File::open failed. What
we want to do instead is take different actions for different failure reasons:
if File::open failed because the file doesn’t exist, we want to create the
file and return the handle to the new file. If File::open failed for any
other reason—for example, because we didn’t have permission to open the file—we
still want the code to panic! in the same way as it did in Listing 9-4. Look
at Listing 9-5, which adds an inner match expression.
Filename: src/main.rs
use std::fs::File;
use std::io::ErrorKind;
fn main() {
let f = File::open("hello.txt");
let f = match f {
Ok(file) => file,
Err(error) => match error.kind() {
ErrorKind::NotFound => match File::create("hello.txt") {
Ok(fc) => fc,
Err(e) => panic!("Problem creating the file: {:?}", e),
},
other_error => {
panic!("Problem opening the file: {:?}", other_error)
}
},
};
}
Listing 9-5: Handling different kinds of errors in different ways
The type of the value that File::open returns inside the Err variant is
io::Error, which is a struct provided by the standard library. This struct
has a method kind that we can call to get an io::ErrorKind value. The enum
io::ErrorKind is provided by the standard library and has variants
representing the different kinds of errors that might result from an io
operation. The variant we want to use is ErrorKind::NotFound, which indicates
the file we’re trying to open doesn’t exist yet. So we match on f, but we
also have an inner match on error.kind().
The condition we want to check in the inner match is whether the value returned
by error.kind() is the NotFound variant of the ErrorKind enum. If it is,
we try to create the file with File::create. However, because File::create
could also fail, we need a second arm in the inner match expression. When the
file can’t be created, a different error message is printed. The second arm of
the outer match stays the same, so the program panics on any error besides
the missing file error.
That’s a lot of match! The match expression is very useful but also very
much a primitive. In Chapter 13, you’ll learn about closures; the Result<T, E> type has many methods that accept a closure and are implemented using
match expressions. Using those methods will make your code more concise. A
more seasoned Rustacean might write this code instead of Listing 9-5:
use std::fs::File;
use std::io::ErrorKind;
fn main() {
let f = File::open("hello.txt").unwrap_or_else(|error| {
if error.kind() == ErrorKind::NotFound {
File::create("hello.txt").unwrap_or_else(|error| {
panic!("Problem creating the file: {:?}", error);
})
} else {
panic!("Problem opening the file: {:?}", error);
}
});
}
Although this code has the same behavior as Listing 9-5, it doesn’t contain any
match expressions and is cleaner to read. Come back to this example after
you’ve read Chapter 13, and look up the unwrap_or_else method in the standard
library documentation. Many more of these methods can clean up huge nested
match expressions when you’re dealing with errors.
Shortcuts for Panic on Error: unwrap and expect
Using match works well enough, but it can be a bit verbose and doesn’t always
communicate intent well. The Result<T, E> type has many helper methods
defined on it to do various tasks. One of those methods, called unwrap, is a
shortcut method that is implemented just like the match expression we wrote in
Listing 9-4. If the Result value is the Ok variant, unwrap will return
the value inside the Ok. If the Result is the Err variant, unwrap will
call the panic! macro for us. Here is an example of unwrap in action:
Filename: src/main.rs
use std::fs::File; fn main() { let f = File::open("hello.txt").unwrap(); }
If we run this code without a hello.txt file, we’ll see an error message from
the panic! call that the unwrap method makes:
thread 'main' panicked at 'called `Result::unwrap()` on an `Err` value: Error {
repr: Os { code: 2, message: "No such file or directory" } }',
src/libcore/result.rs:906:4
Another method, expect, which is similar to unwrap, lets us also choose the
panic! error message. Using expect instead of unwrap and providing good
error messages can convey your intent and make tracking down the source of a
panic easier. The syntax of expect looks like this:
Filename: src/main.rs
use std::fs::File; fn main() { let f = File::open("hello.txt").expect("Failed to open hello.txt"); }
We use expect in the same way as unwrap: to return the file handle or call
the panic! macro. The error message used by expect in its call to panic!
will be the parameter that we pass to expect, rather than the default
panic! message that unwrap uses. Here’s what it looks like:
thread 'main' panicked at 'Failed to open hello.txt: Error { repr: Os { code:
2, message: "No such file or directory" } }', src/libcore/result.rs:906:4
Because this error message starts with the text we specified, Failed to open hello.txt, it will be easier to find where in the code this error message is
coming from. If we use unwrap in multiple places, it can take more time to
figure out exactly which unwrap is causing the panic because all unwrap
calls that panic print the same message.
Propagating Errors
When you’re writing a function whose implementation calls something that might fail, instead of handling the error within this function, you can return the error to the calling code so that it can decide what to do. This is known as propagating the error and gives more control to the calling code, where there might be more information or logic that dictates how the error should be handled than what you have available in the context of your code.
For example, Listing 9-6 shows a function that reads a username from a file. If the file doesn’t exist or can’t be read, this function will return those errors to the code that called this function.
Filename: src/main.rs
#![allow(unused)] fn main() { use std::fs::File; use std::io; use std::io::Read; fn read_username_from_file() -> Result<String, io::Error> { let f = File::open("hello.txt"); let mut f = match f { Ok(file) => file, Err(e) => return Err(e), }; let mut s = String::new(); match f.read_to_string(&mut s) { Ok(_) => Ok(s), Err(e) => Err(e), } } }
Listing 9-6: A function that returns errors to the
calling code using match
This function can be written in a much shorter way, but we’re going to start by
doing a lot of it manually in order to explore error handling; at the end,
we’ll show the shorter way. Let’s look at the return type of the function first:
Result<String, io::Error>. This means the function is returning a value of
the type Result<T, E> where the generic parameter T has been filled in
with the concrete type String and the generic type E has been filled in
with the concrete type io::Error. If this function succeeds without any
problems, the code that calls this function will receive an Ok value that
holds a String—the username that this function read from the file. If this
function encounters any problems, the code that calls this function will
receive an Err value that holds an instance of io::Error that contains
more information about what the problems were. We chose io::Error as the
return type of this function because that happens to be the type of the error
value returned from both of the operations we’re calling in this function’s
body that might fail: the File::open function and the read_to_string
method.
The body of the function starts by calling the File::open function. Then we
handle the Result value returned with a match similar to the match in
Listing 9-4, only instead of calling panic! in the Err case, we return
early from this function and pass the error value from File::open back to the
calling code as this function’s error value. If File::open succeeds, we store
the file handle in the variable f and continue.
Then we create a new String in variable s and call the read_to_string
method on the file handle in f to read the contents of the file into s. The
read_to_string method also returns a Result because it might fail, even
though File::open succeeded. So we need another match to handle that
Result: if read_to_string succeeds, then our function has succeeded, and we
return the username from the file that’s now in s wrapped in an Ok. If
read_to_string fails, we return the error value in the same way that we
returned the error value in the match that handled the return value of
File::open. However, we don’t need to explicitly say return, because this
is the last expression in the function.
The code that calls this code will then handle getting either an Ok value
that contains a username or an Err value that contains an io::Error. We
don’t know what the calling code will do with those values. If the calling code
gets an Err value, it could call panic! and crash the program, use a
default username, or look up the username from somewhere other than a file, for
example. We don’t have enough information on what the calling code is actually
trying to do, so we propagate all the success or error information upward for
it to handle appropriately.
This pattern of propagating errors is so common in Rust that Rust provides the
question mark operator ? to make this easier.
A Shortcut for Propagating Errors: the ? Operator
Listing 9-7 shows an implementation of read_username_from_file that has the
same functionality as it had in Listing 9-6, but this implementation uses the
? operator.
Filename: src/main.rs
#![allow(unused)] fn main() { use std::fs::File; use std::io; use std::io::Read; fn read_username_from_file() -> Result<String, io::Error> { let mut f = File::open("hello.txt")?; let mut s = String::new(); f.read_to_string(&mut s)?; Ok(s) } }
Listing 9-7: A function that returns errors to the
calling code using the ? operator
The ? placed after a Result value is defined to work in almost the same way
as the match expressions we defined to handle the Result values in Listing
9-6. If the value of the Result is an Ok, the value inside the Ok will
get returned from this expression, and the program will continue. If the value
is an Err, the Err will be returned from the whole function as if we had
used the return keyword so the error value gets propagated to the calling
code.
There is a difference between what the match expression from Listing 9-6 does
and what the ? operator does: error values that have the ? operator called
on them go through the from function, defined in the From trait in the
standard library, which is used to convert errors from one type into another.
When the ? operator calls the from function, the error type received is
converted into the error type defined in the return type of the current
function. This is useful when a function returns one error type to represent all
the ways a function might fail, even if parts might fail for many different
reasons. As long as each error type implements the from function to define how
to convert itself to the returned error type, the ? operator takes care of the
conversion automatically.
In the context of Listing 9-7, the ? at the end of the File::open call will
return the value inside an Ok to the variable f. If an error occurs, the
? operator will return early out of the whole function and give any Err
value to the calling code. The same thing applies to the ? at the end of the
read_to_string call.
The ? operator eliminates a lot of boilerplate and makes this function’s
implementation simpler. We could even shorten this code further by chaining
method calls immediately after the ?, as shown in Listing 9-8.
Filename: src/main.rs
#![allow(unused)] fn main() { use std::fs::File; use std::io; use std::io::Read; fn read_username_from_file() -> Result<String, io::Error> { let mut s = String::new(); File::open("hello.txt")?.read_to_string(&mut s)?; Ok(s) } }
Listing 9-8: Chaining method calls after the ?
operator
We’ve moved the creation of the new String in s to the beginning of the
function; that part hasn’t changed. Instead of creating a variable f, we’ve
chained the call to read_to_string directly onto the result of
File::open("hello.txt")?. We still have a ? at the end of the
read_to_string call, and we still return an Ok value containing the
username in s when both File::open and read_to_string succeed rather than
returning errors. The functionality is again the same as in Listing 9-6 and
Listing 9-7; this is just a different, more ergonomic way to write it.
Speaking of different ways to write this function, Listing 9-9 shows that there’s a way to make this even shorter.
Filename: src/main.rs
#![allow(unused)] fn main() { use std::fs; use std::io; fn read_username_from_file() -> Result<String, io::Error> { fs::read_to_string("hello.txt") } }
Listing 9-9: Using fs::read_to_string instead of
opening and then reading the file
Reading a file into a string is a fairly common operation, so Rust provides the
convenient fs::read_to_string function that opens the file, creates a new
String, reads the contents of the file, puts the contents into that String,
and returns it. Of course, using fs::read_to_string doesn’t give us the
opportunity to explain all the error handling, so we did it the longer way
first.
The ? Operator Can Be Used in Functions That Return Result
The ? operator can be used in functions that have a return type of
Result, because it is defined to work in the same way as the match
expression we defined in Listing 9-6. The part of the match that requires a
return type of Result is return Err(e), so the return type of the function
has to be a Result to be compatible with this return.
Let’s look at what happens if we use the ? operator in the main function,
which you’ll recall has a return type of ():
use std::fs::File;
fn main() {
let f = File::open("hello.txt")?;
}
When we compile this code, we get the following error message:
$ cargo run
Compiling error-handling v0.1.0 (file:///projects/error-handling)
error[E0277]: the `?` operator can only be used in a function that returns `Result` or `Option` (or another type that implements `Try`)
--> src/main.rs:4:13
|
3 | / fn main() {
4 | | let f = File::open("hello.txt")?;
| | ^^^^^^^^^^^^^^^^^^^^^^^^ cannot use the `?` operator in a function that returns `()`
5 | | }
| |_- this function should return `Result` or `Option` to accept `?`
|
= help: the trait `Try` is not implemented for `()`
= note: required by `from_error`
error: aborting due to previous error
For more information about this error, try `rustc --explain E0277`.
error: could not compile `error-handling`
To learn more, run the command again with --verbose.
This error points out that we’re only allowed to use the ? operator in a
function that returns Result or Option or another type that implements
std::ops::Try. When you’re writing code in a function
that doesn’t return one of these types, and you want to use ? when you call other
functions that return Result<T, E>, you have two choices to fix this problem.
One technique is to change the return type of your function to be Result<T, E> if you have no restrictions preventing that. The other technique is to use
a match or one of the Result<T, E> methods to handle the Result<T, E> in
whatever way is appropriate.
The main function is special, and there are restrictions on what its return
type must be. One valid return type for main is (), and conveniently, another
valid return type is Result<T, E>, as shown here:
use std::error::Error;
use std::fs::File;
fn main() -> Result<(), Box<dyn Error>> {
let f = File::open("hello.txt")?;
Ok(())
}
The Box<dyn Error> type is called a trait object, which we’ll talk about in
the “Using Trait Objects that Allow for Values of Different
Types” section in Chapter 17. For now, you can
read Box<dyn Error> to mean “any kind of error.” Using ? in a main
function with this return type is allowed.
Now that we’ve discussed the details of calling panic! or returning Result,
let’s return to the topic of how to decide which is appropriate to use in which
cases.
To panic! or Not to panic!
So how do you decide when you should call panic! and when you should return
Result? When code panics, there’s no way to recover. You could call panic!
for any error situation, whether there’s a possible way to recover or not, but
then you’re making the decision on behalf of the code calling your code that a
situation is unrecoverable. When you choose to return a Result value, you
give the calling code options rather than making the decision for it. The
calling code could choose to attempt to recover in a way that’s appropriate for
its situation, or it could decide that an Err value in this case is
unrecoverable, so it can call panic! and turn your recoverable error into an
unrecoverable one. Therefore, returning Result is a good default choice when
you’re defining a function that might fail.
In rare situations, it’s more appropriate to write code that panics instead of
returning a Result. Let’s explore why it’s appropriate to panic in examples,
prototype code, and tests. Then we’ll discuss situations in which the compiler
can’t tell that failure is impossible, but you as a human can. The chapter will
conclude with some general guidelines on how to decide whether to panic in
library code.
Examples, Prototype Code, and Tests
When you’re writing an example to illustrate some concept, having robust
error-handling code in the example as well can make the example less clear. In
examples, it’s understood that a call to a method like unwrap that could
panic is meant as a placeholder for the way you’d want your application to
handle errors, which can differ based on what the rest of your code is doing.
Similarly, the unwrap and expect methods are very handy when prototyping,
before you’re ready to decide how to handle errors. They leave clear markers in
your code for when you’re ready to make your program more robust.
If a method call fails in a test, you’d want the whole test to fail, even if
that method isn’t the functionality under test. Because panic! is how a test
is marked as a failure, calling unwrap or expect is exactly what should
happen.
Cases in Which You Have More Information Than the Compiler
It would also be appropriate to call unwrap when you have some other logic
that ensures the Result will have an Ok value, but the logic isn’t
something the compiler understands. You’ll still have a Result value that you
need to handle: whatever operation you’re calling still has the possibility of
failing in general, even though it’s logically impossible in your particular
situation. If you can ensure by manually inspecting the code that you’ll never
have an Err variant, it’s perfectly acceptable to call unwrap. Here’s an
example:
fn main() { use std::net::IpAddr; let home: IpAddr = "127.0.0.1".parse().unwrap(); }
We’re creating an IpAddr instance by parsing a hardcoded string. We can see
that 127.0.0.1 is a valid IP address, so it’s acceptable to use unwrap
here. However, having a hardcoded, valid string doesn’t change the return type
of the parse method: we still get a Result value, and the compiler will
still make us handle the Result as if the Err variant is a possibility
because the compiler isn’t smart enough to see that this string is always a
valid IP address. If the IP address string came from a user rather than being
hardcoded into the program and therefore did have a possibility of failure,
we’d definitely want to handle the Result in a more robust way instead.
Guidelines for Error Handling
It’s advisable to have your code panic when it’s possible that your code could end up in a bad state. In this context, a bad state is when some assumption, guarantee, contract, or invariant has been broken, such as when invalid values, contradictory values, or missing values are passed to your code—plus one or more of the following:
- The bad state is not something that’s expected to happen occasionally.
- Your code after this point needs to rely on not being in this bad state.
- There’s not a good way to encode this information in the types you use.
If someone calls your code and passes in values that don’t make sense, the best
choice might be to call panic! and alert the person using your library to the
bug in their code so they can fix it during development. Similarly, panic! is
often appropriate if you’re calling external code that is out of your control
and it returns an invalid state that you have no way of fixing.
However, when failure is expected, it’s more appropriate to return a Result
than to make a panic! call. Examples include a parser being given malformed
data or an HTTP request returning a status that indicates you have hit a rate
limit. In these cases, returning a Result indicates that failure is an
expected possibility that the calling code must decide how to handle.
When your code performs operations on values, your code should verify the
values are valid first and panic if the values aren’t valid. This is mostly for
safety reasons: attempting to operate on invalid data can expose your code to
vulnerabilities. This is the main reason the standard library will call
panic! if you attempt an out-of-bounds memory access: trying to access memory
that doesn’t belong to the current data structure is a common security problem.
Functions often have contracts: their behavior is only guaranteed if the
inputs meet particular requirements. Panicking when the contract is violated
makes sense because a contract violation always indicates a caller-side bug and
it’s not a kind of error you want the calling code to have to explicitly
handle. In fact, there’s no reasonable way for calling code to recover; the
calling programmers need to fix the code. Contracts for a function,
especially when a violation will cause a panic, should be explained in the API
documentation for the function.
However, having lots of error checks in all of your functions would be verbose
and annoying. Fortunately, you can use Rust’s type system (and thus the type
checking the compiler does) to do many of the checks for you. If your function
has a particular type as a parameter, you can proceed with your code’s logic
knowing that the compiler has already ensured you have a valid value. For
example, if you have a type rather than an Option, your program expects to
have something rather than nothing. Your code then doesn’t have to handle
two cases for the Some and None variants: it will only have one case for
definitely having a value. Code trying to pass nothing to your function won’t
even compile, so your function doesn’t have to check for that case at runtime.
Another example is using an unsigned integer type such as u32, which ensures
the parameter is never negative.
Creating Custom Types for Validation
Let’s take the idea of using Rust’s type system to ensure we have a valid value one step further and look at creating a custom type for validation. Recall the guessing game in Chapter 2 in which our code asked the user to guess a number between 1 and 100. We never validated that the user’s guess was between those numbers before checking it against our secret number; we only validated that the guess was positive. In this case, the consequences were not very dire: our output of “Too high” or “Too low” would still be correct. But it would be a useful enhancement to guide the user toward valid guesses and have different behavior when a user guesses a number that’s out of range versus when a user types, for example, letters instead.
One way to do this would be to parse the guess as an i32 instead of only a
u32 to allow potentially negative numbers, and then add a check for the
number being in range, like so:
use rand::Rng;
use std::cmp::Ordering;
use std::io;
fn main() {
println!("Guess the number!");
let secret_number = rand::thread_rng().gen_range(1..101);
loop {
// --snip--
println!("Please input your guess.");
let mut guess = String::new();
io::stdin()
.read_line(&mut guess)
.expect("Failed to read line");
let guess: i32 = match guess.trim().parse() {
Ok(num) => num,
Err(_) => continue,
};
if guess < 1 || guess > 100 {
println!("The secret number will be between 1 and 100.");
continue;
}
match guess.cmp(&secret_number) {
// --snip--
Ordering::Less => println!("Too small!"),
Ordering::Greater => println!("Too big!"),
Ordering::Equal => {
println!("You win!");
break;
}
}
}
}
The if expression checks whether our value is out of range, tells the user
about the problem, and calls continue to start the next iteration of the loop
and ask for another guess. After the if expression, we can proceed with the
comparisons between guess and the secret number knowing that guess is
between 1 and 100.
However, this is not an ideal solution: if it was absolutely critical that the program only operated on values between 1 and 100, and it had many functions with this requirement, having a check like this in every function would be tedious (and might impact performance).
Instead, we can make a new type and put the validations in a function to create
an instance of the type rather than repeating the validations everywhere. That
way, it’s safe for functions to use the new type in their signatures and
confidently use the values they receive. Listing 9-10 shows one way to define a
Guess type that will only create an instance of Guess if the new function
receives a value between 1 and 100.
#![allow(unused)] fn main() { pub struct Guess { value: i32, } impl Guess { pub fn new(value: i32) -> Guess { if value < 1 || value > 100 { panic!("Guess value must be between 1 and 100, got {}.", value); } Guess { value } } pub fn value(&self) -> i32 { self.value } } }
Listing 9-10: A Guess type that will only continue with
values between 1 and 100
First, we define a struct named Guess that has a field named value that
holds an i32. This is where the number will be stored.
Then we implement an associated function named new on Guess that creates
instances of Guess values. The new function is defined to have one
parameter named value of type i32 and to return a Guess. The code in the
body of the new function tests value to make sure it’s between 1 and 100.
If value doesn’t pass this test, we make a panic! call, which will alert
the programmer who is writing the calling code that they have a bug they need
to fix, because creating a Guess with a value outside this range would
violate the contract that Guess::new is relying on. The conditions in which
Guess::new might panic should be discussed in its public-facing API
documentation; we’ll cover documentation conventions indicating the possibility
of a panic! in the API documentation that you create in Chapter 14. If
value does pass the test, we create a new Guess with its value field set
to the value parameter and return the Guess.
Next, we implement a method named value that borrows self, doesn’t have any
other parameters, and returns an i32. This kind of method is sometimes called
a getter, because its purpose is to get some data from its fields and return
it. This public method is necessary because the value field of the Guess
struct is private. It’s important that the value field be private so code
using the Guess struct is not allowed to set value directly: code outside
the module must use the Guess::new function to create an instance of
Guess, thereby ensuring there’s no way for a Guess to have a value that
hasn’t been checked by the conditions in the Guess::new function.
A function that has a parameter or returns only numbers between 1 and 100 could
then declare in its signature that it takes or returns a Guess rather than an
i32 and wouldn’t need to do any additional checks in its body.
Summary
Rust’s error handling features are designed to help you write more robust code.
The panic! macro signals that your program is in a state it can’t handle and
lets you tell the process to stop instead of trying to proceed with invalid or
incorrect values. The Result enum uses Rust’s type system to indicate that
operations might fail in a way that your code could recover from. You can use
Result to tell code that calls your code that it needs to handle potential
success or failure as well. Using panic! and Result in the appropriate
situations will make your code more reliable in the face of inevitable problems.
Now that you’ve seen useful ways that the standard library uses generics with
the Option and Result enums, we’ll talk about how generics work and how you
can use them in your code.
Generic Types, Traits, and Lifetimes
Every programming language has tools for effectively handling the duplication of concepts. In Rust, one such tool is generics. Generics are abstract stand-ins for concrete types or other properties. When we’re writing code, we can express the behavior of generics or how they relate to other generics without knowing what will be in their place when compiling and running the code.
Similar to the way a function takes parameters with unknown values to run the
same code on multiple concrete values, functions can take parameters of some
generic type instead of a concrete type, like i32 or String. In fact, we’ve
already used generics in Chapter 6 with Option<T>, Chapter 8 with Vec<T>
and HashMap<K, V>, and Chapter 9 with Result<T, E>. In this chapter, you’ll
explore how to define your own types, functions, and methods with generics!
First, we’ll review how to extract a function to reduce code duplication. Next, we’ll use the same technique to make a generic function from two functions that differ only in the types of their parameters. We’ll also explain how to use generic types in struct and enum definitions.
Then you’ll learn how to use traits to define behavior in a generic way. You can combine traits with generic types to constrain a generic type to only those types that have a particular behavior, as opposed to just any type.
Finally, we’ll discuss lifetimes, a variety of generics that give the compiler information about how references relate to each other. Lifetimes allow us to borrow values in many situations while still enabling the compiler to check that the references are valid.
Removing Duplication by Extracting a Function
Before diving into generics syntax, let’s first look at how to remove duplication that doesn’t involve generic types by extracting a function. Then we’ll apply this technique to extract a generic function! In the same way that you recognize duplicated code to extract into a function, you’ll start to recognize duplicated code that can use generics.
Consider a short program that finds the largest number in a list, as shown in Listing 10-1.
Filename: src/main.rs
fn main() { let number_list = vec![34, 50, 25, 100, 65]; let mut largest = number_list[0]; for number in number_list { if number > largest { largest = number; } } println!("The largest number is {}", largest); assert_eq!(largest, 100); }
Listing 10-1: Code to find the largest number in a list of numbers
This code stores a list of integers in the variable number_list and places
the first number in the list in a variable named largest. Then it iterates
through all the numbers in the list, and if the current number is greater than
the number stored in largest, it replaces the number in that variable.
However, if the current number is less than or equal to the largest number seen
so far, the variable doesn’t change, and the code moves on to the next number
in the list. After considering all the numbers in the list, largest should
hold the largest number, which in this case is 100.
To find the largest number in two different lists of numbers, we can duplicate the code in Listing 10-1 and use the same logic at two different places in the program, as shown in Listing 10-2.
Filename: src/main.rs
fn main() { let number_list = vec![34, 50, 25, 100, 65]; let mut largest = number_list[0]; for number in number_list { if number > largest { largest = number; } } println!("The largest number is {}", largest); let number_list = vec![102, 34, 6000, 89, 54, 2, 43, 8]; let mut largest = number_list[0]; for number in number_list { if number > largest { largest = number; } } println!("The largest number is {}", largest); }
Listing 10-2: Code to find the largest number in two lists of numbers
Although this code works, duplicating code is tedious and error prone. We also have to update the code in multiple places when we want to change it.
To eliminate this duplication, we can create an abstraction by defining a function that operates on any list of integers given to it in a parameter. This solution makes our code clearer and lets us express the concept of finding the largest number in a list abstractly.
In Listing 10-3, we extracted the code that finds the largest number into a
function named largest. Unlike the code in Listing 10-1, which can find the
largest number in only one particular list, this program can find the largest
number in two different lists.
Filename: src/main.rs
fn largest(list: &[i32]) -> i32 { let mut largest = list[0]; for &item in list { if item > largest { largest = item; } } largest } fn main() { let number_list = vec![34, 50, 25, 100, 65]; let result = largest(&number_list); println!("The largest number is {}", result); assert_eq!(result, 100); let number_list = vec![102, 34, 6000, 89, 54, 2, 43, 8]; let result = largest(&number_list); println!("The largest number is {}", result); assert_eq!(result, 6000); }
Listing 10-3: Abstracted code to find the largest number in two lists
The largest function has a parameter called list, which represents any
concrete slice of i32 values that we might pass into the function. As a
result, when we call the function, the code runs on the specific values that we
pass in. Don't worry about the syntax of the for loop for now. We aren't
referencing a reference to an i32 here; we're pattern matching and
destructuring each &i32 that the for loop gets so that item will be an
i32 inside the loop body. We'll cover pattern matching in detail in Chapter
18.
In sum, here are the steps we took to change the code from Listing 10-2 to Listing 10-3:
- Identify duplicate code.
- Extract the duplicate code into the body of the function and specify the inputs and return values of that code in the function signature.
- Update the two instances of duplicated code to call the function instead.
Next, we’ll use these same steps with generics to reduce code duplication in
different ways. In the same way that the function body can operate on an
abstract list instead of specific values, generics allow code to operate on
abstract types.
For example, say we had two functions: one that finds the largest item in a
slice of i32 values and one that finds the largest item in a slice of char
values. How would we eliminate that duplication? Let’s find out!
Generic Data Types
We can use generics to create definitions for items like function signatures or structs, which we can then use with many different concrete data types. Let’s first look at how to define functions, structs, enums, and methods using generics. Then we’ll discuss how generics affect code performance.
In Function Definitions
When defining a function that uses generics, we place the generics in the signature of the function where we would usually specify the data types of the parameters and return value. Doing so makes our code more flexible and provides more functionality to callers of our function while preventing code duplication.
Continuing with our largest function, Listing 10-4 shows two functions that
both find the largest value in a slice.
Filename: src/main.rs
fn largest_i32(list: &[i32]) -> i32 { let mut largest = list[0]; for &item in list { if item > largest { largest = item; } } largest } fn largest_char(list: &[char]) -> char { let mut largest = list[0]; for &item in list { if item > largest { largest = item; } } largest } fn main() { let number_list = vec![34, 50, 25, 100, 65]; let result = largest_i32(&number_list); println!("The largest number is {}", result); assert_eq!(result, 100); let char_list = vec!['y', 'm', 'a', 'q']; let result = largest_char(&char_list); println!("The largest char is {}", result); assert_eq!(result, 'y'); }
Listing 10-4: Two functions that differ only in their names and the types in their signatures
The largest_i32 function is the one we extracted in Listing 10-3 that finds
the largest i32 in a slice. The largest_char function finds the largest
char in a slice. The function bodies have the same code, so let’s eliminate
the duplication by introducing a generic type parameter in a single function.
To parameterize the types in the new function we’ll define, we need to name the
type parameter, just as we do for the value parameters to a function. You can
use any identifier as a type parameter name. But we’ll use T because, by
convention, parameter names in Rust are short, often just a letter, and Rust’s
type-naming convention is CamelCase. Short for “type,” T is the default
choice of most Rust programmers.
When we use a parameter in the body of the function, we have to declare the
parameter name in the signature so the compiler knows what that name means.
Similarly, when we use a type parameter name in a function signature, we have
to declare the type parameter name before we use it. To define the generic
largest function, place type name declarations inside angle brackets, <>,
between the name of the function and the parameter list, like this:
fn largest<T>(list: &[T]) -> T {
We read this definition as: the function largest is generic over some type
T. This function has one parameter named list, which is a slice of values
of type T. The largest function will return a value of the
same type T.
Listing 10-5 shows the combined largest function definition using the generic
data type in its signature. The listing also shows how we can call the function
with either a slice of i32 values or char values. Note that this code won’t
compile yet, but we’ll fix it later in this chapter.
Filename: src/main.rs
fn largest<T>(list: &[T]) -> T {
let mut largest = list[0];
for &item in list {
if item > largest {
largest = item;
}
}
largest
}
fn main() {
let number_list = vec![34, 50, 25, 100, 65];
let result = largest(&number_list);
println!("The largest number is {}", result);
let char_list = vec!['y', 'm', 'a', 'q'];
let result = largest(&char_list);
println!("The largest char is {}", result);
}
Listing 10-5: A definition of the largest function that
uses generic type parameters but doesn’t compile yet
If we compile this code right now, we’ll get this error:
$ cargo run
Compiling chapter10 v0.1.0 (file:///projects/chapter10)
error[E0369]: binary operation `>` cannot be applied to type `T`
--> src/main.rs:5:17
|
5 | if item > largest {
| ---- ^ ------- T
| |
| T
|
help: consider restricting type parameter `T`
|
1 | fn largest<T: std::cmp::PartialOrd>(list: &[T]) -> T {
| ^^^^^^^^^^^^^^^^^^^^^^
error: aborting due to previous error
For more information about this error, try `rustc --explain E0369`.
error: could not compile `chapter10`
To learn more, run the command again with --verbose.
The note mentions std::cmp::PartialOrd, which is a trait. We’ll talk about
traits in the next section. For now, this error states that the body of
largest won’t work for all possible types that T could be. Because we want
to compare values of type T in the body, we can only use types whose values
can be ordered. To enable comparisons, the standard library has the
std::cmp::PartialOrd trait that you can implement on types (see Appendix C
for more on this trait). You’ll learn how to specify that a generic type has a
particular trait in the “Traits as Parameters” section, but let’s first explore other ways of using generic type
parameters.
In Struct Definitions
We can also define structs to use a generic type parameter in one or more
fields using the <> syntax. Listing 10-6 shows how to define a Point<T>
struct to hold x and y coordinate values of any type.
Filename: src/main.rs
struct Point<T> { x: T, y: T, } fn main() { let integer = Point { x: 5, y: 10 }; let float = Point { x: 1.0, y: 4.0 }; }
Listing 10-6: A Point<T> struct that holds x and y
values of type T
The syntax for using generics in struct definitions is similar to that used in function definitions. First, we declare the name of the type parameter inside angle brackets just after the name of the struct. Then we can use the generic type in the struct definition where we would otherwise specify concrete data types.
Note that because we’ve used only one generic type to define Point<T>, this
definition says that the Point<T> struct is generic over some type T, and
the fields x and y are both that same type, whatever that type may be. If
we create an instance of a Point<T> that has values of different types, as in
Listing 10-7, our code won’t compile.
Filename: src/main.rs
struct Point<T> {
x: T,
y: T,
}
fn main() {
let wont_work = Point { x: 5, y: 4.0 };
}
Listing 10-7: The fields x and y must be the same
type because both have the same generic data type T.
In this example, when we assign the integer value 5 to x, we let the
compiler know that the generic type T will be an integer for this instance of
Point<T>. Then when we specify 4.0 for y, which we’ve defined to have the
same type as x, we’ll get a type mismatch error like this:
$ cargo run
Compiling chapter10 v0.1.0 (file:///projects/chapter10)
error[E0308]: mismatched types
--> src/main.rs:7:38
|
7 | let wont_work = Point { x: 5, y: 4.0 };
| ^^^ expected integer, found floating-point number
error: aborting due to previous error
For more information about this error, try `rustc --explain E0308`.
error: could not compile `chapter10`
To learn more, run the command again with --verbose.
To define a Point struct where x and y are both generics but could have
different types, we can use multiple generic type parameters. For example, in
Listing 10-8, we can change the definition of Point to be generic over types
T and U where x is of type T and y is of type U.
Filename: src/main.rs
struct Point<T, U> { x: T, y: U, } fn main() { let both_integer = Point { x: 5, y: 10 }; let both_float = Point { x: 1.0, y: 4.0 }; let integer_and_float = Point { x: 5, y: 4.0 }; }
Listing 10-8: A Point<T, U> generic over two types so
that x and y can be values of different types
Now all the instances of Point shown are allowed! You can use as many generic
type parameters in a definition as you want, but using more than a few makes
your code hard to read. When you need lots of generic types in your code, it
could indicate that your code needs restructuring into smaller pieces.
In Enum Definitions
As we did with structs, we can define enums to hold generic data types in their
variants. Let’s take another look at the Option<T> enum that the standard
library provides, which we used in Chapter 6:
#![allow(unused)] fn main() { enum Option<T> { Some(T), None, } }
This definition should now make more sense to you. As you can see, Option<T>
is an enum that is generic over type T and has two variants: Some, which
holds one value of type T, and a None variant that doesn’t hold any value.
By using the Option<T> enum, we can express the abstract concept of having an
optional value, and because Option<T> is generic, we can use this abstraction
no matter what the type of the optional value is.
Enums can use multiple generic types as well. The definition of the Result
enum that we used in Chapter 9 is one example:
#![allow(unused)] fn main() { enum Result<T, E> { Ok(T), Err(E), } }
The Result enum is generic over two types, T and E, and has two variants:
Ok, which holds a value of type T, and Err, which holds a value of type
E. This definition makes it convenient to use the Result enum anywhere we
have an operation that might succeed (return a value of some type T) or fail
(return an error of some type E). In fact, this is what we used to open a
file in Listing 9-3, where T was filled in with the type std::fs::File when
the file was opened successfully and E was filled in with the type
std::io::Error when there were problems opening the file.
When you recognize situations in your code with multiple struct or enum definitions that differ only in the types of the values they hold, you can avoid duplication by using generic types instead.
In Method Definitions
We can implement methods on structs and enums (as we did in Chapter 5) and use
generic types in their definitions, too. Listing 10-9 shows the Point<T>
struct we defined in Listing 10-6 with a method named x implemented on it.
Filename: src/main.rs
struct Point<T> { x: T, y: T, } impl<T> Point<T> { fn x(&self) -> &T { &self.x } } fn main() { let p = Point { x: 5, y: 10 }; println!("p.x = {}", p.x()); }
Listing 10-9: Implementing a method named x on the
Point<T> struct that will return a reference to the x field of type
T
Here, we’ve defined a method named x on Point<T> that returns a reference
to the data in the field x.
Note that we have to declare T just after impl so we can use it to specify
that we’re implementing methods on the type Point<T>. By declaring T as a
generic type after impl, Rust can identify that the type in the angle
brackets in Point is a generic type rather than a concrete type.
We could, for example, implement methods only on Point<f32> instances rather
than on Point<T> instances with any generic type. In Listing 10-10 we use the
concrete type f32, meaning we don’t declare any types after impl.
Filename: src/main.rs
struct Point<T> { x: T, y: T, } impl<T> Point<T> { fn x(&self) -> &T { &self.x } } impl Point<f32> { fn distance_from_origin(&self) -> f32 { (self.x.powi(2) + self.y.powi(2)).sqrt() } } fn main() { let p = Point { x: 5, y: 10 }; println!("p.x = {}", p.x()); }
Listing 10-10: An impl block that only applies to a
struct with a particular concrete type for the generic type parameter T
This code means the type Point<f32> will have a method named
distance_from_origin and other instances of Point<T> where T is not of
type f32 will not have this method defined. The method measures how far our
point is from the point at coordinates (0.0, 0.0) and uses mathematical
operations that are available only for floating point types.
Generic type parameters in a struct definition aren’t always the same as those
you use in that struct’s method signatures. For example, Listing 10-11 defines
the method mixup on the Point<T, U> struct from Listing 10-8. The method
takes another Point as a parameter, which might have different types from the
self Point we’re calling mixup on. The method creates a new Point
instance with the x value from the self Point (of type T) and the y
value from the passed-in Point (of type W).
Filename: src/main.rs
struct Point<T, U> { x: T, y: U, } impl<T, U> Point<T, U> { fn mixup<V, W>(self, other: Point<V, W>) -> Point<T, W> { Point { x: self.x, y: other.y, } } } fn main() { let p1 = Point { x: 5, y: 10.4 }; let p2 = Point { x: "Hello", y: 'c' }; let p3 = p1.mixup(p2); println!("p3.x = {}, p3.y = {}", p3.x, p3.y); }
Listing 10-11: A method that uses different generic types from its struct’s definition
In main, we’ve defined a Point that has an i32 for x (with value 5)
and an f64 for y (with value 10.4). The p2 variable is a Point struct
that has a string slice for x (with value "Hello") and a char for y
(with value c). Calling mixup on p1 with the argument p2 gives us p3,
which will have an i32 for x, because x came from p1. The p3 variable
will have a char for y, because y came from p2. The println! macro
call will print p3.x = 5, p3.y = c.
The purpose of this example is to demonstrate a situation in which some generic
parameters are declared with impl and some are declared with the method
definition. Here, the generic parameters T and U are declared after impl,
because they go with the struct definition. The generic parameters V and W
are declared after fn mixup, because they’re only relevant to the method.
Performance of Code Using Generics
You might be wondering whether there is a runtime cost when you’re using generic type parameters. The good news is that Rust implements generics in such a way that your code doesn’t run any slower using generic types than it would with concrete types.
Rust accomplishes this by performing monomorphization of the code that is using generics at compile time. Monomorphization is the process of turning generic code into specific code by filling in the concrete types that are used when compiled.
In this process, the compiler does the opposite of the steps we used to create the generic function in Listing 10-5: the compiler looks at all the places where generic code is called and generates code for the concrete types the generic code is called with.
Let’s look at how this works with an example that uses the standard library’s
Option<T> enum:
#![allow(unused)] fn main() { let integer = Some(5); let float = Some(5.0); }
When Rust compiles this code, it performs monomorphization. During that
process, the compiler reads the values that have been used in Option<T>
instances and identifies two kinds of Option<T>: one is i32 and the other
is f64. As such, it expands the generic definition of Option<T> into
Option_i32 and Option_f64, thereby replacing the generic definition with
the specific ones.
The monomorphized version of the code looks like the following. The generic
Option<T> is replaced with the specific definitions created by the compiler:
Filename: src/main.rs
enum Option_i32 { Some(i32), None, } enum Option_f64 { Some(f64), None, } fn main() { let integer = Option_i32::Some(5); let float = Option_f64::Some(5.0); }
Because Rust compiles generic code into code that specifies the type in each instance, we pay no runtime cost for using generics. When the code runs, it performs just as it would if we had duplicated each definition by hand. The process of monomorphization makes Rust’s generics extremely efficient at runtime.
Traits: Defining Shared Behavior
A trait tells the Rust compiler about functionality a particular type has and can share with other types. We can use traits to define shared behavior in an abstract way. We can use trait bounds to specify that a generic can be any type that has certain behavior.
Note: Traits are similar to a feature often called interfaces in other languages, although with some differences.
Defining a Trait
A type’s behavior consists of the methods we can call on that type. Different types share the same behavior if we can call the same methods on all of those types. Trait definitions are a way to group method signatures together to define a set of behaviors necessary to accomplish some purpose.
For example, let’s say we have multiple structs that hold various kinds and
amounts of text: a NewsArticle struct that holds a news story filed in a
particular location and a Tweet that can have at most 280 characters along
with metadata that indicates whether it was a new tweet, a retweet, or a reply
to another tweet.
We want to make a media aggregator library that can display summaries of data
that might be stored in a NewsArticle or Tweet instance. To do this, we
need a summary from each type, and we need to request that summary by calling a
summarize method on an instance. Listing 10-12 shows the definition of a
Summary trait that expresses this behavior.
Filename: src/lib.rs
pub trait Summary {
fn summarize(&self) -> String;
}
Listing 10-12: A Summary trait that consists of the
behavior provided by a summarize method
Here, we declare a trait using the trait keyword and then the trait’s name,
which is Summary in this case. Inside the curly brackets, we declare the
method signatures that describe the behaviors of the types that implement this
trait, which in this case is fn summarize(&self) -> String.
After the method signature, instead of providing an implementation within curly
brackets, we use a semicolon. Each type implementing this trait must provide
its own custom behavior for the body of the method. The compiler will enforce
that any type that has the Summary trait will have the method summarize
defined with this signature exactly.
A trait can have multiple methods in its body: the method signatures are listed one per line and each line ends in a semicolon.
Implementing a Trait on a Type
Now that we’ve defined the desired behavior using the Summary trait, we can
implement it on the types in our media aggregator. Listing 10-13 shows an
implementation of the Summary trait on the NewsArticle struct that uses the
headline, the author, and the location to create the return value of
summarize. For the Tweet struct, we define summarize as the username
followed by the entire text of the tweet, assuming that tweet content is
already limited to 280 characters.
Filename: src/lib.rs
pub trait Summary {
fn summarize(&self) -> String;
}
pub struct NewsArticle {
pub headline: String,
pub location: String,
pub author: String,
pub content: String,
}
impl Summary for NewsArticle {
fn summarize(&self) -> String {
format!("{}, by {} ({})", self.headline, self.author, self.location)
}
}
pub struct Tweet {
pub username: String,
pub content: String,
pub reply: bool,
pub retweet: bool,
}
impl Summary for Tweet {
fn summarize(&self) -> String {
format!("{}: {}", self.username, self.content)
}
}
Listing 10-13: Implementing the Summary trait on the
NewsArticle and Tweet types
Implementing a trait on a type is similar to implementing regular methods. The
difference is that after impl, we put the trait name that we want to
implement, then use the for keyword, and then specify the name of the type we
want to implement the trait for. Within the impl block, we put the method
signatures that the trait definition has defined. Instead of adding a semicolon
after each signature, we use curly brackets and fill in the method body with
the specific behavior that we want the methods of the trait to have for the
particular type.
After implementing the trait, we can call the methods on instances of
NewsArticle and Tweet in the same way we call regular methods, like this:
use chapter10::{self, Summary, Tweet};
fn main() {
let tweet = Tweet {
username: String::from("horse_ebooks"),
content: String::from(
"of course, as you probably already know, people",
),
reply: false,
retweet: false,
};
println!("1 new tweet: {}", tweet.summarize());
}
This code prints 1 new tweet: horse_ebooks: of course, as you probably already know, people.
Note that because we defined the Summary trait and the NewsArticle and
Tweet types in the same lib.rs in Listing 10-13, they’re all in the same
scope. Let’s say this lib.rs is for a crate we’ve called aggregator and
someone else wants to use our crate’s functionality to implement the Summary
trait on a struct defined within their library’s scope. They would need to
bring the trait into their scope first. They would do so by specifying use aggregator::Summary;, which then would enable them to implement Summary for
their type. The Summary trait would also need to be a public trait for
another crate to implement it, which it is because we put the pub keyword
before trait in Listing 10-12.
One restriction to note with trait implementations is that we can implement a
trait on a type only if either the trait or the type is local to our crate.
For example, we can implement standard library traits like Display on a
custom type like Tweet as part of our aggregator crate functionality,
because the type Tweet is local to our aggregator crate. We can also
implement Summary on Vec<T> in our aggregator crate, because the
trait Summary is local to our aggregator crate.
But we can’t implement external traits on external types. For example, we can’t
implement the Display trait on Vec<T> within our aggregator crate,
because Display and Vec<T> are defined in the standard library and aren’t
local to our aggregator crate. This restriction is part of a property of
programs called coherence, and more specifically the orphan rule, so named
because the parent type is not present. This rule ensures that other people’s
code can’t break your code and vice versa. Without the rule, two crates could
implement the same trait for the same type, and Rust wouldn’t know which
implementation to use.
Default Implementations
Sometimes it’s useful to have default behavior for some or all of the methods in a trait instead of requiring implementations for all methods on every type. Then, as we implement the trait on a particular type, we can keep or override each method’s default behavior.
Listing 10-14 shows how to specify a default string for the summarize method
of the Summary trait instead of only defining the method signature, as we did
in Listing 10-12.
Filename: src/lib.rs
pub trait Summary {
fn summarize(&self) -> String {
String::from("(Read more...)")
}
}
pub struct NewsArticle {
pub headline: String,
pub location: String,
pub author: String,
pub content: String,
}
impl Summary for NewsArticle {}
pub struct Tweet {
pub username: String,
pub content: String,
pub reply: bool,
pub retweet: bool,
}
impl Summary for Tweet {
fn summarize(&self) -> String {
format!("{}: {}", self.username, self.content)
}
}
Listing 10-14: Definition of a Summary trait with a
default implementation of the summarize method
To use a default implementation to summarize instances of NewsArticle instead
of defining a custom implementation, we specify an empty impl block with
impl Summary for NewsArticle {}.
Even though we’re no longer defining the summarize method on NewsArticle
directly, we’ve provided a default implementation and specified that
NewsArticle implements the Summary trait. As a result, we can still call
the summarize method on an instance of NewsArticle, like this:
use chapter10::{self, NewsArticle, Summary};
fn main() {
let article = NewsArticle {
headline: String::from("Penguins win the Stanley Cup Championship!"),
location: String::from("Pittsburgh, PA, USA"),
author: String::from("Iceburgh"),
content: String::from(
"The Pittsburgh Penguins once again are the best \
hockey team in the NHL.",
),
};
println!("New article available! {}", article.summarize());
}
This code prints New article available! (Read more...).
Creating a default implementation for summarize doesn’t require us to change
anything about the implementation of Summary on Tweet in Listing 10-13. The
reason is that the syntax for overriding a default implementation is the same
as the syntax for implementing a trait method that doesn’t have a default
implementation.
Default implementations can call other methods in the same trait, even if those
other methods don’t have a default implementation. In this way, a trait can
provide a lot of useful functionality and only require implementors to specify
a small part of it. For example, we could define the Summary trait to have a
summarize_author method whose implementation is required, and then define a
summarize method that has a default implementation that calls the
summarize_author method:
pub trait Summary {
fn summarize_author(&self) -> String;
fn summarize(&self) -> String {
format!("(Read more from {}...)", self.summarize_author())
}
}
pub struct Tweet {
pub username: String,
pub content: String,
pub reply: bool,
pub retweet: bool,
}
impl Summary for Tweet {
fn summarize_author(&self) -> String {
format!("@{}", self.username)
}
}
To use this version of Summary, we only need to define summarize_author
when we implement the trait on a type:
pub trait Summary {
fn summarize_author(&self) -> String;
fn summarize(&self) -> String {
format!("(Read more from {}...)", self.summarize_author())
}
}
pub struct Tweet {
pub username: String,
pub content: String,
pub reply: bool,
pub retweet: bool,
}
impl Summary for Tweet {
fn summarize_author(&self) -> String {
format!("@{}", self.username)
}
}
After we define summarize_author, we can call summarize on instances of the
Tweet struct, and the default implementation of summarize will call the
definition of summarize_author that we’ve provided. Because we’ve implemented
summarize_author, the Summary trait has given us the behavior of the
summarize method without requiring us to write any more code.
use chapter10::{self, Summary, Tweet};
fn main() {
let tweet = Tweet {
username: String::from("horse_ebooks"),
content: String::from(
"of course, as you probably already know, people",
),
reply: false,
retweet: false,
};
println!("1 new tweet: {}", tweet.summarize());
}
This code prints 1 new tweet: (Read more from @horse_ebooks...).
Note that it isn’t possible to call the default implementation from an overriding implementation of that same method.
Traits as Parameters
Now that you know how to define and implement traits, we can explore how to use traits to define functions that accept many different types.
For example, in Listing 10-13, we implemented the Summary trait on the
NewsArticle and Tweet types. We can define a notify function that calls
the summarize method on its item parameter, which is of some type that
implements the Summary trait. To do this, we can use the impl Trait
syntax, like this:
pub trait Summary {
fn summarize(&self) -> String;
}
pub struct NewsArticle {
pub headline: String,
pub location: String,
pub author: String,
pub content: String,
}
impl Summary for NewsArticle {
fn summarize(&self) -> String {
format!("{}, by {} ({})", self.headline, self.author, self.location)
}
}
pub struct Tweet {
pub username: String,
pub content: String,
pub reply: bool,
pub retweet: bool,
}
impl Summary for Tweet {
fn summarize(&self) -> String {
format!("{}: {}", self.username, self.content)
}
}
pub fn notify(item: &impl Summary) {
println!("Breaking news! {}", item.summarize());
}
Instead of a concrete type for the item parameter, we specify the impl
keyword and the trait name. This parameter accepts any type that implements the
specified trait. In the body of notify, we can call any methods on item
that come from the Summary trait, such as summarize. We can call notify
and pass in any instance of NewsArticle or Tweet. Code that calls the
function with any other type, such as a String or an i32, won’t compile
because those types don’t implement Summary.
Trait Bound Syntax
The impl Trait syntax works for straightforward cases but is actually
syntax sugar for a longer form, which is called a trait bound; it looks like
this:
pub fn notify<T: Summary>(item: &T) {
println!("Breaking news! {}", item.summarize());
}
This longer form is equivalent to the example in the previous section but is more verbose. We place trait bounds with the declaration of the generic type parameter after a colon and inside angle brackets.
The impl Trait syntax is convenient and makes for more concise code in simple
cases. The trait bound syntax can express more complexity in other cases. For
example, we can have two parameters that implement Summary. Using the impl Trait syntax looks like this:
pub fn notify(item1: &impl Summary, item2: &impl Summary) {
If we wanted this function to allow item1 and item2 to have different
types, using impl Trait would be appropriate (as long as both types implement
Summary). If we wanted to force both parameters to have the same type, that’s
only possible to express using a trait bound, like this:
pub fn notify<T: Summary>(item1: &T, item2: &T) {
The generic type T specified as the type of the item1 and item2
parameters constrains the function such that the concrete type of the value
passed as an argument for item1 and item2 must be the same.
Specifying Multiple Trait Bounds with the + Syntax
We can also specify more than one trait bound. Say we wanted notify to use
display formatting on item as well as the summarize method: we specify in
the notify definition that item must implement both Display and
Summary. We can do so using the + syntax:
pub fn notify(item: &(impl Summary + Display)) {
The + syntax is also valid with trait bounds on generic types:
pub fn notify<T: Summary + Display>(item: &T) {
With the two trait bounds specified, the body of notify can call summarize
and use {} to format item.
Clearer Trait Bounds with where Clauses
Using too many trait bounds has its downsides. Each generic has its own trait
bounds, so functions with multiple generic type parameters can contain lots of
trait bound information between the function’s name and its parameter list,
making the function signature hard to read. For this reason, Rust has alternate
syntax for specifying trait bounds inside a where clause after the function
signature. So instead of writing this:
fn some_function<T: Display + Clone, U: Clone + Debug>(t: &T, u: &U) -> i32 {
we can use a where clause, like this:
fn some_function<T, U>(t: &T, u: &U) -> i32
where T: Display + Clone,
U: Clone + Debug
{
This function’s signature is less cluttered: the function name, parameter list, and return type are close together, similar to a function without lots of trait bounds.
Returning Types that Implement Traits
We can also use the impl Trait syntax in the return position to return a
value of some type that implements a trait, as shown here:
pub trait Summary {
fn summarize(&self) -> String;
}
pub struct NewsArticle {
pub headline: String,
pub location: String,
pub author: String,
pub content: String,
}
impl Summary for NewsArticle {
fn summarize(&self) -> String {
format!("{}, by {} ({})", self.headline, self.author, self.location)
}
}
pub struct Tweet {
pub username: String,
pub content: String,
pub reply: bool,
pub retweet: bool,
}
impl Summary for Tweet {
fn summarize(&self) -> String {
format!("{}: {}", self.username, self.content)
}
}
fn returns_summarizable() -> impl Summary {
Tweet {
username: String::from("horse_ebooks"),
content: String::from(
"of course, as you probably already know, people",
),
reply: false,
retweet: false,
}
}
By using impl Summary for the return type, we specify that the
returns_summarizable function returns some type that implements the Summary
trait without naming the concrete type. In this case, returns_summarizable
returns a Tweet, but the code calling this function doesn’t know that.
The ability to return a type that is only specified by the trait it implements
is especially useful in the context of closures and iterators, which we cover
in Chapter 13. Closures and iterators create types that only the compiler knows
or types that are very long to specify. The impl Trait syntax lets you
concisely specify that a function returns some type that implements the
Iterator trait without needing to write out a very long type.
However, you can only use impl Trait if you’re returning a single type. For
example, this code that returns either a NewsArticle or a Tweet with the
return type specified as impl Summary wouldn’t work:
pub trait Summary {
fn summarize(&self) -> String;
}
pub struct NewsArticle {
pub headline: String,
pub location: String,
pub author: String,
pub content: String,
}
impl Summary for NewsArticle {
fn summarize(&self) -> String {
format!("{}, by {} ({})", self.headline, self.author, self.location)
}
}
pub struct Tweet {
pub username: String,
pub content: String,
pub reply: bool,
pub retweet: bool,
}
impl Summary for Tweet {
fn summarize(&self) -> String {
format!("{}: {}", self.username, self.content)
}
}
fn returns_summarizable(switch: bool) -> impl Summary {
if switch {
NewsArticle {
headline: String::from(
"Penguins win the Stanley Cup Championship!",
),
location: String::from("Pittsburgh, PA, USA"),
author: String::from("Iceburgh"),
content: String::from(
"The Pittsburgh Penguins once again are the best \
hockey team in the NHL.",
),
}
} else {
Tweet {
username: String::from("horse_ebooks"),
content: String::from(
"of course, as you probably already know, people",
),
reply: false,
retweet: false,
}
}
}
Returning either a NewsArticle or a Tweet isn’t allowed due to restrictions
around how the impl Trait syntax is implemented in the compiler. We’ll cover
how to write a function with this behavior in the “Using Trait Objects That
Allow for Values of Different
Types” section of Chapter 17.
Fixing the largest Function with Trait Bounds
Now that you know how to specify the behavior you want to use using the generic
type parameter’s bounds, let’s return to Listing 10-5 to fix the definition of
the largest function that uses a generic type parameter! Last time we tried
to run that code, we received this error:
$ cargo run
Compiling chapter10 v0.1.0 (file:///projects/chapter10)
error[E0369]: binary operation `>` cannot be applied to type `T`
--> src/main.rs:5:17
|
5 | if item > largest {
| ---- ^ ------- T
| |
| T
|
help: consider restricting type parameter `T`
|
1 | fn largest<T: std::cmp::PartialOrd>(list: &[T]) -> T {
| ^^^^^^^^^^^^^^^^^^^^^^
error: aborting due to previous error
For more information about this error, try `rustc --explain E0369`.
error: could not compile `chapter10`
To learn more, run the command again with --verbose.
In the body of largest we wanted to compare two values of type T using the
greater than (>) operator. Because that operator is defined as a default
method on the standard library trait std::cmp::PartialOrd, we need to specify
PartialOrd in the trait bounds for T so the largest function can work on
slices of any type that we can compare. We don’t need to bring PartialOrd
into scope because it’s in the prelude. Change the signature of largest to
look like this:
fn largest<T: PartialOrd>(list: &[T]) -> T {
let mut largest = list[0];
for &item in list {
if item > largest {
largest = item;
}
}
largest
}
fn main() {
let number_list = vec![34, 50, 25, 100, 65];
let result = largest(&number_list);
println!("The largest number is {}", result);
let char_list = vec!['y', 'm', 'a', 'q'];
let result = largest(&char_list);
println!("The largest char is {}", result);
}
This time when we compile the code, we get a different set of errors:
$ cargo run
Compiling chapter10 v0.1.0 (file:///projects/chapter10)
error[E0508]: cannot move out of type `[T]`, a non-copy slice
--> src/main.rs:2:23
|
2 | let mut largest = list[0];
| ^^^^^^^
| |
| cannot move out of here
| move occurs because `list[_]` has type `T`, which does not implement the `Copy` trait
| help: consider borrowing here: `&list[0]`
error[E0507]: cannot move out of a shared reference
--> src/main.rs:4:18
|
4 | for &item in list {
| ----- ^^^^
| ||
| |data moved here
| |move occurs because `item` has type `T`, which does not implement the `Copy` trait
| help: consider removing the `&`: `item`
error: aborting due to 2 previous errors
Some errors have detailed explanations: E0507, E0508.
For more information about an error, try `rustc --explain E0507`.
error: could not compile `chapter10`
To learn more, run the command again with --verbose.
The key line in this error is cannot move out of type [T], a non-copy slice.
With our non-generic versions of the largest function, we were only trying to
find the largest i32 or char. As discussed in the “Stack-Only Data:
Copy” section in Chapter 4, types like
i32 and char that have a known size can be stored on the stack, so they
implement the Copy trait. But when we made the largest function generic,
it became possible for the list parameter to have types in it that don’t
implement the Copy trait. Consequently, we wouldn’t be able to move the
value out of list[0] and into the largest variable, resulting in this
error.
To call this code with only those types that implement the Copy trait, we can
add Copy to the trait bounds of T! Listing 10-15 shows the complete code of
a generic largest function that will compile as long as the types of the
values in the slice that we pass into the function implement the PartialOrd
and Copy traits, like i32 and char do.
Filename: src/main.rs
fn largest<T: PartialOrd + Copy>(list: &[T]) -> T { let mut largest = list[0]; for &item in list { if item > largest { largest = item; } } largest } fn main() { let number_list = vec![34, 50, 25, 100, 65]; let result = largest(&number_list); println!("The largest number is {}", result); let char_list = vec!['y', 'm', 'a', 'q']; let result = largest(&char_list); println!("The largest char is {}", result); }
Listing 10-15: A working definition of the largest
function that works on any generic type that implements the PartialOrd and
Copy traits
If we don’t want to restrict the largest function to the types that implement
the Copy trait, we could specify that T has the trait bound Clone instead
of Copy. Then we could clone each value in the slice when we want the
largest function to have ownership. Using the clone function means we’re
potentially making more heap allocations in the case of types that own heap
data like String, and heap allocations can be slow if we’re working with
large amounts of data.
Another way we could implement largest is for the function to return a
reference to a T value in the slice. If we change the return type to &T
instead of T, thereby changing the body of the function to return a
reference, we wouldn’t need the Clone or Copy trait bounds and we could
avoid heap allocations. Try implementing these alternate solutions on your own!
Using Trait Bounds to Conditionally Implement Methods
By using a trait bound with an impl block that uses generic type parameters,
we can implement methods conditionally for types that implement the specified
traits. For example, the type Pair<T> in Listing 10-16 always implements the
new function. But Pair<T> only implements the cmp_display method if its
inner type T implements the PartialOrd trait that enables comparison and
the Display trait that enables printing.
Filename: src/lib.rs
use std::fmt::Display;
struct Pair<T> {
x: T,
y: T,
}
impl<T> Pair<T> {
fn new(x: T, y: T) -> Self {
Self { x, y }
}
}
impl<T: Display + PartialOrd> Pair<T> {
fn cmp_display(&self) {
if self.x >= self.y {
println!("The largest member is x = {}", self.x);
} else {
println!("The largest member is y = {}", self.y);
}
}
}
Listing 10-16: Conditionally implement methods on a generic type depending on trait bounds
We can also conditionally implement a trait for any type that implements
another trait. Implementations of a trait on any type that satisfies the trait
bounds are called blanket implementations and are extensively used in the
Rust standard library. For example, the standard library implements the
ToString trait on any type that implements the Display trait. The impl
block in the standard library looks similar to this code:
impl<T: Display> ToString for T {
// --snip--
}
Because the standard library has this blanket implementation, we can call the
to_string method defined by the ToString trait on any type that implements
the Display trait. For example, we can turn integers into their corresponding
String values like this because integers implement Display:
#![allow(unused)] fn main() { let s = 3.to_string(); }
Blanket implementations appear in the documentation for the trait in the “Implementors” section.
Traits and trait bounds let us write code that uses generic type parameters to reduce duplication but also specify to the compiler that we want the generic type to have particular behavior. The compiler can then use the trait bound information to check that all the concrete types used with our code provide the correct behavior. In dynamically typed languages, we would get an error at runtime if we called a method on a type which didn’t define the method. But Rust moves these errors to compile time so we’re forced to fix the problems before our code is even able to run. Additionally, we don’t have to write code that checks for behavior at runtime because we’ve already checked at compile time. Doing so improves performance without having to give up the flexibility of generics.
Another kind of generic that we’ve already been using is called lifetimes. Rather than ensuring that a type has the behavior we want, lifetimes ensure that references are valid as long as we need them to be. Let’s look at how lifetimes do that.
Validating References with Lifetimes
One detail we didn’t discuss in the “References and Borrowing” section in Chapter 4 is that every reference in Rust has a lifetime, which is the scope for which that reference is valid. Most of the time, lifetimes are implicit and inferred, just like most of the time, types are inferred. We must annotate types when multiple types are possible. In a similar way, we must annotate lifetimes when the lifetimes of references could be related in a few different ways. Rust requires us to annotate the relationships using generic lifetime parameters to ensure the actual references used at runtime will definitely be valid.
The concept of lifetimes is somewhat different from tools in other programming languages, arguably making lifetimes Rust’s most distinctive feature. Although we won’t cover lifetimes in their entirety in this chapter, we’ll discuss common ways you might encounter lifetime syntax so you can become familiar with the concepts.
Preventing Dangling References with Lifetimes
The main aim of lifetimes is to prevent dangling references, which cause a program to reference data other than the data it’s intended to reference. Consider the program in Listing 10-17, which has an outer scope and an inner scope.
fn main() {
{
let r;
{
let x = 5;
r = &x;
}
println!("r: {}", r);
}
}
Listing 10-17: An attempt to use a reference whose value has gone out of scope
Note: The examples in Listings 10-17, 10-18, and 10-24 declare variables without giving them an initial value, so the variable name exists in the outer scope. At first glance, this might appear to be in conflict with Rust’s having no null values. However, if we try to use a variable before giving it a value, we’ll get a compile-time error, which shows that Rust indeed does not allow null values.
The outer scope declares a variable named r with no initial value, and the
inner scope declares a variable named x with the initial value of 5. Inside
the inner scope, we attempt to set the value of r as a reference to x. Then
the inner scope ends, and we attempt to print the value in r. This code won’t
compile because the value r is referring to has gone out of scope before we
try to use it. Here is the error message:
$ cargo run
Compiling chapter10 v0.1.0 (file:///projects/chapter10)
error[E0597]: `x` does not live long enough
--> src/main.rs:7:17
|
7 | r = &x;
| ^^ borrowed value does not live long enough
8 | }
| - `x` dropped here while still borrowed
9 |
10 | println!("r: {}", r);
| - borrow later used here
error: aborting due to previous error
For more information about this error, try `rustc --explain E0597`.
error: could not compile `chapter10`
To learn more, run the command again with --verbose.
The variable x doesn’t “live long enough.” The reason is that x will be out
of scope when the inner scope ends on line 7. But r is still valid for the
outer scope; because its scope is larger, we say that it “lives longer.” If
Rust allowed this code to work, r would be referencing memory that was
deallocated when x went out of scope, and anything we tried to do with r
wouldn’t work correctly. So how does Rust determine that this code is invalid?
It uses a borrow checker.
The Borrow Checker
The Rust compiler has a borrow checker that compares scopes to determine whether all borrows are valid. Listing 10-18 shows the same code as Listing 10-17 but with annotations showing the lifetimes of the variables.
fn main() {
{
let r; // ---------+-- 'a
// |
{ // |
let x = 5; // -+-- 'b |
r = &x; // | |
} // -+ |
// |
println!("r: {}", r); // |
} // ---------+
}
Listing 10-18: Annotations of the lifetimes of r and
x, named 'a and 'b, respectively
Here, we’ve annotated the lifetime of r with 'a and the lifetime of x
with 'b. As you can see, the inner 'b block is much smaller than the outer
'a lifetime block. At compile time, Rust compares the size of the two
lifetimes and sees that r has a lifetime of 'a but that it refers to memory
with a lifetime of 'b. The program is rejected because 'b is shorter than
'a: the subject of the reference doesn’t live as long as the reference.
Listing 10-19 fixes the code so it doesn’t have a dangling reference and compiles without any errors.
fn main() { { let x = 5; // ----------+-- 'b // | let r = &x; // --+-- 'a | // | | println!("r: {}", r); // | | // --+ | } // ----------+ }
Listing 10-19: A valid reference because the data has a longer lifetime than the reference
Here, x has the lifetime 'b, which in this case is larger than 'a. This
means r can reference x because Rust knows that the reference in r will
always be valid while x is valid.
Now that you know where the lifetimes of references are and how Rust analyzes lifetimes to ensure references will always be valid, let’s explore generic lifetimes of parameters and return values in the context of functions.
Generic Lifetimes in Functions
Let’s write a function that returns the longer of two string slices. This
function will take two string slices and return a string slice. After we’ve
implemented the longest function, the code in Listing 10-20 should print The longest string is abcd.
Filename: src/main.rs
fn main() {
let string1 = String::from("abcd");
let string2 = "xyz";
let result = longest(string1.as_str(), string2);
println!("The longest string is {}", result);
}
Listing 10-20: A main function that calls the longest
function to find the longer of two string slices
Note that we want the function to take string slices, which are references,
because we don’t want the longest function to take ownership of its
parameters. Refer to the “String Slices as
Parameters” section in Chapter 4
for more discussion about why the parameters we use in Listing 10-20 are the
ones we want.
If we try to implement the longest function as shown in Listing 10-21, it
won’t compile.
Filename: src/main.rs
fn main() {
let string1 = String::from("abcd");
let string2 = "xyz";
let result = longest(string1.as_str(), string2);
println!("The longest string is {}", result);
}
fn longest(x: &str, y: &str) -> &str {
if x.len() > y.len() {
x
} else {
y
}
}
Listing 10-21: An implementation of the longest
function that returns the longer of two string slices but does not yet
compile
Instead, we get the following error that talks about lifetimes:
$ cargo run
Compiling chapter10 v0.1.0 (file:///projects/chapter10)
error[E0106]: missing lifetime specifier
--> src/main.rs:9:33
|
9 | fn longest(x: &str, y: &str) -> &str {
| ---- ---- ^ expected named lifetime parameter
|
= help: this function's return type contains a borrowed value, but the signature does not say whether it is borrowed from `x` or `y`
help: consider introducing a named lifetime parameter
|
9 | fn longest<'a>(x: &'a str, y: &'a str) -> &'a str {
| ^^^^ ^^^^^^^ ^^^^^^^ ^^^
error: aborting due to previous error
For more information about this error, try `rustc --explain E0106`.
error: could not compile `chapter10`
To learn more, run the command again with --verbose.
The help text reveals that the return type needs a generic lifetime parameter
on it because Rust can’t tell whether the reference being returned refers to
x or y. Actually, we don’t know either, because the if block in the body
of this function returns a reference to x and the else block returns a
reference to y!
When we’re defining this function, we don’t know the concrete values that will
be passed into this function, so we don’t know whether the if case or the
else case will execute. We also don’t know the concrete lifetimes of the
references that will be passed in, so we can’t look at the scopes as we did in
Listings 10-18 and 10-19 to determine whether the reference we return will
always be valid. The borrow checker can’t determine this either, because it
doesn’t know how the lifetimes of x and y relate to the lifetime of the
return value. To fix this error, we’ll add generic lifetime parameters that
define the relationship between the references so the borrow checker can
perform its analysis.
Lifetime Annotation Syntax
Lifetime annotations don’t change how long any of the references live. Just as functions can accept any type when the signature specifies a generic type parameter, functions can accept references with any lifetime by specifying a generic lifetime parameter. Lifetime annotations describe the relationships of the lifetimes of multiple references to each other without affecting the lifetimes.
Lifetime annotations have a slightly unusual syntax: the names of lifetime
parameters must start with an apostrophe (') and are usually all lowercase and
very short, like generic types. Most people use the name 'a. We place
lifetime parameter annotations after the & of a reference, using a space to
separate the annotation from the reference’s type.
Here are some examples: a reference to an i32 without a lifetime parameter, a
reference to an i32 that has a lifetime parameter named 'a, and a mutable
reference to an i32 that also has the lifetime 'a.
&i32 // a reference
&'a i32 // a reference with an explicit lifetime
&'a mut i32 // a mutable reference with an explicit lifetime
One lifetime annotation by itself doesn’t have much meaning, because the
annotations are meant to tell Rust how generic lifetime parameters of multiple
references relate to each other. For example, let’s say we have a function with
the parameter first that is a reference to an i32 with lifetime 'a. The
function also has another parameter named second that is another reference to
an i32 that also has the lifetime 'a. The lifetime annotations indicate
that the references first and second must both live as long as that generic
lifetime.
Lifetime Annotations in Function Signatures
Now let’s examine lifetime annotations in the context of the longest
function. As with generic type parameters, we need to declare generic lifetime
parameters inside angle brackets between the function name and the parameter
list. The constraint we want to express in this signature is that all the
references in the parameters and the return value must have the same lifetime.
We’ll name the lifetime 'a and then add it to each reference, as shown in
Listing 10-22.
Filename: src/main.rs
fn main() { let string1 = String::from("abcd"); let string2 = "xyz"; let result = longest(string1.as_str(), string2); println!("The longest string is {}", result); } fn longest<'a>(x: &'a str, y: &'a str) -> &'a str { if x.len() > y.len() { x } else { y } }
Listing 10-22: The longest function definition
specifying that all the references in the signature must have the same lifetime
'a
This code should compile and produce the result we want when we use it with the
main function in Listing 10-20.
The function signature now tells Rust that for some lifetime 'a, the function
takes two parameters, both of which are string slices that live at least as
long as lifetime 'a. The function signature also tells Rust that the string
slice returned from the function will live at least as long as lifetime 'a.
In practice, it means that the lifetime of the reference returned by the
longest function is the same as the smaller of the lifetimes of the
references passed in. These constraints are what we want Rust to enforce.
Remember, when we specify the lifetime parameters in this function signature,
we’re not changing the lifetimes of any values passed in or returned. Rather,
we’re specifying that the borrow checker should reject any values that don’t
adhere to these constraints. Note that the longest function doesn’t need to
know exactly how long x and y will live, only that some scope can be
substituted for 'a that will satisfy this signature.
When annotating lifetimes in functions, the annotations go in the function signature, not in the function body. Rust can analyze the code within the function without any help. However, when a function has references to or from code outside that function, it becomes almost impossible for Rust to figure out the lifetimes of the parameters or return values on its own. The lifetimes might be different each time the function is called. This is why we need to annotate the lifetimes manually.
When we pass concrete references to longest, the concrete lifetime that is
substituted for 'a is the part of the scope of x that overlaps with the
scope of y. In other words, the generic lifetime 'a will get the concrete
lifetime that is equal to the smaller of the lifetimes of x and y. Because
we’ve annotated the returned reference with the same lifetime parameter 'a,
the returned reference will also be valid for the length of the smaller of the
lifetimes of x and y.
Let’s look at how the lifetime annotations restrict the longest function by
passing in references that have different concrete lifetimes. Listing 10-23 is
a straightforward example.
Filename: src/main.rs
fn main() { let string1 = String::from("long string is long"); { let string2 = String::from("xyz"); let result = longest(string1.as_str(), string2.as_str()); println!("The longest string is {}", result); } } fn longest<'a>(x: &'a str, y: &'a str) -> &'a str { if x.len() > y.len() { x } else { y } }
Listing 10-23: Using the longest function with
references to String values that have different concrete lifetimes
In this example, string1 is valid until the end of the outer scope, string2
is valid until the end of the inner scope, and result references something
that is valid until the end of the inner scope. Run this code, and you’ll see
that the borrow checker approves of this code; it will compile and print The longest string is long string is long.
Next, let’s try an example that shows that the lifetime of the reference in
result must be the smaller lifetime of the two arguments. We’ll move the
declaration of the result variable outside the inner scope but leave the
assignment of the value to the result variable inside the scope with
string2. Then we’ll move the println! that uses result outside the inner
scope, after the inner scope has ended. The code in Listing 10-24 will not
compile.
Filename: src/main.rs
fn main() {
let string1 = String::from("long string is long");
let result;
{
let string2 = String::from("xyz");
result = longest(string1.as_str(), string2.as_str());
}
println!("The longest string is {}", result);
}
fn longest<'a>(x: &'a str, y: &'a str) -> &'a str {
if x.len() > y.len() {
x
} else {
y
}
}
Listing 10-24: Attempting to use result after string2
has gone out of scope
When we try to compile this code, we’ll get this error:
$ cargo run
Compiling chapter10 v0.1.0 (file:///projects/chapter10)
error[E0597]: `string2` does not live long enough
--> src/main.rs:6:44
|
6 | result = longest(string1.as_str(), string2.as_str());
| ^^^^^^^ borrowed value does not live long enough
7 | }
| - `string2` dropped here while still borrowed
8 | println!("The longest string is {}", result);
| ------ borrow later used here
error: aborting due to previous error
For more information about this error, try `rustc --explain E0597`.
error: could not compile `chapter10`
To learn more, run the command again with --verbose.
The error shows that for result to be valid for the println! statement,
string2 would need to be valid until the end of the outer scope. Rust knows
this because we annotated the lifetimes of the function parameters and return
values using the same lifetime parameter 'a.
As humans, we can look at this code and see that string1 is longer than
string2 and therefore result will contain a reference to string1.
Because string1 has not gone out of scope yet, a reference to string1 will
still be valid for the println! statement. However, the compiler can’t see
that the reference is valid in this case. We’ve told Rust that the lifetime of
the reference returned by the longest function is the same as the smaller of
the lifetimes of the references passed in. Therefore, the borrow checker
disallows the code in Listing 10-24 as possibly having an invalid reference.
Try designing more experiments that vary the values and lifetimes of the
references passed in to the longest function and how the returned reference
is used. Make hypotheses about whether or not your experiments will pass the
borrow checker before you compile; then check to see if you’re right!
Thinking in Terms of Lifetimes
The way in which you need to specify lifetime parameters depends on what your
function is doing. For example, if we changed the implementation of the
longest function to always return the first parameter rather than the longest
string slice, we wouldn’t need to specify a lifetime on the y parameter. The
following code will compile:
Filename: src/main.rs
fn main() { let string1 = String::from("abcd"); let string2 = "efghijklmnopqrstuvwxyz"; let result = longest(string1.as_str(), string2); println!("The longest string is {}", result); } fn longest<'a>(x: &'a str, y: &str) -> &'a str { x }
In this example, we’ve specified a lifetime parameter 'a for the parameter
x and the return type, but not for the parameter y, because the lifetime of
y does not have any relationship with the lifetime of x or the return value.
When returning a reference from a function, the lifetime parameter for the
return type needs to match the lifetime parameter for one of the parameters. If
the reference returned does not refer to one of the parameters, it must refer
to a value created within this function, which would be a dangling reference
because the value will go out of scope at the end of the function. Consider
this attempted implementation of the longest function that won’t compile:
Filename: src/main.rs
fn main() {
let string1 = String::from("abcd");
let string2 = "xyz";
let result = longest(string1.as_str(), string2);
println!("The longest string is {}", result);
}
fn longest<'a>(x: &str, y: &str) -> &'a str {
let result = String::from("really long string");
result.as_str()
}
Here, even though we’ve specified a lifetime parameter 'a for the return
type, this implementation will fail to compile because the return value
lifetime is not related to the lifetime of the parameters at all. Here is the
error message we get:
$ cargo run
Compiling chapter10 v0.1.0 (file:///projects/chapter10)
error[E0515]: cannot return value referencing local variable `result`
--> src/main.rs:11:5
|
11 | result.as_str()
| ------^^^^^^^^^
| |
| returns a value referencing data owned by the current function
| `result` is borrowed here
error: aborting due to previous error
For more information about this error, try `rustc --explain E0515`.
error: could not compile `chapter10`
To learn more, run the command again with --verbose.
The problem is that result goes out of scope and gets cleaned up at the end
of the longest function. We’re also trying to return a reference to result
from the function. There is no way we can specify lifetime parameters that
would change the dangling reference, and Rust won’t let us create a dangling
reference. In this case, the best fix would be to return an owned data type
rather than a reference so the calling function is then responsible for
cleaning up the value.
Ultimately, lifetime syntax is about connecting the lifetimes of various parameters and return values of functions. Once they’re connected, Rust has enough information to allow memory-safe operations and disallow operations that would create dangling pointers or otherwise violate memory safety.
Lifetime Annotations in Struct Definitions
So far, we’ve only defined structs to hold owned types. It’s possible for
structs to hold references, but in that case we would need to add a lifetime
annotation on every reference in the struct’s definition. Listing 10-25 has a
struct named ImportantExcerpt that holds a string slice.
Filename: src/main.rs
struct ImportantExcerpt<'a> { part: &'a str, } fn main() { let novel = String::from("Call me Ishmael. Some years ago..."); let first_sentence = novel.split('.').next().expect("Could not find a '.'"); let i = ImportantExcerpt { part: first_sentence, }; }
Listing 10-25: A struct that holds a reference, so its definition needs a lifetime annotation
This struct has one field, part, that holds a string slice, which is a
reference. As with generic data types, we declare the name of the generic
lifetime parameter inside angle brackets after the name of the struct so we can
use the lifetime parameter in the body of the struct definition. This
annotation means an instance of ImportantExcerpt can’t outlive the reference
it holds in its part field.
The main function here creates an instance of the ImportantExcerpt struct
that holds a reference to the first sentence of the String owned by the
variable novel. The data in novel exists before the ImportantExcerpt
instance is created. In addition, novel doesn’t go out of scope until after
the ImportantExcerpt goes out of scope, so the reference in the
ImportantExcerpt instance is valid.
Lifetime Elision
You’ve learned that every reference has a lifetime and that you need to specify lifetime parameters for functions or structs that use references. However, in Chapter 4 we had a function in Listing 4-9, which is shown again in Listing 10-26, that compiled without lifetime annotations.
Filename: src/lib.rs
fn first_word(s: &str) -> &str { let bytes = s.as_bytes(); for (i, &item) in bytes.iter().enumerate() { if item == b' ' { return &s[0..i]; } } &s[..] } fn main() { let my_string = String::from("hello world"); // first_word works on slices of `String`s let word = first_word(&my_string[..]); let my_string_literal = "hello world"; // first_word works on slices of string literals let word = first_word(&my_string_literal[..]); // Because string literals *are* string slices already, // this works too, without the slice syntax! let word = first_word(my_string_literal); }
Listing 10-26: A function we defined in Listing 4-9 that compiled without lifetime annotations, even though the parameter and return type are references
The reason this function compiles without lifetime annotations is historical: in early versions (pre-1.0) of Rust, this code wouldn’t have compiled because every reference needed an explicit lifetime. At that time, the function signature would have been written like this:
fn first_word<'a>(s: &'a str) -> &'a str {
After writing a lot of Rust code, the Rust team found that Rust programmers were entering the same lifetime annotations over and over in particular situations. These situations were predictable and followed a few deterministic patterns. The developers programmed these patterns into the compiler’s code so the borrow checker could infer the lifetimes in these situations and wouldn’t need explicit annotations.
This piece of Rust history is relevant because it’s possible that more deterministic patterns will emerge and be added to the compiler. In the future, even fewer lifetime annotations might be required.
The patterns programmed into Rust’s analysis of references are called the lifetime elision rules. These aren’t rules for programmers to follow; they’re a set of particular cases that the compiler will consider, and if your code fits these cases, you don’t need to write the lifetimes explicitly.
The elision rules don’t provide full inference. If Rust deterministically applies the rules but there is still ambiguity as to what lifetimes the references have, the compiler won’t guess what the lifetime of the remaining references should be. In this case, instead of guessing, the compiler will give you an error that you can resolve by adding the lifetime annotations that specify how the references relate to each other.
Lifetimes on function or method parameters are called input lifetimes, and lifetimes on return values are called output lifetimes.
The compiler uses three rules to figure out what lifetimes references have when
there aren’t explicit annotations. The first rule applies to input lifetimes,
and the second and third rules apply to output lifetimes. If the compiler gets
to the end of the three rules and there are still references for which it can’t
figure out lifetimes, the compiler will stop with an error. These rules apply
to fn definitions as well as impl blocks.
The first rule is that each parameter that is a reference gets its own lifetime
parameter. In other words, a function with one parameter gets one lifetime
parameter: fn foo<'a>(x: &'a i32); a function with two parameters gets two
separate lifetime parameters: fn foo<'a, 'b>(x: &'a i32, y: &'b i32); and so
on.
The second rule is if there is exactly one input lifetime parameter, that
lifetime is assigned to all output lifetime parameters: fn foo<'a>(x: &'a i32) -> &'a i32.
The third rule is if there are multiple input lifetime parameters, but one of
them is &self or &mut self because this is a method, the lifetime of self
is assigned to all output lifetime parameters. This third rule makes methods
much nicer to read and write because fewer symbols are necessary.
Let’s pretend we’re the compiler. We’ll apply these rules to figure out what
the lifetimes of the references in the signature of the first_word function
in Listing 10-26 are. The signature starts without any lifetimes associated
with the references:
fn first_word(s: &str) -> &str {
Then the compiler applies the first rule, which specifies that each parameter
gets its own lifetime. We’ll call it 'a as usual, so now the signature is
this:
fn first_word<'a>(s: &'a str) -> &str {
The second rule applies because there is exactly one input lifetime. The second rule specifies that the lifetime of the one input parameter gets assigned to the output lifetime, so the signature is now this:
fn first_word<'a>(s: &'a str) -> &'a str {
Now all the references in this function signature have lifetimes, and the compiler can continue its analysis without needing the programmer to annotate the lifetimes in this function signature.
Let’s look at another example, this time using the longest function that had
no lifetime parameters when we started working with it in Listing 10-21:
fn longest(x: &str, y: &str) -> &str {
Let’s apply the first rule: each parameter gets its own lifetime. This time we have two parameters instead of one, so we have two lifetimes:
fn longest<'a, 'b>(x: &'a str, y: &'b str) -> &str {
You can see that the second rule doesn’t apply because there is more than one
input lifetime. The third rule doesn’t apply either, because longest is a
function rather than a method, so none of the parameters are self. After
working through all three rules, we still haven’t figured out what the return
type’s lifetime is. This is why we got an error trying to compile the code in
Listing 10-21: the compiler worked through the lifetime elision rules but still
couldn’t figure out all the lifetimes of the references in the signature.
Because the third rule really only applies in method signatures, we’ll look at lifetimes in that context next to see why the third rule means we don’t have to annotate lifetimes in method signatures very often.
Lifetime Annotations in Method Definitions
When we implement methods on a struct with lifetimes, we use the same syntax as that of generic type parameters shown in Listing 10-11. Where we declare and use the lifetime parameters depends on whether they’re related to the struct fields or the method parameters and return values.
Lifetime names for struct fields always need to be declared after the impl
keyword and then used after the struct’s name, because those lifetimes are part
of the struct’s type.
In method signatures inside the impl block, references might be tied to the
lifetime of references in the struct’s fields, or they might be independent. In
addition, the lifetime elision rules often make it so that lifetime annotations
aren’t necessary in method signatures. Let’s look at some examples using the
struct named ImportantExcerpt that we defined in Listing 10-25.
First, we’ll use a method named level whose only parameter is a reference to
self and whose return value is an i32, which is not a reference to anything:
struct ImportantExcerpt<'a> { part: &'a str, } impl<'a> ImportantExcerpt<'a> { fn level(&self) -> i32 { 3 } } impl<'a> ImportantExcerpt<'a> { fn announce_and_return_part(&self, announcement: &str) -> &str { println!("Attention please: {}", announcement); self.part } } fn main() { let novel = String::from("Call me Ishmael. Some years ago..."); let first_sentence = novel.split('.').next().expect("Could not find a '.'"); let i = ImportantExcerpt { part: first_sentence, }; }
The lifetime parameter declaration after impl and its use after the type name
are required, but we’re not required to annotate the lifetime of the reference
to self because of the first elision rule.
Here is an example where the third lifetime elision rule applies:
struct ImportantExcerpt<'a> { part: &'a str, } impl<'a> ImportantExcerpt<'a> { fn level(&self) -> i32 { 3 } } impl<'a> ImportantExcerpt<'a> { fn announce_and_return_part(&self, announcement: &str) -> &str { println!("Attention please: {}", announcement); self.part } } fn main() { let novel = String::from("Call me Ishmael. Some years ago..."); let first_sentence = novel.split('.').next().expect("Could not find a '.'"); let i = ImportantExcerpt { part: first_sentence, }; }
There are two input lifetimes, so Rust applies the first lifetime elision rule
and gives both &self and announcement their own lifetimes. Then, because
one of the parameters is &self, the return type gets the lifetime of &self,
and all lifetimes have been accounted for.
The Static Lifetime
One special lifetime we need to discuss is 'static, which means that this
reference can live for the entire duration of the program. All string
literals have the 'static lifetime, which we can annotate as follows:
#![allow(unused)] fn main() { let s: &'static str = "I have a static lifetime."; }
The text of this string is stored directly in the program’s binary, which
is always available. Therefore, the lifetime of all string literals is
'static.
You might see suggestions to use the 'static lifetime in error messages. But
before specifying 'static as the lifetime for a reference, think about
whether the reference you have actually lives the entire lifetime of your
program or not. You might consider whether you want it to live that long, even
if it could. Most of the time, the problem results from attempting to create a
dangling reference or a mismatch of the available lifetimes. In such cases, the
solution is fixing those problems, not specifying the 'static lifetime.
Generic Type Parameters, Trait Bounds, and Lifetimes Together
Let’s briefly look at the syntax of specifying generic type parameters, trait bounds, and lifetimes all in one function!
fn main() { let string1 = String::from("abcd"); let string2 = "xyz"; let result = longest_with_an_announcement( string1.as_str(), string2, "Today is someone's birthday!", ); println!("The longest string is {}", result); } use std::fmt::Display; fn longest_with_an_announcement<'a, T>( x: &'a str, y: &'a str, ann: T, ) -> &'a str where T: Display, { println!("Announcement! {}", ann); if x.len() > y.len() { x } else { y } }
This is the longest function from Listing 10-22 that returns the longer of
two string slices. But now it has an extra parameter named ann of the generic
type T, which can be filled in by any type that implements the Display
trait as specified by the where clause. This extra parameter will be printed
before the function compares the lengths of the string slices, which is why the
Display trait bound is necessary. Because lifetimes are a type of generic,
the declarations of the lifetime parameter 'a and the generic type parameter
T go in the same list inside the angle brackets after the function name.
Summary
We covered a lot in this chapter! Now that you know about generic type parameters, traits and trait bounds, and generic lifetime parameters, you’re ready to write code without repetition that works in many different situations. Generic type parameters let you apply the code to different types. Traits and trait bounds ensure that even though the types are generic, they’ll have the behavior the code needs. You learned how to use lifetime annotations to ensure that this flexible code won’t have any dangling references. And all of this analysis happens at compile time, which doesn’t affect runtime performance!
Believe it or not, there is much more to learn on the topics we discussed in this chapter: Chapter 17 discusses trait objects, which are another way to use traits. There are also more complex scenarios involving lifetime annotations that you will only need in very advanced scenarios; for those, you should read the Rust Reference. But next, you’ll learn how to write tests in Rust so you can make sure your code is working the way it should.
Writing Automated Tests
In his 1972 essay “The Humble Programmer,” Edsger W. Dijkstra said that “Program testing can be a very effective way to show the presence of bugs, but it is hopelessly inadequate for showing their absence.” That doesn’t mean we shouldn’t try to test as much as we can!
Correctness in our programs is the extent to which our code does what we intend it to do. Rust is designed with a high degree of concern about the correctness of programs, but correctness is complex and not easy to prove. Rust’s type system shoulders a huge part of this burden, but the type system cannot catch every kind of incorrectness. As such, Rust includes support for writing automated software tests within the language.
As an example, say we write a function called add_two that adds 2 to whatever
number is passed to it. This function’s signature accepts an integer as a
parameter and returns an integer as a result. When we implement and compile
that function, Rust does all the type checking and borrow checking that you’ve
learned so far to ensure that, for instance, we aren’t passing a String value
or an invalid reference to this function. But Rust can’t check that this
function will do precisely what we intend, which is return the parameter plus 2
rather than, say, the parameter plus 10 or the parameter minus 50! That’s where
tests come in.
We can write tests that assert, for example, that when we pass 3 to the
add_two function, the returned value is 5. We can run these tests whenever
we make changes to our code to make sure any existing correct behavior has not
changed.
Testing is a complex skill: although we can’t cover every detail about how to write good tests in one chapter, we’ll discuss the mechanics of Rust’s testing facilities. We’ll talk about the annotations and macros available to you when writing your tests, the default behavior and options provided for running your tests, and how to organize tests into unit tests and integration tests.
How to Write Tests
Tests are Rust functions that verify that the non-test code is functioning in the expected manner. The bodies of test functions typically perform these three actions:
- Set up any needed data or state.
- Run the code you want to test.
- Assert the results are what you expect.
Let’s look at the features Rust provides specifically for writing tests that
take these actions, which include the test attribute, a few macros, and the
should_panic attribute.
The Anatomy of a Test Function
At its simplest, a test in Rust is a function that’s annotated with the test
attribute. Attributes are metadata about pieces of Rust code; one example is
the derive attribute we used with structs in Chapter 5. To change a function
into a test function, add #[test] on the line before fn. When you run your
tests with the cargo test command, Rust builds a test runner binary that runs
the functions annotated with the test attribute and reports on whether each
test function passes or fails.
When we make a new library project with Cargo, a test module with a test function in it is automatically generated for us. This module helps you start writing your tests so you don’t have to look up the exact structure and syntax of test functions every time you start a new project. You can add as many additional test functions and as many test modules as you want!
We’ll explore some aspects of how tests work by experimenting with the template test generated for us without actually testing any code. Then we’ll write some real-world tests that call some code that we’ve written and assert that its behavior is correct.
Let’s create a new library project called adder:
$ cargo new adder --lib
Created library `adder` project
$ cd adder
The contents of the src/lib.rs file in your adder library should look like
Listing 11-1.
Filename: src/lib.rs
#[cfg(test)]
mod tests {
#[test]
fn it_works() {
assert_eq!(2 + 2, 4);
}
}
Listing 11-1: The test module and function generated
automatically by cargo new
For now, let’s ignore the top two lines and focus on the function to see how it
works. Note the #[test] annotation before the fn line: this attribute
indicates this is a test function, so the test runner knows to treat this
function as a test. We could also have non-test functions in the tests module
to help set up common scenarios or perform common operations, so we need to
indicate which functions are tests by using the #[test] attribute.
The function body uses the assert_eq! macro to assert that 2 + 2 equals 4.
This assertion serves as an example of the format for a typical test. Let’s run
it to see that this test passes.
The cargo test command runs all tests in our project, as shown in Listing
11-2.
$ cargo test
Compiling adder v0.1.0 (file:///projects/adder)
Finished test [unoptimized + debuginfo] target(s) in 0.57s
Running target/debug/deps/adder-92948b65e88960b4
running 1 test
test tests::it_works ... ok
test result: ok. 1 passed; 0 failed; 0 ignored; 0 measured; 0 filtered out; finished in 0.00s
Doc-tests adder
running 0 tests
test result: ok. 0 passed; 0 failed; 0 ignored; 0 measured; 0 filtered out; finished in 0.00s
Listing 11-2: The output from running the automatically generated test
Cargo compiled and ran the test. After the Compiling, Finished, and
Running lines is the line running 1 test. The next line shows the name
of the generated test function, called it_works, and the result of running
that test, ok. The overall summary of running the tests appears next. The
text test result: ok. means that all the tests passed, and the portion that
reads 1 passed; 0 failed totals the number of tests that passed or failed.
Because we don’t have any tests we’ve marked as ignored, the summary shows 0 ignored. We also haven’t filtered the tests being run, so the end of the
summary shows 0 filtered out. We’ll talk about ignoring and filtering out
tests in the next section, “Controlling How Tests Are
Run.”
The 0 measured statistic is for benchmark tests that measure performance.
Benchmark tests are, as of this writing, only available in nightly Rust. See
the documentation about benchmark tests to learn more.
The next part of the test output, which starts with Doc-tests adder, is for
the results of any documentation tests. We don’t have any documentation tests
yet, but Rust can compile any code examples that appear in our API
documentation. This feature helps us keep our docs and our code in sync! We’ll
discuss how to write documentation tests in the “Documentation Comments as
Tests” section of Chapter 14. For now, we’ll
ignore the Doc-tests output.
Let’s change the name of our test to see how that changes the test output.
Change the it_works function to a different name, such as exploration, like
so:
Filename: src/lib.rs
#[cfg(test)]
mod tests {
#[test]
fn exploration() {
assert_eq!(2 + 2, 4);
}
}
Then run cargo test again. The output now shows exploration instead of
it_works:
$ cargo test
Compiling adder v0.1.0 (file:///projects/adder)
Finished test [unoptimized + debuginfo] target(s) in 0.59s
Running target/debug/deps/adder-92948b65e88960b4
running 1 test
test tests::exploration ... ok
test result: ok. 1 passed; 0 failed; 0 ignored; 0 measured; 0 filtered out; finished in 0.00s
Doc-tests adder
running 0 tests
test result: ok. 0 passed; 0 failed; 0 ignored; 0 measured; 0 filtered out; finished in 0.00s
Let’s add another test, but this time we’ll make a test that fails! Tests fail
when something in the test function panics. Each test is run in a new thread,
and when the main thread sees that a test thread has died, the test is marked
as failed. We talked about the simplest way to cause a panic in Chapter 9,
which is to call the panic! macro. Enter the new test, another, so your
src/lib.rs file looks like Listing 11-3.
Filename: src/lib.rs
#[cfg(test)]
mod tests {
#[test]
fn exploration() {
assert_eq!(2 + 2, 4);
}
#[test]
fn another() {
panic!("Make this test fail");
}
}
Listing 11-3: Adding a second test that will fail because
we call the panic! macro
Run the tests again using cargo test. The output should look like Listing
11-4, which shows that our exploration test passed and another failed.
$ cargo test
Compiling adder v0.1.0 (file:///projects/adder)
Finished test [unoptimized + debuginfo] target(s) in 0.72s
Running target/debug/deps/adder-92948b65e88960b4
running 2 tests
test tests::another ... FAILED
test tests::exploration ... ok
failures:
---- tests::another stdout ----
thread 'main' panicked at 'Make this test fail', src/lib.rs:10:9
note: run with `RUST_BACKTRACE=1` environment variable to display a backtrace
failures:
tests::another
test result: FAILED. 1 passed; 1 failed; 0 ignored; 0 measured; 0 filtered out; finished in 0.00s
error: test failed, to rerun pass '--lib'
Listing 11-4: Test results when one test passes and one test fails
Instead of ok, the line test tests::another shows FAILED. Two new
sections appear between the individual results and the summary: the first
section displays the detailed reason for each test failure. In this case,
another failed because it panicked at 'Make this test fail', which happened
on line 10 in the src/lib.rs file. The next section lists just the names of
all the failing tests, which is useful when there are lots of tests and lots of
detailed failing test output. We can use the name of a failing test to run just
that test to more easily debug it; we’ll talk more about ways to run tests in
the “Controlling How Tests Are Run” section.
The summary line displays at the end: overall, our test result is FAILED.
We had one test pass and one test fail.
Now that you’ve seen what the test results look like in different scenarios,
let’s look at some macros other than panic! that are useful in tests.
Checking Results with the assert! Macro
The assert! macro, provided by the standard library, is useful when you want
to ensure that some condition in a test evaluates to true. We give the
assert! macro an argument that evaluates to a Boolean. If the value is
true, assert! does nothing and the test passes. If the value is false,
the assert! macro calls the panic! macro, which causes the test to fail.
Using the assert! macro helps us check that our code is functioning in the
way we intend.
In Chapter 5, Listing 5-15, we used a Rectangle struct and a can_hold
method, which are repeated here in Listing 11-5. Let’s put this code in the
src/lib.rs file and write some tests for it using the assert! macro.
Filename: src/lib.rs
#[derive(Debug)]
struct Rectangle {
width: u32,
height: u32,
}
impl Rectangle {
fn can_hold(&self, other: &Rectangle) -> bool {
self.width > other.width && self.height > other.height
}
}
Listing 11-5: Using the Rectangle struct and its
can_hold method from Chapter 5
The can_hold method returns a Boolean, which means it’s a perfect use case
for the assert! macro. In Listing 11-6, we write a test that exercises the
can_hold method by creating a Rectangle instance that has a width of 8 and
a height of 7 and asserting that it can hold another Rectangle instance that
has a width of 5 and a height of 1.
Filename: src/lib.rs
#[derive(Debug)]
struct Rectangle {
width: u32,
height: u32,
}
impl Rectangle {
fn can_hold(&self, other: &Rectangle) -> bool {
self.width > other.width && self.height > other.height
}
}
#[cfg(test)]
mod tests {
use super::*;
#[test]
fn larger_can_hold_smaller() {
let larger = Rectangle {
width: 8,
height: 7,
};
let smaller = Rectangle {
width: 5,
height: 1,
};
assert!(larger.can_hold(&smaller));
}
}
Listing 11-6: A test for can_hold that checks whether a
larger rectangle can indeed hold a smaller rectangle
Note that we’ve added a new line inside the tests module: use super::*;.
The tests module is a regular module that follows the usual visibility rules
we covered in Chapter 7 in the “Paths for Referring to an Item in the Module
Tree”
section. Because the tests module is an inner module, we need to bring the
code under test in the outer module into the scope of the inner module. We use
a glob here so anything we define in the outer module is available to this
tests module.
We’ve named our test larger_can_hold_smaller, and we’ve created the two
Rectangle instances that we need. Then we called the assert! macro and
passed it the result of calling larger.can_hold(&smaller). This expression
is supposed to return true, so our test should pass. Let’s find out!
$ cargo test
Compiling rectangle v0.1.0 (file:///projects/rectangle)
Finished test [unoptimized + debuginfo] target(s) in 0.66s
Running target/debug/deps/rectangle-6584c4561e48942e
running 1 test
test tests::larger_can_hold_smaller ... ok
test result: ok. 1 passed; 0 failed; 0 ignored; 0 measured; 0 filtered out; finished in 0.00s
Doc-tests rectangle
running 0 tests
test result: ok. 0 passed; 0 failed; 0 ignored; 0 measured; 0 filtered out; finished in 0.00s
It does pass! Let’s add another test, this time asserting that a smaller rectangle cannot hold a larger rectangle:
Filename: src/lib.rs
#[derive(Debug)]
struct Rectangle {
width: u32,
height: u32,
}
impl Rectangle {
fn can_hold(&self, other: &Rectangle) -> bool {
self.width > other.width && self.height > other.height
}
}
#[cfg(test)]
mod tests {
use super::*;
#[test]
fn larger_can_hold_smaller() {
// --snip--
let larger = Rectangle {
width: 8,
height: 7,
};
let smaller = Rectangle {
width: 5,
height: 1,
};
assert!(larger.can_hold(&smaller));
}
#[test]
fn smaller_cannot_hold_larger() {
let larger = Rectangle {
width: 8,
height: 7,
};
let smaller = Rectangle {
width: 5,
height: 1,
};
assert!(!smaller.can_hold(&larger));
}
}
Because the correct result of the can_hold function in this case is false,
we need to negate that result before we pass it to the assert! macro. As a
result, our test will pass if can_hold returns false:
$ cargo test
Compiling rectangle v0.1.0 (file:///projects/rectangle)
Finished test [unoptimized + debuginfo] target(s) in 0.66s
Running target/debug/deps/rectangle-6584c4561e48942e
running 2 tests
test tests::larger_can_hold_smaller ... ok
test tests::smaller_cannot_hold_larger ... ok
test result: ok. 2 passed; 0 failed; 0 ignored; 0 measured; 0 filtered out; finished in 0.00s
Doc-tests rectangle
running 0 tests
test result: ok. 0 passed; 0 failed; 0 ignored; 0 measured; 0 filtered out; finished in 0.00s
Two tests that pass! Now let’s see what happens to our test results when we
introduce a bug in our code. Let’s change the implementation of the can_hold
method by replacing the greater than sign with a less than sign when it
compares the widths:
#[derive(Debug)]
struct Rectangle {
width: u32,
height: u32,
}
// --snip--
impl Rectangle {
fn can_hold(&self, other: &Rectangle) -> bool {
self.width < other.width && self.height > other.height
}
}
#[cfg(test)]
mod tests {
use super::*;
#[test]
fn larger_can_hold_smaller() {
let larger = Rectangle {
width: 8,
height: 7,
};
let smaller = Rectangle {
width: 5,
height: 1,
};
assert!(larger.can_hold(&smaller));
}
#[test]
fn smaller_cannot_hold_larger() {
let larger = Rectangle {
width: 8,
height: 7,
};
let smaller = Rectangle {
width: 5,
height: 1,
};
assert!(!smaller.can_hold(&larger));
}
}
Running the tests now produces the following:
$ cargo test
Compiling rectangle v0.1.0 (file:///projects/rectangle)
Finished test [unoptimized + debuginfo] target(s) in 0.66s
Running target/debug/deps/rectangle-6584c4561e48942e
running 2 tests
test tests::larger_can_hold_smaller ... FAILED
test tests::smaller_cannot_hold_larger ... ok
failures:
---- tests::larger_can_hold_smaller stdout ----
thread 'main' panicked at 'assertion failed: larger.can_hold(&smaller)', src/lib.rs:28:9
note: run with `RUST_BACKTRACE=1` environment variable to display a backtrace
failures:
tests::larger_can_hold_smaller
test result: FAILED. 1 passed; 1 failed; 0 ignored; 0 measured; 0 filtered out; finished in 0.00s
error: test failed, to rerun pass '--lib'
Our tests caught the bug! Because larger.width is 8 and smaller.width is
5, the comparison of the widths in can_hold now returns false: 8 is not
less than 5.
Testing Equality with the assert_eq! and assert_ne! Macros
A common way to test functionality is to compare the result of the code under
test to the value you expect the code to return to make sure they’re equal. You
could do this using the assert! macro and passing it an expression using the
== operator. However, this is such a common test that the standard library
provides a pair of macros—assert_eq! and assert_ne!—to perform this test
more conveniently. These macros compare two arguments for equality or
inequality, respectively. They’ll also print the two values if the assertion
fails, which makes it easier to see why the test failed; conversely, the
assert! macro only indicates that it got a false value for the ==
expression, not the values that lead to the false value.
In Listing 11-7, we write a function named add_two that adds 2 to its
parameter and returns the result. Then we test this function using the
assert_eq! macro.
Filename: src/lib.rs
pub fn add_two(a: i32) -> i32 {
a + 2
}
#[cfg(test)]
mod tests {
use super::*;
#[test]
fn it_adds_two() {
assert_eq!(4, add_two(2));
}
}
Listing 11-7: Testing the function add_two using the
assert_eq! macro
Let’s check that it passes!
$ cargo test
Compiling adder v0.1.0 (file:///projects/adder)
Finished test [unoptimized + debuginfo] target(s) in 0.58s
Running target/debug/deps/adder-92948b65e88960b4
running 1 test
test tests::it_adds_two ... ok
test result: ok. 1 passed; 0 failed; 0 ignored; 0 measured; 0 filtered out; finished in 0.00s
Doc-tests adder
running 0 tests
test result: ok. 0 passed; 0 failed; 0 ignored; 0 measured; 0 filtered out; finished in 0.00s
The first argument we gave to the assert_eq! macro, 4, is equal to the
result of calling add_two(2). The line for this test is test tests::it_adds_two ... ok, and the ok text indicates that our test passed!
Let’s introduce a bug into our code to see what it looks like when a test that
uses assert_eq! fails. Change the implementation of the add_two function to
instead add 3:
pub fn add_two(a: i32) -> i32 {
a + 3
}
#[cfg(test)]
mod tests {
use super::*;
#[test]
fn it_adds_two() {
assert_eq!(4, add_two(2));
}
}
Run the tests again:
$ cargo test
Compiling adder v0.1.0 (file:///projects/adder)
Finished test [unoptimized + debuginfo] target(s) in 0.61s
Running target/debug/deps/adder-92948b65e88960b4
running 1 test
test tests::it_adds_two ... FAILED
failures:
---- tests::it_adds_two stdout ----
thread 'main' panicked at 'assertion failed: `(left == right)`
left: `4`,
right: `5`', src/lib.rs:11:9
note: run with `RUST_BACKTRACE=1` environment variable to display a backtrace
failures:
tests::it_adds_two
test result: FAILED. 0 passed; 1 failed; 0 ignored; 0 measured; 0 filtered out; finished in 0.00s
error: test failed, to rerun pass '--lib'
Our test caught the bug! The it_adds_two test failed, displaying the message
assertion failed: `(left == right)` and showing that left was 4 and
right was 5. This message is useful and helps us start debugging: it means
the left argument to assert_eq! was 4 but the right argument, where we
had add_two(2), was 5.
Note that in some languages and test frameworks, the parameters to the
functions that assert two values are equal are called expected and actual,
and the order in which we specify the arguments matters. However, in Rust,
they’re called left and right, and the order in which we specify the value
we expect and the value that the code under test produces doesn’t matter. We
could write the assertion in this test as assert_eq!(add_two(2), 4), which
would result in a failure message that displays assertion failed: `(left == right)` and that left was 5 and right was 4.
The assert_ne! macro will pass if the two values we give it are not equal and
fail if they’re equal. This macro is most useful for cases when we’re not sure
what a value will be, but we know what the value definitely won’t be if our
code is functioning as we intend. For example, if we’re testing a function that
is guaranteed to change its input in some way, but the way in which the input
is changed depends on the day of the week that we run our tests, the best thing
to assert might be that the output of the function is not equal to the input.
Under the surface, the assert_eq! and assert_ne! macros use the operators
== and !=, respectively. When the assertions fail, these macros print their
arguments using debug formatting, which means the values being compared must
implement the PartialEq and Debug traits. All the primitive types and most
of the standard library types implement these traits. For structs and enums
that you define, you’ll need to implement PartialEq to assert that values of
those types are equal or not equal. You’ll need to implement Debug to print
the values when the assertion fails. Because both traits are derivable traits,
as mentioned in Listing 5-12 in Chapter 5, this is usually as straightforward
as adding the #[derive(PartialEq, Debug)] annotation to your struct or enum
definition. See Appendix C, “Derivable Traits,” for more details about these and other derivable traits.
Adding Custom Failure Messages
You can also add a custom message to be printed with the failure message as
optional arguments to the assert!, assert_eq!, and assert_ne! macros. Any
arguments specified after the one required argument to assert! or the two
required arguments to assert_eq! and assert_ne! are passed along to the
format! macro (discussed in Chapter 8 in the “Concatenation with the +
Operator or the format!
Macro”
section), so you can pass a format string that contains {} placeholders and
values to go in those placeholders. Custom messages are useful to document
what an assertion means; when a test fails, you’ll have a better idea of what
the problem is with the code.
For example, let’s say we have a function that greets people by name and we want to test that the name we pass into the function appears in the output:
Filename: src/lib.rs
pub fn greeting(name: &str) -> String {
format!("Hello {}!", name)
}
#[cfg(test)]
mod tests {
use super::*;
#[test]
fn greeting_contains_name() {
let result = greeting("Carol");
assert!(result.contains("Carol"));
}
}
The requirements for this program haven’t been agreed upon yet, and we’re
pretty sure the Hello text at the beginning of the greeting will change. We
decided we don’t want to have to update the test when the requirements change,
so instead of checking for exact equality to the value returned from the
greeting function, we’ll just assert that the output contains the text of the
input parameter.
Let’s introduce a bug into this code by changing greeting to not include
name to see what this test failure looks like:
pub fn greeting(name: &str) -> String {
String::from("Hello!")
}
#[cfg(test)]
mod tests {
use super::*;
#[test]
fn greeting_contains_name() {
let result = greeting("Carol");
assert!(result.contains("Carol"));
}
}
Running this test produces the following:
$ cargo test
Compiling greeter v0.1.0 (file:///projects/greeter)
Finished test [unoptimized + debuginfo] target(s) in 0.91s
Running target/debug/deps/greeter-170b942eb5bf5e3a
running 1 test
test tests::greeting_contains_name ... FAILED
failures:
---- tests::greeting_contains_name stdout ----
thread 'main' panicked at 'assertion failed: result.contains(\"Carol\")', src/lib.rs:12:9
note: run with `RUST_BACKTRACE=1` environment variable to display a backtrace
failures:
tests::greeting_contains_name
test result: FAILED. 0 passed; 1 failed; 0 ignored; 0 measured; 0 filtered out; finished in 0.00s
error: test failed, to rerun pass '--lib'
This result just indicates that the assertion failed and which line the
assertion is on. A more useful failure message in this case would print the
value we got from the greeting function. Let’s change the test function,
giving it a custom failure message made from a format string with a placeholder
filled in with the actual value we got from the greeting function:
pub fn greeting(name: &str) -> String {
String::from("Hello!")
}
#[cfg(test)]
mod tests {
use super::*;
#[test]
fn greeting_contains_name() {
let result = greeting("Carol");
assert!(
result.contains("Carol"),
"Greeting did not contain name, value was `{}`",
result
);
}
}
Now when we run the test, we’ll get a more informative error message:
$ cargo test
Compiling greeter v0.1.0 (file:///projects/greeter)
Finished test [unoptimized + debuginfo] target(s) in 0.93s
Running target/debug/deps/greeter-170b942eb5bf5e3a
running 1 test
test tests::greeting_contains_name ... FAILED
failures:
---- tests::greeting_contains_name stdout ----
thread 'main' panicked at 'Greeting did not contain name, value was `Hello!`', src/lib.rs:12:9
note: run with `RUST_BACKTRACE=1` environment variable to display a backtrace
failures:
tests::greeting_contains_name
test result: FAILED. 0 passed; 1 failed; 0 ignored; 0 measured; 0 filtered out; finished in 0.00s
error: test failed, to rerun pass '--lib'
We can see the value we actually got in the test output, which would help us debug what happened instead of what we were expecting to happen.
Checking for Panics with should_panic
In addition to checking that our code returns the correct values we expect,
it’s also important to check that our code handles error conditions as we
expect. For example, consider the Guess type that we created in Chapter 9,
Listing 9-10. Other code that uses Guess depends on the guarantee that Guess
instances will contain only values between 1 and 100. We can write a test that
ensures that attempting to create a Guess instance with a value outside that
range panics.
We do this by adding another attribute, should_panic, to our test function.
This attribute makes a test pass if the code inside the function panics; the
test will fail if the code inside the function doesn’t panic.
Listing 11-8 shows a test that checks that the error conditions of Guess::new
happen when we expect them to.
Filename: src/lib.rs
pub struct Guess {
value: i32,
}
impl Guess {
pub fn new(value: i32) -> Guess {
if value < 1 || value > 100 {
panic!("Guess value must be between 1 and 100, got {}.", value);
}
Guess { value }
}
}
#[cfg(test)]
mod tests {
use super::*;
#[test]
#[should_panic]
fn greater_than_100() {
Guess::new(200);
}
}
Listing 11-8: Testing that a condition will cause a
panic!
We place the #[should_panic] attribute after the #[test] attribute and
before the test function it applies to. Let’s look at the result when this test
passes:
$ cargo test
Compiling guessing_game v0.1.0 (file:///projects/guessing_game)
Finished test [unoptimized + debuginfo] target(s) in 0.58s
Running target/debug/deps/guessing_game-57d70c3acb738f4d
running 1 test
test tests::greater_than_100 ... ok
test result: ok. 1 passed; 0 failed; 0 ignored; 0 measured; 0 filtered out; finished in 0.00s
Doc-tests guessing_game
running 0 tests
test result: ok. 0 passed; 0 failed; 0 ignored; 0 measured; 0 filtered out; finished in 0.00s
Looks good! Now let’s introduce a bug in our code by removing the condition
that the new function will panic if the value is greater than 100:
pub struct Guess {
value: i32,
}
// --snip--
impl Guess {
pub fn new(value: i32) -> Guess {
if value < 1 {
panic!("Guess value must be between 1 and 100, got {}.", value);
}
Guess { value }
}
}
#[cfg(test)]
mod tests {
use super::*;
#[test]
#[should_panic]
fn greater_than_100() {
Guess::new(200);
}
}
When we run the test in Listing 11-8, it will fail:
$ cargo test
Compiling guessing_game v0.1.0 (file:///projects/guessing_game)
Finished test [unoptimized + debuginfo] target(s) in 0.62s
Running target/debug/deps/guessing_game-57d70c3acb738f4d
running 1 test
test tests::greater_than_100 ... FAILED
failures:
---- tests::greater_than_100 stdout ----
note: test did not panic as expected
failures:
tests::greater_than_100
test result: FAILED. 0 passed; 1 failed; 0 ignored; 0 measured; 0 filtered out; finished in 0.00s
error: test failed, to rerun pass '--lib'
We don’t get a very helpful message in this case, but when we look at the test
function, we see that it’s annotated with #[should_panic]. The failure we got
means that the code in the test function did not cause a panic.
Tests that use should_panic can be imprecise because they only indicate that
the code has caused some panic. A should_panic test would pass even if the
test panics for a different reason from the one we were expecting to happen. To
make should_panic tests more precise, we can add an optional expected
parameter to the should_panic attribute. The test harness will make sure that
the failure message contains the provided text. For example, consider the
modified code for Guess in Listing 11-9 where the new function panics with
different messages depending on whether the value is too small or too large.
Filename: src/lib.rs
pub struct Guess {
value: i32,
}
// --snip--
impl Guess {
pub fn new(value: i32) -> Guess {
if value < 1 {
panic!(
"Guess value must be greater than or equal to 1, got {}.",
value
);
} else if value > 100 {
panic!(
"Guess value must be less than or equal to 100, got {}.",
value
);
}
Guess { value }
}
}
#[cfg(test)]
mod tests {
use super::*;
#[test]
#[should_panic(expected = "Guess value must be less than or equal to 100")]
fn greater_than_100() {
Guess::new(200);
}
}
Listing 11-9: Testing that a condition will cause a
panic! with a particular panic message
This test will pass because the value we put in the should_panic attribute’s
expected parameter is a substring of the message that the Guess::new
function panics with. We could have specified the entire panic message that we
expect, which in this case would be Guess value must be less than or equal to 100, got 200. What you choose to specify in the expected parameter for
should_panic depends on how much of the panic message is unique or dynamic
and how precise you want your test to be. In this case, a substring of the
panic message is enough to ensure that the code in the test function executes
the else if value > 100 case.
To see what happens when a should_panic test with an expected message
fails, let’s again introduce a bug into our code by swapping the bodies of the
if value < 1 and the else if value > 100 blocks:
pub struct Guess {
value: i32,
}
impl Guess {
pub fn new(value: i32) -> Guess {
if value < 1 {
panic!(
"Guess value must be less than or equal to 100, got {}.",
value
);
} else if value > 100 {
panic!(
"Guess value must be greater than or equal to 1, got {}.",
value
);
}
Guess { value }
}
}
#[cfg(test)]
mod tests {
use super::*;
#[test]
#[should_panic(expected = "Guess value must be less than or equal to 100")]
fn greater_than_100() {
Guess::new(200);
}
}
This time when we run the should_panic test, it will fail:
$ cargo test
Compiling guessing_game v0.1.0 (file:///projects/guessing_game)
Finished test [unoptimized + debuginfo] target(s) in 0.66s
Running target/debug/deps/guessing_game-57d70c3acb738f4d
running 1 test
test tests::greater_than_100 ... FAILED
failures:
---- tests::greater_than_100 stdout ----
thread 'main' panicked at 'Guess value must be greater than or equal to 1, got 200.', src/lib.rs:13:13
note: run with `RUST_BACKTRACE=1` environment variable to display a backtrace
note: panic did not contain expected string
panic message: `"Guess value must be greater than or equal to 1, got 200."`,
expected substring: `"Guess value must be less than or equal to 100"`
failures:
tests::greater_than_100
test result: FAILED. 0 passed; 1 failed; 0 ignored; 0 measured; 0 filtered out; finished in 0.00s
error: test failed, to rerun pass '--lib'
The failure message indicates that this test did indeed panic as we expected,
but the panic message did not include the expected string 'Guess value must be less than or equal to 100'. The panic message that we did get in this case was
Guess value must be greater than or equal to 1, got 200. Now we can start
figuring out where our bug is!
Using Result<T, E> in Tests
So far, we’ve written tests that panic when they fail. We can also write tests
that use Result<T, E>! Here’s the test from Listing 11-1, rewritten to use
Result<T, E> and return an Err instead of panicking:
#[cfg(test)]
mod tests {
#[test]
fn it_works() -> Result<(), String> {
if 2 + 2 == 4 {
Ok(())
} else {
Err(String::from("two plus two does not equal four"))
}
}
}
The it_works function now has a return type, Result<(), String>. In the
body of the function, rather than calling the assert_eq! macro, we return
Ok(()) when the test passes and an Err with a String inside when the test
fails.
Writing tests so they return a Result<T, E> enables you to use the question
mark operator in the body of tests, which can be a convenient way to write
tests that should fail if any operation within them returns an Err variant.
You can’t use the #[should_panic] annotation on tests that use Result<T, E>. Instead, you should return an Err value directly when the test should
fail.
Now that you know several ways to write tests, let’s look at what is happening
when we run our tests and explore the different options we can use with cargo test.
Controlling How Tests Are Run
Just as cargo run compiles your code and then runs the resulting binary,
cargo test compiles your code in test mode and runs the resulting test
binary. You can specify command line options to change the default behavior of
cargo test. For example, the default behavior of the binary produced by
cargo test is to run all the tests in parallel and capture output generated
during test runs, preventing the output from being displayed and making it
easier to read the output related to the test results.
Some command line options go to cargo test, and some go to the resulting test
binary. To separate these two types of arguments, you list the arguments that
go to cargo test followed by the separator -- and then the ones that go to
the test binary. Running cargo test --help displays the options you can use
with cargo test, and running cargo test -- --help displays the options you
can use after the separator --.
Running Tests in Parallel or Consecutively
When you run multiple tests, by default they run in parallel using threads. This means the tests will finish running faster so you can get feedback quicker on whether or not your code is working. Because the tests are running at the same time, make sure your tests don’t depend on each other or on any shared state, including a shared environment, such as the current working directory or environment variables.
For example, say each of your tests runs some code that creates a file on disk named test-output.txt and writes some data to that file. Then each test reads the data in that file and asserts that the file contains a particular value, which is different in each test. Because the tests run at the same time, one test might overwrite the file between when another test writes and reads the file. The second test will then fail, not because the code is incorrect but because the tests have interfered with each other while running in parallel. One solution is to make sure each test writes to a different file; another solution is to run the tests one at a time.
If you don’t want to run the tests in parallel or if you want more fine-grained
control over the number of threads used, you can send the --test-threads flag
and the number of threads you want to use to the test binary. Take a look at
the following example:
$ cargo test -- --test-threads=1
We set the number of test threads to 1, telling the program not to use any
parallelism. Running the tests using one thread will take longer than running
them in parallel, but the tests won’t interfere with each other if they share
state.
Showing Function Output
By default, if a test passes, Rust’s test library captures anything printed to
standard output. For example, if we call println! in a test and the test
passes, we won’t see the println! output in the terminal; we’ll see only the
line that indicates the test passed. If a test fails, we’ll see whatever was
printed to standard output with the rest of the failure message.
As an example, Listing 11-10 has a silly function that prints the value of its parameter and returns 10, as well as a test that passes and a test that fails.
Filename: src/lib.rs
fn prints_and_returns_10(a: i32) -> i32 {
println!("I got the value {}", a);
10
}
#[cfg(test)]
mod tests {
use super::*;
#[test]
fn this_test_will_pass() {
let value = prints_and_returns_10(4);
assert_eq!(10, value);
}
#[test]
fn this_test_will_fail() {
let value = prints_and_returns_10(8);
assert_eq!(5, value);
}
}
Listing 11-10: Tests for a function that calls
println!
When we run these tests with cargo test, we’ll see the following output:
$ cargo test
Compiling silly-function v0.1.0 (file:///projects/silly-function)
Finished test [unoptimized + debuginfo] target(s) in 0.58s
Running target/debug/deps/silly_function-160869f38cff9166
running 2 tests
test tests::this_test_will_fail ... FAILED
test tests::this_test_will_pass ... ok
failures:
---- tests::this_test_will_fail stdout ----
I got the value 8
thread 'main' panicked at 'assertion failed: `(left == right)`
left: `5`,
right: `10`', src/lib.rs:19:9
note: run with `RUST_BACKTRACE=1` environment variable to display a backtrace
failures:
tests::this_test_will_fail
test result: FAILED. 1 passed; 1 failed; 0 ignored; 0 measured; 0 filtered out; finished in 0.00s
error: test failed, to rerun pass '--lib'
Note that nowhere in this output do we see I got the value 4, which is what
is printed when the test that passes runs. That output has been captured. The
output from the test that failed, I got the value 8, appears in the section
of the test summary output, which also shows the cause of the test failure.
If we want to see printed values for passing tests as well, we can tell Rust
to also show the output of successful tests at the end with --show-output.
$ cargo test -- --show-output
When we run the tests in Listing 11-10 again with the --show-output flag, we
see the following output:
$ cargo test -- --show-output
Compiling silly-function v0.1.0 (file:///projects/silly-function)
Finished test [unoptimized + debuginfo] target(s) in 0.60s
Running target/debug/deps/silly_function-160869f38cff9166
running 2 tests
test tests::this_test_will_fail ... FAILED
test tests::this_test_will_pass ... ok
successes:
---- tests::this_test_will_pass stdout ----
I got the value 4
successes:
tests::this_test_will_pass
failures:
---- tests::this_test_will_fail stdout ----
I got the value 8
thread 'main' panicked at 'assertion failed: `(left == right)`
left: `5`,
right: `10`', src/lib.rs:19:9
note: run with `RUST_BACKTRACE=1` environment variable to display a backtrace
failures:
tests::this_test_will_fail
test result: FAILED. 1 passed; 1 failed; 0 ignored; 0 measured; 0 filtered out; finished in 0.00s
error: test failed, to rerun pass '--lib'
Running a Subset of Tests by Name
Sometimes, running a full test suite can take a long time. If you’re working on
code in a particular area, you might want to run only the tests pertaining to
that code. You can choose which tests to run by passing cargo test the name
or names of the test(s) you want to run as an argument.
To demonstrate how to run a subset of tests, we’ll create three tests for our
add_two function, as shown in Listing 11-11, and choose which ones to run.
Filename: src/lib.rs
pub fn add_two(a: i32) -> i32 {
a + 2
}
#[cfg(test)]
mod tests {
use super::*;
#[test]
fn add_two_and_two() {
assert_eq!(4, add_two(2));
}
#[test]
fn add_three_and_two() {
assert_eq!(5, add_two(3));
}
#[test]
fn one_hundred() {
assert_eq!(102, add_two(100));
}
}
Listing 11-11: Three tests with three different names
If we run the tests without passing any arguments, as we saw earlier, all the tests will run in parallel:
$ cargo test
Compiling adder v0.1.0 (file:///projects/adder)
Finished test [unoptimized + debuginfo] target(s) in 0.62s
Running target/debug/deps/adder-92948b65e88960b4
running 3 tests
test tests::add_three_and_two ... ok
test tests::add_two_and_two ... ok
test tests::one_hundred ... ok
test result: ok. 3 passed; 0 failed; 0 ignored; 0 measured; 0 filtered out; finished in 0.00s
Doc-tests adder
running 0 tests
test result: ok. 0 passed; 0 failed; 0 ignored; 0 measured; 0 filtered out; finished in 0.00s
Running Single Tests
We can pass the name of any test function to cargo test to run only that test:
$ cargo test one_hundred
Compiling adder v0.1.0 (file:///projects/adder)
Finished test [unoptimized + debuginfo] target(s) in 0.69s
Running target/debug/deps/adder-92948b65e88960b4
running 1 test
test tests::one_hundred ... ok
test result: ok. 1 passed; 0 failed; 0 ignored; 0 measured; 2 filtered out; finished in 0.00s
Only the test with the name one_hundred ran; the other two tests didn’t match
that name. The test output lets us know we had more tests than what this
command ran by displaying 2 filtered out at the end of the summary line.
We can’t specify the names of multiple tests in this way; only the first value
given to cargo test will be used. But there is a way to run multiple tests.
Filtering to Run Multiple Tests
We can specify part of a test name, and any test whose name matches that value
will be run. For example, because two of our tests’ names contain add, we can
run those two by running cargo test add:
$ cargo test add
Compiling adder v0.1.0 (file:///projects/adder)
Finished test [unoptimized + debuginfo] target(s) in 0.61s
Running target/debug/deps/adder-92948b65e88960b4
running 2 tests
test tests::add_three_and_two ... ok
test tests::add_two_and_two ... ok
test result: ok. 2 passed; 0 failed; 0 ignored; 0 measured; 1 filtered out; finished in 0.00s
This command ran all tests with add in the name and filtered out the test
named one_hundred. Also note that the module in which a test appears becomes
part of the test’s name, so we can run all the tests in a module by filtering
on the module’s name.
Ignoring Some Tests Unless Specifically Requested
Sometimes a few specific tests can be very time-consuming to execute, so you
might want to exclude them during most runs of cargo test. Rather than
listing as arguments all tests you do want to run, you can instead annotate the
time-consuming tests using the ignore attribute to exclude them, as shown
here:
Filename: src/lib.rs
#[test]
fn it_works() {
assert_eq!(2 + 2, 4);
}
#[test]
#[ignore]
fn expensive_test() {
// code that takes an hour to run
}
After #[test] we add the #[ignore] line to the test we want to exclude. Now
when we run our tests, it_works runs, but expensive_test doesn’t:
$ cargo test
Compiling adder v0.1.0 (file:///projects/adder)
Finished test [unoptimized + debuginfo] target(s) in 0.60s
Running target/debug/deps/adder-92948b65e88960b4
running 2 tests
test expensive_test ... ignored
test it_works ... ok
test result: ok. 1 passed; 0 failed; 1 ignored; 0 measured; 0 filtered out; finished in 0.00s
Doc-tests adder
running 0 tests
test result: ok. 0 passed; 0 failed; 0 ignored; 0 measured; 0 filtered out; finished in 0.00s
The expensive_test function is listed as ignored. If we want to run only
the ignored tests, we can use cargo test -- --ignored:
$ cargo test -- --ignored
Compiling adder v0.1.0 (file:///projects/adder)
Finished test [unoptimized + debuginfo] target(s) in 0.61s
Running target/debug/deps/adder-92948b65e88960b4
running 1 test
test expensive_test ... ok
test result: ok. 1 passed; 0 failed; 0 ignored; 0 measured; 1 filtered out; finished in 0.00s
Doc-tests adder
running 0 tests
test result: ok. 0 passed; 0 failed; 0 ignored; 0 measured; 0 filtered out; finished in 0.00s
By controlling which tests run, you can make sure your cargo test results
will be fast. When you’re at a point where it makes sense to check the results
of the ignored tests and you have time to wait for the results, you can run
cargo test -- --ignored instead.
Test Organization
As mentioned at the start of the chapter, testing is a complex discipline, and different people use different terminology and organization. The Rust community thinks about tests in terms of two main categories: unit tests and integration tests. Unit tests are small and more focused, testing one module in isolation at a time, and can test private interfaces. Integration tests are entirely external to your library and use your code in the same way any other external code would, using only the public interface and potentially exercising multiple modules per test.
Writing both kinds of tests is important to ensure that the pieces of your library are doing what you expect them to, separately and together.
Unit Tests
The purpose of unit tests is to test each unit of code in isolation from the
rest of the code to quickly pinpoint where code is and isn’t working as
expected. You’ll put unit tests in the src directory in each file with the
code that they’re testing. The convention is to create a module named tests
in each file to contain the test functions and to annotate the module with
cfg(test).
The Tests Module and #[cfg(test)]
The #[cfg(test)] annotation on the tests module tells Rust to compile and run
the test code only when you run cargo test, not when you run cargo build.
This saves compile time when you only want to build the library and saves space
in the resulting compiled artifact because the tests are not included. You’ll
see that because integration tests go in a different directory, they don’t need
the #[cfg(test)] annotation. However, because unit tests go in the same files
as the code, you’ll use #[cfg(test)] to specify that they shouldn’t be
included in the compiled result.
Recall that when we generated the new adder project in the first section of
this chapter, Cargo generated this code for us:
Filename: src/lib.rs
#[cfg(test)]
mod tests {
#[test]
fn it_works() {
assert_eq!(2 + 2, 4);
}
}
This code is the automatically generated test module. The attribute cfg
stands for configuration and tells Rust that the following item should only
be included given a certain configuration option. In this case, the
configuration option is test, which is provided by Rust for compiling and
running tests. By using the cfg attribute, Cargo compiles our test code only
if we actively run the tests with cargo test. This includes any helper
functions that might be within this module, in addition to the functions
annotated with #[test].
Testing Private Functions
There’s debate within the testing community about whether or not private
functions should be tested directly, and other languages make it difficult or
impossible to test private functions. Regardless of which testing ideology you
adhere to, Rust’s privacy rules do allow you to test private functions.
Consider the code in Listing 11-12 with the private function internal_adder.
Filename: src/lib.rs
pub fn add_two(a: i32) -> i32 {
internal_adder(a, 2)
}
fn internal_adder(a: i32, b: i32) -> i32 {
a + b
}
#[cfg(test)]
mod tests {
use super::*;
#[test]
fn internal() {
assert_eq!(4, internal_adder(2, 2));
}
}
Listing 11-12: Testing a private function
Note that the internal_adder function is not marked as pub, but because
tests are just Rust code and the tests module is just another module, you can
bring internal_adder into a test’s scope and call it. If you don’t think
private functions should be tested, there’s nothing in Rust that will compel
you to do so.
Integration Tests
In Rust, integration tests are entirely external to your library. They use your library in the same way any other code would, which means they can only call functions that are part of your library’s public API. Their purpose is to test whether many parts of your library work together correctly. Units of code that work correctly on their own could have problems when integrated, so test coverage of the integrated code is important as well. To create integration tests, you first need a tests directory.
The tests Directory
We create a tests directory at the top level of our project directory, next to src. Cargo knows to look for integration test files in this directory. We can then make as many test files as we want to in this directory, and Cargo will compile each of the files as an individual crate.
Let’s create an integration test. With the code in Listing 11-12 still in the src/lib.rs file, make a tests directory, create a new file named tests/integration_test.rs, and enter the code in Listing 11-13.
Filename: tests/integration_test.rs
use adder;
#[test]
fn it_adds_two() {
assert_eq!(4, adder::add_two(2));
}
Listing 11-13: An integration test of a function in the
adder crate
We’ve added use adder at the top of the code, which we didn’t need in the
unit tests. The reason is that each file in the tests directory is a separate
crate, so we need to bring our library into each test crate’s scope.
We don’t need to annotate any code in tests/integration_test.rs with
#[cfg(test)]. Cargo treats the tests directory specially and compiles files
in this directory only when we run cargo test. Run cargo test now:
$ cargo test
Compiling adder v0.1.0 (file:///projects/adder)
Finished test [unoptimized + debuginfo] target(s) in 1.31s
Running target/debug/deps/adder-1082c4b063a8fbe6
running 1 test
test tests::internal ... ok
test result: ok. 1 passed; 0 failed; 0 ignored; 0 measured; 0 filtered out; finished in 0.00s
Running target/debug/deps/integration_test-1082c4b063a8fbe6
running 1 test
test it_adds_two ... ok
test result: ok. 1 passed; 0 failed; 0 ignored; 0 measured; 0 filtered out; finished in 0.00s
Doc-tests adder
running 0 tests
test result: ok. 0 passed; 0 failed; 0 ignored; 0 measured; 0 filtered out; finished in 0.00s
The three sections of output include the unit tests, the integration test, and
the doc tests. The first section for the unit tests is the same as we’ve been
seeing: one line for each unit test (one named internal that we added in
Listing 11-12) and then a summary line for the unit tests.
The integration tests section starts with the line Running target/debug/deps/integration_test-1082c4b063a8fbe6 (the hash at the end of
your output will be different). Next, there is a line for each test function in
that integration test and a summary line for the results of the integration
test just before the Doc-tests adder section starts.
Similarly to how adding more unit test functions adds more result lines to the unit tests section, adding more test functions to the integration test file adds more result lines to this integration test file’s section. Each integration test file has its own section, so if we add more files in the tests directory, there will be more integration test sections.
We can still run a particular integration test function by specifying the test
function’s name as an argument to cargo test. To run all the tests in a
particular integration test file, use the --test argument of cargo test
followed by the name of the file:
$ cargo test --test integration_test
Compiling adder v0.1.0 (file:///projects/adder)
Finished test [unoptimized + debuginfo] target(s) in 0.64s
Running target/debug/deps/integration_test-82e7799c1bc62298
running 1 test
test it_adds_two ... ok
test result: ok. 1 passed; 0 failed; 0 ignored; 0 measured; 0 filtered out; finished in 0.00s
This command runs only the tests in the tests/integration_test.rs file.
Submodules in Integration Tests
As you add more integration tests, you might want to make more than one file in the tests directory to help organize them; for example, you can group the test functions by the functionality they’re testing. As mentioned earlier, each file in the tests directory is compiled as its own separate crate.
Treating each integration test file as its own crate is useful to create separate scopes that are more like the way end users will be using your crate. However, this means files in the tests directory don’t share the same behavior as files in src do, as you learned in Chapter 7 regarding how to separate code into modules and files.
The different behavior of files in the tests directory is most noticeable
when you have a set of helper functions that would be useful in multiple
integration test files and you try to follow the steps in the “Separating
Modules into Different Files”
section of Chapter 7 to extract them into a common module. For example, if we
create tests/common.rs and place a function named setup in it, we can add
some code to setup that we want to call from multiple test functions in
multiple test files:
Filename: tests/common.rs
#![allow(unused)] fn main() { pub fn setup() { // setup code specific to your library's tests would go here } }
When we run the tests again, we’ll see a new section in the test output for the
common.rs file, even though this file doesn’t contain any test functions nor
did we call the setup function from anywhere:
$ cargo test
Compiling adder v0.1.0 (file:///projects/adder)
Finished test [unoptimized + debuginfo] target(s) in 0.89s
Running target/debug/deps/adder-92948b65e88960b4
running 1 test
test tests::internal ... ok
test result: ok. 1 passed; 0 failed; 0 ignored; 0 measured; 0 filtered out; finished in 0.00s
Running target/debug/deps/common-92948b65e88960b4
running 0 tests
test result: ok. 0 passed; 0 failed; 0 ignored; 0 measured; 0 filtered out; finished in 0.00s
Running target/debug/deps/integration_test-92948b65e88960b4
running 1 test
test it_adds_two ... ok
test result: ok. 1 passed; 0 failed; 0 ignored; 0 measured; 0 filtered out; finished in 0.00s
Doc-tests adder
running 0 tests
test result: ok. 0 passed; 0 failed; 0 ignored; 0 measured; 0 filtered out; finished in 0.00s
Having common appear in the test results with running 0 tests displayed for
it is not what we wanted. We just wanted to share some code with the other
integration test files.
To avoid having common appear in the test output, instead of creating
tests/common.rs, we’ll create tests/common/mod.rs. This is an alternate
naming convention that Rust also understands. Naming the file this way tells
Rust not to treat the common module as an integration test file. When we move
the setup function code into tests/common/mod.rs and delete the
tests/common.rs file, the section in the test output will no longer appear.
Files in subdirectories of the tests directory don’t get compiled as separate
crates or have sections in the test output.
After we’ve created tests/common/mod.rs, we can use it from any of the
integration test files as a module. Here’s an example of calling the setup
function from the it_adds_two test in tests/integration_test.rs:
Filename: tests/integration_test.rs
use adder;
mod common;
#[test]
fn it_adds_two() {
common::setup();
assert_eq!(4, adder::add_two(2));
}
Note that the mod common; declaration is the same as the module declaration
we demonstrated in Listing 7-21. Then in the test function, we can call the
common::setup() function.
Integration Tests for Binary Crates
If our project is a binary crate that only contains a src/main.rs file and
doesn’t have a src/lib.rs file, we can’t create integration tests in the
tests directory and bring functions defined in the src/main.rs file into
scope with a use statement. Only library crates expose functions that other
crates can use; binary crates are meant to be run on their own.
This is one of the reasons Rust projects that provide a binary have a
straightforward src/main.rs file that calls logic that lives in the
src/lib.rs file. Using that structure, integration tests can test the
library crate with use to make the important functionality available.
If the important functionality works, the small amount of code in the
src/main.rs file will work as well, and that small amount of code doesn’t
need to be tested.
Summary
Rust’s testing features provide a way to specify how code should function to ensure it continues to work as you expect, even as you make changes. Unit tests exercise different parts of a library separately and can test private implementation details. Integration tests check that many parts of the library work together correctly, and they use the library’s public API to test the code in the same way external code will use it. Even though Rust’s type system and ownership rules help prevent some kinds of bugs, tests are still important to reduce logic bugs having to do with how your code is expected to behave.
Let’s combine the knowledge you learned in this chapter and in previous chapters to work on a project!
An I/O Project: Building a Command Line Program
This chapter is a recap of the many skills you’ve learned so far and an exploration of a few more standard library features. We’ll build a command line tool that interacts with file and command line input/output to practice some of the Rust concepts you now have under your belt.
Rust’s speed, safety, single binary output, and cross-platform support make it
an ideal language for creating command line tools, so for our project, we’ll
make our own version of the classic command line tool grep (globally
search a regular expression and print). In the simplest use case,
grep searches a specified file for a specified string. To do so, grep takes
as its arguments a filename and a string. Then it reads the file, finds lines
in that file that contain the string argument, and prints those lines.
Along the way, we’ll show how to make our command line tool use features of the
terminal that many command line tools use. We’ll read the value of an
environment variable to allow the user to configure the behavior of our tool.
We’ll also print error messages to the standard error console stream (stderr)
instead of standard output (stdout), so, for example, the user can redirect
successful output to a file while still seeing error messages onscreen.
One Rust community member, Andrew Gallant, has already created a fully
featured, very fast version of grep, called ripgrep. By comparison, our
version of grep will be fairly simple, but this chapter will give you some of
the background knowledge you need to understand a real-world project such as
ripgrep.
Our grep project will combine a number of concepts you’ve learned so far:
- Organizing code (using what you learned about modules in Chapter 7)
- Using vectors and strings (collections, Chapter 8)
- Handling errors (Chapter 9)
- Using traits and lifetimes where appropriate (Chapter 10)
- Writing tests (Chapter 11)
We’ll also briefly introduce closures, iterators, and trait objects, which Chapters 13 and 17 will cover in detail.
Accepting Command Line Arguments
Let’s create a new project with, as always, cargo new. We’ll call our project
minigrep to distinguish it from the grep tool that you might already have
on your system.
$ cargo new minigrep
Created binary (application) `minigrep` project
$ cd minigrep
The first task is to make minigrep accept its two command line arguments: the
filename and a string to search for. That is, we want to be able to run our
program with cargo run, a string to search for, and a path to a file to
search in, like so:
$ cargo run searchstring example-filename.txt
Right now, the program generated by cargo new cannot process arguments we
give it. Some existing libraries on crates.io can help
with writing a program that accepts command line arguments, but because you’re
just learning this concept, let’s implement this capability ourselves.
Reading the Argument Values
To enable minigrep to read the values of command line arguments we pass to
it, we’ll need a function provided in Rust’s standard library, which is
std::env::args. This function returns an iterator of the command line
arguments that were given to minigrep. We’ll cover iterators fully in
Chapter 13. For now, you only need to know two details
about iterators: iterators produce a series of values, and we can call the
collect method on an iterator to turn it into a collection, such as a vector,
containing all the elements the iterator produces.
Use the code in Listing 12-1 to allow your minigrep program to read any
command line arguments passed to it and then collect the values into a vector.
Filename: src/main.rs
use std::env; fn main() { let args: Vec<String> = env::args().collect(); println!("{:?}", args); }
Listing 12-1: Collecting the command line arguments into a vector and printing them
First, we bring the std::env module into scope with a use statement so we
can use its args function. Notice that the std::env::args function is
nested in two levels of modules. As we discussed in Chapter
7, in cases where the desired function is
nested in more than one module, it’s conventional to bring the parent module
into scope rather than the function. By doing so, we can easily use other
functions from std::env. It’s also less ambiguous than adding use std::env::args and then calling the function with just args, because args
might easily be mistaken for a function that’s defined in the current module.
The
argsFunction and Invalid UnicodeNote that
std::env::argswill panic if any argument contains invalid Unicode. If your program needs to accept arguments containing invalid Unicode, usestd::env::args_osinstead. That function returns an iterator that producesOsStringvalues instead ofStringvalues. We’ve chosen to usestd::env::argshere for simplicity, becauseOsStringvalues differ per platform and are more complex to work with thanStringvalues.
On the first line of main, we call env::args, and we immediately use
collect to turn the iterator into a vector containing all the values produced
by the iterator. We can use the collect function to create many kinds of
collections, so we explicitly annotate the type of args to specify that we
want a vector of strings. Although we very rarely need to annotate types in
Rust, collect is one function you do often need to annotate because Rust
isn’t able to infer the kind of collection you want.
Finally, we print the vector using the debug formatter, :?. Let’s try running
the code first with no arguments and then with two arguments:
$ cargo run
Compiling minigrep v0.1.0 (file:///projects/minigrep)
Finished dev [unoptimized + debuginfo] target(s) in 0.61s
Running `target/debug/minigrep`
["target/debug/minigrep"]
$ cargo run needle haystack
Compiling minigrep v0.1.0 (file:///projects/minigrep)
Finished dev [unoptimized + debuginfo] target(s) in 1.57s
Running `target/debug/minigrep needle haystack`
["target/debug/minigrep", "needle", "haystack"]
Notice that the first value in the vector is "target/debug/minigrep", which
is the name of our binary. This matches the behavior of the arguments list in
C, letting programs use the name by which they were invoked in their execution.
It’s often convenient to have access to the program name in case you want to
print it in messages or change behavior of the program based on what command
line alias was used to invoke the program. But for the purposes of this
chapter, we’ll ignore it and save only the two arguments we need.
Saving the Argument Values in Variables
Printing the value of the vector of arguments illustrated that the program is able to access the values specified as command line arguments. Now we need to save the values of the two arguments in variables so we can use the values throughout the rest of the program. We do that in Listing 12-2.
Filename: src/main.rs
use std::env;
fn main() {
let args: Vec<String> = env::args().collect();
let query = &args[1];
let filename = &args[2];
println!("Searching for {}", query);
println!("In file {}", filename);
}
Listing 12-2: Creating variables to hold the query argument and filename argument
As we saw when we printed the vector, the program’s name takes up the first
value in the vector at args[0], so we’re starting at index 1. The first
argument minigrep takes is the string we’re searching for, so we put a
reference to the first argument in the variable query. The second argument
will be the filename, so we put a reference to the second argument in the
variable filename.
We temporarily print the values of these variables to prove that the code is
working as we intend. Let’s run this program again with the arguments test
and sample.txt:
$ cargo run test sample.txt
Compiling minigrep v0.1.0 (file:///projects/minigrep)
Finished dev [unoptimized + debuginfo] target(s) in 0.0s
Running `target/debug/minigrep test sample.txt`
Searching for test
In file sample.txt
Great, the program is working! The values of the arguments we need are being saved into the right variables. Later we’ll add some error handling to deal with certain potential erroneous situations, such as when the user provides no arguments; for now, we’ll ignore that situation and work on adding file-reading capabilities instead.
Reading a File
Now we’ll add functionality to read the file that is specified in the
filename command line argument. First, we need a sample file to test it with:
the best kind of file to use to make sure minigrep is working is one with a
small amount of text over multiple lines with some repeated words. Listing 12-3
has an Emily Dickinson poem that will work well! Create a file called
poem.txt at the root level of your project, and enter the poem “I’m Nobody!
Who are you?”
Filename: poem.txt
I'm nobody! Who are you?
Are you nobody, too?
Then there's a pair of us - don't tell!
They'd banish us, you know.
How dreary to be somebody!
How public, like a frog
To tell your name the livelong day
To an admiring bog!
Listing 12-3: A poem by Emily Dickinson makes a good test case
With the text in place, edit src/main.rs and add code to read the file, as shown in Listing 12-4.
Filename: src/main.rs
use std::env;
use std::fs;
fn main() {
// --snip--
let args: Vec<String> = env::args().collect();
let query = &args[1];
let filename = &args[2];
println!("Searching for {}", query);
println!("In file {}", filename);
let contents = fs::read_to_string(filename)
.expect("Something went wrong reading the file");
println!("With text:\n{}", contents);
}
Listing 12-4: Reading the contents of the file specified by the second argument
First, we add another use statement to bring in a relevant part of the
standard library: we need std::fs to handle files.
In main, we’ve added a new statement: fs::read_to_string takes the
filename, opens that file, and returns a Result<String> of the file’s
contents.
After that statement, we’ve again added a temporary println! statement that
prints the value of contents after the file is read, so we can check that the
program is working so far.
Let’s run this code with any string as the first command line argument (because we haven’t implemented the searching part yet) and the poem.txt file as the second argument:
$ cargo run the poem.txt
Compiling minigrep v0.1.0 (file:///projects/minigrep)
Finished dev [unoptimized + debuginfo] target(s) in 0.0s
Running `target/debug/minigrep the poem.txt`
Searching for the
In file poem.txt
With text:
I'm nobody! Who are you?
Are you nobody, too?
Then there's a pair of us - don't tell!
They'd banish us, you know.
How dreary to be somebody!
How public, like a frog
To tell your name the livelong day
To an admiring bog!
Great! The code read and then printed the contents of the file. But the code
has a few flaws. The main function has multiple responsibilities: generally,
functions are clearer and easier to maintain if each function is responsible
for only one idea. The other problem is that we’re not handling errors as well
as we could. The program is still small, so these flaws aren’t a big problem,
but as the program grows, it will be harder to fix them cleanly. It’s good
practice to begin refactoring early on when developing a program, because it’s
much easier to refactor smaller amounts of code. We’ll do that next.
Refactoring to Improve Modularity and Error Handling
To improve our program, we’ll fix four problems that have to do with the program’s structure and how it’s handling potential errors.
First, our main function now performs two tasks: it parses arguments and
reads files. For such a small function, this isn’t a major problem. However, if
we continue to grow our program inside main, the number of separate tasks the
main function handles will increase. As a function gains responsibilities, it
becomes more difficult to reason about, harder to test, and harder to change
without breaking one of its parts. It’s best to separate functionality so each
function is responsible for one task.
This issue also ties into the second problem: although query and filename
are configuration variables to our program, variables like contents are used
to perform the program’s logic. The longer main becomes, the more variables
we’ll need to bring into scope; the more variables we have in scope, the harder
it will be to keep track of the purpose of each. It’s best to group the
configuration variables into one structure to make their purpose clear.
The third problem is that we’ve used expect to print an error message when
reading the file fails, but the error message just prints Something went wrong reading the file. Reading a file can fail in a number of ways: for example,
the file could be missing, or we might not have permission to open it. Right
now, regardless of the situation, we’d print the Something went wrong reading the file error message, which wouldn’t give the user any information!
Fourth, we use expect repeatedly to handle different errors, and if the user
runs our program without specifying enough arguments, they’ll get an index out of bounds error from Rust that doesn’t clearly explain the problem. It would
be best if all the error-handling code were in one place so future maintainers
had only one place to consult in the code if the error-handling logic needed to
change. Having all the error-handling code in one place will also ensure that
we’re printing messages that will be meaningful to our end users.
Let’s address these four problems by refactoring our project.
Separation of Concerns for Binary Projects
The organizational problem of allocating responsibility for multiple tasks to
the main function is common to many binary projects. As a result, the Rust
community has developed a process to use as a guideline for splitting the
separate concerns of a binary program when main starts getting large. The
process has the following steps:
- Split your program into a main.rs and a lib.rs and move your program’s logic to lib.rs.
- As long as your command line parsing logic is small, it can remain in main.rs.
- When the command line parsing logic starts getting complicated, extract it from main.rs and move it to lib.rs.
The responsibilities that remain in the main function after this process
should be limited to the following:
- Calling the command line parsing logic with the argument values
- Setting up any other configuration
- Calling a
runfunction in lib.rs - Handling the error if
runreturns an error
This pattern is about separating concerns: main.rs handles running the
program, and lib.rs handles all the logic of the task at hand. Because you
can’t test the main function directly, this structure lets you test all of
your program’s logic by moving it into functions in lib.rs. The only code
that remains in main.rs will be small enough to verify its correctness by
reading it. Let’s rework our program by following this process.
Extracting the Argument Parser
We’ll extract the functionality for parsing arguments into a function that
main will call to prepare for moving the command line parsing logic to
src/lib.rs. Listing 12-5 shows the new start of main that calls a new
function parse_config, which we’ll define in src/main.rs for the moment.
Filename: src/main.rs
use std::env;
use std::fs;
fn main() {
let args: Vec<String> = env::args().collect();
let (query, filename) = parse_config(&args);
// --snip--
println!("Searching for {}", query);
println!("In file {}", filename);
let contents = fs::read_to_string(filename)
.expect("Something went wrong reading the file");
println!("With text:\n{}", contents);
}
fn parse_config(args: &[String]) -> (&str, &str) {
let query = &args[1];
let filename = &args[2];
(query, filename)
}
Listing 12-5: Extracting a parse_config function from
main
We’re still collecting the command line arguments into a vector, but instead of
assigning the argument value at index 1 to the variable query and the
argument value at index 2 to the variable filename within the main
function, we pass the whole vector to the parse_config function. The
parse_config function then holds the logic that determines which argument
goes in which variable and passes the values back to main. We still create
the query and filename variables in main, but main no longer has the
responsibility of determining how the command line arguments and variables
correspond.
This rework may seem like overkill for our small program, but we’re refactoring in small, incremental steps. After making this change, run the program again to verify that the argument parsing still works. It’s good to check your progress often, to help identify the cause of problems when they occur.
Grouping Configuration Values
We can take another small step to improve the parse_config function further.
At the moment, we’re returning a tuple, but then we immediately break that
tuple into individual parts again. This is a sign that perhaps we don’t have
the right abstraction yet.
Another indicator that shows there’s room for improvement is the config part
of parse_config, which implies that the two values we return are related and
are both part of one configuration value. We’re not currently conveying this
meaning in the structure of the data other than by grouping the two values into
a tuple; we could put the two values into one struct and give each of the
struct fields a meaningful name. Doing so will make it easier for future
maintainers of this code to understand how the different values relate to each
other and what their purpose is.
Note: Using primitive values when a complex type would be more appropriate is an anti-pattern known as primitive obsession.
Listing 12-6 shows the improvements to the parse_config function.
Filename: src/main.rs
use std::env;
use std::fs;
fn main() {
let args: Vec<String> = env::args().collect();
let config = parse_config(&args);
println!("Searching for {}", config.query);
println!("In file {}", config.filename);
let contents = fs::read_to_string(config.filename)
.expect("Something went wrong reading the file");
// --snip--
println!("With text:\n{}", contents);
}
struct Config {
query: String,
filename: String,
}
fn parse_config(args: &[String]) -> Config {
let query = args[1].clone();
let filename = args[2].clone();
Config { query, filename }
}
Listing 12-6: Refactoring parse_config to return an
instance of a Config struct
We’ve added a struct named Config defined to have fields named query and
filename. The signature of parse_config now indicates that it returns a
Config value. In the body of parse_config, where we used to return string
slices that reference String values in args, we now define Config to
contain owned String values. The args variable in main is the owner of
the argument values and is only letting the parse_config function borrow
them, which means we’d violate Rust’s borrowing rules if Config tried to take
ownership of the values in args.
We could manage the String data in a number of different ways, but the
easiest, though somewhat inefficient, route is to call the clone method on
the values. This will make a full copy of the data for the Config instance to
own, which takes more time and memory than storing a reference to the string
data. However, cloning the data also makes our code very straightforward
because we don’t have to manage the lifetimes of the references; in this
circumstance, giving up a little performance to gain simplicity is a worthwhile
trade-off.
The Trade-Offs of Using
cloneThere’s a tendency among many Rustaceans to avoid using
cloneto fix ownership problems because of its runtime cost. In Chapter 13, you’ll learn how to use more efficient methods in this type of situation. But for now, it’s okay to copy a few strings to continue making progress because you’ll make these copies only once and your filename and query string are very small. It’s better to have a working program that’s a bit inefficient than to try to hyperoptimize code on your first pass. As you become more experienced with Rust, it’ll be easier to start with the most efficient solution, but for now, it’s perfectly acceptable to callclone.
We’ve updated main so it places the instance of Config returned by
parse_config into a variable named config, and we updated the code that
previously used the separate query and filename variables so it now uses
the fields on the Config struct instead.
Now our code more clearly conveys that query and filename are related and
that their purpose is to configure how the program will work. Any code that
uses these values knows to find them in the config instance in the fields
named for their purpose.
Creating a Constructor for Config
So far, we’ve extracted the logic responsible for parsing the command line
arguments from main and placed it in the parse_config function. Doing so
helped us to see that the query and filename values were related and that
relationship should be conveyed in our code. We then added a Config struct to
name the related purpose of query and filename and to be able to return the
values’ names as struct field names from the parse_config function.
So now that the purpose of the parse_config function is to create a Config
instance, we can change parse_config from a plain function to a function
named new that is associated with the Config struct. Making this change
will make the code more idiomatic. We can create instances of types in the
standard library, such as String, by calling String::new. Similarly, by
changing parse_config into a new function associated with Config, we’ll
be able to create instances of Config by calling Config::new. Listing 12-7
shows the changes we need to make.
Filename: src/main.rs
use std::env;
use std::fs;
fn main() {
let args: Vec<String> = env::args().collect();
let config = Config::new(&args);
println!("Searching for {}", config.query);
println!("In file {}", config.filename);
let contents = fs::read_to_string(config.filename)
.expect("Something went wrong reading the file");
println!("With text:\n{}", contents);
// --snip--
}
// --snip--
struct Config {
query: String,
filename: String,
}
impl Config {
fn new(args: &[String]) -> Config {
let query = args[1].clone();
let filename = args[2].clone();
Config { query, filename }
}
}
Listing 12-7: Changing parse_config into
Config::new
We’ve updated main where we were calling parse_config to instead call
Config::new. We’ve changed the name of parse_config to new and moved it
within an impl block, which associates the new function with Config. Try
compiling this code again to make sure it works.
Fixing the Error Handling
Now we’ll work on fixing our error handling. Recall that attempting to access
the values in the args vector at index 1 or index 2 will cause the program to
panic if the vector contains fewer than three items. Try running the program
without any arguments; it will look like this:
$ cargo run
Compiling minigrep v0.1.0 (file:///projects/minigrep)
Finished dev [unoptimized + debuginfo] target(s) in 0.0s
Running `target/debug/minigrep`
thread 'main' panicked at 'index out of bounds: the len is 1 but the index is 1', src/main.rs:27:21
note: run with `RUST_BACKTRACE=1` environment variable to display a backtrace
The line index out of bounds: the len is 1 but the index is 1 is an error
message intended for programmers. It won’t help our end users understand what
happened and what they should do instead. Let’s fix that now.
Improving the Error Message
In Listing 12-8, we add a check in the new function that will verify that the
slice is long enough before accessing index 1 and 2. If the slice isn’t long
enough, the program panics and displays a better error message than the index out of bounds message.
Filename: src/main.rs
use std::env;
use std::fs;
fn main() {
let args: Vec<String> = env::args().collect();
let config = Config::new(&args);
println!("Searching for {}", config.query);
println!("In file {}", config.filename);
let contents = fs::read_to_string(config.filename)
.expect("Something went wrong reading the file");
println!("With text:\n{}", contents);
}
struct Config {
query: String,
filename: String,
}
impl Config {
// --snip--
fn new(args: &[String]) -> Config {
if args.len() < 3 {
panic!("not enough arguments");
}
// --snip--
let query = args[1].clone();
let filename = args[2].clone();
Config { query, filename }
}
}
Listing 12-8: Adding a check for the number of arguments
This code is similar to the Guess::new function we wrote in Listing
9-10, where we called panic! when the
value argument was out of the range of valid values. Instead of checking for
a range of values here, we’re checking that the length of args is at least 3
and the rest of the function can operate under the assumption that this
condition has been met. If args has fewer than three items, this condition
will be true, and we call the panic! macro to end the program immediately.
With these extra few lines of code in new, let’s run the program without any
arguments again to see what the error looks like now:
$ cargo run
Compiling minigrep v0.1.0 (file:///projects/minigrep)
Finished dev [unoptimized + debuginfo] target(s) in 0.0s
Running `target/debug/minigrep`
thread 'main' panicked at 'not enough arguments', src/main.rs:26:13
note: run with `RUST_BACKTRACE=1` environment variable to display a backtrace
This output is better: we now have a reasonable error message. However, we also
have extraneous information we don’t want to give to our users. Perhaps using
the technique we used in Listing 9-10 isn’t the best to use here: a call to
panic! is more appropriate for a programming problem than a usage problem,
as discussed in Chapter 9. Instead, we
can use the other technique you learned about in Chapter 9—returning a
Result that indicates either success or an error.
Returning a Result from new Instead of Calling panic!
We can instead return a Result value that will contain a Config instance in
the successful case and will describe the problem in the error case. When
Config::new is communicating to main, we can use the Result type to
signal there was a problem. Then we can change main to convert an Err
variant into a more practical error for our users without the surrounding text
about thread 'main' and RUST_BACKTRACE that a call to panic! causes.
Listing 12-9 shows the changes we need to make to the return value of
Config::new and the body of the function needed to return a Result. Note
that this won’t compile until we update main as well, which we’ll do in the
next listing.
Filename: src/main.rs
use std::env;
use std::fs;
fn main() {
let args: Vec<String> = env::args().collect();
let config = Config::new(&args);
println!("Searching for {}", config.query);
println!("In file {}", config.filename);
let contents = fs::read_to_string(config.filename)
.expect("Something went wrong reading the file");
println!("With text:\n{}", contents);
}
struct Config {
query: String,
filename: String,
}
impl Config {
fn new(args: &[String]) -> Result<Config, &str> {
if args.len() < 3 {
return Err("not enough arguments");
}
let query = args[1].clone();
let filename = args[2].clone();
Ok(Config { query, filename })
}
}
Listing 12-9: Returning a Result from
Config::new
Our new function now returns a Result with a Config instance in the
success case and a &str in the error case.
We’ve made two changes in the body of the new function: instead of calling
panic! when the user doesn’t pass enough arguments, we now return an Err
value, and we’ve wrapped the Config return value in an Ok. These changes
make the function conform to its new type signature.
Returning an Err value from Config::new allows the main function to
handle the Result value returned from the new function and exit the process
more cleanly in the error case.
Calling Config::new and Handling Errors
To handle the error case and print a user-friendly message, we need to update
main to handle the Result being returned by Config::new, as shown in
Listing 12-10. We’ll also take the responsibility of exiting the command line
tool with a nonzero error code from panic! and implement it by hand. A
nonzero exit status is a convention to signal to the process that called our
program that the program exited with an error state.
Filename: src/main.rs
use std::env;
use std::fs;
use std::process;
fn main() {
let args: Vec<String> = env::args().collect();
let config = Config::new(&args).unwrap_or_else(|err| {
println!("Problem parsing arguments: {}", err);
process::exit(1);
});
// --snip--
println!("Searching for {}", config.query);
println!("In file {}", config.filename);
let contents = fs::read_to_string(config.filename)
.expect("Something went wrong reading the file");
println!("With text:\n{}", contents);
}
struct Config {
query: String,
filename: String,
}
impl Config {
fn new(args: &[String]) -> Result<Config, &str> {
if args.len() < 3 {
return Err("not enough arguments");
}
let query = args[1].clone();
let filename = args[2].clone();
Ok(Config { query, filename })
}
}
Listing 12-10: Exiting with an error code if creating a
new Config fails
In this listing, we’ve used a method we haven’t covered in detail yet:
unwrap_or_else, which is defined on Result<T, E> by the standard library.
Using unwrap_or_else allows us to define some custom, non-panic! error
handling. If the Result is an Ok value, this method’s behavior is similar
to unwrap: it returns the inner value Ok is wrapping. However, if the value
is an Err value, this method calls the code in the closure, which is an
anonymous function we define and pass as an argument to unwrap_or_else. We’ll
cover closures in more detail in Chapter 13. For now,
you just need to know that unwrap_or_else will pass the inner value of the
Err, which in this case is the static string "not enough arguments" that we
added in Listing 12-9, to our closure in the argument err that appears
between the vertical pipes. The code in the closure can then use the err
value when it runs.
We’ve added a new use line to bring process from the standard library into
scope. The code in the closure that will be run in the error case is only two
lines: we print the err value and then call process::exit. The
process::exit function will stop the program immediately and return the
number that was passed as the exit status code. This is similar to the
panic!-based handling we used in Listing 12-8, but we no longer get all the
extra output. Let’s try it:
$ cargo run
Compiling minigrep v0.1.0 (file:///projects/minigrep)
Finished dev [unoptimized + debuginfo] target(s) in 0.48s
Running `target/debug/minigrep`
Problem parsing arguments: not enough arguments
Great! This output is much friendlier for our users.
Extracting Logic from main
Now that we’ve finished refactoring the configuration parsing, let’s turn to
the program’s logic. As we stated in “Separation of Concerns for Binary
Projects”, we’ll
extract a function named run that will hold all the logic currently in the
main function that isn’t involved with setting up configuration or handling
errors. When we’re done, main will be concise and easy to verify by
inspection, and we’ll be able to write tests for all the other logic.
Listing 12-11 shows the extracted run function. For now, we’re just making
the small, incremental improvement of extracting the function. We’re still
defining the function in src/main.rs.
Filename: src/main.rs
use std::env;
use std::fs;
use std::process;
fn main() {
// --snip--
let args: Vec<String> = env::args().collect();
let config = Config::new(&args).unwrap_or_else(|err| {
println!("Problem parsing arguments: {}", err);
process::exit(1);
});
println!("Searching for {}", config.query);
println!("In file {}", config.filename);
run(config);
}
fn run(config: Config) {
let contents = fs::read_to_string(config.filename)
.expect("Something went wrong reading the file");
println!("With text:\n{}", contents);
}
// --snip--
struct Config {
query: String,
filename: String,
}
impl Config {
fn new(args: &[String]) -> Result<Config, &str> {
if args.len() < 3 {
return Err("not enough arguments");
}
let query = args[1].clone();
let filename = args[2].clone();
Ok(Config { query, filename })
}
}
Listing 12-11: Extracting a run function containing the
rest of the program logic
The run function now contains all the remaining logic from main, starting
from reading the file. The run function takes the Config instance as an
argument.
Returning Errors from the run Function
With the remaining program logic separated into the run function, we can
improve the error handling, as we did with Config::new in Listing 12-9.
Instead of allowing the program to panic by calling expect, the run
function will return a Result<T, E> when something goes wrong. This will let
us further consolidate into main the logic around handling errors in a
user-friendly way. Listing 12-12 shows the changes we need to make to the
signature and body of run.
Filename: src/main.rs
use std::env;
use std::fs;
use std::process;
use std::error::Error;
// --snip--
fn main() {
let args: Vec<String> = env::args().collect();
let config = Config::new(&args).unwrap_or_else(|err| {
println!("Problem parsing arguments: {}", err);
process::exit(1);
});
println!("Searching for {}", config.query);
println!("In file {}", config.filename);
run(config);
}
fn run(config: Config) -> Result<(), Box<dyn Error>> {
let contents = fs::read_to_string(config.filename)?;
println!("With text:\n{}", contents);
Ok(())
}
struct Config {
query: String,
filename: String,
}
impl Config {
fn new(args: &[String]) -> Result<Config, &str> {
if args.len() < 3 {
return Err("not enough arguments");
}
let query = args[1].clone();
let filename = args[2].clone();
Ok(Config { query, filename })
}
}
Listing 12-12: Changing the run function to return
Result
We’ve made three significant changes here. First, we changed the return type of
the run function to Result<(), Box<dyn Error>>. This function previously
returned the unit type, (), and we keep that as the value returned in the
Ok case.
For the error type, we used the trait object Box<dyn Error> (and we’ve
brought std::error::Error into scope with a use statement at the top).
We’ll cover trait objects in Chapter 17. For now, just
know that Box<dyn Error> means the function will return a type that
implements the Error trait, but we don’t have to specify what particular type
the return value will be. This gives us flexibility to return error values that
may be of different types in different error cases. The dyn keyword is short
for “dynamic.”
Second, we’ve removed the call to expect in favor of the ? operator, as we
talked about in Chapter 9. Rather than
panic! on an error, ? will return the error value from the current function
for the caller to handle.
Third, the run function now returns an Ok value in the success case. We’ve
declared the run function’s success type as () in the signature, which
means we need to wrap the unit type value in the Ok value. This Ok(())
syntax might look a bit strange at first, but using () like this is the
idiomatic way to indicate that we’re calling run for its side effects only;
it doesn’t return a value we need.
When you run this code, it will compile but will display a warning:
$ cargo run the poem.txt
Compiling minigrep v0.1.0 (file:///projects/minigrep)
warning: unused `std::result::Result` that must be used
--> src/main.rs:19:5
|
19 | run(config);
| ^^^^^^^^^^^^
|
= note: `#[warn(unused_must_use)]` on by default
= note: this `Result` may be an `Err` variant, which should be handled
warning: 1 warning emitted
Finished dev [unoptimized + debuginfo] target(s) in 0.71s
Running `target/debug/minigrep the poem.txt`
Searching for the
In file poem.txt
With text:
I'm nobody! Who are you?
Are you nobody, too?
Then there's a pair of us - don't tell!
They'd banish us, you know.
How dreary to be somebody!
How public, like a frog
To tell your name the livelong day
To an admiring bog!
Rust tells us that our code ignored the Result value and the Result value
might indicate that an error occurred. But we’re not checking to see whether or
not there was an error, and the compiler reminds us that we probably meant to
have some error-handling code here! Let’s rectify that problem now.
Handling Errors Returned from run in main
We’ll check for errors and handle them using a technique similar to one we used
with Config::new in Listing 12-10, but with a slight difference:
Filename: src/main.rs
use std::env;
use std::error::Error;
use std::fs;
use std::process;
fn main() {
// --snip--
let args: Vec<String> = env::args().collect();
let config = Config::new(&args).unwrap_or_else(|err| {
println!("Problem parsing arguments: {}", err);
process::exit(1);
});
println!("Searching for {}", config.query);
println!("In file {}", config.filename);
if let Err(e) = run(config) {
println!("Application error: {}", e);
process::exit(1);
}
}
fn run(config: Config) -> Result<(), Box<dyn Error>> {
let contents = fs::read_to_string(config.filename)?;
println!("With text:\n{}", contents);
Ok(())
}
struct Config {
query: String,
filename: String,
}
impl Config {
fn new(args: &[String]) -> Result<Config, &str> {
if args.len() < 3 {
return Err("not enough arguments");
}
let query = args[1].clone();
let filename = args[2].clone();
Ok(Config { query, filename })
}
}
We use if let rather than unwrap_or_else to check whether run returns an
Err value and call process::exit(1) if it does. The run function doesn’t
return a value that we want to unwrap in the same way that Config::new
returns the Config instance. Because run returns () in the success case,
we only care about detecting an error, so we don’t need unwrap_or_else to
return the unwrapped value because it would only be ().
The bodies of the if let and the unwrap_or_else functions are the same in
both cases: we print the error and exit.
Splitting Code into a Library Crate
Our minigrep project is looking good so far! Now we’ll split the
src/main.rs file and put some code into the src/lib.rs file so we can test
it and have a src/main.rs file with fewer responsibilities.
Let’s move all the code that isn’t the main function from src/main.rs to
src/lib.rs:
- The
runfunction definition - The relevant
usestatements - The definition of
Config - The
Config::newfunction definition
The contents of src/lib.rs should have the signatures shown in Listing 12-13 (we’ve omitted the bodies of the functions for brevity). Note that this won’t compile until we modify src/main.rs in Listing 12-14.
Filename: src/lib.rs
use std::error::Error;
use std::fs;
pub struct Config {
pub query: String,
pub filename: String,
}
impl Config {
pub fn new(args: &[String]) -> Result<Config, &str> {
// --snip--
if args.len() < 3 {
return Err("not enough arguments");
}
let query = args[1].clone();
let filename = args[2].clone();
Ok(Config { query, filename })
}
}
pub fn run(config: Config) -> Result<(), Box<dyn Error>> {
// --snip--
let contents = fs::read_to_string(config.filename)?;
println!("With text:\n{}", contents);
Ok(())
}
Listing 12-13: Moving Config and run into
src/lib.rs
We’ve made liberal use of the pub keyword: on Config, on its fields and its
new method, and on the run function. We now have a library crate that has a
public API that we can test!
Now we need to bring the code we moved to src/lib.rs into the scope of the binary crate in src/main.rs, as shown in Listing 12-14.
Filename: src/main.rs
use std::env;
use std::process;
use minigrep::Config;
fn main() {
// --snip--
let args: Vec<String> = env::args().collect();
let config = Config::new(&args).unwrap_or_else(|err| {
println!("Problem parsing arguments: {}", err);
process::exit(1);
});
println!("Searching for {}", config.query);
println!("In file {}", config.filename);
if let Err(e) = minigrep::run(config) {
// --snip--
println!("Application error: {}", e);
process::exit(1);
}
}
Listing 12-14: Using the minigrep library crate in
src/main.rs
We add a use minigrep::Config line to bring the Config type from the
library crate into the binary crate’s scope, and we prefix the run function
with our crate name. Now all the functionality should be connected and should
work. Run the program with cargo run and make sure everything works
correctly.
Whew! That was a lot of work, but we’ve set ourselves up for success in the future. Now it’s much easier to handle errors, and we’ve made the code more modular. Almost all of our work will be done in src/lib.rs from here on out.
Let’s take advantage of this newfound modularity by doing something that would have been difficult with the old code but is easy with the new code: we’ll write some tests!
Developing the Library’s Functionality with Test-Driven Development
Now that we’ve extracted the logic into src/lib.rs and left the argument
collecting and error handling in src/main.rs, it’s much easier to write tests
for the core functionality of our code. We can call functions directly with
various arguments and check return values without having to call our binary
from the command line. Feel free to write some tests for the functionality in
the Config::new and run functions on your own.
In this section, we’ll add the searching logic to the minigrep program by
using the Test-driven development (TDD) process. This software development
technique follows these steps:
- Write a test that fails and run it to make sure it fails for the reason you expect.
- Write or modify just enough code to make the new test pass.
- Refactor the code you just added or changed and make sure the tests continue to pass.
- Repeat from step 1!
This process is just one of many ways to write software, but TDD can help drive code design as well. Writing the test before you write the code that makes the test pass helps to maintain high test coverage throughout the process.
We’ll test drive the implementation of the functionality that will actually do
the searching for the query string in the file contents and produce a list of
lines that match the query. We’ll add this functionality in a function called
search.
Writing a Failing Test
Because we don’t need them anymore, let’s remove the println! statements from
src/lib.rs and src/main.rs that we used to check the program’s behavior.
Then, in src/lib.rs, we’ll add a tests module with a test function, as we
did in Chapter 11. The test function specifies
the behavior we want the search function to have: it will take a query and
the text to search for the query in, and it will return only the lines from the
text that contain the query. Listing 12-15 shows this test, which won’t compile
yet.
Filename: src/lib.rs
use std::error::Error;
use std::fs;
pub struct Config {
pub query: String,
pub filename: String,
}
impl Config {
pub fn new(args: &[String]) -> Result<Config, &str> {
if args.len() < 3 {
return Err("not enough arguments");
}
let query = args[1].clone();
let filename = args[2].clone();
Ok(Config { query, filename })
}
}
pub fn run(config: Config) -> Result<(), Box<dyn Error>> {
let contents = fs::read_to_string(config.filename)?;
Ok(())
}
#[cfg(test)]
mod tests {
use super::*;
#[test]
fn one_result() {
let query = "duct";
let contents = "\
Rust:
safe, fast, productive.
Pick three.";
assert_eq!(vec!["safe, fast, productive."], search(query, contents));
}
}
Listing 12-15: Creating a failing test for the search
function we wish we had
This test searches for the string "duct". The text we’re searching is three
lines, only one of which contains "duct". We assert that the value returned
from the search function contains only the line we expect.
We aren’t able to run this test and watch it fail because the test doesn’t even
compile: the search function doesn’t exist yet! So now we’ll add just enough
code to get the test to compile and run by adding a definition of the search
function that always returns an empty vector, as shown in Listing 12-16. Then
the test should compile and fail because an empty vector doesn’t match a vector
containing the line "safe, fast, productive."
Filename: src/lib.rs
use std::error::Error;
use std::fs;
pub struct Config {
pub query: String,
pub filename: String,
}
impl Config {
pub fn new(args: &[String]) -> Result<Config, &str> {
if args.len() < 3 {
return Err("not enough arguments");
}
let query = args[1].clone();
let filename = args[2].clone();
Ok(Config { query, filename })
}
}
pub fn run(config: Config) -> Result<(), Box<dyn Error>> {
let contents = fs::read_to_string(config.filename)?;
Ok(())
}
pub fn search<'a>(query: &str, contents: &'a str) -> Vec<&'a str> {
vec![]
}
#[cfg(test)]
mod tests {
use super::*;
#[test]
fn one_result() {
let query = "duct";
let contents = "\
Rust:
safe, fast, productive.
Pick three.";
assert_eq!(vec!["safe, fast, productive."], search(query, contents));
}
}
Listing 12-16: Defining just enough of the search
function so our test will compile
Notice that we need an explicit lifetime 'a defined in the signature of
search and used with the contents argument and the return value. Recall in
Chapter 10 that the lifetime parameters
specify which argument lifetime is connected to the lifetime of the return
value. In this case, we indicate that the returned vector should contain string
slices that reference slices of the argument contents (rather than the
argument query).
In other words, we tell Rust that the data returned by the search function
will live as long as the data passed into the search function in the
contents argument. This is important! The data referenced by a slice needs
to be valid for the reference to be valid; if the compiler assumes we’re making
string slices of query rather than contents, it will do its safety checking
incorrectly.
If we forget the lifetime annotations and try to compile this function, we’ll get this error:
$ cargo build
Compiling minigrep v0.1.0 (file:///projects/minigrep)
error[E0106]: missing lifetime specifier
--> src/lib.rs:28:51
|
28 | pub fn search(query: &str, contents: &str) -> Vec<&str> {
| ---- ---- ^ expected named lifetime parameter
|
= help: this function's return type contains a borrowed value, but the signature does not say whether it is borrowed from `query` or `contents`
help: consider introducing a named lifetime parameter
|
28 | pub fn search<'a>(query: &'a str, contents: &'a str) -> Vec<&'a str> {
| ^^^^ ^^^^^^^ ^^^^^^^ ^^^
error: aborting due to previous error
For more information about this error, try `rustc --explain E0106`.
error: could not compile `minigrep`
To learn more, run the command again with --verbose.
Rust can’t possibly know which of the two arguments we need, so we need to tell
it. Because contents is the argument that contains all of our text and we
want to return the parts of that text that match, we know contents is the
argument that should be connected to the return value using the lifetime syntax.
Other programming languages don’t require you to connect arguments to return values in the signature. Although this might seem strange, it will get easier over time. You might want to compare this example with the “Validating References with Lifetimes” section in Chapter 10.
Now let’s run the test:
$ cargo test
Compiling minigrep v0.1.0 (file:///projects/minigrep)
Finished test [unoptimized + debuginfo] target(s) in 0.97s
Running target/debug/deps/minigrep-4672b652f7794785
running 1 test
test tests::one_result ... FAILED
failures:
---- tests::one_result stdout ----
thread 'main' panicked at 'assertion failed: `(left == right)`
left: `["safe, fast, productive."]`,
right: `[]`', src/lib.rs:44:9
note: run with `RUST_BACKTRACE=1` environment variable to display a backtrace
failures:
tests::one_result
test result: FAILED. 0 passed; 1 failed; 0 ignored; 0 measured; 0 filtered out; finished in 0.00s
error: test failed, to rerun pass '--lib'
Great, the test fails, exactly as we expected. Let’s get the test to pass!
Writing Code to Pass the Test
Currently, our test is failing because we always return an empty vector. To fix
that and implement search, our program needs to follow these steps:
- Iterate through each line of the contents.
- Check whether the line contains our query string.
- If it does, add it to the list of values we’re returning.
- If it doesn’t, do nothing.
- Return the list of results that match.
Let’s work through each step, starting with iterating through lines.
Iterating Through Lines with the lines Method
Rust has a helpful method to handle line-by-line iteration of strings,
conveniently named lines, that works as shown in Listing 12-17. Note this
won’t compile yet.
Filename: src/lib.rs
use std::error::Error;
use std::fs;
pub struct Config {
pub query: String,
pub filename: String,
}
impl Config {
pub fn new(args: &[String]) -> Result<Config, &str> {
if args.len() < 3 {
return Err("not enough arguments");
}
let query = args[1].clone();
let filename = args[2].clone();
Ok(Config { query, filename })
}
}
pub fn run(config: Config) -> Result<(), Box<dyn Error>> {
let contents = fs::read_to_string(config.filename)?;
Ok(())
}
pub fn search<'a>(query: &str, contents: &'a str) -> Vec<&'a str> {
for line in contents.lines() {
// do something with line
}
}
#[cfg(test)]
mod tests {
use super::*;
#[test]
fn one_result() {
let query = "duct";
let contents = "\
Rust:
safe, fast, productive.
Pick three.";
assert_eq!(vec!["safe, fast, productive."], search(query, contents));
}
}
Listing 12-17: Iterating through each line in contents
The lines method returns an iterator. We’ll talk about iterators in depth in
Chapter 13, but recall that you saw this way of using an
iterator in Listing 3-5, where we used a for loop
with an iterator to run some code on each item in a collection.
Searching Each Line for the Query
Next, we’ll check whether the current line contains our query string.
Fortunately, strings have a helpful method named contains that does this for
us! Add a call to the contains method in the search function, as shown in
Listing 12-18. Note this still won’t compile yet.
Filename: src/lib.rs
use std::error::Error;
use std::fs;
pub struct Config {
pub query: String,
pub filename: String,
}
impl Config {
pub fn new(args: &[String]) -> Result<Config, &str> {
if args.len() < 3 {
return Err("not enough arguments");
}
let query = args[1].clone();
let filename = args[2].clone();
Ok(Config { query, filename })
}
}
pub fn run(config: Config) -> Result<(), Box<dyn Error>> {
let contents = fs::read_to_string(config.filename)?;
Ok(())
}
pub fn search<'a>(query: &str, contents: &'a str) -> Vec<&'a str> {
for line in contents.lines() {
if line.contains(query) {
// do something with line
}
}
}
#[cfg(test)]
mod tests {
use super::*;
#[test]
fn one_result() {
let query = "duct";
let contents = "\
Rust:
safe, fast, productive.
Pick three.";
assert_eq!(vec!["safe, fast, productive."], search(query, contents));
}
}
Listing 12-18: Adding functionality to see whether the
line contains the string in query
Storing Matching Lines
We also need a way to store the lines that contain our query string. For that,
we can make a mutable vector before the for loop and call the push method
to store a line in the vector. After the for loop, we return the vector, as
shown in Listing 12-19.
Filename: src/lib.rs
use std::error::Error;
use std::fs;
pub struct Config {
pub query: String,
pub filename: String,
}
impl Config {
pub fn new(args: &[String]) -> Result<Config, &str> {
if args.len() < 3 {
return Err("not enough arguments");
}
let query = args[1].clone();
let filename = args[2].clone();
Ok(Config { query, filename })
}
}
pub fn run(config: Config) -> Result<(), Box<dyn Error>> {
let contents = fs::read_to_string(config.filename)?;
Ok(())
}
pub fn search<'a>(query: &str, contents: &'a str) -> Vec<&'a str> {
let mut results = Vec::new();
for line in contents.lines() {
if line.contains(query) {
results.push(line);
}
}
results
}
#[cfg(test)]
mod tests {
use super::*;
#[test]
fn one_result() {
let query = "duct";
let contents = "\
Rust:
safe, fast, productive.
Pick three.";
assert_eq!(vec!["safe, fast, productive."], search(query, contents));
}
}
Listing 12-19: Storing the lines that match so we can return them
Now the search function should return only the lines that contain query,
and our test should pass. Let’s run the test:
$ cargo test
Compiling minigrep v0.1.0 (file:///projects/minigrep)
Finished test [unoptimized + debuginfo] target(s) in 1.22s
Running target/debug/deps/minigrep-4672b652f7794785
running 1 test
test tests::one_result ... ok
test result: ok. 1 passed; 0 failed; 0 ignored; 0 measured; 0 filtered out; finished in 0.00s
Running target/debug/deps/minigrep-4672b652f7794785
running 0 tests
test result: ok. 0 passed; 0 failed; 0 ignored; 0 measured; 0 filtered out; finished in 0.00s
Doc-tests minigrep
running 0 tests
test result: ok. 0 passed; 0 failed; 0 ignored; 0 measured; 0 filtered out; finished in 0.00s
Our test passed, so we know it works!
At this point, we could consider opportunities for refactoring the implementation of the search function while keeping the tests passing to maintain the same functionality. The code in the search function isn’t too bad, but it doesn’t take advantage of some useful features of iterators. We’ll return to this example in Chapter 13, where we’ll explore iterators in detail, and look at how to improve it.
Using the search Function in the run Function
Now that the search function is working and tested, we need to call search
from our run function. We need to pass the config.query value and the
contents that run reads from the file to the search function. Then run
will print each line returned from search:
Filename: src/lib.rs
use std::error::Error;
use std::fs;
pub struct Config {
pub query: String,
pub filename: String,
}
impl Config {
pub fn new(args: &[String]) -> Result<Config, &str> {
if args.len() < 3 {
return Err("not enough arguments");
}
let query = args[1].clone();
let filename = args[2].clone();
Ok(Config { query, filename })
}
}
pub fn run(config: Config) -> Result<(), Box<dyn Error>> {
let contents = fs::read_to_string(config.filename)?;
for line in search(&config.query, &contents) {
println!("{}", line);
}
Ok(())
}
pub fn search<'a>(query: &str, contents: &'a str) -> Vec<&'a str> {
let mut results = Vec::new();
for line in contents.lines() {
if line.contains(query) {
results.push(line);
}
}
results
}
#[cfg(test)]
mod tests {
use super::*;
#[test]
fn one_result() {
let query = "duct";
let contents = "\
Rust:
safe, fast, productive.
Pick three.";
assert_eq!(vec!["safe, fast, productive."], search(query, contents));
}
}
We’re still using a for loop to return each line from search and print it.
Now the entire program should work! Let’s try it out, first with a word that should return exactly one line from the Emily Dickinson poem, “frog”:
$ cargo run frog poem.txt
Compiling minigrep v0.1.0 (file:///projects/minigrep)
Finished dev [unoptimized + debuginfo] target(s) in 0.38s
Running `target/debug/minigrep frog poem.txt`
How public, like a frog
Cool! Now let’s try a word that will match multiple lines, like “body”:
$ cargo run body poem.txt
Compiling minigrep v0.1.0 (file:///projects/minigrep)
Finished dev [unoptimized + debuginfo] target(s) in 0.0s
Running `target/debug/minigrep body poem.txt`
I'm nobody! Who are you?
Are you nobody, too?
How dreary to be somebody!
And finally, let’s make sure that we don’t get any lines when we search for a word that isn’t anywhere in the poem, such as “monomorphization”:
$ cargo run monomorphization poem.txt
Compiling minigrep v0.1.0 (file:///projects/minigrep)
Finished dev [unoptimized + debuginfo] target(s) in 0.0s
Running `target/debug/minigrep monomorphization poem.txt`
Excellent! We’ve built our own mini version of a classic tool and learned a lot about how to structure applications. We’ve also learned a bit about file input and output, lifetimes, testing, and command line parsing.
To round out this project, we’ll briefly demonstrate how to work with environment variables and how to print to standard error, both of which are useful when you’re writing command line programs.
Working with Environment Variables
We’ll improve minigrep by adding an extra feature: an option for
case-insensitive searching that the user can turn on via an environment
variable. We could make this feature a command line option and require that
users enter it each time they want it to apply, but instead we’ll use an
environment variable. Doing so allows our users to set the environment variable
once and have all their searches be case insensitive in that terminal session.
Writing a Failing Test for the Case-Insensitive search Function
We want to add a new search_case_insensitive function that we’ll call when
the environment variable is on. We’ll continue to follow the TDD process, so
the first step is again to write a failing test. We’ll add a new test for the
new search_case_insensitive function and rename our old test from
one_result to case_sensitive to clarify the differences between the two
tests, as shown in Listing 12-20.
Filename: src/lib.rs
use std::error::Error;
use std::fs;
pub struct Config {
pub query: String,
pub filename: String,
}
impl Config {
pub fn new(args: &[String]) -> Result<Config, &str> {
if args.len() < 3 {
return Err("not enough arguments");
}
let query = args[1].clone();
let filename = args[2].clone();
Ok(Config { query, filename })
}
}
pub fn run(config: Config) -> Result<(), Box<dyn Error>> {
let contents = fs::read_to_string(config.filename)?;
for line in search(&config.query, &contents) {
println!("{}", line);
}
Ok(())
}
pub fn search<'a>(query: &str, contents: &'a str) -> Vec<&'a str> {
let mut results = Vec::new();
for line in contents.lines() {
if line.contains(query) {
results.push(line);
}
}
results
}
#[cfg(test)]
mod tests {
use super::*;
#[test]
fn case_sensitive() {
let query = "duct";
let contents = "\
Rust:
safe, fast, productive.
Pick three.
Duct tape.";
assert_eq!(vec!["safe, fast, productive."], search(query, contents));
}
#[test]
fn case_insensitive() {
let query = "rUsT";
let contents = "\
Rust:
safe, fast, productive.
Pick three.
Trust me.";
assert_eq!(
vec!["Rust:", "Trust me."],
search_case_insensitive(query, contents)
);
}
}
Listing 12-20: Adding a new failing test for the case-insensitive function we’re about to add
Note that we’ve edited the old test’s contents too. We’ve added a new line
with the text "Duct tape." using a capital D that shouldn’t match the query
"duct" when we’re searching in a case-sensitive manner. Changing the old test
in this way helps ensure that we don’t accidentally break the case-sensitive
search functionality that we’ve already implemented. This test should pass now
and should continue to pass as we work on the case-insensitive search.
The new test for the case-insensitive search uses "rUsT" as its query. In
the search_case_insensitive function we’re about to add, the query "rUsT"
should match the line containing "Rust:" with a capital R and match the line
"Trust me." even though both have different casing from the query. This is
our failing test, and it will fail to compile because we haven’t yet defined
the search_case_insensitive function. Feel free to add a skeleton
implementation that always returns an empty vector, similar to the way we did
for the search function in Listing 12-16 to see the test compile and fail.
Implementing the search_case_insensitive Function
The search_case_insensitive function, shown in Listing 12-21, will be almost
the same as the search function. The only difference is that we’ll lowercase
the query and each line so whatever the case of the input arguments,
they’ll be the same case when we check whether the line contains the query.
Filename: src/lib.rs
use std::error::Error;
use std::fs;
pub struct Config {
pub query: String,
pub filename: String,
}
impl Config {
pub fn new(args: &[String]) -> Result<Config, &str> {
if args.len() < 3 {
return Err("not enough arguments");
}
let query = args[1].clone();
let filename = args[2].clone();
Ok(Config { query, filename })
}
}
pub fn run(config: Config) -> Result<(), Box<dyn Error>> {
let contents = fs::read_to_string(config.filename)?;
for line in search(&config.query, &contents) {
println!("{}", line);
}
Ok(())
}
pub fn search<'a>(query: &str, contents: &'a str) -> Vec<&'a str> {
let mut results = Vec::new();
for line in contents.lines() {
if line.contains(query) {
results.push(line);
}
}
results
}
pub fn search_case_insensitive<'a>(
query: &str,
contents: &'a str,
) -> Vec<&'a str> {
let query = query.to_lowercase();
let mut results = Vec::new();
for line in contents.lines() {
if line.to_lowercase().contains(&query) {
results.push(line);
}
}
results
}
#[cfg(test)]
mod tests {
use super::*;
#[test]
fn case_sensitive() {
let query = "duct";
let contents = "\
Rust:
safe, fast, productive.
Pick three.
Duct tape.";
assert_eq!(vec!["safe, fast, productive."], search(query, contents));
}
#[test]
fn case_insensitive() {
let query = "rUsT";
let contents = "\
Rust:
safe, fast, productive.
Pick three.
Trust me.";
assert_eq!(
vec!["Rust:", "Trust me."],
search_case_insensitive(query, contents)
);
}
}
Listing 12-21: Defining the search_case_insensitive
function to lowercase the query and the line before comparing them
First, we lowercase the query string and store it in a shadowed variable with
the same name. Calling to_lowercase on the query is necessary so no matter
whether the user’s query is "rust", "RUST", "Rust", or "rUsT", we’ll
treat the query as if it were "rust" and be insensitive to the case. While
to_lowercase will handle basic Unicode, it won't be 100% accurate. If we were
writing a real application, we'd want to do a bit more work here, but this section
is about environment variables, not Unicode, so we'll leave it at that here.
Note that query is now a String rather than a string slice, because calling
to_lowercase creates new data rather than referencing existing data. Say the
query is "rUsT", as an example: that string slice doesn’t contain a lowercase
u or t for us to use, so we have to allocate a new String containing
"rust". When we pass query as an argument to the contains method now, we
need to add an ampersand because the signature of contains is defined to take
a string slice.
Next, we add a call to to_lowercase on each line before we check whether it
contains query to lowercase all characters. Now that we’ve converted line
and query to lowercase, we’ll find matches no matter what the case of the
query is.
Let’s see if this implementation passes the tests:
$ cargo test
Compiling minigrep v0.1.0 (file:///projects/minigrep)
Finished test [unoptimized + debuginfo] target(s) in 1.33s
Running target/debug/deps/minigrep-4672b652f7794785
running 2 tests
test tests::case_insensitive ... ok
test tests::case_sensitive ... ok
test result: ok. 2 passed; 0 failed; 0 ignored; 0 measured; 0 filtered out; finished in 0.00s
Running target/debug/deps/minigrep-4672b652f7794785
running 0 tests
test result: ok. 0 passed; 0 failed; 0 ignored; 0 measured; 0 filtered out; finished in 0.00s
Doc-tests minigrep
running 0 tests
test result: ok. 0 passed; 0 failed; 0 ignored; 0 measured; 0 filtered out; finished in 0.00s
Great! They passed. Now, let’s call the new search_case_insensitive function
from the run function. First, we’ll add a configuration option to the
Config struct to switch between case-sensitive and case-insensitive search.
Adding this field will cause compiler errors because we aren’t initializing
this field anywhere yet:
Filename: src/lib.rs
use std::error::Error;
use std::fs;
pub struct Config {
pub query: String,
pub filename: String,
pub case_sensitive: bool,
}
impl Config {
pub fn new(args: &[String]) -> Result<Config, &str> {
if args.len() < 3 {
return Err("not enough arguments");
}
let query = args[1].clone();
let filename = args[2].clone();
Ok(Config { query, filename })
}
}
pub fn run(config: Config) -> Result<(), Box<dyn Error>> {
let contents = fs::read_to_string(config.filename)?;
let results = if config.case_sensitive {
search(&config.query, &contents)
} else {
search_case_insensitive(&config.query, &contents)
};
for line in results {
println!("{}", line);
}
Ok(())
}
pub fn search<'a>(query: &str, contents: &'a str) -> Vec<&'a str> {
let mut results = Vec::new();
for line in contents.lines() {
if line.contains(query) {
results.push(line);
}
}
results
}
pub fn search_case_insensitive<'a>(
query: &str,
contents: &'a str,
) -> Vec<&'a str> {
let query = query.to_lowercase();
let mut results = Vec::new();
for line in contents.lines() {
if line.to_lowercase().contains(&query) {
results.push(line);
}
}
results
}
#[cfg(test)]
mod tests {
use super::*;
#[test]
fn case_sensitive() {
let query = "duct";
let contents = "\
Rust:
safe, fast, productive.
Pick three.
Duct tape.";
assert_eq!(vec!["safe, fast, productive."], search(query, contents));
}
#[test]
fn case_insensitive() {
let query = "rUsT";
let contents = "\
Rust:
safe, fast, productive.
Pick three.
Trust me.";
assert_eq!(
vec!["Rust:", "Trust me."],
search_case_insensitive(query, contents)
);
}
}
Note that we added the case_sensitive field that holds a Boolean. Next, we
need the run function to check the case_sensitive field’s value and use
that to decide whether to call the search function or the
search_case_insensitive function, as shown in Listing 12-22. Note this still
won’t compile yet.
Filename: src/lib.rs
use std::error::Error;
use std::fs;
pub struct Config {
pub query: String,
pub filename: String,
pub case_sensitive: bool,
}
impl Config {
pub fn new(args: &[String]) -> Result<Config, &str> {
if args.len() < 3 {
return Err("not enough arguments");
}
let query = args[1].clone();
let filename = args[2].clone();
Ok(Config { query, filename })
}
}
pub fn run(config: Config) -> Result<(), Box<dyn Error>> {
let contents = fs::read_to_string(config.filename)?;
let results = if config.case_sensitive {
search(&config.query, &contents)
} else {
search_case_insensitive(&config.query, &contents)
};
for line in results {
println!("{}", line);
}
Ok(())
}
pub fn search<'a>(query: &str, contents: &'a str) -> Vec<&'a str> {
let mut results = Vec::new();
for line in contents.lines() {
if line.contains(query) {
results.push(line);
}
}
results
}
pub fn search_case_insensitive<'a>(
query: &str,
contents: &'a str,
) -> Vec<&'a str> {
let query = query.to_lowercase();
let mut results = Vec::new();
for line in contents.lines() {
if line.to_lowercase().contains(&query) {
results.push(line);
}
}
results
}
#[cfg(test)]
mod tests {
use super::*;
#[test]
fn case_sensitive() {
let query = "duct";
let contents = "\
Rust:
safe, fast, productive.
Pick three.
Duct tape.";
assert_eq!(vec!["safe, fast, productive."], search(query, contents));
}
#[test]
fn case_insensitive() {
let query = "rUsT";
let contents = "\
Rust:
safe, fast, productive.
Pick three.
Trust me.";
assert_eq!(
vec!["Rust:", "Trust me."],
search_case_insensitive(query, contents)
);
}
}
Listing 12-22: Calling either search or
search_case_insensitive based on the value in config.case_sensitive
Finally, we need to check for the environment variable. The functions for
working with environment variables are in the env module in the standard
library, so we want to bring that module into scope with a use std::env; line
at the top of src/lib.rs. Then we’ll use the var function from the env
module to check for an environment variable named CASE_INSENSITIVE, as shown
in Listing 12-23.
Filename: src/lib.rs
use std::env;
// --snip--
use std::error::Error;
use std::fs;
pub struct Config {
pub query: String,
pub filename: String,
pub case_sensitive: bool,
}
impl Config {
pub fn new(args: &[String]) -> Result<Config, &str> {
if args.len() < 3 {
return Err("not enough arguments");
}
let query = args[1].clone();
let filename = args[2].clone();
let case_sensitive = env::var("CASE_INSENSITIVE").is_err();
Ok(Config {
query,
filename,
case_sensitive,
})
}
}
pub fn run(config: Config) -> Result<(), Box<dyn Error>> {
let contents = fs::read_to_string(config.filename)?;
let results = if config.case_sensitive {
search(&config.query, &contents)
} else {
search_case_insensitive(&config.query, &contents)
};
for line in results {
println!("{}", line);
}
Ok(())
}
pub fn search<'a>(query: &str, contents: &'a str) -> Vec<&'a str> {
let mut results = Vec::new();
for line in contents.lines() {
if line.contains(query) {
results.push(line);
}
}
results
}
pub fn search_case_insensitive<'a>(
query: &str,
contents: &'a str,
) -> Vec<&'a str> {
let query = query.to_lowercase();
let mut results = Vec::new();
for line in contents.lines() {
if line.to_lowercase().contains(&query) {
results.push(line);
}
}
results
}
#[cfg(test)]
mod tests {
use super::*;
#[test]
fn case_sensitive() {
let query = "duct";
let contents = "\
Rust:
safe, fast, productive.
Pick three.
Duct tape.";
assert_eq!(vec!["safe, fast, productive."], search(query, contents));
}
#[test]
fn case_insensitive() {
let query = "rUsT";
let contents = "\
Rust:
safe, fast, productive.
Pick three.
Trust me.";
assert_eq!(
vec!["Rust:", "Trust me."],
search_case_insensitive(query, contents)
);
}
}
Listing 12-23: Checking for an environment variable named
CASE_INSENSITIVE
Here, we create a new variable case_sensitive. To set its value, we call the
env::var function and pass it the name of the CASE_INSENSITIVE environment
variable. The env::var function returns a Result that will be the successful
Ok variant that contains the value of the environment variable if the
environment variable is set. It will return the Err variant if the
environment variable is not set.
We’re using the is_err method on the Result to check whether it’s an error
and therefore unset, which means it should do a case-sensitive search. If the
CASE_INSENSITIVE environment variable is set to anything, is_err will
return false and the program will perform a case-insensitive search. We don’t
care about the value of the environment variable, just whether it’s set or
unset, so we’re checking is_err rather than using unwrap, expect, or any
of the other methods we’ve seen on Result.
We pass the value in the case_sensitive variable to the Config instance so
the run function can read that value and decide whether to call search or
search_case_insensitive, as we implemented in Listing 12-22.
Let’s give it a try! First, we’ll run our program without the environment
variable set and with the query to, which should match any line that contains
the word “to” in all lowercase:
$ cargo run to poem.txt
Compiling minigrep v0.1.0 (file:///projects/minigrep)
Finished dev [unoptimized + debuginfo] target(s) in 0.0s
Running `target/debug/minigrep to poem.txt`
Are you nobody, too?
How dreary to be somebody!
Looks like that still works! Now, let’s run the program with CASE_INSENSITIVE
set to 1 but with the same query to.
If you're using PowerShell, you will need to set the environment variable and run the program as separate commands:
PS> $Env:CASE_INSENSITIVE=1; cargo run to poem.txt
This will make CASE_INSENSITIVE persist for the remainder of your shell
session. It can be unset with the Remove-Item cmdlet:
PS> Remove-Item Env:CASE_INSENSITIVE
We should get lines that contain “to” that might have uppercase letters:
$ CASE_INSENSITIVE=1 cargo run to poem.txt
Finished dev [unoptimized + debuginfo] target(s) in 0.0s
Running `target/debug/minigrep to poem.txt`
Are you nobody, too?
How dreary to be somebody!
To tell your name the livelong day
To an admiring bog!
Excellent, we also got lines containing “To”! Our minigrep program can now do
case-insensitive searching controlled by an environment variable. Now you know
how to manage options set using either command line arguments or environment
variables.
Some programs allow arguments and environment variables for the same configuration. In those cases, the programs decide that one or the other takes precedence. For another exercise on your own, try controlling case insensitivity through either a command line argument or an environment variable. Decide whether the command line argument or the environment variable should take precedence if the program is run with one set to case sensitive and one set to case insensitive.
The std::env module contains many more useful features for dealing with
environment variables: check out its documentation to see what is available.
Writing Error Messages to Standard Error Instead of Standard Output
At the moment, we’re writing all of our output to the terminal using the
println! macro. Most terminals provide two kinds of output: standard
output (stdout) for general information and standard error (stderr)
for error messages. This distinction enables users to choose to direct the
successful output of a program to a file but still print error messages to the
screen.
The println! macro is only capable of printing to standard output, so we
have to use something else to print to standard error.
Checking Where Errors Are Written
First, let’s observe how the content printed by minigrep is currently being
written to standard output, including any error messages we want to write to
standard error instead. We’ll do that by redirecting the standard output stream
to a file while also intentionally causing an error. We won’t redirect the
standard error stream, so any content sent to standard error will continue to
display on the screen.
Command line programs are expected to send error messages to the standard error stream so we can still see error messages on the screen even if we redirect the standard output stream to a file. Our program is not currently well-behaved: we’re about to see that it saves the error message output to a file instead!
The way to demonstrate this behavior is by running the program with > and the
filename, output.txt, that we want to redirect the standard output stream to.
We won’t pass any arguments, which should cause an error:
$ cargo run > output.txt
The > syntax tells the shell to write the contents of standard output to
output.txt instead of the screen. We didn’t see the error message we were
expecting printed to the screen, so that means it must have ended up in the
file. This is what output.txt contains:
Problem parsing arguments: not enough arguments
Yup, our error message is being printed to standard output. It’s much more useful for error messages like this to be printed to standard error so only data from a successful run ends up in the file. We’ll change that.
Printing Errors to Standard Error
We’ll use the code in Listing 12-24 to change how error messages are printed.
Because of the refactoring we did earlier in this chapter, all the code that
prints error messages is in one function, main. The standard library provides
the eprintln! macro that prints to the standard error stream, so let’s change
the two places we were calling println! to print errors to use eprintln!
instead.
Filename: src/main.rs
use std::env;
use std::process;
use minigrep::Config;
fn main() {
let args: Vec<String> = env::args().collect();
let config = Config::new(&args).unwrap_or_else(|err| {
eprintln!("Problem parsing arguments: {}", err);
process::exit(1);
});
if let Err(e) = minigrep::run(config) {
eprintln!("Application error: {}", e);
process::exit(1);
}
}
Listing 12-24: Writing error messages to standard error
instead of standard output using eprintln!
After changing println! to eprintln!, let’s run the program again in the
same way, without any arguments and redirecting standard output with >:
$ cargo run > output.txt
Problem parsing arguments: not enough arguments
Now we see the error onscreen and output.txt contains nothing, which is the behavior we expect of command line programs.
Let’s run the program again with arguments that don’t cause an error but still redirect standard output to a file, like so:
$ cargo run to poem.txt > output.txt
We won’t see any output to the terminal, and output.txt will contain our results:
Filename: output.txt
Are you nobody, too?
How dreary to be somebody!
This demonstrates that we’re now using standard output for successful output and standard error for error output as appropriate.
Summary
This chapter recapped some of the major concepts you’ve learned so far and
covered how to perform common I/O operations in Rust. By using command line
arguments, files, environment variables, and the eprintln! macro for printing
errors, you’re now prepared to write command line applications. By using the
concepts in previous chapters, your code will be well organized, store data
effectively in the appropriate data structures, handle errors nicely, and be
well tested.
Next, we’ll explore some Rust features that were influenced by functional languages: closures and iterators.
Functional Language Features: Iterators and Closures
Rust’s design has taken inspiration from many existing languages and techniques, and one significant influence is functional programming. Programming in a functional style often includes using functions as values by passing them in arguments, returning them from other functions, assigning them to variables for later execution, and so forth.
In this chapter, we won’t debate the issue of what functional programming is or isn’t but will instead discuss some features of Rust that are similar to features in many languages often referred to as functional.
More specifically, we’ll cover:
- Closures, a function-like construct you can store in a variable
- Iterators, a way of processing a series of elements
- How to use these two features to improve the I/O project in Chapter 12
- The performance of these two features (Spoiler alert: they’re faster than you might think!)
Other Rust features, such as pattern matching and enums, which we’ve covered in other chapters, are influenced by the functional style as well. Mastering closures and iterators is an important part of writing idiomatic, fast Rust code, so we’ll devote this entire chapter to them.
Closures: Anonymous Functions that Can Capture Their Environment
Rust’s closures are anonymous functions you can save in a variable or pass as arguments to other functions. You can create the closure in one place and then call the closure to evaluate it in a different context. Unlike functions, closures can capture values from the scope in which they’re defined. We’ll demonstrate how these closure features allow for code reuse and behavior customization.
Creating an Abstraction of Behavior with Closures
Let’s work on an example of a situation in which it’s useful to store a closure to be executed later. Along the way, we’ll talk about the syntax of closures, type inference, and traits.
Consider this hypothetical situation: we work at a startup that’s making an app to generate custom exercise workout plans. The backend is written in Rust, and the algorithm that generates the workout plan takes into account many factors, such as the app user’s age, body mass index, exercise preferences, recent workouts, and an intensity number they specify. The actual algorithm used isn’t important in this example; what’s important is that this calculation takes a few seconds. We want to call this algorithm only when we need to and only call it once so we don’t make the user wait more than necessary.
We’ll simulate calling this hypothetical algorithm with the function
simulated_expensive_calculation shown in Listing 13-1, which will print
calculating slowly..., wait for two seconds, and then return whatever number
we passed in.
Filename: src/main.rs
use std::thread; use std::time::Duration; fn simulated_expensive_calculation(intensity: u32) -> u32 { println!("calculating slowly..."); thread::sleep(Duration::from_secs(2)); intensity } fn main() {}
Listing 13-1: A function to stand in for a hypothetical calculation that takes about 2 seconds to run
Next is the main function, which contains the parts of the workout app
important for this example. This function represents the code that the app will
call when a user asks for a workout plan. Because the interaction with the
app’s frontend isn’t relevant to the use of closures, we’ll hardcode values
representing inputs to our program and print the outputs.
The required inputs are these:
- An intensity number from the user, which is specified when they request a workout to indicate whether they want a low-intensity workout or a high-intensity workout
- A random number that will generate some variety in the workout plans
The output will be the recommended workout plan. Listing 13-2 shows the main
function we’ll use.
Filename: src/main.rs
use std::thread; use std::time::Duration; fn simulated_expensive_calculation(intensity: u32) -> u32 { println!("calculating slowly..."); thread::sleep(Duration::from_secs(2)); intensity } fn generate_workout(intensity: u32, random_number: u32) {} fn main() { let simulated_user_specified_value = 10; let simulated_random_number = 7; generate_workout(simulated_user_specified_value, simulated_random_number); }
Listing 13-2: A main function with hardcoded values to
simulate user input and random number generation
We’ve hardcoded the variable simulated_user_specified_value as 10 and the
variable simulated_random_number as 7 for simplicity’s sake; in an actual
program, we’d get the intensity number from the app frontend, and we’d use the
rand crate to generate a random number, as we did in the Guessing Game
example in Chapter 2. The main function calls a generate_workout function
with the simulated input values.
Now that we have the context, let’s get to the algorithm. The function
generate_workout in Listing 13-3 contains the business logic of the
app that we’re most concerned with in this example. The rest of the code
changes in this example will be made to this function.
Filename: src/main.rs
use std::thread; use std::time::Duration; fn simulated_expensive_calculation(intensity: u32) -> u32 { println!("calculating slowly..."); thread::sleep(Duration::from_secs(2)); intensity } fn generate_workout(intensity: u32, random_number: u32) { if intensity < 25 { println!( "Today, do {} pushups!", simulated_expensive_calculation(intensity) ); println!( "Next, do {} situps!", simulated_expensive_calculation(intensity) ); } else { if random_number == 3 { println!("Take a break today! Remember to stay hydrated!"); } else { println!( "Today, run for {} minutes!", simulated_expensive_calculation(intensity) ); } } } fn main() { let simulated_user_specified_value = 10; let simulated_random_number = 7; generate_workout(simulated_user_specified_value, simulated_random_number); }
Listing 13-3: The business logic that prints the workout
plans based on the inputs and calls to the simulated_expensive_calculation
function
The code in Listing 13-3 has multiple calls to the slow calculation function.
The first if block calls simulated_expensive_calculation twice, the if
inside the outer else doesn’t call it at all, and the code inside the
second else case calls it once.
The desired behavior of the generate_workout function is to first check
whether the user wants a low-intensity workout (indicated by a number less than
25) or a high-intensity workout (a number of 25 or greater).
Low-intensity workout plans will recommend a number of push-ups and sit-ups based on the complex algorithm we’re simulating.
If the user wants a high-intensity workout, there’s some additional logic: if the value of the random number generated by the app happens to be 3, the app will recommend a break and hydration. If not, the user will get a number of minutes of running based on the complex algorithm.
This code works the way the business wants it to now, but let’s say the data
science team decides that we need to make some changes to the way we call the
simulated_expensive_calculation function in the future. To simplify the
update when those changes happen, we want to refactor this code so it calls the
simulated_expensive_calculation function only once. We also want to cut the
place where we’re currently unnecessarily calling the function twice without
adding any other calls to that function in the process. That is, we don’t want
to call it if the result isn’t needed, and we still want to call it only once.
Refactoring Using Functions
We could restructure the workout program in many ways. First, we’ll try
extracting the duplicated call to the simulated_expensive_calculation
function into a variable, as shown in Listing 13-4.
Filename: src/main.rs
use std::thread; use std::time::Duration; fn simulated_expensive_calculation(intensity: u32) -> u32 { println!("calculating slowly..."); thread::sleep(Duration::from_secs(2)); intensity } fn generate_workout(intensity: u32, random_number: u32) { let expensive_result = simulated_expensive_calculation(intensity); if intensity < 25 { println!("Today, do {} pushups!", expensive_result); println!("Next, do {} situps!", expensive_result); } else { if random_number == 3 { println!("Take a break today! Remember to stay hydrated!"); } else { println!("Today, run for {} minutes!", expensive_result); } } } fn main() { let simulated_user_specified_value = 10; let simulated_random_number = 7; generate_workout(simulated_user_specified_value, simulated_random_number); }
Listing 13-4: Extracting the calls to
simulated_expensive_calculation to one place and storing the result in the
expensive_result variable
This change unifies all the calls to simulated_expensive_calculation and
solves the problem of the first if block unnecessarily calling the function
twice. Unfortunately, we’re now calling this function and waiting for the
result in all cases, which includes the inner if block that doesn’t use the
result value at all.
We want to refer to simulated_expensive_calculation only once in
generate_workout, but defer the expensive calculation to only where
we actually need the result. This is a use case for closures!
Refactoring with Closures to Store Code
Instead of always calling the simulated_expensive_calculation function before
the if blocks, we can define a closure and store the closure in a variable
rather than storing the result of the function call, as shown in Listing 13-5.
We can actually move the whole body of simulated_expensive_calculation within
the closure we’re introducing here.
Filename: src/main.rs
use std::thread; use std::time::Duration; fn generate_workout(intensity: u32, random_number: u32) { let expensive_closure = |num| { println!("calculating slowly..."); thread::sleep(Duration::from_secs(2)); num }; if intensity < 25 { println!("Today, do {} pushups!", expensive_closure(intensity)); println!("Next, do {} situps!", expensive_closure(intensity)); } else { if random_number == 3 { println!("Take a break today! Remember to stay hydrated!"); } else { println!( "Today, run for {} minutes!", expensive_closure(intensity) ); } } } fn main() { let simulated_user_specified_value = 10; let simulated_random_number = 7; generate_workout(simulated_user_specified_value, simulated_random_number); }
Listing 13-5: Defining a closure and storing it in the
expensive_closure variable
The closure definition comes after the = to assign it to the variable
expensive_closure. To define a closure, we start with a pair of vertical
pipes (|), inside which we specify the parameters to the closure; this syntax
was chosen because of its similarity to closure definitions in Smalltalk and
Ruby. This closure has one parameter named num: if we had more than one
parameter, we would separate them with commas, like |param1, param2|.
After the parameters, we place curly brackets that hold the body of the
closure—these are optional if the closure body is a single expression. The end
of the closure, after the curly brackets, needs a semicolon to complete the
let statement. The value returned from the last line in the closure body
(num) will be the value returned from the closure when it’s called, because
that line doesn’t end in a semicolon; just as in function bodies.
Note that this let statement means expensive_closure contains the
definition of an anonymous function, not the resulting value of calling the
anonymous function. Recall that we’re using a closure because we want to define
the code to call at one point, store that code, and call it at a later point;
the code we want to call is now stored in expensive_closure.
With the closure defined, we can change the code in the if blocks to call the
closure to execute the code and get the resulting value. We call a closure like
we do a function: we specify the variable name that holds the closure
definition and follow it with parentheses containing the argument values we
want to use, as shown in Listing 13-6.
Filename: src/main.rs
use std::thread; use std::time::Duration; fn generate_workout(intensity: u32, random_number: u32) { let expensive_closure = |num| { println!("calculating slowly..."); thread::sleep(Duration::from_secs(2)); num }; if intensity < 25 { println!("Today, do {} pushups!", expensive_closure(intensity)); println!("Next, do {} situps!", expensive_closure(intensity)); } else { if random_number == 3 { println!("Take a break today! Remember to stay hydrated!"); } else { println!( "Today, run for {} minutes!", expensive_closure(intensity) ); } } } fn main() { let simulated_user_specified_value = 10; let simulated_random_number = 7; generate_workout(simulated_user_specified_value, simulated_random_number); }
Listing 13-6: Calling the expensive_closure we’ve
defined
Now how to perform the expensive calculation is defined in only one place, and we’re only executing that code where we need the results.
However, we’ve reintroduced one of the problems from Listing 13-3: we’re still
calling the closure twice in the first if block, which will call the
expensive code twice and make the user wait twice as long as they need to. We
could fix this problem by creating a variable local to that if block to hold
the result of calling the closure, but closures provide us with another
solution. We’ll talk about that solution in a bit. But first let’s talk about
why there aren’t type annotations in the closure definition and the traits
involved with closures.
Closure Type Inference and Annotation
Closures don’t require you to annotate the types of the parameters or the
return value like fn functions do. Type annotations are required on functions
because they’re part of an explicit interface exposed to your users. Defining
this interface rigidly is important for ensuring that everyone agrees on what
types of values a function uses and returns. But closures aren’t used in an
exposed interface like this: they’re stored in variables and used without
naming them and exposing them to users of our library.
Closures are usually short and relevant only within a narrow context rather than in any arbitrary scenario. Within these limited contexts, the compiler is reliably able to infer the types of the parameters and the return type, similar to how it’s able to infer the types of most variables.
Making programmers annotate the types in these small, anonymous functions would be annoying and largely redundant with the information the compiler already has available.
As with variables, we can add type annotations if we want to increase explicitness and clarity at the cost of being more verbose than is strictly necessary. Annotating the types for the closure we defined in Listing 13-5 would look like the definition shown in Listing 13-7.
Filename: src/main.rs
use std::thread; use std::time::Duration; fn generate_workout(intensity: u32, random_number: u32) { let expensive_closure = |num: u32| -> u32 { println!("calculating slowly..."); thread::sleep(Duration::from_secs(2)); num }; if intensity < 25 { println!("Today, do {} pushups!", expensive_closure(intensity)); println!("Next, do {} situps!", expensive_closure(intensity)); } else { if random_number == 3 { println!("Take a break today! Remember to stay hydrated!"); } else { println!( "Today, run for {} minutes!", expensive_closure(intensity) ); } } } fn main() { let simulated_user_specified_value = 10; let simulated_random_number = 7; generate_workout(simulated_user_specified_value, simulated_random_number); }
Listing 13-7: Adding optional type annotations of the parameter and return value types in the closure
With type annotations added, the syntax of closures looks more similar to the syntax of functions. The following is a vertical comparison of the syntax for the definition of a function that adds 1 to its parameter and a closure that has the same behavior. We’ve added some spaces to line up the relevant parts. This illustrates how closure syntax is similar to function syntax except for the use of pipes and the amount of syntax that is optional:
fn add_one_v1 (x: u32) -> u32 { x + 1 }
let add_one_v2 = |x: u32| -> u32 { x + 1 };
let add_one_v3 = |x| { x + 1 };
let add_one_v4 = |x| x + 1 ;
The first line shows a function definition, and the second line shows a fully
annotated closure definition. The third line removes the type annotations from
the closure definition, and the fourth line removes the brackets, which are
optional because the closure body has only one expression. These are all valid
definitions that will produce the same behavior when they’re called. Calling
the closures is required for add_one_v3 and add_one_v4 to be able to
compile because the types will be inferred from their usage.
Closure definitions will have one concrete type inferred for each of their
parameters and for their return value. For instance, Listing 13-8 shows the
definition of a short closure that just returns the value it receives as a
parameter. This closure isn’t very useful except for the purposes of this
example. Note that we haven’t added any type annotations to the definition: if
we then try to call the closure twice, using a String as an argument the
first time and a u32 the second time, we’ll get an error.
Filename: src/main.rs
fn main() {
let example_closure = |x| x;
let s = example_closure(String::from("hello"));
let n = example_closure(5);
}
Listing 13-8: Attempting to call a closure whose types are inferred with two different types
The compiler gives us this error:
$ cargo run
Compiling closure-example v0.1.0 (file:///projects/closure-example)
error[E0308]: mismatched types
--> src/main.rs:5:29
|
5 | let n = example_closure(5);
| ^
| |
| expected struct `String`, found integer
| help: try using a conversion method: `5.to_string()`
error: aborting due to previous error
For more information about this error, try `rustc --explain E0308`.
error: could not compile `closure-example`
To learn more, run the command again with --verbose.
The first time we call example_closure with the String value, the compiler
infers the type of x and the return type of the closure to be String. Those
types are then locked into the closure in example_closure, and we get a type
error if we try to use a different type with the same closure.
Storing Closures Using Generic Parameters and the Fn Traits
Let’s return to our workout generation app. In Listing 13-6, our code was still calling the expensive calculation closure more times than it needed to. One option to solve this issue is to save the result of the expensive closure in a variable for reuse and use the variable in each place we need the result, instead of calling the closure again. However, this method could result in a lot of repeated code.
Fortunately, another solution is available to us. We can create a struct that will hold the closure and the resulting value of calling the closure. The struct will execute the closure only if we need the resulting value, and it will cache the resulting value so the rest of our code doesn’t have to be responsible for saving and reusing the result. You may know this pattern as memoization or lazy evaluation.
To make a struct that holds a closure, we need to specify the type of the closure, because a struct definition needs to know the types of each of its fields. Each closure instance has its own unique anonymous type: that is, even if two closures have the same signature, their types are still considered different. To define structs, enums, or function parameters that use closures, we use generics and trait bounds, as we discussed in Chapter 10.
The Fn traits are provided by the standard library. All closures implement at
least one of the traits: Fn, FnMut, or FnOnce. We’ll discuss the
difference between these traits in the “Capturing the Environment with
Closures” section; in
this example, we can use the Fn trait.
We add types to the Fn trait bound to represent the types of the parameters
and return values the closures must have to match this trait bound. In this
case, our closure has a parameter of type u32 and returns a u32, so the
trait bound we specify is Fn(u32) -> u32.
Listing 13-9 shows the definition of the Cacher struct that holds a closure
and an optional result value.
Filename: src/main.rs
struct Cacher<T> where T: Fn(u32) -> u32, { calculation: T, value: Option<u32>, } fn main() {}
Listing 13-9: Defining a Cacher struct that holds a
closure in calculation and an optional result in value
The Cacher struct has a calculation field of the generic type T. The
trait bounds on T specify that it’s a closure by using the Fn trait. Any
closure we want to store in the calculation field must have one u32
parameter (specified within the parentheses after Fn) and must return a
u32 (specified after the ->).
Note: Functions can implement all three of the
Fntraits too. If what we want to do doesn’t require capturing a value from the environment, we can use a function rather than a closure where we need something that implements anFntrait.
The value field is of type Option<u32>. Before we execute the closure,
value will be None. When code using a Cacher asks for the result of the
closure, the Cacher will execute the closure at that time and store the
result within a Some variant in the value field. Then if the code asks for
the result of the closure again, instead of executing the closure again, the
Cacher will return the result held in the Some variant.
The logic around the value field we’ve just described is defined in Listing
13-10.
Filename: src/main.rs
struct Cacher<T> where T: Fn(u32) -> u32, { calculation: T, value: Option<u32>, } impl<T> Cacher<T> where T: Fn(u32) -> u32, { fn new(calculation: T) -> Cacher<T> { Cacher { calculation, value: None, } } fn value(&mut self, arg: u32) -> u32 { match self.value { Some(v) => v, None => { let v = (self.calculation)(arg); self.value = Some(v); v } } } } fn main() {}
Listing 13-10: The caching logic of Cacher
We want Cacher to manage the struct fields’ values rather than letting the
calling code potentially change the values in these fields directly, so these
fields are private.
The Cacher::new function takes a generic parameter T, which we’ve defined
as having the same trait bound as the Cacher struct. Then Cacher::new
returns a Cacher instance that holds the closure specified in the
calculation field and a None value in the value field, because we haven’t
executed the closure yet.
When the calling code needs the result of evaluating the closure, instead of
calling the closure directly, it will call the value method. This method
checks whether we already have a resulting value in self.value in a Some;
if we do, it returns the value within the Some without executing the closure
again.
If self.value is None, the code calls the closure stored in
self.calculation, saves the result in self.value for future use, and
returns the value as well.
Listing 13-11 shows how we can use this Cacher struct in the function
generate_workout from Listing 13-6.
Filename: src/main.rs
use std::thread; use std::time::Duration; struct Cacher<T> where T: Fn(u32) -> u32, { calculation: T, value: Option<u32>, } impl<T> Cacher<T> where T: Fn(u32) -> u32, { fn new(calculation: T) -> Cacher<T> { Cacher { calculation, value: None, } } fn value(&mut self, arg: u32) -> u32 { match self.value { Some(v) => v, None => { let v = (self.calculation)(arg); self.value = Some(v); v } } } } fn generate_workout(intensity: u32, random_number: u32) { let mut expensive_result = Cacher::new(|num| { println!("calculating slowly..."); thread::sleep(Duration::from_secs(2)); num }); if intensity < 25 { println!("Today, do {} pushups!", expensive_result.value(intensity)); println!("Next, do {} situps!", expensive_result.value(intensity)); } else { if random_number == 3 { println!("Take a break today! Remember to stay hydrated!"); } else { println!( "Today, run for {} minutes!", expensive_result.value(intensity) ); } } } fn main() { let simulated_user_specified_value = 10; let simulated_random_number = 7; generate_workout(simulated_user_specified_value, simulated_random_number); }
Listing 13-11: Using Cacher in the generate_workout
function to abstract away the caching logic
Instead of saving the closure in a variable directly, we save a new instance of
Cacher that holds the closure. Then, in each place we want the result, we
call the value method on the Cacher instance. We can call the value
method as many times as we want, or not call it at all, and the expensive
calculation will be run a maximum of once.
Try running this program with the main function from Listing 13-2. Change the
values in the simulated_user_specified_value and simulated_random_number
variables to verify that in all the cases in the various if and else
blocks, calculating slowly... appears only once and only when needed. The
Cacher takes care of the logic necessary to ensure we aren’t calling the
expensive calculation more than we need to so generate_workout can focus on
the business logic.
Limitations of the Cacher Implementation
Caching values is a generally useful behavior that we might want to use in
other parts of our code with different closures. However, there are two
problems with the current implementation of Cacher that would make reusing it
in different contexts difficult.
The first problem is that a Cacher instance assumes it will always get the
same value for the parameter arg to the value method. That is, this test of
Cacher will fail:
struct Cacher<T>
where
T: Fn(u32) -> u32,
{
calculation: T,
value: Option<u32>,
}
impl<T> Cacher<T>
where
T: Fn(u32) -> u32,
{
fn new(calculation: T) -> Cacher<T> {
Cacher {
calculation,
value: None,
}
}
fn value(&mut self, arg: u32) -> u32 {
match self.value {
Some(v) => v,
None => {
let v = (self.calculation)(arg);
self.value = Some(v);
v
}
}
}
}
#[cfg(test)]
mod tests {
use super::*;
#[test]
fn call_with_different_values() {
let mut c = Cacher::new(|a| a);
let v1 = c.value(1);
let v2 = c.value(2);
assert_eq!(v2, 2);
}
}
This test creates a new Cacher instance with a closure that returns the value
passed into it. We call the value method on this Cacher instance with an
arg value of 1 and then an arg value of 2, and we expect the call to
value with the arg value of 2 to return 2.
Run this test with the Cacher implementation in Listing 13-9 and Listing
13-10, and the test will fail on the assert_eq! with this message:
$ cargo test
Compiling cacher v0.1.0 (file:///projects/cacher)
Finished test [unoptimized + debuginfo] target(s) in 0.72s
Running target/debug/deps/cacher-4116485fb32b3fff
running 1 test
test tests::call_with_different_values ... FAILED
failures:
---- tests::call_with_different_values stdout ----
thread 'main' panicked at 'assertion failed: `(left == right)`
left: `1`,
right: `2`', src/lib.rs:43:9
note: run with `RUST_BACKTRACE=1` environment variable to display a backtrace
failures:
tests::call_with_different_values
test result: FAILED. 0 passed; 1 failed; 0 ignored; 0 measured; 0 filtered out; finished in 0.00s
error: test failed, to rerun pass '--lib'
The problem is that the first time we called c.value with 1, the Cacher
instance saved Some(1) in self.value. Thereafter, no matter what we pass into
the value method, it will always return 1.
Try modifying Cacher to hold a hash map rather than a single value. The keys
of the hash map will be the arg values that are passed in, and the values of
the hash map will be the result of calling the closure on that key. Instead of
looking at whether self.value directly has a Some or a None value, the
value function will look up the arg in the hash map and return the value if
it’s present. If it’s not present, the Cacher will call the closure and save
the resulting value in the hash map associated with its arg value.
The second problem with the current Cacher implementation is that it only
accepts closures that take one parameter of type u32 and return a u32. We
might want to cache the results of closures that take a string slice and return
usize values, for example. To fix this issue, try introducing more generic
parameters to increase the flexibility of the Cacher functionality.
Capturing the Environment with Closures
In the workout generator example, we only used closures as inline anonymous functions. However, closures have an additional capability that functions don’t have: they can capture their environment and access variables from the scope in which they’re defined.
Listing 13-12 has an example of a closure stored in the equal_to_x variable
that uses the x variable from the closure’s surrounding environment.
Filename: src/main.rs
fn main() { let x = 4; let equal_to_x = |z| z == x; let y = 4; assert!(equal_to_x(y)); }
Listing 13-12: Example of a closure that refers to a variable in its enclosing scope
Here, even though x is not one of the parameters of equal_to_x, the
equal_to_x closure is allowed to use the x variable that’s defined in the
same scope that equal_to_x is defined in.
We can’t do the same with functions; if we try with the following example, our code won’t compile:
Filename: src/main.rs
fn main() {
let x = 4;
fn equal_to_x(z: i32) -> bool {
z == x
}
let y = 4;
assert!(equal_to_x(y));
}
We get an error:
$ cargo run
Compiling equal-to-x v0.1.0 (file:///projects/equal-to-x)
error[E0434]: can't capture dynamic environment in a fn item
--> src/main.rs:5:14
|
5 | z == x
| ^
|
= help: use the `|| { ... }` closure form instead
error: aborting due to previous error
For more information about this error, try `rustc --explain E0434`.
error: could not compile `equal-to-x`
To learn more, run the command again with --verbose.
The compiler even reminds us that this only works with closures!
When a closure captures a value from its environment, it uses memory to store the values for use in the closure body. This use of memory is overhead that we don’t want to pay in more common cases where we want to execute code that doesn’t capture its environment. Because functions are never allowed to capture their environment, defining and using functions will never incur this overhead.
Closures can capture values from their environment in three ways, which
directly map to the three ways a function can take a parameter: taking
ownership, borrowing mutably, and borrowing immutably. These are encoded in the
three Fn traits as follows:
FnOnceconsumes the variables it captures from its enclosing scope, known as the closure’s environment. To consume the captured variables, the closure must take ownership of these variables and move them into the closure when it is defined. TheOncepart of the name represents the fact that the closure can’t take ownership of the same variables more than once, so it can be called only once.FnMutcan change the environment because it mutably borrows values.Fnborrows values from the environment immutably.
When you create a closure, Rust infers which trait to use based on how the
closure uses the values from the environment. All closures implement FnOnce
because they can all be called at least once. Closures that don’t move the
captured variables also implement FnMut, and closures that don’t need mutable
access to the captured variables also implement Fn. In Listing 13-12, the
equal_to_x closure borrows x immutably (so equal_to_x has the Fn trait)
because the body of the closure only needs to read the value in x.
If you want to force the closure to take ownership of the values it uses in the
environment, you can use the move keyword before the parameter list. This
technique is mostly useful when passing a closure to a new thread to move the
data so it’s owned by the new thread.
Note:
moveclosures may still implementFnorFnMut, even though they capture variables by move. This is because the traits implemented by a closure type are determined by what the closure does with captured values, not how it captures them. Themovekeyword only specifies the latter.
We’ll have more examples of move closures in Chapter 16 when we talk about
concurrency. For now, here’s the code from Listing 13-12 with the move
keyword added to the closure definition and using vectors instead of integers,
because integers can be copied rather than moved; note that this code will not
yet compile.
Filename: src/main.rs
fn main() {
let x = vec![1, 2, 3];
let equal_to_x = move |z| z == x;
println!("can't use x here: {:?}", x);
let y = vec![1, 2, 3];
assert!(equal_to_x(y));
}
We receive the following error:
$ cargo run
Compiling equal-to-x v0.1.0 (file:///projects/equal-to-x)
error[E0382]: borrow of moved value: `x`
--> src/main.rs:6:40
|
2 | let x = vec![1, 2, 3];
| - move occurs because `x` has type `Vec<i32>`, which does not implement the `Copy` trait
3 |
4 | let equal_to_x = move |z| z == x;
| -------- - variable moved due to use in closure
| |
| value moved into closure here
5 |
6 | println!("can't use x here: {:?}", x);
| ^ value borrowed here after move
error: aborting due to previous error
For more information about this error, try `rustc --explain E0382`.
error: could not compile `equal-to-x`
To learn more, run the command again with --verbose.
The x value is moved into the closure when the closure is defined, because we
added the move keyword. The closure then has ownership of x, and main
isn’t allowed to use x anymore in the println! statement. Removing
println! will fix this example.
Most of the time when specifying one of the Fn trait bounds, you can start
with Fn and the compiler will tell you if you need FnMut or FnOnce based
on what happens in the closure body.
To illustrate situations where closures that can capture their environment are useful as function parameters, let’s move on to our next topic: iterators.
Processing a Series of Items with Iterators
The iterator pattern allows you to perform some task on a sequence of items in turn. An iterator is responsible for the logic of iterating over each item and determining when the sequence has finished. When you use iterators, you don’t have to reimplement that logic yourself.
In Rust, iterators are lazy, meaning they have no effect until you call
methods that consume the iterator to use it up. For example, the code in
Listing 13-13 creates an iterator over the items in the vector v1 by calling
the iter method defined on Vec<T>. This code by itself doesn’t do anything
useful.
fn main() { let v1 = vec![1, 2, 3]; let v1_iter = v1.iter(); }
Listing 13-13: Creating an iterator
Once we’ve created an iterator, we can use it in a variety of ways. In Listing
3-5 in Chapter 3, we used iterators with for loops to execute some code on
each item, although we glossed over what the call to iter did until now.
The example in Listing 13-14 separates the creation of the iterator from the
use of the iterator in the for loop. The iterator is stored in the v1_iter
variable, and no iteration takes place at that time. When the for loop is
called using the iterator in v1_iter, each element in the iterator is used in
one iteration of the loop, which prints out each value.
fn main() { let v1 = vec![1, 2, 3]; let v1_iter = v1.iter(); for val in v1_iter { println!("Got: {}", val); } }
Listing 13-14: Using an iterator in a for loop
In languages that don’t have iterators provided by their standard libraries, you would likely write this same functionality by starting a variable at index 0, using that variable to index into the vector to get a value, and incrementing the variable value in a loop until it reached the total number of items in the vector.
Iterators handle all that logic for you, cutting down on repetitive code you could potentially mess up. Iterators give you more flexibility to use the same logic with many different kinds of sequences, not just data structures you can index into, like vectors. Let’s examine how iterators do that.
The Iterator Trait and the next Method
All iterators implement a trait named Iterator that is defined in the
standard library. The definition of the trait looks like this:
#![allow(unused)] fn main() { pub trait Iterator { type Item; fn next(&mut self) -> Option<Self::Item>; // methods with default implementations elided } }
Notice this definition uses some new syntax: type Item and Self::Item,
which are defining an associated type with this trait. We’ll talk about
associated types in depth in Chapter 19. For now, all you need to know is that
this code says implementing the Iterator trait requires that you also define
an Item type, and this Item type is used in the return type of the next
method. In other words, the Item type will be the type returned from the
iterator.
The Iterator trait only requires implementors to define one method: the
next method, which returns one item of the iterator at a time wrapped in
Some and, when iteration is over, returns None.
We can call the next method on iterators directly; Listing 13-15 demonstrates
what values are returned from repeated calls to next on the iterator created
from the vector.
Filename: src/lib.rs
#[cfg(test)]
mod tests {
#[test]
fn iterator_demonstration() {
let v1 = vec![1, 2, 3];
let mut v1_iter = v1.iter();
assert_eq!(v1_iter.next(), Some(&1));
assert_eq!(v1_iter.next(), Some(&2));
assert_eq!(v1_iter.next(), Some(&3));
assert_eq!(v1_iter.next(), None);
}
}
Listing 13-15: Calling the next method on an
iterator
Note that we needed to make v1_iter mutable: calling the next method on an
iterator changes internal state that the iterator uses to keep track of where
it is in the sequence. In other words, this code consumes, or uses up, the
iterator. Each call to next eats up an item from the iterator. We didn’t need
to make v1_iter mutable when we used a for loop because the loop took
ownership of v1_iter and made it mutable behind the scenes.
Also note that the values we get from the calls to next are immutable
references to the values in the vector. The iter method produces an iterator
over immutable references. If we want to create an iterator that takes
ownership of v1 and returns owned values, we can call into_iter instead of
iter. Similarly, if we want to iterate over mutable references, we can call
iter_mut instead of iter.
Methods that Consume the Iterator
The Iterator trait has a number of different methods with default
implementations provided by the standard library; you can find out about these
methods by looking in the standard library API documentation for the Iterator
trait. Some of these methods call the next method in their definition, which
is why you’re required to implement the next method when implementing the
Iterator trait.
Methods that call next are called consuming adaptors, because calling them
uses up the iterator. One example is the sum method, which takes ownership of
the iterator and iterates through the items by repeatedly calling next, thus
consuming the iterator. As it iterates through, it adds each item to a running
total and returns the total when iteration is complete. Listing 13-16 has a
test illustrating a use of the sum method:
Filename: src/lib.rs
#[cfg(test)]
mod tests {
#[test]
fn iterator_sum() {
let v1 = vec![1, 2, 3];
let v1_iter = v1.iter();
let total: i32 = v1_iter.sum();
assert_eq!(total, 6);
}
}
Listing 13-16: Calling the sum method to get the total
of all items in the iterator
We aren’t allowed to use v1_iter after the call to sum because sum takes
ownership of the iterator we call it on.
Methods that Produce Other Iterators
Other methods defined on the Iterator trait, known as iterator adaptors,
allow you to change iterators into different kinds of iterators. You can chain
multiple calls to iterator adaptors to perform complex actions in a readable
way. But because all iterators are lazy, you have to call one of the consuming
adaptor methods to get results from calls to iterator adaptors.
Listing 13-17 shows an example of calling the iterator adaptor method map,
which takes a closure to call on each item to produce a new iterator. The
closure here creates a new iterator in which each item from the vector has been
incremented by 1. However, this code produces a warning:
Filename: src/main.rs
fn main() { let v1: Vec<i32> = vec![1, 2, 3]; v1.iter().map(|x| x + 1); }
Listing 13-17: Calling the iterator adaptor map to
create a new iterator
The warning we get is this:
$ cargo run
Compiling iterators v0.1.0 (file:///projects/iterators)
warning: unused `Map` that must be used
--> src/main.rs:4:5
|
4 | v1.iter().map(|x| x + 1);
| ^^^^^^^^^^^^^^^^^^^^^^^^^
|
= note: `#[warn(unused_must_use)]` on by default
= note: iterators are lazy and do nothing unless consumed
warning: 1 warning emitted
Finished dev [unoptimized + debuginfo] target(s) in 0.47s
Running `target/debug/iterators`
The code in Listing 13-17 doesn’t do anything; the closure we’ve specified never gets called. The warning reminds us why: iterator adaptors are lazy, and we need to consume the iterator here.
To fix this and consume the iterator, we’ll use the collect method, which we
used in Chapter 12 with env::args in Listing 12-1. This method consumes the
iterator and collects the resulting values into a collection data type.
In Listing 13-18, we collect the results of iterating over the iterator that’s
returned from the call to map into a vector. This vector will end up
containing each item from the original vector incremented by 1.
Filename: src/main.rs
fn main() { let v1: Vec<i32> = vec![1, 2, 3]; let v2: Vec<_> = v1.iter().map(|x| x + 1).collect(); assert_eq!(v2, vec![2, 3, 4]); }
Listing 13-18: Calling the map method to create a new
iterator and then calling the collect method to consume the new iterator and
create a vector
Because map takes a closure, we can specify any operation we want to perform
on each item. This is a great example of how closures let you customize some
behavior while reusing the iteration behavior that the Iterator trait
provides.
Using Closures that Capture Their Environment
Now that we’ve introduced iterators, we can demonstrate a common use of
closures that capture their environment by using the filter iterator adaptor.
The filter method on an iterator takes a closure that takes each item from
the iterator and returns a Boolean. If the closure returns true, the value
will be included in the iterator produced by filter. If the closure returns
false, the value won’t be included in the resulting iterator.
In Listing 13-19, we use filter with a closure that captures the shoe_size
variable from its environment to iterate over a collection of Shoe struct
instances. It will return only shoes that are the specified size.
Filename: src/lib.rs
#[derive(PartialEq, Debug)]
struct Shoe {
size: u32,
style: String,
}
fn shoes_in_size(shoes: Vec<Shoe>, shoe_size: u32) -> Vec<Shoe> {
shoes.into_iter().filter(|s| s.size == shoe_size).collect()
}
#[cfg(test)]
mod tests {
use super::*;
#[test]
fn filters_by_size() {
let shoes = vec![
Shoe {
size: 10,
style: String::from("sneaker"),
},
Shoe {
size: 13,
style: String::from("sandal"),
},
Shoe {
size: 10,
style: String::from("boot"),
},
];
let in_my_size = shoes_in_size(shoes, 10);
assert_eq!(
in_my_size,
vec![
Shoe {
size: 10,
style: String::from("sneaker")
},
Shoe {
size: 10,
style: String::from("boot")
},
]
);
}
}
Listing 13-19: Using the filter method with a closure
that captures shoe_size
The shoes_in_size function takes ownership of a vector of shoes and a shoe
size as parameters. It returns a vector containing only shoes of the specified
size.
In the body of shoes_in_size, we call into_iter to create an iterator
that takes ownership of the vector. Then we call filter to adapt that
iterator into a new iterator that only contains elements for which the closure
returns true.
The closure captures the shoe_size parameter from the environment and
compares the value with each shoe’s size, keeping only shoes of the size
specified. Finally, calling collect gathers the values returned by the
adapted iterator into a vector that’s returned by the function.
The test shows that when we call shoes_in_size, we get back only shoes
that have the same size as the value we specified.
Creating Our Own Iterators with the Iterator Trait
We’ve shown that you can create an iterator by calling iter, into_iter, or
iter_mut on a vector. You can create iterators from the other collection
types in the standard library, such as hash map. You can also create iterators
that do anything you want by implementing the Iterator trait on your own
types. As previously mentioned, the only method you’re required to provide a
definition for is the next method. Once you’ve done that, you can use all
other methods that have default implementations provided by the Iterator
trait!
To demonstrate, let’s create an iterator that will only ever count from 1 to 5.
First, we’ll create a struct to hold some values. Then we’ll make this struct
into an iterator by implementing the Iterator trait and using the values in
that implementation.
Listing 13-20 has the definition of the Counter struct and an associated
new function to create instances of Counter:
Filename: src/lib.rs
struct Counter {
count: u32,
}
impl Counter {
fn new() -> Counter {
Counter { count: 0 }
}
}
Listing 13-20: Defining the Counter struct and a new
function that creates instances of Counter with an initial value of 0 for
count
The Counter struct has one field named count. This field holds a u32
value that will keep track of where we are in the process of iterating from 1
to 5. The count field is private because we want the implementation of
Counter to manage its value. The new function enforces the behavior of
always starting new instances with a value of 0 in the count field.
Next, we’ll implement the Iterator trait for our Counter type by defining
the body of the next method to specify what we want to happen when this
iterator is used, as shown in Listing 13-21:
Filename: src/lib.rs
struct Counter {
count: u32,
}
impl Counter {
fn new() -> Counter {
Counter { count: 0 }
}
}
impl Iterator for Counter {
type Item = u32;
fn next(&mut self) -> Option<Self::Item> {
if self.count < 5 {
self.count += 1;
Some(self.count)
} else {
None
}
}
}
Listing 13-21: Implementing the Iterator trait on our
Counter struct
We set the associated Item type for our iterator to u32, meaning the
iterator will return u32 values. Again, don’t worry about associated types
yet, we’ll cover them in Chapter 19.
We want our iterator to add 1 to the current state, so we initialized count
to 0 so it would return 1 first. If the value of count is less than 5, next
will increment count and return the current value wrapped in Some. Once
count is 5, our iterator will stop incrementing count and always return
None.
Using Our Counter Iterator’s next Method
Once we’ve implemented the Iterator trait, we have an iterator! Listing 13-22
shows a test demonstrating that we can use the iterator functionality of our
Counter struct by calling the next method on it directly, just as we did
with the iterator created from a vector in Listing 13-15.
Filename: src/lib.rs
struct Counter {
count: u32,
}
impl Counter {
fn new() -> Counter {
Counter { count: 0 }
}
}
impl Iterator for Counter {
type Item = u32;
fn next(&mut self) -> Option<Self::Item> {
if self.count < 5 {
self.count += 1;
Some(self.count)
} else {
None
}
}
}
#[cfg(test)]
mod tests {
use super::*;
#[test]
fn calling_next_directly() {
let mut counter = Counter::new();
assert_eq!(counter.next(), Some(1));
assert_eq!(counter.next(), Some(2));
assert_eq!(counter.next(), Some(3));
assert_eq!(counter.next(), Some(4));
assert_eq!(counter.next(), Some(5));
assert_eq!(counter.next(), None);
}
}
Listing 13-22: Testing the functionality of the next
method implementation
This test creates a new Counter instance in the counter variable and then
calls next repeatedly, verifying that we have implemented the behavior we
want this iterator to have: returning the values from 1 to 5.
Using Other Iterator Trait Methods
We implemented the Iterator trait by defining the next method, so we
can now use any Iterator trait method’s default implementations as defined in
the standard library, because they all use the next method’s functionality.
For example, if for some reason we wanted to take the values produced by an
instance of Counter, pair them with values produced by another Counter
instance after skipping the first value, multiply each pair together, keep only
those results that are divisible by 3, and add all the resulting values
together, we could do so, as shown in the test in Listing 13-23:
Filename: src/lib.rs
struct Counter {
count: u32,
}
impl Counter {
fn new() -> Counter {
Counter { count: 0 }
}
}
impl Iterator for Counter {
type Item = u32;
fn next(&mut self) -> Option<Self::Item> {
if self.count < 5 {
self.count += 1;
Some(self.count)
} else {
None
}
}
}
#[cfg(test)]
mod tests {
use super::*;
#[test]
fn calling_next_directly() {
let mut counter = Counter::new();
assert_eq!(counter.next(), Some(1));
assert_eq!(counter.next(), Some(2));
assert_eq!(counter.next(), Some(3));
assert_eq!(counter.next(), Some(4));
assert_eq!(counter.next(), Some(5));
assert_eq!(counter.next(), None);
}
#[test]
fn using_other_iterator_trait_methods() {
let sum: u32 = Counter::new()
.zip(Counter::new().skip(1))
.map(|(a, b)| a * b)
.filter(|x| x % 3 == 0)
.sum();
assert_eq!(18, sum);
}
}
Listing 13-23: Using a variety of Iterator trait
methods on our Counter iterator
Note that zip produces only four pairs; the theoretical fifth pair (5, None) is never produced because zip returns None when either of its input
iterators return None.
All of these method calls are possible because we specified how the next
method works, and the standard library provides default implementations for
other methods that call next.
Improving Our I/O Project
With this new knowledge about iterators, we can improve the I/O project in
Chapter 12 by using iterators to make places in the code clearer and more
concise. Let’s look at how iterators can improve our implementation of the
Config::new function and the search function.
Removing a clone Using an Iterator
In Listing 12-6, we added code that took a slice of String values and created
an instance of the Config struct by indexing into the slice and cloning the
values, allowing the Config struct to own those values. In Listing 13-24,
we’ve reproduced the implementation of the Config::new function as it was in
Listing 12-23:
Filename: src/lib.rs
use std::env;
use std::error::Error;
use std::fs;
pub struct Config {
pub query: String,
pub filename: String,
pub case_sensitive: bool,
}
impl Config {
pub fn new(args: &[String]) -> Result<Config, &str> {
if args.len() < 3 {
return Err("not enough arguments");
}
let query = args[1].clone();
let filename = args[2].clone();
let case_sensitive = env::var("CASE_INSENSITIVE").is_err();
Ok(Config {
query,
filename,
case_sensitive,
})
}
}
pub fn run(config: Config) -> Result<(), Box<dyn Error>> {
let contents = fs::read_to_string(config.filename)?;
let results = if config.case_sensitive {
search(&config.query, &contents)
} else {
search_case_insensitive(&config.query, &contents)
};
for line in results {
println!("{}", line);
}
Ok(())
}
pub fn search<'a>(query: &str, contents: &'a str) -> Vec<&'a str> {
let mut results = Vec::new();
for line in contents.lines() {
if line.contains(query) {
results.push(line);
}
}
results
}
pub fn search_case_insensitive<'a>(
query: &str,
contents: &'a str,
) -> Vec<&'a str> {
let query = query.to_lowercase();
let mut results = Vec::new();
for line in contents.lines() {
if line.to_lowercase().contains(&query) {
results.push(line);
}
}
results
}
#[cfg(test)]
mod tests {
use super::*;
#[test]
fn case_sensitive() {
let query = "duct";
let contents = "\
Rust:
safe, fast, productive.
Pick three.
Duct tape.";
assert_eq!(vec!["safe, fast, productive."], search(query, contents));
}
#[test]
fn case_insensitive() {
let query = "rUsT";
let contents = "\
Rust:
safe, fast, productive.
Pick three.
Trust me.";
assert_eq!(
vec!["Rust:", "Trust me."],
search_case_insensitive(query, contents)
);
}
}
Listing 13-24: Reproduction of the Config::new function
from Listing 12-23
At the time, we said not to worry about the inefficient clone calls because
we would remove them in the future. Well, that time is now!
We needed clone here because we have a slice with String elements in the
parameter args, but the new function doesn’t own args. To return
ownership of a Config instance, we had to clone the values from the query
and filename fields of Config so the Config instance can own its values.
With our new knowledge about iterators, we can change the new function to
take ownership of an iterator as its argument instead of borrowing a slice.
We’ll use the iterator functionality instead of the code that checks the length
of the slice and indexes into specific locations. This will clarify what the
Config::new function is doing because the iterator will access the values.
Once Config::new takes ownership of the iterator and stops using indexing
operations that borrow, we can move the String values from the iterator into
Config rather than calling clone and making a new allocation.
Using the Returned Iterator Directly
Open your I/O project’s src/main.rs file, which should look like this:
Filename: src/main.rs
use std::env;
use std::process;
use minigrep::Config;
fn main() {
let args: Vec<String> = env::args().collect();
let config = Config::new(&args).unwrap_or_else(|err| {
eprintln!("Problem parsing arguments: {}", err);
process::exit(1);
});
// --snip--
if let Err(e) = minigrep::run(config) {
eprintln!("Application error: {}", e);
process::exit(1);
}
}
We’ll change the start of the main function that we had in Listing 12-24 to
the code in Listing 13-25. This won’t compile until we update Config::new as
well.
Filename: src/main.rs
use std::env;
use std::process;
use minigrep::Config;
fn main() {
let config = Config::new(env::args()).unwrap_or_else(|err| {
eprintln!("Problem parsing arguments: {}", err);
process::exit(1);
});
// --snip--
if let Err(e) = minigrep::run(config) {
eprintln!("Application error: {}", e);
process::exit(1);
}
}
Listing 13-25: Passing the return value of env::args to
Config::new
The env::args function returns an iterator! Rather than collecting the
iterator values into a vector and then passing a slice to Config::new, now
we’re passing ownership of the iterator returned from env::args to
Config::new directly.
Next, we need to update the definition of Config::new. In your I/O project’s
src/lib.rs file, let’s change the signature of Config::new to look like
Listing 13-26. This still won’t compile because we need to update the function
body.
Filename: src/lib.rs
use std::env;
use std::error::Error;
use std::fs;
pub struct Config {
pub query: String,
pub filename: String,
pub case_sensitive: bool,
}
impl Config {
pub fn new(mut args: env::Args) -> Result<Config, &'static str> {
// --snip--
if args.len() < 3 {
return Err("not enough arguments");
}
let query = args[1].clone();
let filename = args[2].clone();
let case_sensitive = env::var("CASE_INSENSITIVE").is_err();
Ok(Config {
query,
filename,
case_sensitive,
})
}
}
pub fn run(config: Config) -> Result<(), Box<dyn Error>> {
let contents = fs::read_to_string(config.filename)?;
let results = if config.case_sensitive {
search(&config.query, &contents)
} else {
search_case_insensitive(&config.query, &contents)
};
for line in results {
println!("{}", line);
}
Ok(())
}
pub fn search<'a>(query: &str, contents: &'a str) -> Vec<&'a str> {
let mut results = Vec::new();
for line in contents.lines() {
if line.contains(query) {
results.push(line);
}
}
results
}
pub fn search_case_insensitive<'a>(
query: &str,
contents: &'a str,
) -> Vec<&'a str> {
let query = query.to_lowercase();
let mut results = Vec::new();
for line in contents.lines() {
if line.to_lowercase().contains(&query) {
results.push(line);
}
}
results
}
#[cfg(test)]
mod tests {
use super::*;
#[test]
fn case_sensitive() {
let query = "duct";
let contents = "\
Rust:
safe, fast, productive.
Pick three.
Duct tape.";
assert_eq!(vec!["safe, fast, productive."], search(query, contents));
}
#[test]
fn case_insensitive() {
let query = "rUsT";
let contents = "\
Rust:
safe, fast, productive.
Pick three.
Trust me.";
assert_eq!(
vec!["Rust:", "Trust me."],
search_case_insensitive(query, contents)
);
}
}
Listing 13-26: Updating the signature of Config::new to
expect an iterator
The standard library documentation for the env::args function shows that the
type of the iterator it returns is std::env::Args. We’ve updated the
signature of the Config::new function so the parameter args has the type
std::env::Args instead of &[String]. Because we’re taking ownership of
args and we’ll be mutating args by iterating over it, we can add the mut
keyword into the specification of the args parameter to make it mutable.
We also needed to specify that the string slice error type can now only have
the 'static lifetime. Because we’re only ever returning string literals, this
was true before. However, when we had a reference in the parameters, there was
the possibility that the reference in the return type could have had the same
lifetime as the reference in the parameters. The rules that we discussed in the
“Lifetime Elision” section of Chapter 10 applied, and we
weren’t required to annotate the lifetime of &str. With the change to args,
the lifetime elision rules no longer apply, and we must specify the 'static
lifetime.
Using Iterator Trait Methods Instead of Indexing
Next, we’ll fix the body of Config::new. The standard library documentation
also mentions that std::env::Args implements the Iterator trait, so we know
we can call the next method on it! Listing 13-27 updates the code from
Listing 12-23 to use the next method:
Filename: src/lib.rs
use std::env;
use std::error::Error;
use std::fs;
pub struct Config {
pub query: String,
pub filename: String,
pub case_sensitive: bool,
}
impl Config {
pub fn new(mut args: env::Args) -> Result<Config, &'static str> {
args.next();
let query = match args.next() {
Some(arg) => arg,
None => return Err("Didn't get a query string"),
};
let filename = match args.next() {
Some(arg) => arg,
None => return Err("Didn't get a file name"),
};
let case_sensitive = env::var("CASE_INSENSITIVE").is_err();
Ok(Config {
query,
filename,
case_sensitive,
})
}
}
pub fn run(config: Config) -> Result<(), Box<dyn Error>> {
let contents = fs::read_to_string(config.filename)?;
let results = if config.case_sensitive {
search(&config.query, &contents)
} else {
search_case_insensitive(&config.query, &contents)
};
for line in results {
println!("{}", line);
}
Ok(())
}
pub fn search<'a>(query: &str, contents: &'a str) -> Vec<&'a str> {
let mut results = Vec::new();
for line in contents.lines() {
if line.contains(query) {
results.push(line);
}
}
results
}
pub fn search_case_insensitive<'a>(
query: &str,
contents: &'a str,
) -> Vec<&'a str> {
let query = query.to_lowercase();
let mut results = Vec::new();
for line in contents.lines() {
if line.to_lowercase().contains(&query) {
results.push(line);
}
}
results
}
#[cfg(test)]
mod tests {
use super::*;
#[test]
fn case_sensitive() {
let query = "duct";
let contents = "\
Rust:
safe, fast, productive.
Pick three.
Duct tape.";
assert_eq!(vec!["safe, fast, productive."], search(query, contents));
}
#[test]
fn case_insensitive() {
let query = "rUsT";
let contents = "\
Rust:
safe, fast, productive.
Pick three.
Trust me.";
assert_eq!(
vec!["Rust:", "Trust me."],
search_case_insensitive(query, contents)
);
}
}
Listing 13-27: Changing the body of Config::new to use
iterator methods
Remember that the first value in the return value of env::args is the name of
the program. We want to ignore that and get to the next value, so first we call
next and do nothing with the return value. Second, we call next to get the
value we want to put in the query field of Config. If next returns a
Some, we use a match to extract the value. If it returns None, it means
not enough arguments were given and we return early with an Err value. We do
the same thing for the filename value.
Making Code Clearer with Iterator Adaptors
We can also take advantage of iterators in the search function in our I/O
project, which is reproduced here in Listing 13-28 as it was in Listing 12-19:
Filename: src/lib.rs
use std::error::Error;
use std::fs;
pub struct Config {
pub query: String,
pub filename: String,
}
impl Config {
pub fn new(args: &[String]) -> Result<Config, &str> {
if args.len() < 3 {
return Err("not enough arguments");
}
let query = args[1].clone();
let filename = args[2].clone();
Ok(Config { query, filename })
}
}
pub fn run(config: Config) -> Result<(), Box<dyn Error>> {
let contents = fs::read_to_string(config.filename)?;
Ok(())
}
pub fn search<'a>(query: &str, contents: &'a str) -> Vec<&'a str> {
let mut results = Vec::new();
for line in contents.lines() {
if line.contains(query) {
results.push(line);
}
}
results
}
#[cfg(test)]
mod tests {
use super::*;
#[test]
fn one_result() {
let query = "duct";
let contents = "\
Rust:
safe, fast, productive.
Pick three.";
assert_eq!(vec!["safe, fast, productive."], search(query, contents));
}
}
Listing 13-28: The implementation of the search
function from Listing 12-19
We can write this code in a more concise way using iterator adaptor methods.
Doing so also lets us avoid having a mutable intermediate results vector. The
functional programming style prefers to minimize the amount of mutable state to
make code clearer. Removing the mutable state might enable a future enhancement
to make searching happen in parallel, because we wouldn’t have to manage
concurrent access to the results vector. Listing 13-29 shows this change:
Filename: src/lib.rs
use std::env;
use std::error::Error;
use std::fs;
pub struct Config {
pub query: String,
pub filename: String,
pub case_sensitive: bool,
}
impl Config {
pub fn new(mut args: std::env::Args) -> Result<Config, &'static str> {
args.next();
let query = match args.next() {
Some(arg) => arg,
None => return Err("Didn't get a query string"),
};
let filename = match args.next() {
Some(arg) => arg,
None => return Err("Didn't get a file name"),
};
let case_sensitive = env::var("CASE_INSENSITIVE").is_err();
Ok(Config {
query,
filename,
case_sensitive,
})
}
}
pub fn run(config: Config) -> Result<(), Box<dyn Error>> {
let contents = fs::read_to_string(config.filename)?;
let results = if config.case_sensitive {
search(&config.query, &contents)
} else {
search_case_insensitive(&config.query, &contents)
};
for line in results {
println!("{}", line);
}
Ok(())
}
pub fn search<'a>(query: &str, contents: &'a str) -> Vec<&'a str> {
contents
.lines()
.filter(|line| line.contains(query))
.collect()
}
pub fn search_case_insensitive<'a>(
query: &str,
contents: &'a str,
) -> Vec<&'a str> {
let query = query.to_lowercase();
let mut results = Vec::new();
for line in contents.lines() {
if line.to_lowercase().contains(&query) {
results.push(line);
}
}
results
}
#[cfg(test)]
mod tests {
use super::*;
#[test]
fn case_sensitive() {
let query = "duct";
let contents = "\
Rust:
safe, fast, productive.
Pick three.
Duct tape.";
assert_eq!(vec!["safe, fast, productive."], search(query, contents));
}
#[test]
fn case_insensitive() {
let query = "rUsT";
let contents = "\
Rust:
safe, fast, productive.
Pick three.
Trust me.";
assert_eq!(
vec!["Rust:", "Trust me."],
search_case_insensitive(query, contents)
);
}
}
Listing 13-29: Using iterator adaptor methods in the
implementation of the search function
Recall that the purpose of the search function is to return all lines in
contents that contain the query. Similar to the filter example in Listing
13-19, this code uses the filter adaptor to keep only the lines that
line.contains(query) returns true for. We then collect the matching lines
into another vector with collect. Much simpler! Feel free to make the same
change to use iterator methods in the search_case_insensitive function as
well.
The next logical question is which style you should choose in your own code and why: the original implementation in Listing 13-28 or the version using iterators in Listing 13-29. Most Rust programmers prefer to use the iterator style. It’s a bit tougher to get the hang of at first, but once you get a feel for the various iterator adaptors and what they do, iterators can be easier to understand. Instead of fiddling with the various bits of looping and building new vectors, the code focuses on the high-level objective of the loop. This abstracts away some of the commonplace code so it’s easier to see the concepts that are unique to this code, such as the filtering condition each element in the iterator must pass.
But are the two implementations truly equivalent? The intuitive assumption might be that the more low-level loop will be faster. Let’s talk about performance.
Comparing Performance: Loops vs. Iterators
To determine whether to use loops or iterators, you need to know which version
of our search functions is faster: the version with an explicit for loop or
the version with iterators.
We ran a benchmark by loading the entire contents of The Adventures of
Sherlock Holmes by Sir Arthur Conan Doyle into a String and looking for the
word the in the contents. Here are the results of the benchmark on the
version of search using the for loop and the version using iterators:
test bench_search_for ... bench: 19,620,300 ns/iter (+/- 915,700)
test bench_search_iter ... bench: 19,234,900 ns/iter (+/- 657,200)
The iterator version was slightly faster! We won’t explain the benchmark code here, because the point is not to prove that the two versions are equivalent but to get a general sense of how these two implementations compare performance-wise.
For a more comprehensive benchmark, you should check using various texts of
various sizes as the contents, different words and words of different lengths
as the query, and all kinds of other variations. The point is this:
iterators, although a high-level abstraction, get compiled down to roughly the
same code as if you’d written the lower-level code yourself. Iterators are one
of Rust’s zero-cost abstractions, by which we mean using the abstraction
imposes no additional runtime overhead. This is analogous to how Bjarne
Stroustrup, the original designer and implementor of C++, defines
zero-overhead in “Foundations of C++” (2012):
In general, C++ implementations obey the zero-overhead principle: What you don’t use, you don’t pay for. And further: What you do use, you couldn’t hand code any better.
As another example, the following code is taken from an audio decoder. The
decoding algorithm uses the linear prediction mathematical operation to
estimate future values based on a linear function of the previous samples. This
code uses an iterator chain to do some math on three variables in scope: a
buffer slice of data, an array of 12 coefficients, and an amount by which
to shift data in qlp_shift. We’ve declared the variables within this example
but not given them any values; although this code doesn’t have much meaning
outside of its context, it’s still a concise, real-world example of how Rust
translates high-level ideas to low-level code.
let buffer: &mut [i32];
let coefficients: [i64; 12];
let qlp_shift: i16;
for i in 12..buffer.len() {
let prediction = coefficients.iter()
.zip(&buffer[i - 12..i])
.map(|(&c, &s)| c * s as i64)
.sum::<i64>() >> qlp_shift;
let delta = buffer[i];
buffer[i] = prediction as i32 + delta;
}
To calculate the value of prediction, this code iterates through each of the
12 values in coefficients and uses the zip method to pair the coefficient
values with the previous 12 values in buffer. Then, for each pair, we
multiply the values together, sum all the results, and shift the bits in the
sum qlp_shift bits to the right.
Calculations in applications like audio decoders often prioritize performance
most highly. Here, we’re creating an iterator, using two adaptors, and then
consuming the value. What assembly code would this Rust code compile to? Well,
as of this writing, it compiles down to the same assembly you’d write by hand.
There’s no loop at all corresponding to the iteration over the values in
coefficients: Rust knows that there are 12 iterations, so it “unrolls” the
loop. Unrolling is an optimization that removes the overhead of the loop
controlling code and instead generates repetitive code for each iteration of
the loop.
All of the coefficients get stored in registers, which means accessing the values is very fast. There are no bounds checks on the array access at runtime. All these optimizations that Rust is able to apply make the resulting code extremely efficient. Now that you know this, you can use iterators and closures without fear! They make code seem like it’s higher level but don’t impose a runtime performance penalty for doing so.
Summary
Closures and iterators are Rust features inspired by functional programming language ideas. They contribute to Rust’s capability to clearly express high-level ideas at low-level performance. The implementations of closures and iterators are such that runtime performance is not affected. This is part of Rust’s goal to strive to provide zero-cost abstractions.
Now that we’ve improved the expressiveness of our I/O project, let’s look at
some more features of cargo that will help us share the project with the
world.
More About Cargo and Crates.io
So far we’ve used only the most basic features of Cargo to build, run, and test our code, but it can do a lot more. In this chapter, we’ll discuss some of its other, more advanced features to show you how to do the following:
- Customize your build through release profiles
- Publish libraries on crates.io
- Organize large projects with workspaces
- Install binaries from crates.io
- Extend Cargo using custom commands
Cargo can do even more than what we cover in this chapter, so for a full explanation of all its features, see its documentation.
Customizing Builds with Release Profiles
In Rust, release profiles are predefined and customizable profiles with different configurations that allow a programmer to have more control over various options for compiling code. Each profile is configured independently of the others.
Cargo has two main profiles: the dev profile Cargo uses when you run cargo build and the release profile Cargo uses when you run cargo build --release. The dev profile is defined with good defaults for development,
and the release profile has good defaults for release builds.
These profile names might be familiar from the output of your builds:
$ cargo build
Finished dev [unoptimized + debuginfo] target(s) in 0.0s
$ cargo build --release
Finished release [optimized] target(s) in 0.0s
The dev and release shown in this build output indicate that the compiler
is using different profiles.
Cargo has default settings for each of the profiles that apply when there
aren’t any [profile.*] sections in the project’s Cargo.toml file. By adding
[profile.*] sections for any profile you want to customize, you can override
any subset of the default settings. For example, here are the default values
for the opt-level setting for the dev and release profiles:
Filename: Cargo.toml
[profile.dev]
opt-level = 0
[profile.release]
opt-level = 3
The opt-level setting controls the number of optimizations Rust will apply to
your code, with a range of 0 to 3. Applying more optimizations extends
compiling time, so if you’re in development and compiling your code often,
you’ll want faster compiling even if the resulting code runs slower. That is
the reason the default opt-level for dev is 0. When you’re ready to
release your code, it’s best to spend more time compiling. You’ll only compile
in release mode once, but you’ll run the compiled program many times, so
release mode trades longer compile time for code that runs faster. That is why
the default opt-level for the release profile is 3.
You can override any default setting by adding a different value for it in Cargo.toml. For example, if we want to use optimization level 1 in the development profile, we can add these two lines to our project’s Cargo.toml file:
Filename: Cargo.toml
[profile.dev]
opt-level = 1
This code overrides the default setting of 0. Now when we run cargo build,
Cargo will use the defaults for the dev profile plus our customization to
opt-level. Because we set opt-level to 1, Cargo will apply more
optimizations than the default, but not as many as in a release build.
For the full list of configuration options and defaults for each profile, see Cargo’s documentation.
Publishing a Crate to Crates.io
We’ve used packages from crates.io as dependencies of our project, but you can also share your code with other people by publishing your own packages. The crate registry at crates.io distributes the source code of your packages, so it primarily hosts code that is open source.
Rust and Cargo have features that help make your published package easier for people to use and to find in the first place. We’ll talk about some of these features next and then explain how to publish a package.
Making Useful Documentation Comments
Accurately documenting your packages will help other users know how and when to
use them, so it’s worth investing the time to write documentation. In Chapter
3, we discussed how to comment Rust code using two slashes, //. Rust also has
a particular kind of comment for documentation, known conveniently as a
documentation comment, that will generate HTML documentation. The HTML
displays the contents of documentation comments for public API items intended
for programmers interested in knowing how to use your crate as opposed to how
your crate is implemented.
Documentation comments use three slashes, ///, instead of two and support
Markdown notation for formatting the text. Place documentation comments just
before the item they’re documenting. Listing 14-1 shows documentation comments
for an add_one function in a crate named my_crate:
Filename: src/lib.rs
/// Adds one to the number given.
///
/// # Examples
///
/// ```
/// let arg = 5;
/// let answer = my_crate::add_one(arg);
///
/// assert_eq!(6, answer);
/// ```
pub fn add_one(x: i32) -> i32 {
x + 1
}
Listing 14-1: A documentation comment for a function
Here, we give a description of what the add_one function does, start a
section with the heading Examples, and then provide code that demonstrates
how to use the add_one function. We can generate the HTML documentation from
this documentation comment by running cargo doc. This command runs the
rustdoc tool distributed with Rust and puts the generated HTML documentation
in the target/doc directory.
For convenience, running cargo doc --open will build the HTML for your
current crate’s documentation (as well as the documentation for all of your
crate’s dependencies) and open the result in a web browser. Navigate to the
add_one function and you’ll see how the text in the documentation comments is
rendered, as shown in Figure 14-1:
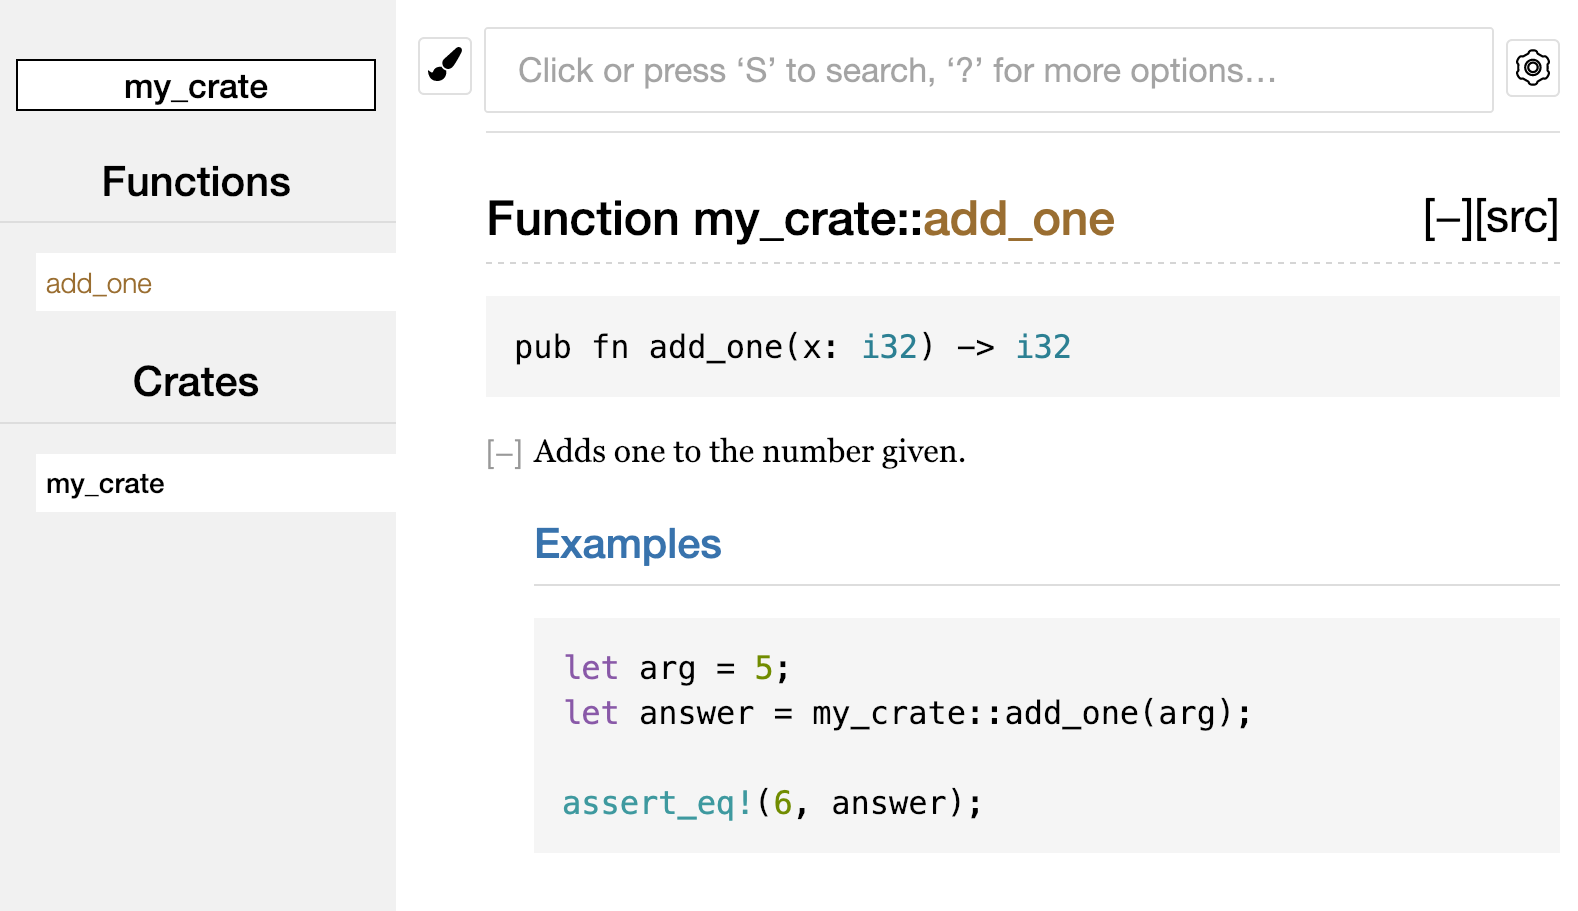
Figure 14-1: HTML documentation for the add_one
function
Commonly Used Sections
We used the # Examples Markdown heading in Listing 14-1 to create a section
in the HTML with the title “Examples.” Here are some other sections that crate
authors commonly use in their documentation:
- Panics: The scenarios in which the function being documented could panic. Callers of the function who don’t want their programs to panic should make sure they don’t call the function in these situations.
- Errors: If the function returns a
Result, describing the kinds of errors that might occur and what conditions might cause those errors to be returned can be helpful to callers so they can write code to handle the different kinds of errors in different ways. - Safety: If the function is
unsafeto call (we discuss unsafety in Chapter 19), there should be a section explaining why the function is unsafe and covering the invariants that the function expects callers to uphold.
Most documentation comments don’t need all of these sections, but this is a good checklist to remind you of the aspects of your code that people calling your code will be interested in knowing about.
Documentation Comments as Tests
Adding example code blocks in your documentation comments can help demonstrate
how to use your library, and doing so has an additional bonus: running cargo test will run the code examples in your documentation as tests! Nothing is
better than documentation with examples. But nothing is worse than examples
that don’t work because the code has changed since the documentation was
written. If we run cargo test with the documentation for the add_one
function from Listing 14-1, we will see a section in the test results like this:
Doc-tests my_crate
running 1 test
test src/lib.rs - add_one (line 5) ... ok
test result: ok. 1 passed; 0 failed; 0 ignored; 0 measured; 0 filtered out; finished in 0.27s
Now if we change either the function or the example so the assert_eq! in the
example panics and run cargo test again, we’ll see that the doc tests catch
that the example and the code are out of sync with each other!
Commenting Contained Items
Another style of doc comment, //!, adds documentation to the item that
contains the comments rather than adding documentation to the items following
the comments. We typically use these doc comments inside the crate root file
(src/lib.rs by convention) or inside a module to document the crate or the
module as a whole.
For example, if we want to add documentation that describes the purpose of the
my_crate crate that contains the add_one function, we can add documentation
comments that start with //! to the beginning of the src/lib.rs file, as
shown in Listing 14-2:
Filename: src/lib.rs
//! # My Crate
//!
//! `my_crate` is a collection of utilities to make performing certain
//! calculations more convenient.
/// Adds one to the number given.
// --snip--
///
/// # Examples
///
/// ```
/// let arg = 5;
/// let answer = my_crate::add_one(arg);
///
/// assert_eq!(6, answer);
/// ```
pub fn add_one(x: i32) -> i32 {
x + 1
}
Listing 14-2: Documentation for the my_crate crate as a
whole
Notice there isn’t any code after the last line that begins with //!. Because
we started the comments with //! instead of ///, we’re documenting the item
that contains this comment rather than an item that follows this comment. In
this case, the item that contains this comment is the src/lib.rs file, which
is the crate root. These comments describe the entire crate.
When we run cargo doc --open, these comments will display on the front
page of the documentation for my_crate above the list of public items in the
crate, as shown in Figure 14-2:
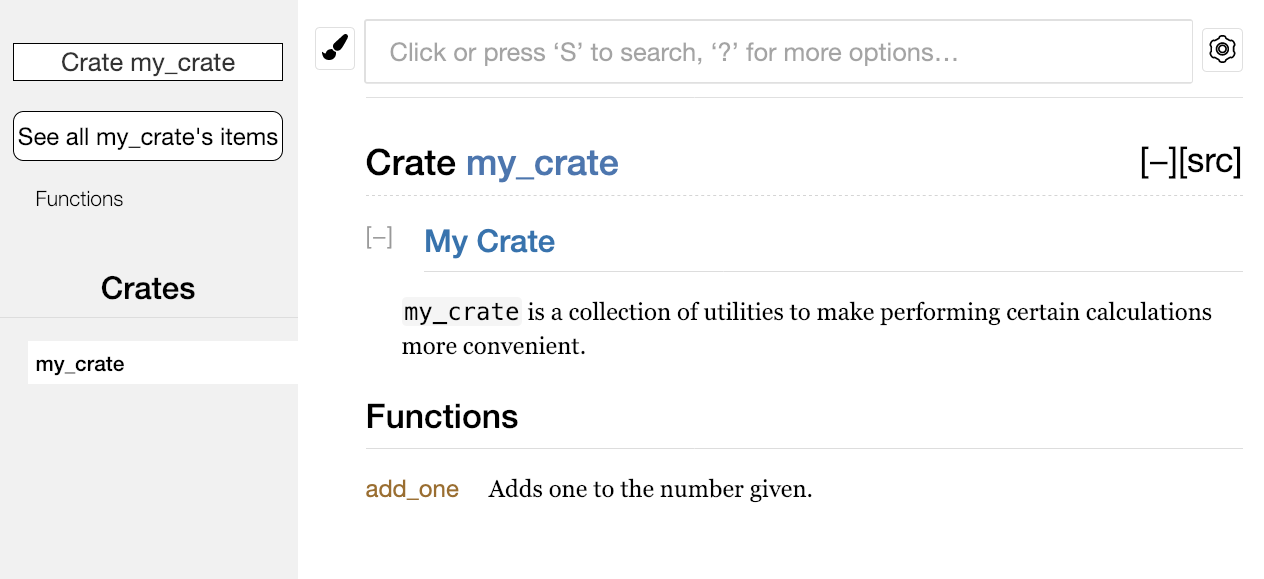
Figure 14-2: Rendered documentation for my_crate,
including the comment describing the crate as a whole
Documentation comments within items are useful for describing crates and modules especially. Use them to explain the overall purpose of the container to help your users understand the crate’s organization.
Exporting a Convenient Public API with pub use
In Chapter 7, we covered how to organize our code into modules using the mod
keyword, how to make items public using the pub keyword, and how to bring
items into a scope with the use keyword. However, the structure that makes
sense to you while you’re developing a crate might not be very convenient for
your users. You might want to organize your structs in a hierarchy containing
multiple levels, but then people who want to use a type you’ve defined deep in
the hierarchy might have trouble finding out that type exists. They might also
be annoyed at having to enter use
my_crate::some_module::another_module::UsefulType; rather than use
my_crate::UsefulType;.
The structure of your public API is a major consideration when publishing a crate. People who use your crate are less familiar with the structure than you are and might have difficulty finding the pieces they want to use if your crate has a large module hierarchy.
The good news is that if the structure isn’t convenient for others to use
from another library, you don’t have to rearrange your internal organization:
instead, you can re-export items to make a public structure that’s different
from your private structure by using pub use. Re-exporting takes a public
item in one location and makes it public in another location, as if it were
defined in the other location instead.
For example, say we made a library named art for modeling artistic concepts.
Within this library are two modules: a kinds module containing two enums
named PrimaryColor and SecondaryColor and a utils module containing a
function named mix, as shown in Listing 14-3:
Filename: src/lib.rs
//! # Art
//!
//! A library for modeling artistic concepts.
pub mod kinds {
/// The primary colors according to the RYB color model.
pub enum PrimaryColor {
Red,
Yellow,
Blue,
}
/// The secondary colors according to the RYB color model.
pub enum SecondaryColor {
Orange,
Green,
Purple,
}
}
pub mod utils {
use crate::kinds::*;
/// Combines two primary colors in equal amounts to create
/// a secondary color.
pub fn mix(c1: PrimaryColor, c2: PrimaryColor) -> SecondaryColor {
// --snip--
// ANCHOR_END: here
SecondaryColor::Orange
// ANCHOR: here
}
}
Listing 14-3: An art library with items organized into
kinds and utils modules
Figure 14-3 shows what the front page of the documentation for this crate
generated by cargo doc would look like:

Figure 14-3: Front page of the documentation for art
that lists the kinds and utils modules
Note that the PrimaryColor and SecondaryColor types aren’t listed on the
front page, nor is the mix function. We have to click kinds and utils to
see them.
Another crate that depends on this library would need use statements that
bring the items from art into scope, specifying the module structure that’s
currently defined. Listing 14-4 shows an example of a crate that uses the
PrimaryColor and mix items from the art crate:
Filename: src/main.rs
use art::kinds::PrimaryColor;
use art::utils::mix;
fn main() {
let red = PrimaryColor::Red;
let yellow = PrimaryColor::Yellow;
mix(red, yellow);
}
Listing 14-4: A crate using the art crate’s items with
its internal structure exported
The author of the code in Listing 14-4, which uses the art crate, had to
figure out that PrimaryColor is in the kinds module and mix is in the
utils module. The module structure of the art crate is more relevant to
developers working on the art crate than to developers using the art crate.
The internal structure that organizes parts of the crate into the kinds
module and the utils module doesn’t contain any useful information for
someone trying to understand how to use the art crate. Instead, the art
crate’s module structure causes confusion because developers have to figure out
where to look, and the structure is inconvenient because developers must
specify the module names in the use statements.
To remove the internal organization from the public API, we can modify the
art crate code in Listing 14-3 to add pub use statements to re-export the
items at the top level, as shown in Listing 14-5:
Filename: src/lib.rs
//! # Art
//!
//! A library for modeling artistic concepts.
pub use self::kinds::PrimaryColor;
pub use self::kinds::SecondaryColor;
pub use self::utils::mix;
pub mod kinds {
// --snip--
/// The primary colors according to the RYB color model.
pub enum PrimaryColor {
Red,
Yellow,
Blue,
}
/// The secondary colors according to the RYB color model.
pub enum SecondaryColor {
Orange,
Green,
Purple,
}
}
pub mod utils {
// --snip--
use crate::kinds::*;
/// Combines two primary colors in equal amounts to create
/// a secondary color.
pub fn mix(c1: PrimaryColor, c2: PrimaryColor) -> SecondaryColor {
SecondaryColor::Orange
}
}
Listing 14-5: Adding pub use statements to re-export
items
The API documentation that cargo doc generates for this crate will now list
and link re-exports on the front page, as shown in Figure 14-4, making the
PrimaryColor and SecondaryColor types and the mix function easier to find.
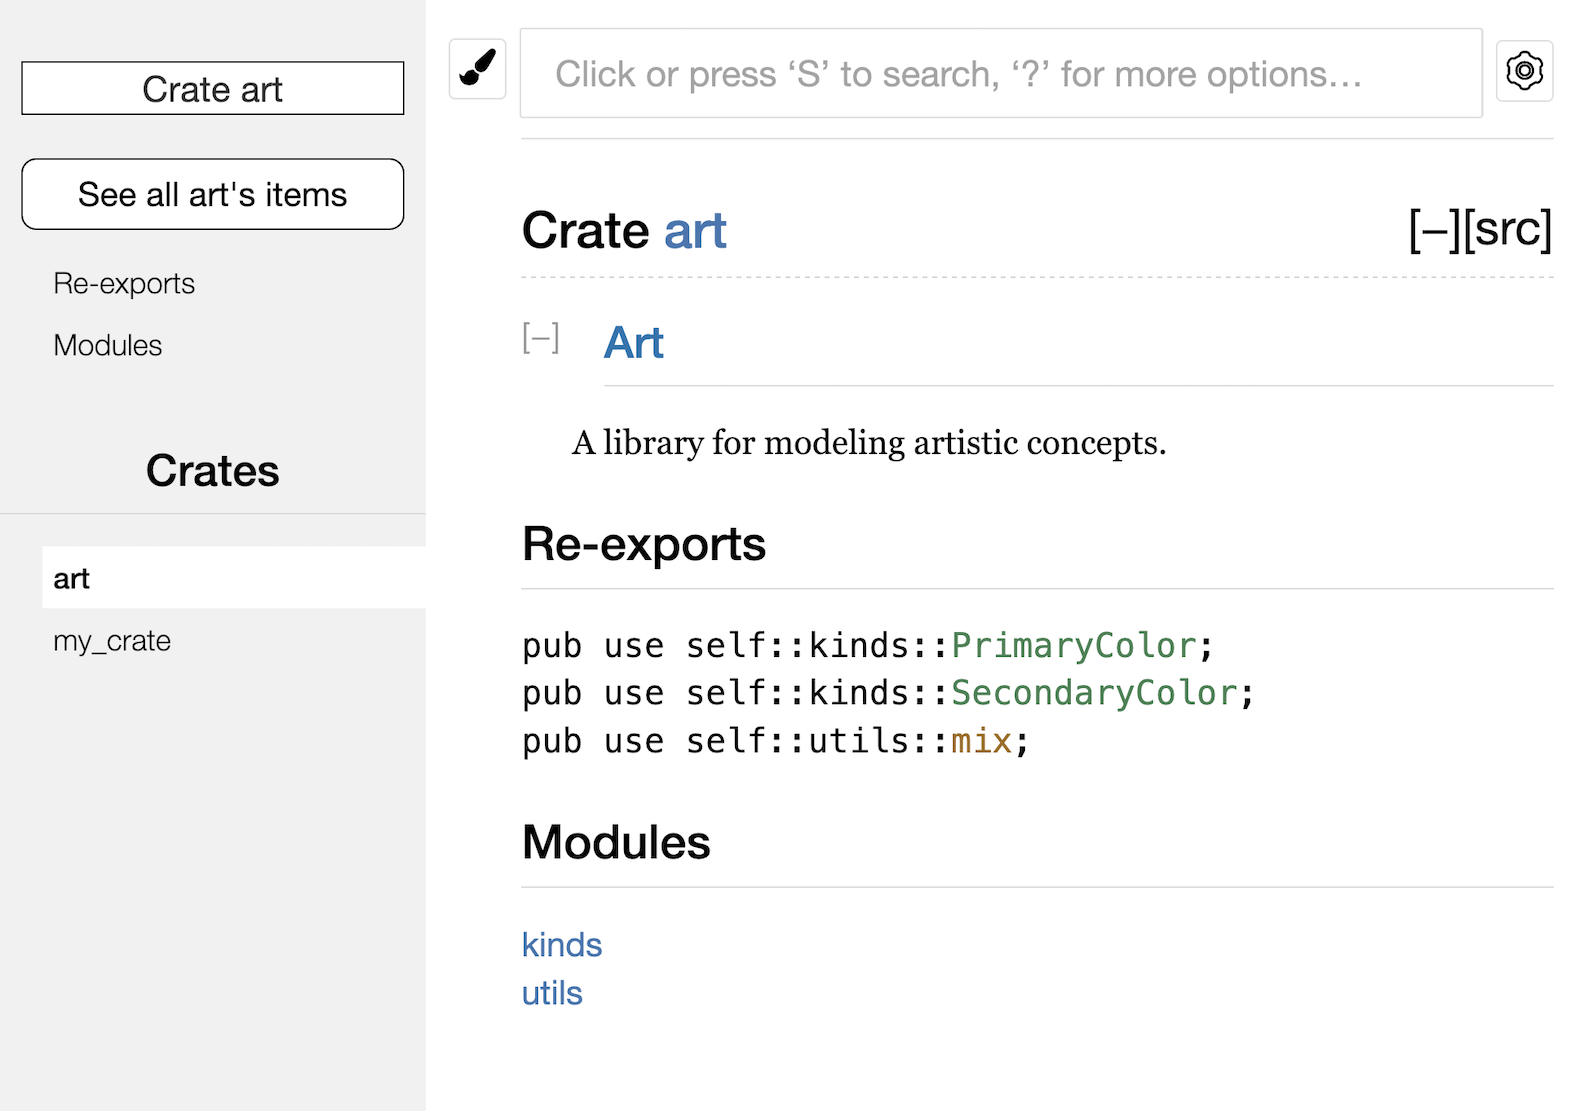
Figure 14-4: The front page of the documentation for art
that lists the re-exports
The art crate users can still see and use the internal structure from Listing
14-3 as demonstrated in Listing 14-4, or they can use the more convenient
structure in Listing 14-5, as shown in Listing 14-6:
Filename: src/main.rs
use art::mix;
use art::PrimaryColor;
fn main() {
// --snip--
let red = PrimaryColor::Red;
let yellow = PrimaryColor::Yellow;
mix(red, yellow);
}
Listing 14-6: A program using the re-exported items from
the art crate
In cases where there are many nested modules, re-exporting the types at the top
level with pub use can make a significant difference in the experience of
people who use the crate.
Creating a useful public API structure is more of an art than a science, and
you can iterate to find the API that works best for your users. Choosing pub use gives you flexibility in how you structure your crate internally and
decouples that internal structure from what you present to your users. Look at
some of the code of crates you’ve installed to see if their internal structure
differs from their public API.
Setting Up a Crates.io Account
Before you can publish any crates, you need to create an account on
crates.io and get an API token. To do so,
visit the home page at crates.io and log in
via a GitHub account. (The GitHub account is currently a requirement, but the
site might support other ways of creating an account in the future.) Once
you’re logged in, visit your account settings at
https://crates.io/me/ and retrieve your
API key. Then run the cargo login command with your API key, like this:
$ cargo login abcdefghijklmnopqrstuvwxyz012345
This command will inform Cargo of your API token and store it locally in ~/.cargo/credentials. Note that this token is a secret: do not share it with anyone else. If you do share it with anyone for any reason, you should revoke it and generate a new token on crates.io.
Adding Metadata to a New Crate
Now that you have an account, let’s say you have a crate you want to publish.
Before publishing, you’ll need to add some metadata to your crate by adding it
to the [package] section of the crate’s Cargo.toml file.
Your crate will need a unique name. While you’re working on a crate locally,
you can name a crate whatever you’d like. However, crate names on
crates.io are allocated on a first-come,
first-served basis. Once a crate name is taken, no one else can publish a crate
with that name. Before attempting to publish a crate, search for the name you
want to use on the site. If the name has been used by another crate, you will
need to find another name and edit the name field in the Cargo.toml file
under the [package] section to use the new name for publishing, like so:
Filename: Cargo.toml
[package]
name = "guessing_game"
Even if you’ve chosen a unique name, when you run cargo publish to publish
the crate at this point, you’ll get a warning and then an error:
$ cargo publish
Updating crates.io index
warning: manifest has no description, license, license-file, documentation, homepage or repository.
See https://doc.rust-lang.org/cargo/reference/manifest.html#package-metadata for more info.
--snip--
error: api errors (status 200 OK): missing or empty metadata fields: description, license. Please see https://doc.rust-lang.org/cargo/reference/manifest.html for how to upload metadata
The reason is that you’re missing some crucial information: a description and license are required so people will know what your crate does and under what terms they can use it. To rectify this error, you need to include this information in the Cargo.toml file.
Add a description that is just a sentence or two, because it will appear with
your crate in search results. For the license field, you need to give a
license identifier value. The Linux Foundation’s Software Package Data
Exchange (SPDX) lists the identifiers you can use for this value. For
example, to specify that you’ve licensed your crate using the MIT License, add
the MIT identifier:
Filename: Cargo.toml
[package]
name = "guessing_game"
license = "MIT"
If you want to use a license that doesn’t appear in the SPDX, you need to place
the text of that license in a file, include the file in your project, and then
use license-file to specify the name of that file instead of using the
license key.
Guidance on which license is appropriate for your project is beyond the scope
of this book. Many people in the Rust community license their projects in the
same way as Rust by using a dual license of MIT OR Apache-2.0. This practice
demonstrates that you can also specify multiple license identifiers separated
by OR to have multiple licenses for your project.
With a unique name, the version, the author details that cargo new added
when you created the crate, your description, and a license added, the
Cargo.toml file for a project that is ready to publish might look like this:
Filename: Cargo.toml
[package]
name = "guessing_game"
version = "0.1.0"
authors = ["Your Name <you@example.com>"]
edition = "2018"
description = "A fun game where you guess what number the computer has chosen."
license = "MIT OR Apache-2.0"
[dependencies]
Cargo’s documentation describes other metadata you can specify to ensure others can discover and use your crate more easily.
Publishing to Crates.io
Now that you’ve created an account, saved your API token, chosen a name for your crate, and specified the required metadata, you’re ready to publish! Publishing a crate uploads a specific version to crates.io for others to use.
Be careful when publishing a crate because a publish is permanent. The version can never be overwritten, and the code cannot be deleted. One major goal of crates.io is to act as a permanent archive of code so that builds of all projects that depend on crates from crates.io will continue to work. Allowing version deletions would make fulfilling that goal impossible. However, there is no limit to the number of crate versions you can publish.
Run the cargo publish command again. It should succeed now:
$ cargo publish
Updating crates.io index
Packaging guessing_game v0.1.0 (file:///projects/guessing_game)
Verifying guessing_game v0.1.0 (file:///projects/guessing_game)
Compiling guessing_game v0.1.0
(file:///projects/guessing_game/target/package/guessing_game-0.1.0)
Finished dev [unoptimized + debuginfo] target(s) in 0.19s
Uploading guessing_game v0.1.0 (file:///projects/guessing_game)
Congratulations! You’ve now shared your code with the Rust community, and anyone can easily add your crate as a dependency of their project.
Publishing a New Version of an Existing Crate
When you’ve made changes to your crate and are ready to release a new version,
you change the version value specified in your Cargo.toml file and
republish. Use the Semantic Versioning rules to decide what an
appropriate next version number is based on the kinds of changes you’ve made.
Then run cargo publish to upload the new version.
Removing Versions from Crates.io with cargo yank
Although you can’t remove previous versions of a crate, you can prevent any future projects from adding them as a new dependency. This is useful when a crate version is broken for one reason or another. In such situations, Cargo supports yanking a crate version.
Yanking a version prevents new projects from starting to depend on that version while allowing all existing projects that depend on it to continue to download and depend on that version. Essentially, a yank means that all projects with a Cargo.lock will not break, and any future Cargo.lock files generated will not use the yanked version.
To yank a version of a crate, run cargo yank and specify which version you
want to yank:
$ cargo yank --vers 1.0.1
By adding --undo to the command, you can also undo a yank and allow projects
to start depending on a version again:
$ cargo yank --vers 1.0.1 --undo
A yank does not delete any code. For example, the yank feature is not intended for deleting accidentally uploaded secrets. If that happens, you must reset those secrets immediately.
Cargo Workspaces
In Chapter 12, we built a package that included a binary crate and a library crate. As your project develops, you might find that the library crate continues to get bigger and you want to split up your package further into multiple library crates. In this situation, Cargo offers a feature called workspaces that can help manage multiple related packages that are developed in tandem.
Creating a Workspace
A workspace is a set of packages that share the same Cargo.lock and output
directory. Let’s make a project using a workspace—we’ll use trivial code so we
can concentrate on the structure of the workspace. There are multiple ways to
structure a workspace; we’re going to show one common way. We’ll have a
workspace containing a binary and two libraries. The binary, which will provide
the main functionality, will depend on the two libraries. One library will
provide an add_one function, and a second library an add_two function.
These three crates will be part of the same workspace. We’ll start by creating
a new directory for the workspace:
$ mkdir add
$ cd add
Next, in the add directory, we create the Cargo.toml file that will
configure the entire workspace. This file won’t have a [package] section or
the metadata we’ve seen in other Cargo.toml files. Instead, it will start
with a [workspace] section that will allow us to add members to the workspace
by specifying the path to the package with our binary crate; in this case,
that path is adder:
Filename: Cargo.toml
[workspace]
members = [
"adder",
]
Next, we’ll create the adder binary crate by running cargo new within the
add directory:
$ cargo new adder
Created binary (application) `adder` package
At this point, we can build the workspace by running cargo build. The files
in your add directory should look like this:
├── Cargo.lock
├── Cargo.toml
├── adder
│ ├── Cargo.toml
│ └── src
│ └── main.rs
└── target
The workspace has one target directory at the top level for the compiled
artifacts to be placed into; the adder package doesn’t have its own target
directory. Even if we were to run cargo build from inside the adder
directory, the compiled artifacts would still end up in add/target rather
than add/adder/target. Cargo structures the target directory in a workspace
like this because the crates in a workspace are meant to depend on each other.
If each crate had its own target directory, each crate would have to
recompile each of the other crates in the workspace to have the artifacts in
its own target directory. By sharing one target directory, the crates can
avoid unnecessary rebuilding.
Creating the Second Package in the Workspace
Next, let’s create another member package in the workspace and call it add-one.
Change the top-level Cargo.toml to specify the add-one path in the
members list:
Filename: Cargo.toml
[workspace]
members = [
"adder",
"add-one",
]
Then generate a new library crate named add-one:
$ cargo new add-one --lib
Created library `add-one` package
Your add directory should now have these directories and files:
├── Cargo.lock
├── Cargo.toml
├── add-one
│ ├── Cargo.toml
│ └── src
│ └── lib.rs
├── adder
│ ├── Cargo.toml
│ └── src
│ └── main.rs
└── target
In the add-one/src/lib.rs file, let’s add an add_one function:
Filename: add-one/src/lib.rs
pub fn add_one(x: i32) -> i32 {
x + 1
}
Now that we have another package in the workspace, we can have the adder
package with our binary depend on the add-one package, that has our
library. First, we’ll need to add a path dependency on add-one to
adder/Cargo.toml.
Filename: adder/Cargo.toml
[dependencies]
add-one = { path = "../add-one" }
Cargo doesn’t assume that crates in a workspace will depend on each other, so we need to be explicit about the dependency relationships between the crates.
Next, let’s use the add_one function from the add-one crate in the adder
crate. Open the adder/src/main.rs file and add a use line at the top to
bring the new add-one library crate into scope. Then change the main
function to call the add_one function, as in Listing 14-7.
Filename: adder/src/main.rs
use add_one;
fn main() {
let num = 10;
println!(
"Hello, world! {} plus one is {}!",
num,
add_one::add_one(num)
);
}
Listing 14-7: Using the add-one library crate from the
adder crate
Let’s build the workspace by running cargo build in the top-level add
directory!
$ cargo build
Compiling add-one v0.1.0 (file:///projects/add/add-one)
Compiling adder v0.1.0 (file:///projects/add/adder)
Finished dev [unoptimized + debuginfo] target(s) in 0.68s
To run the binary crate from the add directory, we can specify which
package in the workspace we want to run by using the -p argument and the
package name with cargo run:
$ cargo run -p adder
Finished dev [unoptimized + debuginfo] target(s) in 0.0s
Running `target/debug/adder`
Hello, world! 10 plus one is 11!
This runs the code in adder/src/main.rs, which depends on the add-one crate.
Depending on an External Package in a Workspace
Notice that the workspace has only one Cargo.lock file at the top level of
the workspace rather than having a Cargo.lock in each crate’s directory. This
ensures that all crates are using the same version of all dependencies. If we
add the rand package to the adder/Cargo.toml and add-one/Cargo.toml
files, Cargo will resolve both of those to one version of rand and record
that in the one Cargo.lock. Making all crates in the workspace use the same
dependencies means the crates in the workspace will always be compatible with
each other. Let’s add the rand crate to the [dependencies] section in the
add-one/Cargo.toml file to be able to use the rand crate in the add-one
crate:
Filename: add-one/Cargo.toml
[dependencies]
rand = "0.8.3"
We can now add use rand; to the add-one/src/lib.rs file, and building the
whole workspace by running cargo build in the add directory will bring in
and compile the rand crate. We will get one warning because we aren’t
referring to the rand we brought into scope:
$ cargo build
Updating crates.io index
Downloaded rand v0.8.3
--snip--
Compiling rand v0.8.3
Compiling add-one v0.1.0 (file:///projects/add/add-one)
warning: unused import: `rand`
--> add-one/src/lib.rs:1:5
|
1 | use rand;
| ^^^^
|
= note: `#[warn(unused_imports)]` on by default
warning: 1 warning emitted
Compiling adder v0.1.0 (file:///projects/add/adder)
Finished dev [unoptimized + debuginfo] target(s) in 10.18s
The top-level Cargo.lock now contains information about the dependency of
add-one on rand. However, even though rand is used somewhere in the
workspace, we can’t use it in other crates in the workspace unless we add
rand to their Cargo.toml files as well. For example, if we add use rand;
to the adder/src/main.rs file for the adder package, we’ll get an error:
$ cargo build
--snip--
Compiling adder v0.1.0 (file:///projects/add/adder)
error[E0432]: unresolved import `rand`
--> adder/src/main.rs:2:5
|
2 | use rand;
| ^^^^ no external crate `rand`
To fix this, edit the Cargo.toml file for the adder package and indicate
that rand is a dependency for it as well. Building the adder package will
add rand to the list of dependencies for adder in Cargo.lock, but no
additional copies of rand will be downloaded. Cargo has ensured that every
crate in every package in the workspace using the rand package will be
using the same version. Using the same version of rand across the workspace
saves space because we won’t have multiple copies and ensures that the crates
in the workspace will be compatible with each other.
Adding a Test to a Workspace
For another enhancement, let’s add a test of the add_one::add_one function
within the add_one crate:
Filename: add-one/src/lib.rs
pub fn add_one(x: i32) -> i32 {
x + 1
}
#[cfg(test)]
mod tests {
use super::*;
#[test]
fn it_works() {
assert_eq!(3, add_one(2));
}
}
Now run cargo test in the top-level add directory:
$ cargo test
Compiling add-one v0.1.0 (file:///projects/add/add-one)
Compiling adder v0.1.0 (file:///projects/add/adder)
Finished test [unoptimized + debuginfo] target(s) in 0.27s
Running target/debug/deps/add_one-f0253159197f7841
running 1 test
test tests::it_works ... ok
test result: ok. 1 passed; 0 failed; 0 ignored; 0 measured; 0 filtered out; finished in 0.00s
Running target/debug/deps/adder-49979ff40686fa8e
running 0 tests
test result: ok. 0 passed; 0 failed; 0 ignored; 0 measured; 0 filtered out; finished in 0.00s
Doc-tests add-one
running 0 tests
test result: ok. 0 passed; 0 failed; 0 ignored; 0 measured; 0 filtered out; finished in 0.00s
The first section of the output shows that the it_works test in the add-one
crate passed. The next section shows that zero tests were found in the adder
crate, and then the last section shows zero documentation tests were found in
the add-one crate. Running cargo test in a workspace structured like this
one will run the tests for all the crates in the workspace.
We can also run tests for one particular crate in a workspace from the
top-level directory by using the -p flag and specifying the name of the crate
we want to test:
$ cargo test -p add-one
Finished test [unoptimized + debuginfo] target(s) in 0.00s
Running target/debug/deps/add_one-b3235fea9a156f74
running 1 test
test tests::it_works ... ok
test result: ok. 1 passed; 0 failed; 0 ignored; 0 measured; 0 filtered out; finished in 0.00s
Doc-tests add-one
running 0 tests
test result: ok. 0 passed; 0 failed; 0 ignored; 0 measured; 0 filtered out; finished in 0.00s
This output shows cargo test only ran the tests for the add-one crate and
didn’t run the adder crate tests.
If you publish the crates in the workspace to crates.io,
each crate in the workspace will need to be published separately. The cargo publish command does not have an --all flag or a -p flag, so you must
change to each crate’s directory and run cargo publish on each crate in the
workspace to publish the crates.
For additional practice, add an add-two crate to this workspace in a similar
way as the add-one crate!
As your project grows, consider using a workspace: it’s easier to understand smaller, individual components than one big blob of code. Furthermore, keeping the crates in a workspace can make coordination between them easier if they are often changed at the same time.
Installing Binaries from Crates.io with cargo install
The cargo install command allows you to install and use binary crates
locally. This isn’t intended to replace system packages; it’s meant to be a
convenient way for Rust developers to install tools that others have shared on
crates.io. Note that you can only install
packages that have binary targets. A binary target is the runnable program
that is created if the crate has a src/main.rs file or another file specified
as a binary, as opposed to a library target that isn’t runnable on its own but
is suitable for including within other programs. Usually, crates have
information in the README file about whether a crate is a library, has a
binary target, or both.
All binaries installed with cargo install are stored in the installation
root’s bin folder. If you installed Rust using rustup.rs and don’t have any
custom configurations, this directory will be $HOME/.cargo/bin. Ensure that
directory is in your $PATH to be able to run programs you’ve installed with
cargo install.
For example, in Chapter 12 we mentioned that there’s a Rust implementation of
the grep tool called ripgrep for searching files. If we want to install
ripgrep, we can run the following:
$ cargo install ripgrep
Updating crates.io index
Downloaded ripgrep v11.0.2
Downloaded 1 crate (243.3 KB) in 0.88s
Installing ripgrep v11.0.2
--snip--
Compiling ripgrep v11.0.2
Finished release [optimized + debuginfo] target(s) in 3m 10s
Installing ~/.cargo/bin/rg
Installed package `ripgrep v11.0.2` (executable `rg`)
The second-to-last line of the output shows the location and the name of the
installed binary, which in the case of ripgrep is rg. As long as the
installation directory is in your $PATH, as mentioned previously, you can
then run rg --help and start using a faster, rustier tool for searching files!
Extending Cargo with Custom Commands
Cargo is designed so you can extend it with new subcommands without having to
modify Cargo. If a binary in your $PATH is named cargo-something, you can
run it as if it was a Cargo subcommand by running cargo something. Custom
commands like this are also listed when you run cargo --list. Being able to
use cargo install to install extensions and then run them just like the
built-in Cargo tools is a super convenient benefit of Cargo’s design!
Summary
Sharing code with Cargo and crates.io is part of what makes the Rust ecosystem useful for many different tasks. Rust’s standard library is small and stable, but crates are easy to share, use, and improve on a timeline different from that of the language. Don’t be shy about sharing code that’s useful to you on crates.io; it’s likely that it will be useful to someone else as well!
Smart Pointers
A pointer is a general concept for a variable that contains an address in
memory. This address refers to, or “points at,” some other data. The most
common kind of pointer in Rust is a reference, which you learned about in
Chapter 4. References are indicated by the & symbol and borrow the value they
point to. They don’t have any special capabilities other than referring to
data. Also, they don’t have any overhead and are the kind of pointer we use
most often.
Smart pointers, on the other hand, are data structures that not only act like a pointer but also have additional metadata and capabilities. The concept of smart pointers isn’t unique to Rust: smart pointers originated in C++ and exist in other languages as well. In Rust, the different smart pointers defined in the standard library provide functionality beyond that provided by references. One example that we’ll explore in this chapter is the reference counting smart pointer type. This pointer enables you to have multiple owners of data by keeping track of the number of owners and, when no owners remain, cleaning up the data.
In Rust, which uses the concept of ownership and borrowing, an additional difference between references and smart pointers is that references are pointers that only borrow data; in contrast, in many cases, smart pointers own the data they point to.
We’ve already encountered a few smart pointers in this book, such as String
and Vec<T> in Chapter 8, although we didn’t call them smart pointers at the
time. Both these types count as smart pointers because they own some memory and
allow you to manipulate it. They also have metadata (such as their capacity)
and extra capabilities or guarantees (such as with String ensuring its data
will always be valid UTF-8).
Smart pointers are usually implemented using structs. The characteristic that
distinguishes a smart pointer from an ordinary struct is that smart pointers
implement the Deref and Drop traits. The Deref trait allows an instance
of the smart pointer struct to behave like a reference so you can write code
that works with either references or smart pointers. The Drop trait allows
you to customize the code that is run when an instance of the smart pointer
goes out of scope. In this chapter, we’ll discuss both traits and demonstrate
why they’re important to smart pointers.
Given that the smart pointer pattern is a general design pattern used frequently in Rust, this chapter won’t cover every existing smart pointer. Many libraries have their own smart pointers, and you can even write your own. We’ll cover the most common smart pointers in the standard library:
Box<T>for allocating values on the heapRc<T>, a reference counting type that enables multiple ownershipRef<T>andRefMut<T>, accessed throughRefCell<T>, a type that enforces the borrowing rules at runtime instead of compile time
In addition, we’ll cover the interior mutability pattern where an immutable type exposes an API for mutating an interior value. We’ll also discuss reference cycles: how they can leak memory and how to prevent them.
Let’s dive in!
Using Box<T> to Point to Data on the Heap
The most straightforward smart pointer is a box, whose type is written
Box<T>. Boxes allow you to store data on the heap rather than the stack. What
remains on the stack is the pointer to the heap data. Refer to Chapter 4 to
review the difference between the stack and the heap.
Boxes don’t have performance overhead, other than storing their data on the heap instead of on the stack. But they don’t have many extra capabilities either. You’ll use them most often in these situations:
- When you have a type whose size can’t be known at compile time and you want to use a value of that type in a context that requires an exact size
- When you have a large amount of data and you want to transfer ownership but ensure the data won’t be copied when you do so
- When you want to own a value and you care only that it’s a type that implements a particular trait rather than being of a specific type
We’ll demonstrate the first situation in the “Enabling Recursive Types with Boxes” section. In the second case, transferring ownership of a large amount of data can take a long time because the data is copied around on the stack. To improve performance in this situation, we can store the large amount of data on the heap in a box. Then, only the small amount of pointer data is copied around on the stack, while the data it references stays in one place on the heap. The third case is known as a trait object, and Chapter 17 devotes an entire section, “Using Trait Objects That Allow for Values of Different Types,” just to that topic. So what you learn here you’ll apply again in Chapter 17!
Using a Box<T> to Store Data on the Heap
Before we discuss this use case for Box<T>, we’ll cover the syntax and how to
interact with values stored within a Box<T>.
Listing 15-1 shows how to use a box to store an i32 value on the heap:
Filename: src/main.rs
fn main() { let b = Box::new(5); println!("b = {}", b); }
Listing 15-1: Storing an i32 value on the heap using a
box
We define the variable b to have the value of a Box that points to the
value 5, which is allocated on the heap. This program will print b = 5; in
this case, we can access the data in the box similar to how we would if this
data were on the stack. Just like any owned value, when a box goes out of
scope, as b does at the end of main, it will be deallocated. The
deallocation happens for the box (stored on the stack) and the data it points
to (stored on the heap).
Putting a single value on the heap isn’t very useful, so you won’t use boxes by
themselves in this way very often. Having values like a single i32 on the
stack, where they’re stored by default, is more appropriate in the majority of
situations. Let’s look at a case where boxes allow us to define types that we
wouldn’t be allowed to if we didn’t have boxes.
Enabling Recursive Types with Boxes
At compile time, Rust needs to know how much space a type takes up. One type whose size can’t be known at compile time is a recursive type, where a value can have as part of itself another value of the same type. Because this nesting of values could theoretically continue infinitely, Rust doesn’t know how much space a value of a recursive type needs. However, boxes have a known size, so by inserting a box in a recursive type definition, you can have recursive types.
Let’s explore the cons list, which is a data type common in functional programming languages, as an example of a recursive type. The cons list type we’ll define is straightforward except for the recursion; therefore, the concepts in the example we’ll work with will be useful any time you get into more complex situations involving recursive types.
More Information About the Cons List
A cons list is a data structure that comes from the Lisp programming language
and its dialects. In Lisp, the cons function (short for “construct function”)
constructs a new pair from its two arguments, which usually are a single value
and another pair. These pairs containing pairs form a list.
The cons function concept has made its way into more general functional programming jargon: “to cons x onto y” informally means to construct a new container instance by putting the element x at the start of this new container, followed by the container y.
Each item in a cons list contains two elements: the value of the current item
and the next item. The last item in the list contains only a value called Nil
without a next item. A cons list is produced by recursively calling the cons
function. The canonical name to denote the base case of the recursion is Nil.
Note that this is not the same as the “null” or “nil” concept in Chapter 6,
which is an invalid or absent value.
Although functional programming languages use cons lists frequently, the cons
list isn’t a commonly used data structure in Rust. Most of the time when you
have a list of items in Rust, Vec<T> is a better choice to use. Other, more
complex recursive data types are useful in various situations, but by
starting with the cons list, we can explore how boxes let us define a recursive
data type without much distraction.
Listing 15-2 contains an enum definition for a cons list. Note that this code
won’t compile yet because the List type doesn’t have a known size, which
we’ll demonstrate.
Filename: src/main.rs
enum List {
Cons(i32, List),
Nil,
}
fn main() {}
Listing 15-2: The first attempt at defining an enum to
represent a cons list data structure of i32 values
Note: We’re implementing a cons list that holds only
i32values for the purposes of this example. We could have implemented it using generics, as we discussed in Chapter 10, to define a cons list type that could store values of any type.
Using the List type to store the list 1, 2, 3 would look like the code in
Listing 15-3:
Filename: src/main.rs
enum List {
Cons(i32, List),
Nil,
}
use crate::List::{Cons, Nil};
fn main() {
let list = Cons(1, Cons(2, Cons(3, Nil)));
}
Listing 15-3: Using the List enum to store the list 1, 2, 3
The first Cons value holds 1 and another List value. This List value is
another Cons value that holds 2 and another List value. This List value
is one more Cons value that holds 3 and a List value, which is finally
Nil, the non-recursive variant that signals the end of the list.
If we try to compile the code in Listing 15-3, we get the error shown in Listing 15-4:
$ cargo run
Compiling cons-list v0.1.0 (file:///projects/cons-list)
error[E0072]: recursive type `List` has infinite size
--> src/main.rs:1:1
|
1 | enum List {
| ^^^^^^^^^ recursive type has infinite size
2 | Cons(i32, List),
| ---- recursive without indirection
|
help: insert some indirection (e.g., a `Box`, `Rc`, or `&`) to make `List` representable
|
2 | Cons(i32, Box<List>),
| ^^^^ ^
error[E0391]: cycle detected when computing drop-check constraints for `List`
--> src/main.rs:1:1
|
1 | enum List {
| ^^^^^^^^^
|
= note: ...which again requires computing drop-check constraints for `List`, completing the cycle
= note: cycle used when computing dropck types for `Canonical { max_universe: U0, variables: [], value: ParamEnvAnd { param_env: ParamEnv { caller_bounds: [], reveal: UserFacing }, value: List } }`
error: aborting due to 2 previous errors
Some errors have detailed explanations: E0072, E0391.
For more information about an error, try `rustc --explain E0072`.
error: could not compile `cons-list`
To learn more, run the command again with --verbose.
Listing 15-4: The error we get when attempting to define a recursive enum
The error shows this type “has infinite size.” The reason is that we’ve defined
List with a variant that is recursive: it holds another value of itself
directly. As a result, Rust can’t figure out how much space it needs to store a
List value. Let’s break down why we get this error a bit. First, let’s look
at how Rust decides how much space it needs to store a value of a non-recursive
type.
Computing the Size of a Non-Recursive Type
Recall the Message enum we defined in Listing 6-2 when we discussed enum
definitions in Chapter 6:
enum Message { Quit, Move { x: i32, y: i32 }, Write(String), ChangeColor(i32, i32, i32), } fn main() {}
To determine how much space to allocate for a Message value, Rust goes
through each of the variants to see which variant needs the most space. Rust
sees that Message::Quit doesn’t need any space, Message::Move needs enough
space to store two i32 values, and so forth. Because only one variant will be
used, the most space a Message value will need is the space it would take to
store the largest of its variants.
Contrast this with what happens when Rust tries to determine how much space a
recursive type like the List enum in Listing 15-2 needs. The compiler starts
by looking at the Cons variant, which holds a value of type i32 and a value
of type List. Therefore, Cons needs an amount of space equal to the size of
an i32 plus the size of a List. To figure out how much memory the List
type needs, the compiler looks at the variants, starting with the Cons
variant. The Cons variant holds a value of type i32 and a value of type
List, and this process continues infinitely, as shown in Figure 15-1.

Figure 15-1: An infinite List consisting of infinite
Cons variants
Using Box<T> to Get a Recursive Type with a Known Size
Rust can’t figure out how much space to allocate for recursively defined types, so the compiler gives the error in Listing 15-4. But the error does include this helpful suggestion:
help: insert some indirection (e.g., a `Box`, `Rc`, or `&`) to make `List` representable
|
2 | Cons(i32, Box<List>),
| ^^^^ ^
In this suggestion, “indirection” means that instead of storing a value directly, we’ll change the data structure to store the value indirectly by storing a pointer to the value instead.
Because a Box<T> is a pointer, Rust always knows how much space a Box<T>
needs: a pointer’s size doesn’t change based on the amount of data it’s
pointing to. This means we can put a Box<T> inside the Cons variant instead
of another List value directly. The Box<T> will point to the next List
value that will be on the heap rather than inside the Cons variant.
Conceptually, we still have a list, created with lists “holding” other lists,
but this implementation is now more like placing the items next to one another
rather than inside one another.
We can change the definition of the List enum in Listing 15-2 and the usage
of the List in Listing 15-3 to the code in Listing 15-5, which will compile:
Filename: src/main.rs
enum List { Cons(i32, Box<List>), Nil, } use crate::List::{Cons, Nil}; fn main() { let list = Cons(1, Box::new(Cons(2, Box::new(Cons(3, Box::new(Nil)))))); }
Listing 15-5: Definition of List that uses Box<T> in
order to have a known size
The Cons variant will need the size of an i32 plus the space to store the
box’s pointer data. The Nil variant stores no values, so it needs less space
than the Cons variant. We now know that any List value will take up the
size of an i32 plus the size of a box’s pointer data. By using a box, we’ve
broken the infinite, recursive chain, so the compiler can figure out the size
it needs to store a List value. Figure 15-2 shows what the Cons variant
looks like now.

Figure 15-2: A List that is not infinitely sized
because Cons holds a Box
Boxes provide only the indirection and heap allocation; they don’t have any other special capabilities, like those we’ll see with the other smart pointer types. They also don’t have any performance overhead that these special capabilities incur, so they can be useful in cases like the cons list where the indirection is the only feature we need. We’ll look at more use cases for boxes in Chapter 17, too.
The Box<T> type is a smart pointer because it implements the Deref trait,
which allows Box<T> values to be treated like references. When a Box<T>
value goes out of scope, the heap data that the box is pointing to is cleaned
up as well because of the Drop trait implementation. Let’s explore these two
traits in more detail. These two traits will be even more important to the
functionality provided by the other smart pointer types we’ll discuss in the
rest of this chapter.
Treating Smart Pointers Like Regular References with the Deref Trait
Implementing the Deref trait allows you to customize the behavior of the
dereference operator, * (as opposed to the multiplication or glob
operator). By implementing Deref in such a way that a smart pointer can be
treated like a regular reference, you can write code that operates on
references and use that code with smart pointers too.
Let’s first look at how the dereference operator works with regular references.
Then we’ll try to define a custom type that behaves like Box<T>, and see why
the dereference operator doesn’t work like a reference on our newly defined
type. We’ll explore how implementing the Deref trait makes it possible for
smart pointers to work in ways similar to references. Then we’ll look at
Rust’s deref coercion feature and how it lets us work with either references
or smart pointers.
Note: there’s one big difference between the
MyBox<T>type we’re about to build and the realBox<T>: our version will not store its data on the heap. We are focusing this example onDeref, so where the data is actually stored is less important than the pointer-like behavior.
Following the Pointer to the Value with the Dereference Operator
A regular reference is a type of pointer, and one way to think of a pointer is
as an arrow to a value stored somewhere else. In Listing 15-6, we create a
reference to an i32 value and then use the dereference operator to follow the
reference to the data:
Filename: src/main.rs
fn main() { let x = 5; let y = &x; assert_eq!(5, x); assert_eq!(5, *y); }
Listing 15-6: Using the dereference operator to follow a
reference to an i32 value
The variable x holds an i32 value, 5. We set y equal to a reference to
x. We can assert that x is equal to 5. However, if we want to make an
assertion about the value in y, we have to use *y to follow the reference
to the value it’s pointing to (hence dereference). Once we dereference y,
we have access to the integer value y is pointing to that we can compare with
5.
If we tried to write assert_eq!(5, y); instead, we would get this compilation
error:
$ cargo run
Compiling deref-example v0.1.0 (file:///projects/deref-example)
error[E0277]: can't compare `{integer}` with `&{integer}`
--> src/main.rs:6:5
|
6 | assert_eq!(5, y);
| ^^^^^^^^^^^^^^^^^ no implementation for `{integer} == &{integer}`
|
= help: the trait `PartialEq<&{integer}>` is not implemented for `{integer}`
= note: this error originates in a macro (in Nightly builds, run with -Z macro-backtrace for more info)
error: aborting due to previous error
For more information about this error, try `rustc --explain E0277`.
error: could not compile `deref-example`
To learn more, run the command again with --verbose.
Comparing a number and a reference to a number isn’t allowed because they’re different types. We must use the dereference operator to follow the reference to the value it’s pointing to.
Using Box<T> Like a Reference
We can rewrite the code in Listing 15-6 to use a Box<T> instead of a
reference; the dereference operator will work as shown in Listing 15-7:
Filename: src/main.rs
fn main() { let x = 5; let y = Box::new(x); assert_eq!(5, x); assert_eq!(5, *y); }
Listing 15-7: Using the dereference operator on a
Box<i32>
The only difference between Listing 15-7 and Listing 15-6 is that here we set
y to be an instance of a box pointing to a copied value of x rather than a
reference pointing to the value of x. In the last assertion, we can use the
dereference operator to follow the box’s pointer in the same way that we did
when y was a reference. Next, we’ll explore what is special about Box<T>
that enables us to use the dereference operator by defining our own box type.
Defining Our Own Smart Pointer
Let’s build a smart pointer similar to the Box<T> type provided by the
standard library to experience how smart pointers behave differently from
references by default. Then we’ll look at how to add the ability to use the
dereference operator.
The Box<T> type is ultimately defined as a tuple struct with one element, so
Listing 15-8 defines a MyBox<T> type in the same way. We’ll also define a
new function to match the new function defined on Box<T>.
Filename: src/main.rs
struct MyBox<T>(T); impl<T> MyBox<T> { fn new(x: T) -> MyBox<T> { MyBox(x) } } fn main() {}
Listing 15-8: Defining a MyBox<T> type
We define a struct named MyBox and declare a generic parameter T, because
we want our type to hold values of any type. The MyBox type is a tuple struct
with one element of type T. The MyBox::new function takes one parameter of
type T and returns a MyBox instance that holds the value passed in.
Let’s try adding the main function in Listing 15-7 to Listing 15-8 and
changing it to use the MyBox<T> type we’ve defined instead of Box<T>. The
code in Listing 15-9 won’t compile because Rust doesn’t know how to dereference
MyBox.
Filename: src/main.rs
struct MyBox<T>(T);
impl<T> MyBox<T> {
fn new(x: T) -> MyBox<T> {
MyBox(x)
}
}
fn main() {
let x = 5;
let y = MyBox::new(x);
assert_eq!(5, x);
assert_eq!(5, *y);
}
Listing 15-9: Attempting to use MyBox<T> in the same
way we used references and Box<T>
Here’s the resulting compilation error:
$ cargo run
Compiling deref-example v0.1.0 (file:///projects/deref-example)
error[E0614]: type `MyBox<{integer}>` cannot be dereferenced
--> src/main.rs:14:19
|
14 | assert_eq!(5, *y);
| ^^
error: aborting due to previous error
For more information about this error, try `rustc --explain E0614`.
error: could not compile `deref-example`
To learn more, run the command again with --verbose.
Our MyBox<T> type can’t be dereferenced because we haven’t implemented that
ability on our type. To enable dereferencing with the * operator, we
implement the Deref trait.
Treating a Type Like a Reference by Implementing the Deref Trait
As discussed in Chapter 10, to implement a trait, we need to provide
implementations for the trait’s required methods. The Deref trait, provided
by the standard library, requires us to implement one method named deref that
borrows self and returns a reference to the inner data. Listing 15-10
contains an implementation of Deref to add to the definition of MyBox:
Filename: src/main.rs
use std::ops::Deref; impl<T> Deref for MyBox<T> { type Target = T; fn deref(&self) -> &Self::Target { &self.0 } } struct MyBox<T>(T); impl<T> MyBox<T> { fn new(x: T) -> MyBox<T> { MyBox(x) } } fn main() { let x = 5; let y = MyBox::new(x); assert_eq!(5, x); assert_eq!(5, *y); }
Listing 15-10: Implementing Deref on MyBox<T>
The type Target = T; syntax defines an associated type for the Deref trait
to use. Associated types are a slightly different way of declaring a generic
parameter, but you don’t need to worry about them for now; we’ll cover them in
more detail in Chapter 19.
We fill in the body of the deref method with &self.0 so deref returns a
reference to the value we want to access with the * operator. The main
function in Listing 15-9 that calls * on the MyBox<T> value now compiles,
and the assertions pass!
Without the Deref trait, the compiler can only dereference & references.
The deref method gives the compiler the ability to take a value of any type
that implements Deref and call the deref method to get a & reference that
it knows how to dereference.
When we entered *y in Listing 15-9, behind the scenes Rust actually ran this
code:
*(y.deref())
Rust substitutes the * operator with a call to the deref method and then a
plain dereference so we don’t have to think about whether or not we need to
call the deref method. This Rust feature lets us write code that functions
identically whether we have a regular reference or a type that implements
Deref.
The reason the deref method returns a reference to a value, and that the plain
dereference outside the parentheses in *(y.deref()) is still necessary, is the
ownership system. If the deref method returned the value directly instead of
a reference to the value, the value would be moved out of self. We don’t want
to take ownership of the inner value inside MyBox<T> in this case or in most
cases where we use the dereference operator.
Note that the * operator is replaced with a call to the deref method and
then a call to the * operator just once, each time we use a * in our code.
Because the substitution of the * operator does not recurse infinitely, we
end up with data of type i32, which matches the 5 in assert_eq! in
Listing 15-9.
Implicit Deref Coercions with Functions and Methods
Deref coercion is a convenience that Rust performs on arguments to functions
and methods. Deref coercion works only on types that implement the Deref
trait. Deref coercion converts such a type into a reference to another type.
For example, deref coercion can convert &String to &str because String
implements the Deref trait such that it returns str. Deref coercion happens
automatically when we pass a reference to a particular type’s value as an
argument to a function or method that doesn’t match the parameter type in the
function or method definition. A sequence of calls to the deref method
converts the type we provided into the type the parameter needs.
Deref coercion was added to Rust so that programmers writing function and
method calls don’t need to add as many explicit references and dereferences
with & and *. The deref coercion feature also lets us write more code that
can work for either references or smart pointers.
To see deref coercion in action, let’s use the MyBox<T> type we defined in
Listing 15-8 as well as the implementation of Deref that we added in Listing
15-10. Listing 15-11 shows the definition of a function that has a string slice
parameter:
Filename: src/main.rs
fn hello(name: &str) { println!("Hello, {}!", name); } fn main() {}
Listing 15-11: A hello function that has the parameter
name of type &str
We can call the hello function with a string slice as an argument, such as
hello("Rust"); for example. Deref coercion makes it possible to call hello
with a reference to a value of type MyBox<String>, as shown in Listing 15-12:
Filename: src/main.rs
use std::ops::Deref; impl<T> Deref for MyBox<T> { type Target = T; fn deref(&self) -> &T { &self.0 } } struct MyBox<T>(T); impl<T> MyBox<T> { fn new(x: T) -> MyBox<T> { MyBox(x) } } fn hello(name: &str) { println!("Hello, {}!", name); } fn main() { let m = MyBox::new(String::from("Rust")); hello(&m); }
Listing 15-12: Calling hello with a reference to a
MyBox<String> value, which works because of deref coercion
Here we’re calling the hello function with the argument &m, which is a
reference to a MyBox<String> value. Because we implemented the Deref trait
on MyBox<T> in Listing 15-10, Rust can turn &MyBox<String> into &String
by calling deref. The standard library provides an implementation of Deref
on String that returns a string slice, and this is in the API documentation
for Deref. Rust calls deref again to turn the &String into &str, which
matches the hello function’s definition.
If Rust didn’t implement deref coercion, we would have to write the code in
Listing 15-13 instead of the code in Listing 15-12 to call hello with a value
of type &MyBox<String>.
Filename: src/main.rs
use std::ops::Deref; impl<T> Deref for MyBox<T> { type Target = T; fn deref(&self) -> &T { &self.0 } } struct MyBox<T>(T); impl<T> MyBox<T> { fn new(x: T) -> MyBox<T> { MyBox(x) } } fn hello(name: &str) { println!("Hello, {}!", name); } fn main() { let m = MyBox::new(String::from("Rust")); hello(&(*m)[..]); }
Listing 15-13: The code we would have to write if Rust didn’t have deref coercion
The (*m) dereferences the MyBox<String> into a String. Then the & and
[..] take a string slice of the String that is equal to the whole string to
match the signature of hello. The code without deref coercions is harder to
read, write, and understand with all of these symbols involved. Deref coercion
allows Rust to handle these conversions for us automatically.
When the Deref trait is defined for the types involved, Rust will analyze the
types and use Deref::deref as many times as necessary to get a reference to
match the parameter’s type. The number of times that Deref::deref needs to be
inserted is resolved at compile time, so there is no runtime penalty for taking
advantage of deref coercion!
How Deref Coercion Interacts with Mutability
Similar to how you use the Deref trait to override the * operator on
immutable references, you can use the DerefMut trait to override the *
operator on mutable references.
Rust does deref coercion when it finds types and trait implementations in three cases:
- From
&Tto&UwhenT: Deref<Target=U> - From
&mut Tto&mut UwhenT: DerefMut<Target=U> - From
&mut Tto&UwhenT: Deref<Target=U>
The first two cases are the same except for mutability. The first case states
that if you have a &T, and T implements Deref to some type U, you can
get a &U transparently. The second case states that the same deref coercion
happens for mutable references.
The third case is trickier: Rust will also coerce a mutable reference to an immutable one. But the reverse is not possible: immutable references will never coerce to mutable references. Because of the borrowing rules, if you have a mutable reference, that mutable reference must be the only reference to that data (otherwise, the program wouldn’t compile). Converting one mutable reference to one immutable reference will never break the borrowing rules. Converting an immutable reference to a mutable reference would require that the initial immutable reference is the only immutable reference to that data, but the borrowing rules don’t guarantee that. Therefore, Rust can’t make the assumption that converting an immutable reference to a mutable reference is possible.
Running Code on Cleanup with the Drop Trait
The second trait important to the smart pointer pattern is Drop, which lets
you customize what happens when a value is about to go out of scope. You can
provide an implementation for the Drop trait on any type, and the code you
specify can be used to release resources like files or network connections.
We’re introducing Drop in the context of smart pointers because the
functionality of the Drop trait is almost always used when implementing a
smart pointer. For example, when a Box<T> is dropped it will deallocate the space
on the heap that the box points to.
In some languages, the programmer must call code to free memory or resources every time they finish using an instance of a smart pointer. If they forget, the system might become overloaded and crash. In Rust, you can specify that a particular bit of code be run whenever a value goes out of scope, and the compiler will insert this code automatically. As a result, you don’t need to be careful about placing cleanup code everywhere in a program that an instance of a particular type is finished with—you still won’t leak resources!
Specify the code to run when a value goes out of scope by implementing the
Drop trait. The Drop trait requires you to implement one method named
drop that takes a mutable reference to self. To see when Rust calls drop,
let’s implement drop with println! statements for now.
Listing 15-14 shows a CustomSmartPointer struct whose only custom
functionality is that it will print Dropping CustomSmartPointer! when the
instance goes out of scope. This example demonstrates when Rust runs the drop
function.
Filename: src/main.rs
struct CustomSmartPointer { data: String, } impl Drop for CustomSmartPointer { fn drop(&mut self) { println!("Dropping CustomSmartPointer with data `{}`!", self.data); } } fn main() { let c = CustomSmartPointer { data: String::from("my stuff"), }; let d = CustomSmartPointer { data: String::from("other stuff"), }; println!("CustomSmartPointers created."); }
Listing 15-14: A CustomSmartPointer struct that
implements the Drop trait where we would put our cleanup code
The Drop trait is included in the prelude, so we don’t need to bring it into
scope. We implement the Drop trait on CustomSmartPointer and provide an
implementation for the drop method that calls println!. The body of the
drop function is where you would place any logic that you wanted to run when
an instance of your type goes out of scope. We’re printing some text here to
demonstrate when Rust will call drop.
In main, we create two instances of CustomSmartPointer and then print
CustomSmartPointers created. At the end of main, our instances of
CustomSmartPointer will go out of scope, and Rust will call the code we put
in the drop method, printing our final message. Note that we didn’t need to
call the drop method explicitly.
When we run this program, we’ll see the following output:
$ cargo run
Compiling drop-example v0.1.0 (file:///projects/drop-example)
Finished dev [unoptimized + debuginfo] target(s) in 0.60s
Running `target/debug/drop-example`
CustomSmartPointers created.
Dropping CustomSmartPointer with data `other stuff`!
Dropping CustomSmartPointer with data `my stuff`!
Rust automatically called drop for us when our instances went out of scope,
calling the code we specified. Variables are dropped in the reverse order of
their creation, so d was dropped before c. This example gives you a visual
guide to how the drop method works; usually you would specify the cleanup
code that your type needs to run rather than a print message.
Dropping a Value Early with std::mem::drop
Unfortunately, it’s not straightforward to disable the automatic drop
functionality. Disabling drop isn’t usually necessary; the whole point of the
Drop trait is that it’s taken care of automatically. Occasionally, however,
you might want to clean up a value early. One example is when using smart
pointers that manage locks: you might want to force the drop method that
releases the lock so that other code in the same scope can acquire the lock.
Rust doesn’t let you call the Drop trait’s drop method manually; instead
you have to call the std::mem::drop function provided by the standard library
if you want to force a value to be dropped before the end of its scope.
If we try to call the Drop trait’s drop method manually by modifying the
main function from Listing 15-14, as shown in Listing 15-15, we’ll get a
compiler error:
Filename: src/main.rs
struct CustomSmartPointer {
data: String,
}
impl Drop for CustomSmartPointer {
fn drop(&mut self) {
println!("Dropping CustomSmartPointer with data `{}`!", self.data);
}
}
fn main() {
let c = CustomSmartPointer {
data: String::from("some data"),
};
println!("CustomSmartPointer created.");
c.drop();
println!("CustomSmartPointer dropped before the end of main.");
}
Listing 15-15: Attempting to call the drop method from
the Drop trait manually to clean up early
When we try to compile this code, we’ll get this error:
$ cargo run
Compiling drop-example v0.1.0 (file:///projects/drop-example)
error[E0040]: explicit use of destructor method
--> src/main.rs:16:7
|
16 | c.drop();
| ^^^^
| |
| explicit destructor calls not allowed
| help: consider using `drop` function: `drop(c)`
error: aborting due to previous error
For more information about this error, try `rustc --explain E0040`.
error: could not compile `drop-example`
To learn more, run the command again with --verbose.
This error message states that we’re not allowed to explicitly call drop. The
error message uses the term destructor, which is the general programming term
for a function that cleans up an instance. A destructor is analogous to a
constructor, which creates an instance. The drop function in Rust is one
particular destructor.
Rust doesn’t let us call drop explicitly because Rust would still
automatically call drop on the value at the end of main. This would be a
double free error because Rust would be trying to clean up the same value
twice.
We can’t disable the automatic insertion of drop when a value goes out of
scope, and we can’t call the drop method explicitly. So, if we need to force
a value to be cleaned up early, we can use the std::mem::drop function.
The std::mem::drop function is different from the drop method in the Drop
trait. We call it by passing the value we want to force to be dropped early as
an argument. The function is in the prelude, so we can modify main in Listing
15-15 to call the drop function, as shown in Listing 15-16:
Filename: src/main.rs
struct CustomSmartPointer { data: String, } impl Drop for CustomSmartPointer { fn drop(&mut self) { println!("Dropping CustomSmartPointer with data `{}`!", self.data); } } fn main() { let c = CustomSmartPointer { data: String::from("some data"), }; println!("CustomSmartPointer created."); drop(c); println!("CustomSmartPointer dropped before the end of main."); }
Listing 15-16: Calling std::mem::drop to explicitly
drop a value before it goes out of scope
Running this code will print the following:
$ cargo run
Compiling drop-example v0.1.0 (file:///projects/drop-example)
Finished dev [unoptimized + debuginfo] target(s) in 0.73s
Running `target/debug/drop-example`
CustomSmartPointer created.
Dropping CustomSmartPointer with data `some data`!
CustomSmartPointer dropped before the end of main.
The text Dropping CustomSmartPointer with data `some data`! is printed
between the CustomSmartPointer created. and CustomSmartPointer dropped before the end of main. text, showing that the drop method code is called to
drop c at that point.
You can use code specified in a Drop trait implementation in many ways to
make cleanup convenient and safe: for instance, you could use it to create your
own memory allocator! With the Drop trait and Rust’s ownership system, you
don’t have to remember to clean up because Rust does it automatically.
You also don’t have to worry about problems resulting from accidentally
cleaning up values still in use: the ownership system that makes sure
references are always valid also ensures that drop gets called only once when
the value is no longer being used.
Now that we’ve examined Box<T> and some of the characteristics of smart
pointers, let’s look at a few other smart pointers defined in the standard
library.
Rc<T>, the Reference Counted Smart Pointer
In the majority of cases, ownership is clear: you know exactly which variable owns a given value. However, there are cases when a single value might have multiple owners. For example, in graph data structures, multiple edges might point to the same node, and that node is conceptually owned by all of the edges that point to it. A node shouldn’t be cleaned up unless it doesn’t have any edges pointing to it.
To enable multiple ownership, Rust has a type called Rc<T>, which is an
abbreviation for reference counting. The Rc<T> type keeps track of the
number of references to a value which determines whether or not a value is
still in use. If there are zero references to a value, the value can be cleaned
up without any references becoming invalid.
Imagine Rc<T> as a TV in a family room. When one person enters to watch TV,
they turn it on. Others can come into the room and watch the TV. When the last
person leaves the room, they turn off the TV because it’s no longer being used.
If someone turns off the TV while others are still watching it, there would be
uproar from the remaining TV watchers!
We use the Rc<T> type when we want to allocate some data on the heap for
multiple parts of our program to read and we can’t determine at compile time
which part will finish using the data last. If we knew which part would finish
last, we could just make that part the data’s owner, and the normal ownership
rules enforced at compile time would take effect.
Note that Rc<T> is only for use in single-threaded scenarios. When we discuss
concurrency in Chapter 16, we’ll cover how to do reference counting in
multithreaded programs.
Using Rc<T> to Share Data
Let’s return to our cons list example in Listing 15-5. Recall that we defined
it using Box<T>. This time, we’ll create two lists that both share ownership
of a third list. Conceptually, this looks similar to Figure 15-3:

Figure 15-3: Two lists, b and c, sharing ownership of
a third list, a
We’ll create list a that contains 5 and then 10. Then we’ll make two more
lists: b that starts with 3 and c that starts with 4. Both b and c
lists will then continue on to the first a list containing 5 and 10. In other
words, both lists will share the first list containing 5 and 10.
Trying to implement this scenario using our definition of List with Box<T>
won’t work, as shown in Listing 15-17:
Filename: src/main.rs
enum List {
Cons(i32, Box<List>),
Nil,
}
use crate::List::{Cons, Nil};
fn main() {
let a = Cons(5, Box::new(Cons(10, Box::new(Nil))));
let b = Cons(3, Box::new(a));
let c = Cons(4, Box::new(a));
}
Listing 15-17: Demonstrating we’re not allowed to have
two lists using Box<T> that try to share ownership of a third list
When we compile this code, we get this error:
$ cargo run
Compiling cons-list v0.1.0 (file:///projects/cons-list)
error[E0382]: use of moved value: `a`
--> src/main.rs:11:30
|
9 | let a = Cons(5, Box::new(Cons(10, Box::new(Nil))));
| - move occurs because `a` has type `List`, which does not implement the `Copy` trait
10 | let b = Cons(3, Box::new(a));
| - value moved here
11 | let c = Cons(4, Box::new(a));
| ^ value used here after move
error: aborting due to previous error
For more information about this error, try `rustc --explain E0382`.
error: could not compile `cons-list`
To learn more, run the command again with --verbose.
The Cons variants own the data they hold, so when we create the b list, a
is moved into b and b owns a. Then, when we try to use a again when
creating c, we’re not allowed to because a has been moved.
We could change the definition of Cons to hold references instead, but then
we would have to specify lifetime parameters. By specifying lifetime
parameters, we would be specifying that every element in the list will live at
least as long as the entire list. The borrow checker wouldn’t let us compile
let a = Cons(10, &Nil); for example, because the temporary Nil value would
be dropped before a could take a reference to it.
Instead, we’ll change our definition of List to use Rc<T> in place of
Box<T>, as shown in Listing 15-18. Each Cons variant will now hold a value
and an Rc<T> pointing to a List. When we create b, instead of taking
ownership of a, we’ll clone the Rc<List> that a is holding, thereby
increasing the number of references from one to two and letting a and b
share ownership of the data in that Rc<List>. We’ll also clone a when
creating c, increasing the number of references from two to three. Every time
we call Rc::clone, the reference count to the data within the Rc<List> will
increase, and the data won’t be cleaned up unless there are zero references to
it.
Filename: src/main.rs
enum List { Cons(i32, Rc<List>), Nil, } use crate::List::{Cons, Nil}; use std::rc::Rc; fn main() { let a = Rc::new(Cons(5, Rc::new(Cons(10, Rc::new(Nil))))); let b = Cons(3, Rc::clone(&a)); let c = Cons(4, Rc::clone(&a)); }
Listing 15-18: A definition of List that uses
Rc<T>
We need to add a use statement to bring Rc<T> into scope because it’s not
in the prelude. In main, we create the list holding 5 and 10 and store it in
a new Rc<List> in a. Then when we create b and c, we call the
Rc::clone function and pass a reference to the Rc<List> in a as an
argument.
We could have called a.clone() rather than Rc::clone(&a), but Rust’s
convention is to use Rc::clone in this case. The implementation of
Rc::clone doesn’t make a deep copy of all the data like most types’
implementations of clone do. The call to Rc::clone only increments the
reference count, which doesn’t take much time. Deep copies of data can take a
lot of time. By using Rc::clone for reference counting, we can visually
distinguish between the deep-copy kinds of clones and the kinds of clones that
increase the reference count. When looking for performance problems in the
code, we only need to consider the deep-copy clones and can disregard calls to
Rc::clone.
Cloning an Rc<T> Increases the Reference Count
Let’s change our working example in Listing 15-18 so we can see the reference
counts changing as we create and drop references to the Rc<List> in a.
In Listing 15-19, we’ll change main so it has an inner scope around list c;
then we can see how the reference count changes when c goes out of scope.
Filename: src/main.rs
enum List { Cons(i32, Rc<List>), Nil, } use crate::List::{Cons, Nil}; use std::rc::Rc; fn main() { let a = Rc::new(Cons(5, Rc::new(Cons(10, Rc::new(Nil))))); println!("count after creating a = {}", Rc::strong_count(&a)); let b = Cons(3, Rc::clone(&a)); println!("count after creating b = {}", Rc::strong_count(&a)); { let c = Cons(4, Rc::clone(&a)); println!("count after creating c = {}", Rc::strong_count(&a)); } println!("count after c goes out of scope = {}", Rc::strong_count(&a)); }
Listing 15-19: Printing the reference count
At each point in the program where the reference count changes, we print the
reference count, which we can get by calling the Rc::strong_count function.
This function is named strong_count rather than count because the Rc<T>
type also has a weak_count; we’ll see what weak_count is used for in the
“Preventing Reference Cycles: Turning an Rc<T> into a
Weak<T>” section.
This code prints the following:
$ cargo run
Compiling cons-list v0.1.0 (file:///projects/cons-list)
Finished dev [unoptimized + debuginfo] target(s) in 0.45s
Running `target/debug/cons-list`
count after creating a = 1
count after creating b = 2
count after creating c = 3
count after c goes out of scope = 2
We can see that the Rc<List> in a has an initial reference count of 1; then
each time we call clone, the count goes up by 1. When c goes out of scope,
the count goes down by 1. We don’t have to call a function to decrease the
reference count like we have to call Rc::clone to increase the reference
count: the implementation of the Drop trait decreases the reference count
automatically when an Rc<T> value goes out of scope.
What we can’t see in this example is that when b and then a go out of scope
at the end of main, the count is then 0, and the Rc<List> is cleaned up
completely at that point. Using Rc<T> allows a single value to have
multiple owners, and the count ensures that the value remains valid as long as
any of the owners still exist.
Via immutable references, Rc<T> allows you to share data between multiple
parts of your program for reading only. If Rc<T> allowed you to have multiple
mutable references too, you might violate one of the borrowing rules discussed
in Chapter 4: multiple mutable borrows to the same place can cause data races
and inconsistencies. But being able to mutate data is very useful! In the next
section, we’ll discuss the interior mutability pattern and the RefCell<T>
type that you can use in conjunction with an Rc<T> to work with this
immutability restriction.
RefCell<T> and the Interior Mutability Pattern
Interior mutability is a design pattern in Rust that allows you to mutate
data even when there are immutable references to that data; normally, this
action is disallowed by the borrowing rules. To mutate data, the pattern uses
unsafe code inside a data structure to bend Rust’s usual rules that govern
mutation and borrowing. We haven’t yet covered unsafe code; we will in Chapter
19. We can use types that use the interior mutability pattern when we can
ensure that the borrowing rules will be followed at runtime, even though the
compiler can’t guarantee that. The unsafe code involved is then wrapped in a
safe API, and the outer type is still immutable.
Let’s explore this concept by looking at the RefCell<T> type that follows the
interior mutability pattern.
Enforcing Borrowing Rules at Runtime with RefCell<T>
Unlike Rc<T>, the RefCell<T> type represents single ownership over the data
it holds. So, what makes RefCell<T> different from a type like Box<T>?
Recall the borrowing rules you learned in Chapter 4:
- At any given time, you can have either (but not both of) one mutable reference or any number of immutable references.
- References must always be valid.
With references and Box<T>, the borrowing rules’ invariants are enforced at
compile time. With RefCell<T>, these invariants are enforced at runtime.
With references, if you break these rules, you’ll get a compiler error. With
RefCell<T>, if you break these rules, your program will panic and exit.
The advantages of checking the borrowing rules at compile time are that errors will be caught sooner in the development process, and there is no impact on runtime performance because all the analysis is completed beforehand. For those reasons, checking the borrowing rules at compile time is the best choice in the majority of cases, which is why this is Rust’s default.
The advantage of checking the borrowing rules at runtime instead is that certain memory-safe scenarios are then allowed, whereas they are disallowed by the compile-time checks. Static analysis, like the Rust compiler, is inherently conservative. Some properties of code are impossible to detect by analyzing the code: the most famous example is the Halting Problem, which is beyond the scope of this book but is an interesting topic to research.
Because some analysis is impossible, if the Rust compiler can’t be sure the
code complies with the ownership rules, it might reject a correct program; in
this way, it’s conservative. If Rust accepted an incorrect program, users
wouldn’t be able to trust in the guarantees Rust makes. However, if Rust
rejects a correct program, the programmer will be inconvenienced, but nothing
catastrophic can occur. The RefCell<T> type is useful when you’re sure your
code follows the borrowing rules but the compiler is unable to understand and
guarantee that.
Similar to Rc<T>, RefCell<T> is only for use in single-threaded scenarios
and will give you a compile-time error if you try using it in a multithreaded
context. We’ll talk about how to get the functionality of RefCell<T> in a
multithreaded program in Chapter 16.
Here is a recap of the reasons to choose Box<T>, Rc<T>, or RefCell<T>:
Rc<T>enables multiple owners of the same data;Box<T>andRefCell<T>have single owners.Box<T>allows immutable or mutable borrows checked at compile time;Rc<T>allows only immutable borrows checked at compile time;RefCell<T>allows immutable or mutable borrows checked at runtime.- Because
RefCell<T>allows mutable borrows checked at runtime, you can mutate the value inside theRefCell<T>even when theRefCell<T>is immutable.
Mutating the value inside an immutable value is the interior mutability pattern. Let’s look at a situation in which interior mutability is useful and examine how it’s possible.
Interior Mutability: A Mutable Borrow to an Immutable Value
A consequence of the borrowing rules is that when you have an immutable value, you can’t borrow it mutably. For example, this code won’t compile:
fn main() {
let x = 5;
let y = &mut x;
}
If you tried to compile this code, you’d get the following error:
$ cargo run
Compiling borrowing v0.1.0 (file:///projects/borrowing)
error[E0596]: cannot borrow `x` as mutable, as it is not declared as mutable
--> src/main.rs:3:13
|
2 | let x = 5;
| - help: consider changing this to be mutable: `mut x`
3 | let y = &mut x;
| ^^^^^^ cannot borrow as mutable
error: aborting due to previous error
For more information about this error, try `rustc --explain E0596`.
error: could not compile `borrowing`
To learn more, run the command again with --verbose.
However, there are situations in which it would be useful for a value to mutate
itself in its methods but appear immutable to other code. Code outside the
value’s methods would not be able to mutate the value. Using RefCell<T> is
one way to get the ability to have interior mutability. But RefCell<T>
doesn’t get around the borrowing rules completely: the borrow checker in the
compiler allows this interior mutability, and the borrowing rules are checked
at runtime instead. If you violate the rules, you’ll get a panic! instead of
a compiler error.
Let’s work through a practical example where we can use RefCell<T> to mutate
an immutable value and see why that is useful.
A Use Case for Interior Mutability: Mock Objects
A test double is the general programming concept for a type used in place of another type during testing. Mock objects are specific types of test doubles that record what happens during a test so you can assert that the correct actions took place.
Rust doesn’t have objects in the same sense as other languages have objects, and Rust doesn’t have mock object functionality built into the standard library as some other languages do. However, you can definitely create a struct that will serve the same purposes as a mock object.
Here’s the scenario we’ll test: we’ll create a library that tracks a value against a maximum value and sends messages based on how close to the maximum value the current value is. This library could be used to keep track of a user’s quota for the number of API calls they’re allowed to make, for example.
Our library will only provide the functionality of tracking how close to the
maximum a value is and what the messages should be at what times. Applications
that use our library will be expected to provide the mechanism for sending the
messages: the application could put a message in the application, send an
email, send a text message, or something else. The library doesn’t need to know
that detail. All it needs is something that implements a trait we’ll provide
called Messenger. Listing 15-20 shows the library code:
Filename: src/lib.rs
pub trait Messenger {
fn send(&self, msg: &str);
}
pub struct LimitTracker<'a, T: Messenger> {
messenger: &'a T,
value: usize,
max: usize,
}
impl<'a, T> LimitTracker<'a, T>
where
T: Messenger,
{
pub fn new(messenger: &T, max: usize) -> LimitTracker<T> {
LimitTracker {
messenger,
value: 0,
max,
}
}
pub fn set_value(&mut self, value: usize) {
self.value = value;
let percentage_of_max = self.value as f64 / self.max as f64;
if percentage_of_max >= 1.0 {
self.messenger.send("Error: You are over your quota!");
} else if percentage_of_max >= 0.9 {
self.messenger
.send("Urgent warning: You've used up over 90% of your quota!");
} else if percentage_of_max >= 0.75 {
self.messenger
.send("Warning: You've used up over 75% of your quota!");
}
}
}
Listing 15-20: A library to keep track of how close a value is to a maximum value and warn when the value is at certain levels
One important part of this code is that the Messenger trait has one method
called send that takes an immutable reference to self and the text of the
message. This trait is the interface our mock object needs to implement so that
the mock can be used in the same way a real object is. The other important part
is that we want to test the behavior of the set_value method on the
LimitTracker. We can change what we pass in for the value parameter, but
set_value doesn’t return anything for us to make assertions on. We want to be
able to say that if we create a LimitTracker with something that implements
the Messenger trait and a particular value for max, when we pass different
numbers for value, the messenger is told to send the appropriate messages.
We need a mock object that, instead of sending an email or text message when we
call send, will only keep track of the messages it’s told to send. We can
create a new instance of the mock object, create a LimitTracker that uses the
mock object, call the set_value method on LimitTracker, and then check that
the mock object has the messages we expect. Listing 15-21 shows an attempt to
implement a mock object to do just that, but the borrow checker won’t allow it:
Filename: src/lib.rs
pub trait Messenger {
fn send(&self, msg: &str);
}
pub struct LimitTracker<'a, T: Messenger> {
messenger: &'a T,
value: usize,
max: usize,
}
impl<'a, T> LimitTracker<'a, T>
where
T: Messenger,
{
pub fn new(messenger: &T, max: usize) -> LimitTracker<T> {
LimitTracker {
messenger,
value: 0,
max,
}
}
pub fn set_value(&mut self, value: usize) {
self.value = value;
let percentage_of_max = self.value as f64 / self.max as f64;
if percentage_of_max >= 1.0 {
self.messenger.send("Error: You are over your quota!");
} else if percentage_of_max >= 0.9 {
self.messenger
.send("Urgent warning: You've used up over 90% of your quota!");
} else if percentage_of_max >= 0.75 {
self.messenger
.send("Warning: You've used up over 75% of your quota!");
}
}
}
#[cfg(test)]
mod tests {
use super::*;
struct MockMessenger {
sent_messages: Vec<String>,
}
impl MockMessenger {
fn new() -> MockMessenger {
MockMessenger {
sent_messages: vec![],
}
}
}
impl Messenger for MockMessenger {
fn send(&self, message: &str) {
self.sent_messages.push(String::from(message));
}
}
#[test]
fn it_sends_an_over_75_percent_warning_message() {
let mock_messenger = MockMessenger::new();
let mut limit_tracker = LimitTracker::new(&mock_messenger, 100);
limit_tracker.set_value(80);
assert_eq!(mock_messenger.sent_messages.len(), 1);
}
}
Listing 15-21: An attempt to implement a MockMessenger
that isn’t allowed by the borrow checker
This test code defines a MockMessenger struct that has a sent_messages
field with a Vec of String values to keep track of the messages it’s told
to send. We also define an associated function new to make it convenient to
create new MockMessenger values that start with an empty list of messages. We
then implement the Messenger trait for MockMessenger so we can give a
MockMessenger to a LimitTracker. In the definition of the send method, we
take the message passed in as a parameter and store it in the MockMessenger
list of sent_messages.
In the test, we’re testing what happens when the LimitTracker is told to set
value to something that is more than 75 percent of the max value. First, we
create a new MockMessenger, which will start with an empty list of messages.
Then we create a new LimitTracker and give it a reference to the new
MockMessenger and a max value of 100. We call the set_value method on the
LimitTracker with a value of 80, which is more than 75 percent of 100. Then
we assert that the list of messages that the MockMessenger is keeping track
of should now have one message in it.
However, there’s one problem with this test, as shown here:
$ cargo test
Compiling limit-tracker v0.1.0 (file:///projects/limit-tracker)
error[E0596]: cannot borrow `self.sent_messages` as mutable, as it is behind a `&` reference
--> src/lib.rs:58:13
|
57 | fn send(&self, message: &str) {
| ----- help: consider changing this to be a mutable reference: `&mut self`
58 | self.sent_messages.push(String::from(message));
| ^^^^^^^^^^^^^^^^^^ `self` is a `&` reference, so the data it refers to cannot be borrowed as mutable
error: aborting due to previous error
For more information about this error, try `rustc --explain E0596`.
error: could not compile `limit-tracker`
To learn more, run the command again with --verbose.
warning: build failed, waiting for other jobs to finish...
error: build failed
We can’t modify the MockMessenger to keep track of the messages, because the
send method takes an immutable reference to self. We also can’t take the
suggestion from the error text to use &mut self instead, because then the
signature of send wouldn’t match the signature in the Messenger trait
definition (feel free to try and see what error message you get).
This is a situation in which interior mutability can help! We’ll store the
sent_messages within a RefCell<T>, and then the send method will be
able to modify sent_messages to store the messages we’ve seen. Listing 15-22
shows what that looks like:
Filename: src/lib.rs
pub trait Messenger {
fn send(&self, msg: &str);
}
pub struct LimitTracker<'a, T: Messenger> {
messenger: &'a T,
value: usize,
max: usize,
}
impl<'a, T> LimitTracker<'a, T>
where
T: Messenger,
{
pub fn new(messenger: &T, max: usize) -> LimitTracker<T> {
LimitTracker {
messenger,
value: 0,
max,
}
}
pub fn set_value(&mut self, value: usize) {
self.value = value;
let percentage_of_max = self.value as f64 / self.max as f64;
if percentage_of_max >= 1.0 {
self.messenger.send("Error: You are over your quota!");
} else if percentage_of_max >= 0.9 {
self.messenger
.send("Urgent warning: You've used up over 90% of your quota!");
} else if percentage_of_max >= 0.75 {
self.messenger
.send("Warning: You've used up over 75% of your quota!");
}
}
}
#[cfg(test)]
mod tests {
use super::*;
use std::cell::RefCell;
struct MockMessenger {
sent_messages: RefCell<Vec<String>>,
}
impl MockMessenger {
fn new() -> MockMessenger {
MockMessenger {
sent_messages: RefCell::new(vec![]),
}
}
}
impl Messenger for MockMessenger {
fn send(&self, message: &str) {
self.sent_messages.borrow_mut().push(String::from(message));
}
}
#[test]
fn it_sends_an_over_75_percent_warning_message() {
// --snip--
let mock_messenger = MockMessenger::new();
let mut limit_tracker = LimitTracker::new(&mock_messenger, 100);
limit_tracker.set_value(80);
assert_eq!(mock_messenger.sent_messages.borrow().len(), 1);
}
}
Listing 15-22: Using RefCell<T> to mutate an inner
value while the outer value is considered immutable
The sent_messages field is now of type RefCell<Vec<String>> instead of
Vec<String>. In the new function, we create a new RefCell<Vec<String>>
instance around the empty vector.
For the implementation of the send method, the first parameter is still an
immutable borrow of self, which matches the trait definition. We call
borrow_mut on the RefCell<Vec<String>> in self.sent_messages to get a
mutable reference to the value inside the RefCell<Vec<String>>, which is
the vector. Then we can call push on the mutable reference to the vector to
keep track of the messages sent during the test.
The last change we have to make is in the assertion: to see how many items are
in the inner vector, we call borrow on the RefCell<Vec<String>> to get an
immutable reference to the vector.
Now that you’ve seen how to use RefCell<T>, let’s dig into how it works!
Keeping Track of Borrows at Runtime with RefCell<T>
When creating immutable and mutable references, we use the & and &mut
syntax, respectively. With RefCell<T>, we use the borrow and borrow_mut
methods, which are part of the safe API that belongs to RefCell<T>. The
borrow method returns the smart pointer type Ref<T>, and borrow_mut
returns the smart pointer type RefMut<T>. Both types implement Deref, so we
can treat them like regular references.
The RefCell<T> keeps track of how many Ref<T> and RefMut<T> smart
pointers are currently active. Every time we call borrow, the RefCell<T>
increases its count of how many immutable borrows are active. When a Ref<T>
value goes out of scope, the count of immutable borrows goes down by one. Just
like the compile-time borrowing rules, RefCell<T> lets us have many immutable
borrows or one mutable borrow at any point in time.
If we try to violate these rules, rather than getting a compiler error as we
would with references, the implementation of RefCell<T> will panic at
runtime. Listing 15-23 shows a modification of the implementation of send in
Listing 15-22. We’re deliberately trying to create two mutable borrows active
for the same scope to illustrate that RefCell<T> prevents us from doing this
at runtime.
Filename: src/lib.rs
pub trait Messenger {
fn send(&self, msg: &str);
}
pub struct LimitTracker<'a, T: Messenger> {
messenger: &'a T,
value: usize,
max: usize,
}
impl<'a, T> LimitTracker<'a, T>
where
T: Messenger,
{
pub fn new(messenger: &T, max: usize) -> LimitTracker<T> {
LimitTracker {
messenger,
value: 0,
max,
}
}
pub fn set_value(&mut self, value: usize) {
self.value = value;
let percentage_of_max = self.value as f64 / self.max as f64;
if percentage_of_max >= 1.0 {
self.messenger.send("Error: You are over your quota!");
} else if percentage_of_max >= 0.9 {
self.messenger
.send("Urgent warning: You've used up over 90% of your quota!");
} else if percentage_of_max >= 0.75 {
self.messenger
.send("Warning: You've used up over 75% of your quota!");
}
}
}
#[cfg(test)]
mod tests {
use super::*;
use std::cell::RefCell;
struct MockMessenger {
sent_messages: RefCell<Vec<String>>,
}
impl MockMessenger {
fn new() -> MockMessenger {
MockMessenger {
sent_messages: RefCell::new(vec![]),
}
}
}
impl Messenger for MockMessenger {
fn send(&self, message: &str) {
let mut one_borrow = self.sent_messages.borrow_mut();
let mut two_borrow = self.sent_messages.borrow_mut();
one_borrow.push(String::from(message));
two_borrow.push(String::from(message));
}
}
#[test]
fn it_sends_an_over_75_percent_warning_message() {
let mock_messenger = MockMessenger::new();
let mut limit_tracker = LimitTracker::new(&mock_messenger, 100);
limit_tracker.set_value(80);
assert_eq!(mock_messenger.sent_messages.borrow().len(), 1);
}
}
Listing 15-23: Creating two mutable references in the
same scope to see that RefCell<T> will panic
We create a variable one_borrow for the RefMut<T> smart pointer returned
from borrow_mut. Then we create another mutable borrow in the same way in the
variable two_borrow. This makes two mutable references in the same scope,
which isn’t allowed. When we run the tests for our library, the code in Listing
15-23 will compile without any errors, but the test will fail:
$ cargo test
Compiling limit-tracker v0.1.0 (file:///projects/limit-tracker)
Finished test [unoptimized + debuginfo] target(s) in 0.91s
Running target/debug/deps/limit_tracker-d1b2637139dca6ca
running 1 test
test tests::it_sends_an_over_75_percent_warning_message ... FAILED
failures:
---- tests::it_sends_an_over_75_percent_warning_message stdout ----
thread 'main' panicked at 'already borrowed: BorrowMutError', src/lib.rs:60:53
note: run with `RUST_BACKTRACE=1` environment variable to display a backtrace
failures:
tests::it_sends_an_over_75_percent_warning_message
test result: FAILED. 0 passed; 1 failed; 0 ignored; 0 measured; 0 filtered out; finished in 0.00s
error: test failed, to rerun pass '--lib'
Notice that the code panicked with the message already borrowed: BorrowMutError. This is how RefCell<T> handles violations of the borrowing
rules at runtime.
Catching borrowing errors at runtime rather than compile time means that you
would find a mistake in your code later in the development process and possibly
not until your code was deployed to production. Also, your code would incur a
small runtime performance penalty as a result of keeping track of the borrows
at runtime rather than compile time. However, using RefCell<T> makes it
possible to write a mock object that can modify itself to keep track of the
messages it has seen while you’re using it in a context where only immutable
values are allowed. You can use RefCell<T> despite its trade-offs to get more
functionality than regular references provide.
Having Multiple Owners of Mutable Data by Combining Rc<T> and RefCell<T>
A common way to use RefCell<T> is in combination with Rc<T>. Recall that
Rc<T> lets you have multiple owners of some data, but it only gives immutable
access to that data. If you have an Rc<T> that holds a RefCell<T>, you can
get a value that can have multiple owners and that you can mutate!
For example, recall the cons list example in Listing 15-18 where we used
Rc<T> to allow multiple lists to share ownership of another list. Because
Rc<T> holds only immutable values, we can’t change any of the values in the
list once we’ve created them. Let’s add in RefCell<T> to gain the ability to
change the values in the lists. Listing 15-24 shows that by using a
RefCell<T> in the Cons definition, we can modify the value stored in all
the lists:
Filename: src/main.rs
#[derive(Debug)] enum List { Cons(Rc<RefCell<i32>>, Rc<List>), Nil, } use crate::List::{Cons, Nil}; use std::cell::RefCell; use std::rc::Rc; fn main() { let value = Rc::new(RefCell::new(5)); let a = Rc::new(Cons(Rc::clone(&value), Rc::new(Nil))); let b = Cons(Rc::new(RefCell::new(3)), Rc::clone(&a)); let c = Cons(Rc::new(RefCell::new(4)), Rc::clone(&a)); *value.borrow_mut() += 10; println!("a after = {:?}", a); println!("b after = {:?}", b); println!("c after = {:?}", c); }
Listing 15-24: Using Rc<RefCell<i32>> to create a
List that we can mutate
We create a value that is an instance of Rc<RefCell<i32>> and store it in a
variable named value so we can access it directly later. Then we create a
List in a with a Cons variant that holds value. We need to clone
value so both a and value have ownership of the inner 5 value rather
than transferring ownership from value to a or having a borrow from
value.
We wrap the list a in an Rc<T> so when we create lists b and c, they
can both refer to a, which is what we did in Listing 15-18.
After we’ve created the lists in a, b, and c, we add 10 to the value in
value. We do this by calling borrow_mut on value, which uses the
automatic dereferencing feature we discussed in Chapter 5 (see the section
“Where’s the -> Operator?”) to
dereference the Rc<T> to the inner RefCell<T> value. The borrow_mut
method returns a RefMut<T> smart pointer, and we use the dereference operator
on it and change the inner value.
When we print a, b, and c, we can see that they all have the modified
value of 15 rather than 5:
$ cargo run
Compiling cons-list v0.1.0 (file:///projects/cons-list)
Finished dev [unoptimized + debuginfo] target(s) in 0.63s
Running `target/debug/cons-list`
a after = Cons(RefCell { value: 15 }, Nil)
b after = Cons(RefCell { value: 3 }, Cons(RefCell { value: 15 }, Nil))
c after = Cons(RefCell { value: 4 }, Cons(RefCell { value: 15 }, Nil))
This technique is pretty neat! By using RefCell<T>, we have an outwardly
immutable List value. But we can use the methods on RefCell<T> that provide
access to its interior mutability so we can modify our data when we need to.
The runtime checks of the borrowing rules protect us from data races, and it’s
sometimes worth trading a bit of speed for this flexibility in our data
structures.
The standard library has other types that provide interior mutability, such as
Cell<T>, which is similar except that instead of giving references to the
inner value, the value is copied in and out of the Cell<T>. There’s also
Mutex<T>, which offers interior mutability that’s safe to use across threads;
we’ll discuss its use in Chapter 16. Check out the standard library docs for
more details on the differences between these types.
Reference Cycles Can Leak Memory
Rust’s memory safety guarantees make it difficult, but not impossible, to
accidentally create memory that is never cleaned up (known as a memory leak).
Preventing memory leaks entirely is not one of Rust’s guarantees in the same
way that disallowing data races at compile time is, meaning memory leaks are
memory safe in Rust. We can see that Rust allows memory leaks by using Rc<T>
and RefCell<T>: it’s possible to create references where items refer to each
other in a cycle. This creates memory leaks because the reference count of each
item in the cycle will never reach 0, and the values will never be dropped.
Creating a Reference Cycle
Let’s look at how a reference cycle might happen and how to prevent it,
starting with the definition of the List enum and a tail method in Listing
15-25:
Filename: src/main.rs
use crate::List::{Cons, Nil}; use std::cell::RefCell; use std::rc::Rc; #[derive(Debug)] enum List { Cons(i32, RefCell<Rc<List>>), Nil, } impl List { fn tail(&self) -> Option<&RefCell<Rc<List>>> { match self { Cons(_, item) => Some(item), Nil => None, } } } fn main() {}
Listing 15-25: A cons list definition that holds a
RefCell<T> so we can modify what a Cons variant is referring to
We’re using another variation of the List definition from Listing 15-5. The
second element in the Cons variant is now RefCell<Rc<List>>, meaning that
instead of having the ability to modify the i32 value as we did in Listing
15-24, we want to modify which List value a Cons variant is pointing to.
We’re also adding a tail method to make it convenient for us to access the
second item if we have a Cons variant.
In Listing 15-26, we’re adding a main function that uses the definitions in
Listing 15-25. This code creates a list in a and a list in b that points to
the list in a. Then it modifies the list in a to point to b, creating a
reference cycle. There are println! statements along the way to show what the
reference counts are at various points in this process.
Filename: src/main.rs
use crate::List::{Cons, Nil}; use std::cell::RefCell; use std::rc::Rc; #[derive(Debug)] enum List { Cons(i32, RefCell<Rc<List>>), Nil, } impl List { fn tail(&self) -> Option<&RefCell<Rc<List>>> { match self { Cons(_, item) => Some(item), Nil => None, } } } fn main() { let a = Rc::new(Cons(5, RefCell::new(Rc::new(Nil)))); println!("a initial rc count = {}", Rc::strong_count(&a)); println!("a next item = {:?}", a.tail()); let b = Rc::new(Cons(10, RefCell::new(Rc::clone(&a)))); println!("a rc count after b creation = {}", Rc::strong_count(&a)); println!("b initial rc count = {}", Rc::strong_count(&b)); println!("b next item = {:?}", b.tail()); if let Some(link) = a.tail() { *link.borrow_mut() = Rc::clone(&b); } println!("b rc count after changing a = {}", Rc::strong_count(&b)); println!("a rc count after changing a = {}", Rc::strong_count(&a)); // Uncomment the next line to see that we have a cycle; // it will overflow the stack // println!("a next item = {:?}", a.tail()); }
Listing 15-26: Creating a reference cycle of two List
values pointing to each other
We create an Rc<List> instance holding a List value in the variable a
with an initial list of 5, Nil. We then create an Rc<List> instance
holding another List value in the variable b that contains the value 10 and
points to the list in a.
We modify a so it points to b instead of Nil, creating a cycle. We
do that by using the tail method to get a reference to the
RefCell<Rc<List>> in a, which we put in the variable link. Then we use
the borrow_mut method on the RefCell<Rc<List>> to change the value inside
from an Rc<List> that holds a Nil value to the Rc<List> in b.
When we run this code, keeping the last println! commented out for the
moment, we’ll get this output:
$ cargo run
Compiling cons-list v0.1.0 (file:///projects/cons-list)
Finished dev [unoptimized + debuginfo] target(s) in 0.53s
Running `target/debug/cons-list`
a initial rc count = 1
a next item = Some(RefCell { value: Nil })
a rc count after b creation = 2
b initial rc count = 1
b next item = Some(RefCell { value: Cons(5, RefCell { value: Nil }) })
b rc count after changing a = 2
a rc count after changing a = 2
The reference count of the Rc<List> instances in both a and b are 2 after
we change the list in a to point to b. At the end of main, Rust drops the
variable b, which decreases the reference count of the Rc<List> instance
from 2 to 1. The memory that Rc<List> has on the heap won’t be dropped at
this point, because its reference count is 1, not 0. Then Rust drops a, which
decreases the reference count of the a Rc<List> instance from 2 to 1 as
well. This instance's memory can’t be dropped either, because the other
Rc<List> instance still refers to it. The memory allocated to the list will
remain uncollected forever. To visualize this reference cycle, we’ve created a
diagram in Figure 15-4.

Figure 15-4: A reference cycle of lists a and b
pointing to each other
If you uncomment the last println! and run the program, Rust will try to
print this cycle with a pointing to b pointing to a and so forth until it
overflows the stack.
In this case, right after we create the reference cycle, the program ends. The consequences of this cycle aren’t very dire. However, if a more complex program allocated lots of memory in a cycle and held onto it for a long time, the program would use more memory than it needed and might overwhelm the system, causing it to run out of available memory.
Creating reference cycles is not easily done, but it’s not impossible either.
If you have RefCell<T> values that contain Rc<T> values or similar nested
combinations of types with interior mutability and reference counting, you must
ensure that you don’t create cycles; you can’t rely on Rust to catch them.
Creating a reference cycle would be a logic bug in your program that you should
use automated tests, code reviews, and other software development practices to
minimize.
Another solution for avoiding reference cycles is reorganizing your data
structures so that some references express ownership and some references don’t.
As a result, you can have cycles made up of some ownership relationships and
some non-ownership relationships, and only the ownership relationships affect
whether or not a value can be dropped. In Listing 15-25, we always want Cons
variants to own their list, so reorganizing the data structure isn’t possible.
Let’s look at an example using graphs made up of parent nodes and child nodes
to see when non-ownership relationships are an appropriate way to prevent
reference cycles.
Preventing Reference Cycles: Turning an Rc<T> into a Weak<T>
So far, we’ve demonstrated that calling Rc::clone increases the
strong_count of an Rc<T> instance, and an Rc<T> instance is only cleaned
up if its strong_count is 0. You can also create a weak reference to the
value within an Rc<T> instance by calling Rc::downgrade and passing a
reference to the Rc<T>. When you call Rc::downgrade, you get a smart
pointer of type Weak<T>. Instead of increasing the strong_count in the
Rc<T> instance by 1, calling Rc::downgrade increases the weak_count by 1.
The Rc<T> type uses weak_count to keep track of how many Weak<T>
references exist, similar to strong_count. The difference is the weak_count
doesn’t need to be 0 for the Rc<T> instance to be cleaned up.
Strong references are how you can share ownership of an Rc<T> instance. Weak
references don’t express an ownership relationship. They won’t cause a
reference cycle because any cycle involving some weak references will be broken
once the strong reference count of values involved is 0.
Because the value that Weak<T> references might have been dropped, to do
anything with the value that a Weak<T> is pointing to, you must make sure the
value still exists. Do this by calling the upgrade method on a Weak<T>
instance, which will return an Option<Rc<T>>. You’ll get a result of Some
if the Rc<T> value has not been dropped yet and a result of None if the
Rc<T> value has been dropped. Because upgrade returns an Option<Rc<T>>,
Rust will ensure that the Some case and the None case are handled, and
there won’t be an invalid pointer.
As an example, rather than using a list whose items know only about the next item, we’ll create a tree whose items know about their children items and their parent items.
Creating a Tree Data Structure: a Node with Child Nodes
To start, we’ll build a tree with nodes that know about their child nodes.
We’ll create a struct named Node that holds its own i32 value as well as
references to its children Node values:
Filename: src/main.rs
use std::cell::RefCell; use std::rc::Rc; #[derive(Debug)] struct Node { value: i32, children: RefCell<Vec<Rc<Node>>>, } fn main() { let leaf = Rc::new(Node { value: 3, children: RefCell::new(vec![]), }); let branch = Rc::new(Node { value: 5, children: RefCell::new(vec![Rc::clone(&leaf)]), }); }
We want a Node to own its children, and we want to share that ownership with
variables so we can access each Node in the tree directly. To do this, we
define the Vec<T> items to be values of type Rc<Node>. We also want to
modify which nodes are children of another node, so we have a RefCell<T> in
children around the Vec<Rc<Node>>.
Next, we’ll use our struct definition and create one Node instance named
leaf with the value 3 and no children, and another instance named branch
with the value 5 and leaf as one of its children, as shown in Listing 15-27:
Filename: src/main.rs
use std::cell::RefCell; use std::rc::Rc; #[derive(Debug)] struct Node { value: i32, children: RefCell<Vec<Rc<Node>>>, } fn main() { let leaf = Rc::new(Node { value: 3, children: RefCell::new(vec![]), }); let branch = Rc::new(Node { value: 5, children: RefCell::new(vec![Rc::clone(&leaf)]), }); }
Listing 15-27: Creating a leaf node with no children
and a branch node with leaf as one of its children
We clone the Rc<Node> in leaf and store that in branch, meaning the
Node in leaf now has two owners: leaf and branch. We can get from
branch to leaf through branch.children, but there’s no way to get from
leaf to branch. The reason is that leaf has no reference to branch and
doesn’t know they’re related. We want leaf to know that branch is its
parent. We’ll do that next.
Adding a Reference from a Child to Its Parent
To make the child node aware of its parent, we need to add a parent field to
our Node struct definition. The trouble is in deciding what the type of
parent should be. We know it can’t contain an Rc<T>, because that would
create a reference cycle with leaf.parent pointing to branch and
branch.children pointing to leaf, which would cause their strong_count
values to never be 0.
Thinking about the relationships another way, a parent node should own its children: if a parent node is dropped, its child nodes should be dropped as well. However, a child should not own its parent: if we drop a child node, the parent should still exist. This is a case for weak references!
So instead of Rc<T>, we’ll make the type of parent use Weak<T>,
specifically a RefCell<Weak<Node>>. Now our Node struct definition looks
like this:
Filename: src/main.rs
use std::cell::RefCell; use std::rc::{Rc, Weak}; #[derive(Debug)] struct Node { value: i32, parent: RefCell<Weak<Node>>, children: RefCell<Vec<Rc<Node>>>, } fn main() { let leaf = Rc::new(Node { value: 3, parent: RefCell::new(Weak::new()), children: RefCell::new(vec![]), }); println!("leaf parent = {:?}", leaf.parent.borrow().upgrade()); let branch = Rc::new(Node { value: 5, parent: RefCell::new(Weak::new()), children: RefCell::new(vec![Rc::clone(&leaf)]), }); *leaf.parent.borrow_mut() = Rc::downgrade(&branch); println!("leaf parent = {:?}", leaf.parent.borrow().upgrade()); }
A node will be able to refer to its parent node but doesn’t own its parent.
In Listing 15-28, we update main to use this new definition so the leaf
node will have a way to refer to its parent, branch:
Filename: src/main.rs
use std::cell::RefCell; use std::rc::{Rc, Weak}; #[derive(Debug)] struct Node { value: i32, parent: RefCell<Weak<Node>>, children: RefCell<Vec<Rc<Node>>>, } fn main() { let leaf = Rc::new(Node { value: 3, parent: RefCell::new(Weak::new()), children: RefCell::new(vec![]), }); println!("leaf parent = {:?}", leaf.parent.borrow().upgrade()); let branch = Rc::new(Node { value: 5, parent: RefCell::new(Weak::new()), children: RefCell::new(vec![Rc::clone(&leaf)]), }); *leaf.parent.borrow_mut() = Rc::downgrade(&branch); println!("leaf parent = {:?}", leaf.parent.borrow().upgrade()); }
Listing 15-28: A leaf node with a weak reference to its
parent node branch
Creating the leaf node looks similar to how creating the leaf node looked
in Listing 15-27 with the exception of the parent field: leaf starts out
without a parent, so we create a new, empty Weak<Node> reference instance.
At this point, when we try to get a reference to the parent of leaf by using
the upgrade method, we get a None value. We see this in the output from the
first println! statement:
leaf parent = None
When we create the branch node, it will also have a new Weak<Node>
reference in the parent field, because branch doesn’t have a parent node.
We still have leaf as one of the children of branch. Once we have the
Node instance in branch, we can modify leaf to give it a Weak<Node>
reference to its parent. We use the borrow_mut method on the
RefCell<Weak<Node>> in the parent field of leaf, and then we use the
Rc::downgrade function to create a Weak<Node> reference to branch from
the Rc<Node> in branch.
When we print the parent of leaf again, this time we’ll get a Some variant
holding branch: now leaf can access its parent! When we print leaf, we
also avoid the cycle that eventually ended in a stack overflow like we had in
Listing 15-26; the Weak<Node> references are printed as (Weak):
leaf parent = Some(Node { value: 5, parent: RefCell { value: (Weak) },
children: RefCell { value: [Node { value: 3, parent: RefCell { value: (Weak) },
children: RefCell { value: [] } }] } })
The lack of infinite output indicates that this code didn’t create a reference
cycle. We can also tell this by looking at the values we get from calling
Rc::strong_count and Rc::weak_count.
Visualizing Changes to strong_count and weak_count
Let’s look at how the strong_count and weak_count values of the Rc<Node>
instances change by creating a new inner scope and moving the creation of
branch into that scope. By doing so, we can see what happens when branch is
created and then dropped when it goes out of scope. The modifications are shown
in Listing 15-29:
Filename: src/main.rs
use std::cell::RefCell; use std::rc::{Rc, Weak}; #[derive(Debug)] struct Node { value: i32, parent: RefCell<Weak<Node>>, children: RefCell<Vec<Rc<Node>>>, } fn main() { let leaf = Rc::new(Node { value: 3, parent: RefCell::new(Weak::new()), children: RefCell::new(vec![]), }); println!( "leaf strong = {}, weak = {}", Rc::strong_count(&leaf), Rc::weak_count(&leaf), ); { let branch = Rc::new(Node { value: 5, parent: RefCell::new(Weak::new()), children: RefCell::new(vec![Rc::clone(&leaf)]), }); *leaf.parent.borrow_mut() = Rc::downgrade(&branch); println!( "branch strong = {}, weak = {}", Rc::strong_count(&branch), Rc::weak_count(&branch), ); println!( "leaf strong = {}, weak = {}", Rc::strong_count(&leaf), Rc::weak_count(&leaf), ); } println!("leaf parent = {:?}", leaf.parent.borrow().upgrade()); println!( "leaf strong = {}, weak = {}", Rc::strong_count(&leaf), Rc::weak_count(&leaf), ); }
Listing 15-29: Creating branch in an inner scope and
examining strong and weak reference counts
After leaf is created, its Rc<Node> has a strong count of 1 and a weak
count of 0. In the inner scope, we create branch and associate it with
leaf, at which point when we print the counts, the Rc<Node> in branch
will have a strong count of 1 and a weak count of 1 (for leaf.parent pointing
to branch with a Weak<Node>). When we print the counts in leaf, we’ll see
it will have a strong count of 2, because branch now has a clone of the
Rc<Node> of leaf stored in branch.children, but will still have a weak
count of 0.
When the inner scope ends, branch goes out of scope and the strong count of
the Rc<Node> decreases to 0, so its Node is dropped. The weak count of 1
from leaf.parent has no bearing on whether or not Node is dropped, so we
don’t get any memory leaks!
If we try to access the parent of leaf after the end of the scope, we’ll get
None again. At the end of the program, the Rc<Node> in leaf has a strong
count of 1 and a weak count of 0, because the variable leaf is now the only
reference to the Rc<Node> again.
All of the logic that manages the counts and value dropping is built into
Rc<T> and Weak<T> and their implementations of the Drop trait. By
specifying that the relationship from a child to its parent should be a
Weak<T> reference in the definition of Node, you’re able to have parent
nodes point to child nodes and vice versa without creating a reference cycle
and memory leaks.
Summary
This chapter covered how to use smart pointers to make different guarantees and
trade-offs from those Rust makes by default with regular references. The
Box<T> type has a known size and points to data allocated on the heap. The
Rc<T> type keeps track of the number of references to data on the heap so
that data can have multiple owners. The RefCell<T> type with its interior
mutability gives us a type that we can use when we need an immutable type but
need to change an inner value of that type; it also enforces the borrowing
rules at runtime instead of at compile time.
Also discussed were the Deref and Drop traits, which enable a lot of the
functionality of smart pointers. We explored reference cycles that can cause
memory leaks and how to prevent them using Weak<T>.
If this chapter has piqued your interest and you want to implement your own smart pointers, check out “The Rustonomicon” for more useful information.
Next, we’ll talk about concurrency in Rust. You’ll even learn about a few new smart pointers.
Fearless Concurrency
Handling concurrent programming safely and efficiently is another of Rust’s major goals. Concurrent programming, where different parts of a program execute independently, and parallel programming, where different parts of a program execute at the same time, are becoming increasingly important as more computers take advantage of their multiple processors. Historically, programming in these contexts has been difficult and error prone: Rust hopes to change that.
Initially, the Rust team thought that ensuring memory safety and preventing concurrency problems were two separate challenges to be solved with different methods. Over time, the team discovered that the ownership and type systems are a powerful set of tools to help manage memory safety and concurrency problems! By leveraging ownership and type checking, many concurrency errors are compile-time errors in Rust rather than runtime errors. Therefore, rather than making you spend lots of time trying to reproduce the exact circumstances under which a runtime concurrency bug occurs, incorrect code will refuse to compile and present an error explaining the problem. As a result, you can fix your code while you’re working on it rather than potentially after it has been shipped to production. We’ve nicknamed this aspect of Rust fearless concurrency. Fearless concurrency allows you to write code that is free of subtle bugs and is easy to refactor without introducing new bugs.
Note: For simplicity’s sake, we’ll refer to many of the problems as concurrent rather than being more precise by saying concurrent and/or parallel. If this book were about concurrency and/or parallelism, we’d be more specific. For this chapter, please mentally substitute concurrent and/or parallel whenever we use concurrent.
Many languages are dogmatic about the solutions they offer for handling concurrent problems. For example, Erlang has elegant functionality for message-passing concurrency but has only obscure ways to share state between threads. Supporting only a subset of possible solutions is a reasonable strategy for higher-level languages, because a higher-level language promises benefits from giving up some control to gain abstractions. However, lower-level languages are expected to provide the solution with the best performance in any given situation and have fewer abstractions over the hardware. Therefore, Rust offers a variety of tools for modeling problems in whatever way is appropriate for your situation and requirements.
Here are the topics we’ll cover in this chapter:
- How to create threads to run multiple pieces of code at the same time
- Message-passing concurrency, where channels send messages between threads
- Shared-state concurrency, where multiple threads have access to some piece of data
- The
SyncandSendtraits, which extend Rust’s concurrency guarantees to user-defined types as well as types provided by the standard library
Using Threads to Run Code Simultaneously
In most current operating systems, an executed program’s code is run in a process, and the operating system manages multiple processes at once. Within your program, you can also have independent parts that run simultaneously. The features that run these independent parts are called threads.
Splitting the computation in your program into multiple threads can improve performance because the program does multiple tasks at the same time, but it also adds complexity. Because threads can run simultaneously, there’s no inherent guarantee about the order in which parts of your code on different threads will run. This can lead to problems, such as:
- Race conditions, where threads are accessing data or resources in an inconsistent order
- Deadlocks, where two threads are waiting for each other to finish using a resource the other thread has, preventing both threads from continuing
- Bugs that happen only in certain situations and are hard to reproduce and fix reliably
Rust attempts to mitigate the negative effects of using threads, but programming in a multithreaded context still takes careful thought and requires a code structure that is different from that in programs running in a single thread.
Programming languages implement threads in a few different ways. Many operating systems provide an API for creating new threads. This model where a language calls the operating system APIs to create threads is sometimes called 1:1, meaning one operating system thread per one language thread.
Many programming languages provide their own special implementation of threads.
Programming language-provided threads are known as green threads, and
languages that use these green threads will execute them in the context of a
different number of operating system threads. For this reason, the
green-threaded model is called the M:N model: there are M green threads per
N operating system threads, where M and N are not necessarily the same
number.
Each model has its own advantages and trade-offs, and the trade-off most important to Rust is runtime support. Runtime is a confusing term and can have different meanings in different contexts.
In this context, by runtime we mean code that is included by the language in every binary. This code can be large or small depending on the language, but every non-assembly language will have some amount of runtime code. For that reason, colloquially when people say a language has “no runtime,” they often mean “small runtime.” Smaller runtimes have fewer features but have the advantage of resulting in smaller binaries, which make it easier to combine the language with other languages in more contexts. Although many languages are okay with increasing the runtime size in exchange for more features, Rust needs to have nearly no runtime and cannot compromise on being able to call into C to maintain performance.
The green-threading M:N model requires a larger language runtime to manage threads. As such, the Rust standard library only provides an implementation of 1:1 threading. Because Rust is such a low-level language, there are crates that implement M:N threading if you would rather trade overhead for aspects such as more control over which threads run when and lower costs of context switching, for example.
Now that we’ve defined threads in Rust, let’s explore how to use the thread-related API provided by the standard library.
Creating a New Thread with spawn
To create a new thread, we call the thread::spawn function and pass it a
closure (we talked about closures in Chapter 13) containing the code we want to
run in the new thread. The example in Listing 16-1 prints some text from a main
thread and other text from a new thread:
Filename: src/main.rs
use std::thread; use std::time::Duration; fn main() { thread::spawn(|| { for i in 1..10 { println!("hi number {} from the spawned thread!", i); thread::sleep(Duration::from_millis(1)); } }); for i in 1..5 { println!("hi number {} from the main thread!", i); thread::sleep(Duration::from_millis(1)); } }
Listing 16-1: Creating a new thread to print one thing while the main thread prints something else
Note that with this function, the new thread will be stopped when the main thread ends, whether or not it has finished running. The output from this program might be a little different every time, but it will look similar to the following:
hi number 1 from the main thread!
hi number 1 from the spawned thread!
hi number 2 from the main thread!
hi number 2 from the spawned thread!
hi number 3 from the main thread!
hi number 3 from the spawned thread!
hi number 4 from the main thread!
hi number 4 from the spawned thread!
hi number 5 from the spawned thread!
The calls to thread::sleep force a thread to stop its execution for a short
duration, allowing a different thread to run. The threads will probably take
turns, but that isn’t guaranteed: it depends on how your operating system
schedules the threads. In this run, the main thread printed first, even though
the print statement from the spawned thread appears first in the code. And even
though we told the spawned thread to print until i is 9, it only got to 5
before the main thread shut down.
If you run this code and only see output from the main thread, or don’t see any overlap, try increasing the numbers in the ranges to create more opportunities for the operating system to switch between the threads.
Waiting for All Threads to Finish Using join Handles
The code in Listing 16-1 not only stops the spawned thread prematurely most of the time due to the main thread ending, but also can’t guarantee that the spawned thread will get to run at all. The reason is that there is no guarantee on the order in which threads run!
We can fix the problem of the spawned thread not getting to run, or not getting
to run completely, by saving the return value of thread::spawn in a variable.
The return type of thread::spawn is JoinHandle. A JoinHandle is an owned
value that, when we call the join method on it, will wait for its thread to
finish. Listing 16-2 shows how to use the JoinHandle of the thread we created
in Listing 16-1 and call join to make sure the spawned thread finishes before
main exits:
Filename: src/main.rs
use std::thread; use std::time::Duration; fn main() { let handle = thread::spawn(|| { for i in 1..10 { println!("hi number {} from the spawned thread!", i); thread::sleep(Duration::from_millis(1)); } }); for i in 1..5 { println!("hi number {} from the main thread!", i); thread::sleep(Duration::from_millis(1)); } handle.join().unwrap(); }
Listing 16-2: Saving a JoinHandle from thread::spawn
to guarantee the thread is run to completion
Calling join on the handle blocks the thread currently running until the
thread represented by the handle terminates. Blocking a thread means that
thread is prevented from performing work or exiting. Because we’ve put the call
to join after the main thread’s for loop, running Listing 16-2 should
produce output similar to this:
hi number 1 from the main thread!
hi number 2 from the main thread!
hi number 1 from the spawned thread!
hi number 3 from the main thread!
hi number 2 from the spawned thread!
hi number 4 from the main thread!
hi number 3 from the spawned thread!
hi number 4 from the spawned thread!
hi number 5 from the spawned thread!
hi number 6 from the spawned thread!
hi number 7 from the spawned thread!
hi number 8 from the spawned thread!
hi number 9 from the spawned thread!
The two threads continue alternating, but the main thread waits because of the
call to handle.join() and does not end until the spawned thread is finished.
But let’s see what happens when we instead move handle.join() before the
for loop in main, like this:
Filename: src/main.rs
use std::thread; use std::time::Duration; fn main() { let handle = thread::spawn(|| { for i in 1..10 { println!("hi number {} from the spawned thread!", i); thread::sleep(Duration::from_millis(1)); } }); handle.join().unwrap(); for i in 1..5 { println!("hi number {} from the main thread!", i); thread::sleep(Duration::from_millis(1)); } }
The main thread will wait for the spawned thread to finish and then run its
for loop, so the output won’t be interleaved anymore, as shown here:
hi number 1 from the spawned thread!
hi number 2 from the spawned thread!
hi number 3 from the spawned thread!
hi number 4 from the spawned thread!
hi number 5 from the spawned thread!
hi number 6 from the spawned thread!
hi number 7 from the spawned thread!
hi number 8 from the spawned thread!
hi number 9 from the spawned thread!
hi number 1 from the main thread!
hi number 2 from the main thread!
hi number 3 from the main thread!
hi number 4 from the main thread!
Small details, such as where join is called, can affect whether or not your
threads run at the same time.
Using move Closures with Threads
The move closure is often used alongside thread::spawn because it allows
you to use data from one thread in another thread.
In Chapter 13, we mentioned we can use the move keyword before the parameter
list of a closure to force the closure to take ownership of the values it uses
in the environment. This technique is especially useful when creating new
threads in order to transfer ownership of values from one thread to another.
Notice in Listing 16-1 that the closure we pass to thread::spawn takes no
arguments: we’re not using any data from the main thread in the spawned
thread’s code. To use data from the main thread in the spawned thread, the
spawned thread’s closure must capture the values it needs. Listing 16-3 shows
an attempt to create a vector in the main thread and use it in the spawned
thread. However, this won’t yet work, as you’ll see in a moment.
Filename: src/main.rs
use std::thread;
fn main() {
let v = vec![1, 2, 3];
let handle = thread::spawn(|| {
println!("Here's a vector: {:?}", v);
});
handle.join().unwrap();
}
Listing 16-3: Attempting to use a vector created by the main thread in another thread
The closure uses v, so it will capture v and make it part of the closure’s
environment. Because thread::spawn runs this closure in a new thread, we
should be able to access v inside that new thread. But when we compile this
example, we get the following error:
$ cargo run
Compiling threads v0.1.0 (file:///projects/threads)
error[E0373]: closure may outlive the current function, but it borrows `v`, which is owned by the current function
--> src/main.rs:6:32
|
6 | let handle = thread::spawn(|| {
| ^^ may outlive borrowed value `v`
7 | println!("Here's a vector: {:?}", v);
| - `v` is borrowed here
|
note: function requires argument type to outlive `'static`
--> src/main.rs:6:18
|
6 | let handle = thread::spawn(|| {
| __________________^
7 | | println!("Here's a vector: {:?}", v);
8 | | });
| |______^
help: to force the closure to take ownership of `v` (and any other referenced variables), use the `move` keyword
|
6 | let handle = thread::spawn(move || {
| ^^^^^^^
error: aborting due to previous error
For more information about this error, try `rustc --explain E0373`.
error: could not compile `threads`
To learn more, run the command again with --verbose.
Rust infers how to capture v, and because println! only needs a reference
to v, the closure tries to borrow v. However, there’s a problem: Rust can’t
tell how long the spawned thread will run, so it doesn’t know if the reference
to v will always be valid.
Listing 16-4 provides a scenario that’s more likely to have a reference to v
that won’t be valid:
Filename: src/main.rs
use std::thread;
fn main() {
let v = vec![1, 2, 3];
let handle = thread::spawn(|| {
println!("Here's a vector: {:?}", v);
});
drop(v); // oh no!
handle.join().unwrap();
}
Listing 16-4: A thread with a closure that attempts to
capture a reference to v from a main thread that drops v
If we were allowed to run this code, there’s a possibility the spawned thread
would be immediately put in the background without running at all. The spawned
thread has a reference to v inside, but the main thread immediately drops
v, using the drop function we discussed in Chapter 15. Then, when the
spawned thread starts to execute, v is no longer valid, so a reference to it
is also invalid. Oh no!
To fix the compiler error in Listing 16-3, we can use the error message’s advice:
help: to force the closure to take ownership of `v` (and any other referenced variables), use the `move` keyword
|
6 | let handle = thread::spawn(move || {
| ^^^^^^^
By adding the move keyword before the closure, we force the closure to take
ownership of the values it’s using rather than allowing Rust to infer that it
should borrow the values. The modification to Listing 16-3 shown in Listing
16-5 will compile and run as we intend:
Filename: src/main.rs
use std::thread; fn main() { let v = vec![1, 2, 3]; let handle = thread::spawn(move || { println!("Here's a vector: {:?}", v); }); handle.join().unwrap(); }
Listing 16-5: Using the move keyword to force a closure
to take ownership of the values it uses
What would happen to the code in Listing 16-4 where the main thread called
drop if we use a move closure? Would move fix that case? Unfortunately,
no; we would get a different error because what Listing 16-4 is trying to do
isn’t allowed for a different reason. If we added move to the closure, we
would move v into the closure’s environment, and we could no longer call
drop on it in the main thread. We would get this compiler error instead:
$ cargo run
Compiling threads v0.1.0 (file:///projects/threads)
error[E0382]: use of moved value: `v`
--> src/main.rs:10:10
|
4 | let v = vec![1, 2, 3];
| - move occurs because `v` has type `Vec<i32>`, which does not implement the `Copy` trait
5 |
6 | let handle = thread::spawn(move || {
| ------- value moved into closure here
7 | println!("Here's a vector: {:?}", v);
| - variable moved due to use in closure
...
10 | drop(v); // oh no!
| ^ value used here after move
error: aborting due to previous error
For more information about this error, try `rustc --explain E0382`.
error: could not compile `threads`
To learn more, run the command again with --verbose.
Rust’s ownership rules have saved us again! We got an error from the code in
Listing 16-3 because Rust was being conservative and only borrowing v for the
thread, which meant the main thread could theoretically invalidate the spawned
thread’s reference. By telling Rust to move ownership of v to the spawned
thread, we’re guaranteeing Rust that the main thread won’t use v anymore. If
we change Listing 16-4 in the same way, we’re then violating the ownership
rules when we try to use v in the main thread. The move keyword overrides
Rust’s conservative default of borrowing; it doesn’t let us violate the
ownership rules.
With a basic understanding of threads and the thread API, let’s look at what we can do with threads.
Using Message Passing to Transfer Data Between Threads
One increasingly popular approach to ensuring safe concurrency is message passing, where threads or actors communicate by sending each other messages containing data. Here’s the idea in a slogan from the Go language documentation: “Do not communicate by sharing memory; instead, share memory by communicating.”
One major tool Rust has for accomplishing message-sending concurrency is the channel, a programming concept that Rust’s standard library provides an implementation of. You can imagine a channel in programming as being like a channel of water, such as a stream or a river. If you put something like a rubber duck or boat into a stream, it will travel downstream to the end of the waterway.
A channel in programming has two halves: a transmitter and a receiver. The transmitter half is the upstream location where you put rubber ducks into the river, and the receiver half is where the rubber duck ends up downstream. One part of your code calls methods on the transmitter with the data you want to send, and another part checks the receiving end for arriving messages. A channel is said to be closed if either the transmitter or receiver half is dropped.
Here, we’ll work up to a program that has one thread to generate values and send them down a channel, and another thread that will receive the values and print them out. We’ll be sending simple values between threads using a channel to illustrate the feature. Once you’re familiar with the technique, you could use channels to implement a chat system or a system where many threads perform parts of a calculation and send the parts to one thread that aggregates the results.
First, in Listing 16-6, we’ll create a channel but not do anything with it. Note that this won’t compile yet because Rust can’t tell what type of values we want to send over the channel.
Filename: src/main.rs
use std::sync::mpsc;
fn main() {
let (tx, rx) = mpsc::channel();
}
Listing 16-6: Creating a channel and assigning the two
halves to tx and rx
We create a new channel using the mpsc::channel function; mpsc stands for
multiple producer, single consumer. In short, the way Rust’s standard library
implements channels means a channel can have multiple sending ends that
produce values but only one receiving end that consumes those values. Imagine
multiple streams flowing together into one big river: everything sent down any
of the streams will end up in one river at the end. We’ll start with a single
producer for now, but we’ll add multiple producers when we get this example
working.
The mpsc::channel function returns a tuple, the first element of which is the
sending end and the second element is the receiving end. The abbreviations tx
and rx are traditionally used in many fields for transmitter and receiver
respectively, so we name our variables as such to indicate each end. We’re
using a let statement with a pattern that destructures the tuples; we’ll
discuss the use of patterns in let statements and destructuring in Chapter
18. Using a let statement this way is a convenient approach to extract the
pieces of the tuple returned by mpsc::channel.
Let’s move the transmitting end into a spawned thread and have it send one string so the spawned thread is communicating with the main thread, as shown in Listing 16-7. This is like putting a rubber duck in the river upstream or sending a chat message from one thread to another.
Filename: src/main.rs
use std::sync::mpsc; use std::thread; fn main() { let (tx, rx) = mpsc::channel(); thread::spawn(move || { let val = String::from("hi"); tx.send(val).unwrap(); }); }
Listing 16-7: Moving tx to a spawned thread and sending
“hi”
Again, we’re using thread::spawn to create a new thread and then using move
to move tx into the closure so the spawned thread owns tx. The spawned
thread needs to own the transmitting end of the channel to be able to send
messages through the channel.
The transmitting end has a send method that takes the value we want to send.
The send method returns a Result<T, E> type, so if the receiving end has
already been dropped and there’s nowhere to send a value, the send operation
will return an error. In this example, we’re calling unwrap to panic in case
of an error. But in a real application, we would handle it properly: return to
Chapter 9 to review strategies for proper error handling.
In Listing 16-8, we’ll get the value from the receiving end of the channel in the main thread. This is like retrieving the rubber duck from the water at the end of the river or like getting a chat message.
Filename: src/main.rs
use std::sync::mpsc; use std::thread; fn main() { let (tx, rx) = mpsc::channel(); thread::spawn(move || { let val = String::from("hi"); tx.send(val).unwrap(); }); let received = rx.recv().unwrap(); println!("Got: {}", received); }
Listing 16-8: Receiving the value “hi” in the main thread and printing it
The receiving end of a channel has two useful methods: recv and try_recv.
We’re using recv, short for receive, which will block the main thread’s
execution and wait until a value is sent down the channel. Once a value is
sent, recv will return it in a Result<T, E>. When the sending end of the
channel closes, recv will return an error to signal that no more values will
be coming.
The try_recv method doesn’t block, but will instead return a Result<T, E>
immediately: an Ok value holding a message if one is available and an Err
value if there aren’t any messages this time. Using try_recv is useful if
this thread has other work to do while waiting for messages: we could write a
loop that calls try_recv every so often, handles a message if one is
available, and otherwise does other work for a little while until checking
again.
We’ve used recv in this example for simplicity; we don’t have any other work
for the main thread to do other than wait for messages, so blocking the main
thread is appropriate.
When we run the code in Listing 16-8, we’ll see the value printed from the main thread:
Got: hi
Perfect!
Channels and Ownership Transference
The ownership rules play a vital role in message sending because they help you
write safe, concurrent code. Preventing errors in concurrent programming is the
advantage of thinking about ownership throughout your Rust programs. Let’s do
an experiment to show how channels and ownership work together to prevent
problems: we’ll try to use a val value in the spawned thread after we’ve
sent it down the channel. Try compiling the code in Listing 16-9 to see why
this code isn’t allowed:
Filename: src/main.rs
use std::sync::mpsc;
use std::thread;
fn main() {
let (tx, rx) = mpsc::channel();
thread::spawn(move || {
let val = String::from("hi");
tx.send(val).unwrap();
println!("val is {}", val);
});
let received = rx.recv().unwrap();
println!("Got: {}", received);
}
Listing 16-9: Attempting to use val after we’ve sent it
down the channel
Here, we try to print val after we’ve sent it down the channel via tx.send.
Allowing this would be a bad idea: once the value has been sent to another
thread, that thread could modify or drop it before we try to use the value
again. Potentially, the other thread’s modifications could cause errors or
unexpected results due to inconsistent or nonexistent data. However, Rust gives
us an error if we try to compile the code in Listing 16-9:
$ cargo run
Compiling message-passing v0.1.0 (file:///projects/message-passing)
error[E0382]: borrow of moved value: `val`
--> src/main.rs:10:31
|
8 | let val = String::from("hi");
| --- move occurs because `val` has type `String`, which does not implement the `Copy` trait
9 | tx.send(val).unwrap();
| --- value moved here
10 | println!("val is {}", val);
| ^^^ value borrowed here after move
error: aborting due to previous error
For more information about this error, try `rustc --explain E0382`.
error: could not compile `message-passing`
To learn more, run the command again with --verbose.
Our concurrency mistake has caused a compile time error. The send function
takes ownership of its parameter, and when the value is moved, the receiver
takes ownership of it. This stops us from accidentally using the value again
after sending it; the ownership system checks that everything is okay.
Sending Multiple Values and Seeing the Receiver Waiting
The code in Listing 16-8 compiled and ran, but it didn’t clearly show us that two separate threads were talking to each other over the channel. In Listing 16-10 we’ve made some modifications that will prove the code in Listing 16-8 is running concurrently: the spawned thread will now send multiple messages and pause for a second between each message.
Filename: src/main.rs
use std::sync::mpsc;
use std::thread;
use std::time::Duration;
fn main() {
let (tx, rx) = mpsc::channel();
thread::spawn(move || {
let vals = vec![
String::from("hi"),
String::from("from"),
String::from("the"),
String::from("thread"),
];
for val in vals {
tx.send(val).unwrap();
thread::sleep(Duration::from_secs(1));
}
});
for received in rx {
println!("Got: {}", received);
}
}
Listing 16-10: Sending multiple messages and pausing between each
This time, the spawned thread has a vector of strings that we want to send to
the main thread. We iterate over them, sending each individually, and pause
between each by calling the thread::sleep function with a Duration value of
1 second.
In the main thread, we’re not calling the recv function explicitly anymore:
instead, we’re treating rx as an iterator. For each value received, we’re
printing it. When the channel is closed, iteration will end.
When running the code in Listing 16-10, you should see the following output with a 1-second pause in between each line:
Got: hi
Got: from
Got: the
Got: thread
Because we don’t have any code that pauses or delays in the for loop in the
main thread, we can tell that the main thread is waiting to receive values from
the spawned thread.
Creating Multiple Producers by Cloning the Transmitter
Earlier we mentioned that mpsc was an acronym for multiple producer,
single consumer. Let’s put mpsc to use and expand the code in Listing 16-10
to create multiple threads that all send values to the same receiver. We can do
so by cloning the transmitting half of the channel, as shown in Listing 16-11:
Filename: src/main.rs
use std::sync::mpsc;
use std::thread;
use std::time::Duration;
fn main() {
// --snip--
let (tx, rx) = mpsc::channel();
let tx1 = tx.clone();
thread::spawn(move || {
let vals = vec![
String::from("hi"),
String::from("from"),
String::from("the"),
String::from("thread"),
];
for val in vals {
tx1.send(val).unwrap();
thread::sleep(Duration::from_secs(1));
}
});
thread::spawn(move || {
let vals = vec![
String::from("more"),
String::from("messages"),
String::from("for"),
String::from("you"),
];
for val in vals {
tx.send(val).unwrap();
thread::sleep(Duration::from_secs(1));
}
});
for received in rx {
println!("Got: {}", received);
}
// --snip--
}
Listing 16-11: Sending multiple messages from multiple producers
This time, before we create the first spawned thread, we call clone on the
sending end of the channel. This will give us a new sending handle we can pass
to the first spawned thread. We pass the original sending end of the channel to
a second spawned thread. This gives us two threads, each sending different
messages to the receiving end of the channel.
When you run the code, your output should look something like this:
Got: hi
Got: more
Got: from
Got: messages
Got: for
Got: the
Got: thread
Got: you
You might see the values in another order; it depends on your system. This is
what makes concurrency interesting as well as difficult. If you experiment with
thread::sleep, giving it various values in the different threads, each run
will be more nondeterministic and create different output each time.
Now that we’ve looked at how channels work, let’s look at a different method of concurrency.
Shared-State Concurrency
Message passing is a fine way of handling concurrency, but it’s not the only one. Consider this part of the slogan from the Go language documentation again: “do not communicate by sharing memory.”
What would communicating by sharing memory look like? In addition, why would message-passing enthusiasts not use it and do the opposite instead?
In a way, channels in any programming language are similar to single ownership, because once you transfer a value down a channel, you should no longer use that value. Shared memory concurrency is like multiple ownership: multiple threads can access the same memory location at the same time. As you saw in Chapter 15, where smart pointers made multiple ownership possible, multiple ownership can add complexity because these different owners need managing. Rust’s type system and ownership rules greatly assist in getting this management correct. For an example, let’s look at mutexes, one of the more common concurrency primitives for shared memory.
Using Mutexes to Allow Access to Data from One Thread at a Time
Mutex is an abbreviation for mutual exclusion, as in, a mutex allows only one thread to access some data at any given time. To access the data in a mutex, a thread must first signal that it wants access by asking to acquire the mutex’s lock. The lock is a data structure that is part of the mutex that keeps track of who currently has exclusive access to the data. Therefore, the mutex is described as guarding the data it holds via the locking system.
Mutexes have a reputation for being difficult to use because you have to remember two rules:
- You must attempt to acquire the lock before using the data.
- When you’re done with the data that the mutex guards, you must unlock the data so other threads can acquire the lock.
For a real-world metaphor for a mutex, imagine a panel discussion at a conference with only one microphone. Before a panelist can speak, they have to ask or signal that they want to use the microphone. When they get the microphone, they can talk for as long as they want to and then hand the microphone to the next panelist who requests to speak. If a panelist forgets to hand the microphone off when they’re finished with it, no one else is able to speak. If management of the shared microphone goes wrong, the panel won’t work as planned!
Management of mutexes can be incredibly tricky to get right, which is why so many people are enthusiastic about channels. However, thanks to Rust’s type system and ownership rules, you can’t get locking and unlocking wrong.
The API of Mutex<T>
As an example of how to use a mutex, let’s start by using a mutex in a single-threaded context, as shown in Listing 16-12:
Filename: src/main.rs
use std::sync::Mutex; fn main() { let m = Mutex::new(5); { let mut num = m.lock().unwrap(); *num = 6; } println!("m = {:?}", m); }
Listing 16-12: Exploring the API of Mutex<T> in a
single-threaded context for simplicity
As with many types, we create a Mutex<T> using the associated function new.
To access the data inside the mutex, we use the lock method to acquire the
lock. This call will block the current thread so it can’t do any work until
it’s our turn to have the lock.
The call to lock would fail if another thread holding the lock panicked. In
that case, no one would ever be able to get the lock, so we’ve chosen to
unwrap and have this thread panic if we’re in that situation.
After we’ve acquired the lock, we can treat the return value, named num in
this case, as a mutable reference to the data inside. The type system ensures
that we acquire a lock before using the value in m: Mutex<i32> is not an
i32, so we must acquire the lock to be able to use the i32 value. We
can’t forget; the type system won’t let us access the inner i32 otherwise.
As you might suspect, Mutex<T> is a smart pointer. More accurately, the call
to lock returns a smart pointer called MutexGuard, wrapped in a
LockResult that we handled with the call to unwrap. The MutexGuard smart
pointer implements Deref to point at our inner data; the smart pointer also
has a Drop implementation that releases the lock automatically when a
MutexGuard goes out of scope, which happens at the end of the inner scope in
Listing 16-12. As a result, we don’t risk forgetting to release the lock and
blocking the mutex from being used by other threads because the lock release
happens automatically.
After dropping the lock, we can print the mutex value and see that we were able
to change the inner i32 to 6.
Sharing a Mutex<T> Between Multiple Threads
Now, let’s try to share a value between multiple threads using Mutex<T>.
We’ll spin up 10 threads and have them each increment a counter value by 1, so
the counter goes from 0 to 10. The next example in Listing 16-13 will have
a compiler error, and we’ll use that error to learn more about using
Mutex<T> and how Rust helps us use it correctly.
Filename: src/main.rs
use std::sync::Mutex;
use std::thread;
fn main() {
let counter = Mutex::new(0);
let mut handles = vec![];
for _ in 0..10 {
let handle = thread::spawn(move || {
let mut num = counter.lock().unwrap();
*num += 1;
});
handles.push(handle);
}
for handle in handles {
handle.join().unwrap();
}
println!("Result: {}", *counter.lock().unwrap());
}
Listing 16-13: Ten threads each increment a counter
guarded by a Mutex<T>
We create a counter variable to hold an i32 inside a Mutex<T>, as we
did in Listing 16-12. Next, we create 10 threads by iterating over a range
of numbers. We use thread::spawn and give all the threads the same closure,
one that moves the counter into the thread, acquires a lock on the Mutex<T>
by calling the lock method, and then adds 1 to the value in the mutex. When a
thread finishes running its closure, num will go out of scope and release the
lock so another thread can acquire it.
In the main thread, we collect all the join handles. Then, as we did in Listing
16-2, we call join on each handle to make sure all the threads finish. At
that point, the main thread will acquire the lock and print the result of this
program.
We hinted that this example wouldn’t compile. Now let’s find out why!
$ cargo run
Compiling shared-state v0.1.0 (file:///projects/shared-state)
error[E0382]: use of moved value: `counter`
--> src/main.rs:9:36
|
5 | let counter = Mutex::new(0);
| ------- move occurs because `counter` has type `Mutex<i32>`, which does not implement the `Copy` trait
...
9 | let handle = thread::spawn(move || {
| ^^^^^^^ value moved into closure here, in previous iteration of loop
10 | let mut num = counter.lock().unwrap();
| ------- use occurs due to use in closure
error: aborting due to previous error
For more information about this error, try `rustc --explain E0382`.
error: could not compile `shared-state`
To learn more, run the command again with --verbose.
The error message states that the counter value was moved in the previous
iteration of the loop. So Rust is telling us that we can’t move the ownership
of lock counter into multiple threads. Let’s fix the compiler error with a
multiple-ownership method we discussed in Chapter 15.
Multiple Ownership with Multiple Threads
In Chapter 15, we gave a value multiple owners by using the smart pointer
Rc<T> to create a reference counted value. Let’s do the same here and see
what happens. We’ll wrap the Mutex<T> in Rc<T> in Listing 16-14 and clone
the Rc<T> before moving ownership to the thread.
Filename: src/main.rs
use std::rc::Rc;
use std::sync::Mutex;
use std::thread;
fn main() {
let counter = Rc::new(Mutex::new(0));
let mut handles = vec![];
for _ in 0..10 {
let counter = Rc::clone(&counter);
let handle = thread::spawn(move || {
let mut num = counter.lock().unwrap();
*num += 1;
});
handles.push(handle);
}
for handle in handles {
handle.join().unwrap();
}
println!("Result: {}", *counter.lock().unwrap());
}
Listing 16-14: Attempting to use Rc<T> to allow
multiple threads to own the Mutex<T>
Once again, we compile and get... different errors! The compiler is teaching us a lot.
$ cargo run
Compiling shared-state v0.1.0 (file:///projects/shared-state)
error[E0277]: `Rc<Mutex<i32>>` cannot be sent between threads safely
--> src/main.rs:11:22
|
11 | let handle = thread::spawn(move || {
| ______________________^^^^^^^^^^^^^_-
| | |
| | `Rc<Mutex<i32>>` cannot be sent between threads safely
12 | | let mut num = counter.lock().unwrap();
13 | |
14 | | *num += 1;
15 | | });
| |_________- within this `[closure@src/main.rs:11:36: 15:10]`
|
= help: within `[closure@src/main.rs:11:36: 15:10]`, the trait `Send` is not implemented for `Rc<Mutex<i32>>`
= note: required because it appears within the type `[closure@src/main.rs:11:36: 15:10]`
error: aborting due to previous error
For more information about this error, try `rustc --explain E0277`.
error: could not compile `shared-state`
To learn more, run the command again with --verbose.
Wow, that error message is very wordy! Here’s the important part to focus
on: `Rc<Mutex<i32>>` cannot be sent between threads safely. The compiler
is also telling us the reason why: the trait `Send` is not implemented for `Rc<Mutex<i32>>` . We’ll talk about Send in the next section: it’s one of
the traits that ensures the types we use with threads are meant for use in
concurrent situations.
Unfortunately, Rc<T> is not safe to share across threads. When Rc<T>
manages the reference count, it adds to the count for each call to clone and
subtracts from the count when each clone is dropped. But it doesn’t use any
concurrency primitives to make sure that changes to the count can’t be
interrupted by another thread. This could lead to wrong counts—subtle bugs that
could in turn lead to memory leaks or a value being dropped before we’re done
with it. What we need is a type exactly like Rc<T> but one that makes changes
to the reference count in a thread-safe way.
Atomic Reference Counting with Arc<T>
Fortunately, Arc<T> is a type like Rc<T> that is safe to use in
concurrent situations. The a stands for atomic, meaning it’s an atomically
reference counted type. Atomics are an additional kind of concurrency
primitive that we won’t cover in detail here: see the standard library
documentation for std::sync::atomic for more details. At this point, you just
need to know that atomics work like primitive types but are safe to share
across threads.
You might then wonder why all primitive types aren’t atomic and why standard
library types aren’t implemented to use Arc<T> by default. The reason is that
thread safety comes with a performance penalty that you only want to pay when
you really need to. If you’re just performing operations on values within a
single thread, your code can run faster if it doesn’t have to enforce the
guarantees atomics provide.
Let’s return to our example: Arc<T> and Rc<T> have the same API, so we fix
our program by changing the use line, the call to new, and the call to
clone. The code in Listing 16-15 will finally compile and run:
Filename: src/main.rs
use std::sync::{Arc, Mutex}; use std::thread; fn main() { let counter = Arc::new(Mutex::new(0)); let mut handles = vec![]; for _ in 0..10 { let counter = Arc::clone(&counter); let handle = thread::spawn(move || { let mut num = counter.lock().unwrap(); *num += 1; }); handles.push(handle); } for handle in handles { handle.join().unwrap(); } println!("Result: {}", *counter.lock().unwrap()); }
Listing 16-15: Using an Arc<T> to wrap the Mutex<T>
to be able to share ownership across multiple threads
This code will print the following:
Result: 10
We did it! We counted from 0 to 10, which may not seem very impressive, but it
did teach us a lot about Mutex<T> and thread safety. You could also use this
program’s structure to do more complicated operations than just incrementing a
counter. Using this strategy, you can divide a calculation into independent
parts, split those parts across threads, and then use a Mutex<T> to have each
thread update the final result with its part.
Similarities Between RefCell<T>/Rc<T> and Mutex<T>/Arc<T>
You might have noticed that counter is immutable but we could get a mutable
reference to the value inside it; this means Mutex<T> provides interior
mutability, as the Cell family does. In the same way we used RefCell<T> in
Chapter 15 to allow us to mutate contents inside an Rc<T>, we use Mutex<T>
to mutate contents inside an Arc<T>.
Another detail to note is that Rust can’t protect you from all kinds of logic
errors when you use Mutex<T>. Recall in Chapter 15 that using Rc<T> came
with the risk of creating reference cycles, where two Rc<T> values refer to
each other, causing memory leaks. Similarly, Mutex<T> comes with the risk of
creating deadlocks. These occur when an operation needs to lock two resources
and two threads have each acquired one of the locks, causing them to wait for
each other forever. If you’re interested in deadlocks, try creating a Rust
program that has a deadlock; then research deadlock mitigation strategies for
mutexes in any language and have a go at implementing them in Rust. The
standard library API documentation for Mutex<T> and MutexGuard offers
useful information.
We’ll round out this chapter by talking about the Send and Sync traits and
how we can use them with custom types.
Extensible Concurrency with the Sync and Send Traits
Interestingly, the Rust language has very few concurrency features. Almost every concurrency feature we’ve talked about so far in this chapter has been part of the standard library, not the language. Your options for handling concurrency are not limited to the language or the standard library; you can write your own concurrency features or use those written by others.
However, two concurrency concepts are embedded in the language: the
std::marker traits Sync and Send.
Allowing Transference of Ownership Between Threads with Send
The Send marker trait indicates that ownership of values of the type implementing
Send can be transferred between threads. Almost every Rust type is Send,
but there are some exceptions, including Rc<T>: this cannot be Send because
if you cloned an Rc<T> value and tried to transfer ownership of the clone to
another thread, both threads might update the reference count at the same time.
For this reason, Rc<T> is implemented for use in single-threaded situations
where you don’t want to pay the thread-safe performance penalty.
Therefore, Rust’s type system and trait bounds ensure that you can never
accidentally send an Rc<T> value across threads unsafely. When we tried to do
this in Listing 16-14, we got the error the trait Send is not implemented for Rc<Mutex<i32>>. When we switched to Arc<T>, which is Send, the code
compiled.
Any type composed entirely of Send types is automatically marked as Send as
well. Almost all primitive types are Send, aside from raw pointers, which
we’ll discuss in Chapter 19.
Allowing Access from Multiple Threads with Sync
The Sync marker trait indicates that it is safe for the type implementing
Sync to be referenced from multiple threads. In other words, any type T is
Sync if &T (an immutable reference to T) is Send, meaning the reference
can be sent safely to another thread. Similar to Send, primitive types are
Sync, and types composed entirely of types that are Sync are also Sync.
The smart pointer Rc<T> is also not Sync for the same reasons that it’s not
Send. The RefCell<T> type (which we talked about in Chapter 15) and the
family of related Cell<T> types are not Sync. The implementation of borrow
checking that RefCell<T> does at runtime is not thread-safe. The smart
pointer Mutex<T> is Sync and can be used to share access with multiple
threads as you saw in the “Sharing a Mutex<T> Between Multiple
Threads” section.
Implementing Send and Sync Manually Is Unsafe
Because types that are made up of Send and Sync traits are automatically
also Send and Sync, we don’t have to implement those traits manually. As
marker traits, they don’t even have any methods to implement. They’re just
useful for enforcing invariants related to concurrency.
Manually implementing these traits involves implementing unsafe Rust code.
We’ll talk about using unsafe Rust code in Chapter 19; for now, the important
information is that building new concurrent types not made up of Send and
Sync parts requires careful thought to uphold the safety guarantees. “The
Rustonomicon” has more information about these guarantees and how to
uphold them.
Summary
This isn’t the last you’ll see of concurrency in this book: the project in Chapter 20 will use the concepts in this chapter in a more realistic situation than the smaller examples discussed here.
As mentioned earlier, because very little of how Rust handles concurrency is part of the language, many concurrency solutions are implemented as crates. These evolve more quickly than the standard library, so be sure to search online for the current, state-of-the-art crates to use in multithreaded situations.
The Rust standard library provides channels for message passing and smart
pointer types, such as Mutex<T> and Arc<T>, that are safe to use in
concurrent contexts. The type system and the borrow checker ensure that the
code using these solutions won’t end up with data races or invalid references.
Once you get your code to compile, you can rest assured that it will happily
run on multiple threads without the kinds of hard-to-track-down bugs common in
other languages. Concurrent programming is no longer a concept to be afraid of:
go forth and make your programs concurrent, fearlessly!
Next, we’ll talk about idiomatic ways to model problems and structure solutions as your Rust programs get bigger. In addition, we’ll discuss how Rust’s idioms relate to those you might be familiar with from object-oriented programming.
Object Oriented Programming Features of Rust
Object-oriented programming (OOP) is a way of modeling programs. Objects came from Simula in the 1960s. Those objects influenced Alan Kay’s programming architecture in which objects pass messages to each other. He coined the term object-oriented programming in 1967 to describe this architecture. Many competing definitions describe what OOP is; some definitions would classify Rust as object oriented, but other definitions would not. In this chapter, we’ll explore certain characteristics that are commonly considered object oriented and how those characteristics translate to idiomatic Rust. We’ll then show you how to implement an object-oriented design pattern in Rust and discuss the trade-offs of doing so versus implementing a solution using some of Rust’s strengths instead.
Characteristics of Object-Oriented Languages
There is no consensus in the programming community about what features a language must have to be considered object oriented. Rust is influenced by many programming paradigms, including OOP; for example, we explored the features that came from functional programming in Chapter 13. Arguably, OOP languages share certain common characteristics, namely objects, encapsulation, and inheritance. Let’s look at what each of those characteristics means and whether Rust supports it.
Objects Contain Data and Behavior
The book Design Patterns: Elements of Reusable Object-Oriented Software by Erich Gamma, Richard Helm, Ralph Johnson, and John Vlissides (Addison-Wesley Professional, 1994) colloquially referred to as The Gang of Four book, is a catalog of object-oriented design patterns. It defines OOP this way:
Object-oriented programs are made up of objects. An object packages both data and the procedures that operate on that data. The procedures are typically called methods or operations.
Using this definition, Rust is object oriented: structs and enums have data,
and impl blocks provide methods on structs and enums. Even though structs and
enums with methods aren’t called objects, they provide the same
functionality, according to the Gang of Four’s definition of objects.
Encapsulation that Hides Implementation Details
Another aspect commonly associated with OOP is the idea of encapsulation, which means that the implementation details of an object aren’t accessible to code using that object. Therefore, the only way to interact with an object is through its public API; code using the object shouldn’t be able to reach into the object’s internals and change data or behavior directly. This enables the programmer to change and refactor an object’s internals without needing to change the code that uses the object.
We discussed how to control encapsulation in Chapter 7: we can use the pub
keyword to decide which modules, types, functions, and methods in our code
should be public, and by default everything else is private. For example, we
can define a struct AveragedCollection that has a field containing a vector
of i32 values. The struct can also have a field that contains the average of
the values in the vector, meaning the average doesn’t have to be computed
on demand whenever anyone needs it. In other words, AveragedCollection will
cache the calculated average for us. Listing 17-1 has the definition of the
AveragedCollection struct:
Filename: src/lib.rs
pub struct AveragedCollection {
list: Vec<i32>,
average: f64,
}
Listing 17-1: An AveragedCollection struct that
maintains a list of integers and the average of the items in the
collection
The struct is marked pub so that other code can use it, but the fields within
the struct remain private. This is important in this case because we want to
ensure that whenever a value is added or removed from the list, the average is
also updated. We do this by implementing add, remove, and average methods
on the struct, as shown in Listing 17-2:
Filename: src/lib.rs
pub struct AveragedCollection {
list: Vec<i32>,
average: f64,
}
impl AveragedCollection {
pub fn add(&mut self, value: i32) {
self.list.push(value);
self.update_average();
}
pub fn remove(&mut self) -> Option<i32> {
let result = self.list.pop();
match result {
Some(value) => {
self.update_average();
Some(value)
}
None => None,
}
}
pub fn average(&self) -> f64 {
self.average
}
fn update_average(&mut self) {
let total: i32 = self.list.iter().sum();
self.average = total as f64 / self.list.len() as f64;
}
}
Listing 17-2: Implementations of the public methods
add, remove, and average on AveragedCollection
The public methods add, remove, and average are the only ways to access
or modify data in an instance of AveragedCollection. When an item is added
to list using the add method or removed using the remove method, the
implementations of each call the private update_average method that handles
updating the average field as well.
We leave the list and average fields private so there is no way for
external code to add or remove items to the list field directly; otherwise,
the average field might become out of sync when the list changes. The
average method returns the value in the average field, allowing external
code to read the average but not modify it.
Because we’ve encapsulated the implementation details of the struct
AveragedCollection, we can easily change aspects, such as the data structure,
in the future. For instance, we could use a HashSet<i32> instead of a
Vec<i32> for the list field. As long as the signatures of the add,
remove, and average public methods stay the same, code using
AveragedCollection wouldn’t need to change. If we made list public instead,
this wouldn’t necessarily be the case: HashSet<i32> and Vec<i32> have
different methods for adding and removing items, so the external code would
likely have to change if it were modifying list directly.
If encapsulation is a required aspect for a language to be considered object
oriented, then Rust meets that requirement. The option to use pub or not for
different parts of code enables encapsulation of implementation details.
Inheritance as a Type System and as Code Sharing
Inheritance is a mechanism whereby an object can inherit from another object’s definition, thus gaining the parent object’s data and behavior without you having to define them again.
If a language must have inheritance to be an object-oriented language, then Rust is not one. There is no way to define a struct that inherits the parent struct’s fields and method implementations. However, if you’re used to having inheritance in your programming toolbox, you can use other solutions in Rust, depending on your reason for reaching for inheritance in the first place.
You choose inheritance for two main reasons. One is for reuse of code: you can
implement particular behavior for one type, and inheritance enables you to
reuse that implementation for a different type. You can share Rust code using
default trait method implementations instead, which you saw in Listing 10-14
when we added a default implementation of the summarize method on the
Summary trait. Any type implementing the Summary trait would have the
summarize method available on it without any further code. This is similar to
a parent class having an implementation of a method and an inheriting child
class also having the implementation of the method. We can also override the
default implementation of the summarize method when we implement the
Summary trait, which is similar to a child class overriding the
implementation of a method inherited from a parent class.
The other reason to use inheritance relates to the type system: to enable a child type to be used in the same places as the parent type. This is also called polymorphism, which means that you can substitute multiple objects for each other at runtime if they share certain characteristics.
Polymorphism
To many people, polymorphism is synonymous with inheritance. But it’s actually a more general concept that refers to code that can work with data of multiple types. For inheritance, those types are generally subclasses.
Rust instead uses generics to abstract over different possible types and trait bounds to impose constraints on what those types must provide. This is sometimes called bounded parametric polymorphism.
Inheritance has recently fallen out of favor as a programming design solution in many programming languages because it’s often at risk of sharing more code than necessary. Subclasses shouldn’t always share all characteristics of their parent class but will do so with inheritance. This can make a program’s design less flexible. It also introduces the possibility of calling methods on subclasses that don’t make sense or that cause errors because the methods don’t apply to the subclass. In addition, some languages will only allow a subclass to inherit from one class, further restricting the flexibility of a program’s design.
For these reasons, Rust takes a different approach, using trait objects instead of inheritance. Let’s look at how trait objects enable polymorphism in Rust.
Using Trait Objects That Allow for Values of Different Types
In Chapter 8, we mentioned that one limitation of vectors is that they can
store elements of only one type. We created a workaround in Listing 8-10 where
we defined a SpreadsheetCell enum that had variants to hold integers, floats,
and text. This meant we could store different types of data in each cell and
still have a vector that represented a row of cells. This is a perfectly good
solution when our interchangeable items are a fixed set of types that we know
when our code is compiled.
However, sometimes we want our library user to be able to extend the set of
types that are valid in a particular situation. To show how we might achieve
this, we’ll create an example graphical user interface (GUI) tool that iterates
through a list of items, calling a draw method on each one to draw it to the
screen—a common technique for GUI tools. We’ll create a library crate called
gui that contains the structure of a GUI library. This crate might include
some types for people to use, such as Button or TextField. In addition,
gui users will want to create their own types that can be drawn: for
instance, one programmer might add an Image and another might add a
SelectBox.
We won’t implement a fully fledged GUI library for this example but will show
how the pieces would fit together. At the time of writing the library, we can’t
know and define all the types other programmers might want to create. But we do
know that gui needs to keep track of many values of different types, and it
needs to call a draw method on each of these differently typed values. It
doesn’t need to know exactly what will happen when we call the draw method,
just that the value will have that method available for us to call.
To do this in a language with inheritance, we might define a class named
Component that has a method named draw on it. The other classes, such as
Button, Image, and SelectBox, would inherit from Component and thus
inherit the draw method. They could each override the draw method to define
their custom behavior, but the framework could treat all of the types as if
they were Component instances and call draw on them. But because Rust
doesn’t have inheritance, we need another way to structure the gui library to
allow users to extend it with new types.
Defining a Trait for Common Behavior
To implement the behavior we want gui to have, we’ll define a trait named
Draw that will have one method named draw. Then we can define a vector that
takes a trait object. A trait object points to both an instance of a type
implementing our specified trait as well as a table used to look up trait
methods on that type at runtime. We create a trait object by specifying some
sort of pointer, such as a & reference or a Box<T> smart pointer, then the
dyn keyword, and then specifying the relevant trait. (We’ll talk about the
reason trait objects must use a pointer in Chapter 19 in the section
“Dynamically Sized Types and the Sized Trait.”) We can use trait objects in place of a generic or concrete type.
Wherever we use a trait object, Rust’s type system will ensure at compile time
that any value used in that context will implement the trait object’s trait.
Consequently, we don’t need to know all the possible types at compile time.
We’ve mentioned that in Rust, we refrain from calling structs and enums
“objects” to distinguish them from other languages’ objects. In a struct or
enum, the data in the struct fields and the behavior in impl blocks are
separated, whereas in other languages, the data and behavior combined into one
concept is often labeled an object. However, trait objects are more like
objects in other languages in the sense that they combine data and behavior.
But trait objects differ from traditional objects in that we can’t add data to
a trait object. Trait objects aren’t as generally useful as objects in other
languages: their specific purpose is to allow abstraction across common
behavior.
Listing 17-3 shows how to define a trait named Draw with one method named
draw:
Filename: src/lib.rs
pub trait Draw {
fn draw(&self);
}
Listing 17-3: Definition of the Draw trait
This syntax should look familiar from our discussions on how to define traits
in Chapter 10. Next comes some new syntax: Listing 17-4 defines a struct named
Screen that holds a vector named components. This vector is of type
Box<dyn Draw>, which is a trait object; it’s a stand-in for any type inside
a Box that implements the Draw trait.
Filename: src/lib.rs
pub trait Draw {
fn draw(&self);
}
pub struct Screen {
pub components: Vec<Box<dyn Draw>>,
}
Listing 17-4: Definition of the Screen struct with a
components field holding a vector of trait objects that implement the Draw
trait
On the Screen struct, we’ll define a method named run that will call the
draw method on each of its components, as shown in Listing 17-5:
Filename: src/lib.rs
pub trait Draw {
fn draw(&self);
}
pub struct Screen {
pub components: Vec<Box<dyn Draw>>,
}
impl Screen {
pub fn run(&self) {
for component in self.components.iter() {
component.draw();
}
}
}
Listing 17-5: A run method on Screen that calls the
draw method on each component
This works differently from defining a struct that uses a generic type
parameter with trait bounds. A generic type parameter can only be substituted
with one concrete type at a time, whereas trait objects allow for multiple
concrete types to fill in for the trait object at runtime. For example, we
could have defined the Screen struct using a generic type and a trait bound
as in Listing 17-6:
Filename: src/lib.rs
pub trait Draw {
fn draw(&self);
}
pub struct Screen<T: Draw> {
pub components: Vec<T>,
}
impl<T> Screen<T>
where
T: Draw,
{
pub fn run(&self) {
for component in self.components.iter() {
component.draw();
}
}
}
Listing 17-6: An alternate implementation of the Screen
struct and its run method using generics and trait bounds
This restricts us to a Screen instance that has a list of components all of
type Button or all of type TextField. If you’ll only ever have homogeneous
collections, using generics and trait bounds is preferable because the
definitions will be monomorphized at compile time to use the concrete types.
On the other hand, with the method using trait objects, one Screen instance
can hold a Vec<T> that contains a Box<Button> as well as a
Box<TextField>. Let’s look at how this works, and then we’ll talk about the
runtime performance implications.
Implementing the Trait
Now we’ll add some types that implement the Draw trait. We’ll provide the
Button type. Again, actually implementing a GUI library is beyond the scope
of this book, so the draw method won’t have any useful implementation in its
body. To imagine what the implementation might look like, a Button struct
might have fields for width, height, and label, as shown in Listing 17-7:
Filename: src/lib.rs
pub trait Draw {
fn draw(&self);
}
pub struct Screen {
pub components: Vec<Box<dyn Draw>>,
}
impl Screen {
pub fn run(&self) {
for component in self.components.iter() {
component.draw();
}
}
}
pub struct Button {
pub width: u32,
pub height: u32,
pub label: String,
}
impl Draw for Button {
fn draw(&self) {
// code to actually draw a button
}
}
Listing 17-7: A Button struct that implements the
Draw trait
The width, height, and label fields on Button will differ from the
fields on other components, such as a TextField type, that might have those
fields plus a placeholder field instead. Each of the types we want to draw on
the screen will implement the Draw trait but will use different code in the
draw method to define how to draw that particular type, as Button has here
(without the actual GUI code, which is beyond the scope of this chapter). The
Button type, for instance, might have an additional impl block containing
methods related to what happens when a user clicks the button. These kinds of
methods won’t apply to types like TextField.
If someone using our library decides to implement a SelectBox struct that has
width, height, and options fields, they implement the Draw trait on the
SelectBox type as well, as shown in Listing 17-8:
Filename: src/main.rs
use gui::Draw;
struct SelectBox {
width: u32,
height: u32,
options: Vec<String>,
}
impl Draw for SelectBox {
fn draw(&self) {
// code to actually draw a select box
}
}
fn main() {}
Listing 17-8: Another crate using gui and implementing
the Draw trait on a SelectBox struct
Our library’s user can now write their main function to create a Screen
instance. To the Screen instance, they can add a SelectBox and a Button
by putting each in a Box<T> to become a trait object. They can then call the
run method on the Screen instance, which will call draw on each of the
components. Listing 17-9 shows this implementation:
Filename: src/main.rs
use gui::Draw;
struct SelectBox {
width: u32,
height: u32,
options: Vec<String>,
}
impl Draw for SelectBox {
fn draw(&self) {
// code to actually draw a select box
}
}
use gui::{Button, Screen};
fn main() {
let screen = Screen {
components: vec![
Box::new(SelectBox {
width: 75,
height: 10,
options: vec![
String::from("Yes"),
String::from("Maybe"),
String::from("No"),
],
}),
Box::new(Button {
width: 50,
height: 10,
label: String::from("OK"),
}),
],
};
screen.run();
}
Listing 17-9: Using trait objects to store values of different types that implement the same trait
When we wrote the library, we didn’t know that someone might add the
SelectBox type, but our Screen implementation was able to operate on the
new type and draw it because SelectBox implements the Draw trait, which
means it implements the draw method.
This concept—of being concerned only with the messages a value responds to
rather than the value’s concrete type—is similar to the concept of duck
typing in dynamically typed languages: if it walks like a duck and quacks
like a duck, then it must be a duck! In the implementation of run on Screen
in Listing 17-5, run doesn’t need to know what the concrete type of each
component is. It doesn’t check whether a component is an instance of a Button
or a SelectBox, it just calls the draw method on the component. By
specifying Box<dyn Draw> as the type of the values in the components
vector, we’ve defined Screen to need values that we can call the draw
method on.
The advantage of using trait objects and Rust’s type system to write code similar to code using duck typing is that we never have to check whether a value implements a particular method at runtime or worry about getting errors if a value doesn’t implement a method but we call it anyway. Rust won’t compile our code if the values don’t implement the traits that the trait objects need.
For example, Listing 17-10 shows what happens if we try to create a Screen
with a String as a component:
Filename: src/main.rs
use gui::Screen;
fn main() {
let screen = Screen {
components: vec![Box::new(String::from("Hi"))],
};
screen.run();
}
Listing 17-10: Attempting to use a type that doesn’t implement the trait object’s trait
We’ll get this error because String doesn’t implement the Draw trait:
$ cargo run
Compiling gui v0.1.0 (file:///projects/gui)
error[E0277]: the trait bound `String: Draw` is not satisfied
--> src/main.rs:5:26
|
5 | components: vec![Box::new(String::from("Hi"))],
| ^^^^^^^^^^^^^^^^^^^^^^^^^^^^ the trait `Draw` is not implemented for `String`
|
= note: required for the cast to the object type `dyn Draw`
error: aborting due to previous error
For more information about this error, try `rustc --explain E0277`.
error: could not compile `gui`
To learn more, run the command again with --verbose.
This error lets us know that either we’re passing something to Screen we
didn’t mean to pass and we should pass a different type or we should implement
Draw on String so that Screen is able to call draw on it.
Trait Objects Perform Dynamic Dispatch
Recall in the “Performance of Code Using Generics” section in Chapter 10 our discussion on the monomorphization process performed by the compiler when we use trait bounds on generics: the compiler generates nongeneric implementations of functions and methods for each concrete type that we use in place of a generic type parameter. The code that results from monomorphization is doing static dispatch, which is when the compiler knows what method you’re calling at compile time. This is opposed to dynamic dispatch, which is when the compiler can’t tell at compile time which method you’re calling. In dynamic dispatch cases, the compiler emits code that at runtime will figure out which method to call.
When we use trait objects, Rust must use dynamic dispatch. The compiler doesn’t know all the types that might be used with the code that is using trait objects, so it doesn’t know which method implemented on which type to call. Instead, at runtime, Rust uses the pointers inside the trait object to know which method to call. There is a runtime cost when this lookup happens that doesn’t occur with static dispatch. Dynamic dispatch also prevents the compiler from choosing to inline a method’s code, which in turn prevents some optimizations. However, we did get extra flexibility in the code that we wrote in Listing 17-5 and were able to support in Listing 17-9, so it’s a trade-off to consider.
Object Safety Is Required for Trait Objects
You can only make object-safe traits into trait objects. Some complex rules govern all the properties that make a trait object safe, but in practice, only two rules are relevant. A trait is object safe if all the methods defined in the trait have the following properties:
- The return type isn’t
Self. - There are no generic type parameters.
The Self keyword is an alias for the type we’re implementing the traits or
methods on. Trait objects must be object safe because once you’ve used a trait
object, Rust no longer knows the concrete type that’s implementing that trait.
If a trait method returns the concrete Self type, but a trait object forgets
the exact type that Self is, there is no way the method can use the original
concrete type. The same is true of generic type parameters that are filled in
with concrete type parameters when the trait is used: the concrete types become
part of the type that implements the trait. When the type is forgotten through
the use of a trait object, there is no way to know what types to fill in the
generic type parameters with.
An example of a trait whose methods are not object safe is the standard
library’s Clone trait. The signature for the clone method in the Clone
trait looks like this:
#![allow(unused)] fn main() { pub trait Clone { fn clone(&self) -> Self; } }
The String type implements the Clone trait, and when we call the clone
method on an instance of String we get back an instance of String.
Similarly, if we call clone on an instance of Vec<T>, we get back an
instance of Vec<T>. The signature of clone needs to know what type will
stand in for Self, because that’s the return type.
The compiler will indicate when you’re trying to do something that violates the
rules of object safety in regard to trait objects. For example, let’s say we
tried to implement the Screen struct in Listing 17-4 to hold types that
implement the Clone trait instead of the Draw trait, like this:
pub struct Screen {
pub components: Vec<Box<dyn Clone>>,
}
We would get this error:
$ cargo build
Compiling gui v0.1.0 (file:///projects/gui)
error[E0038]: the trait `Clone` cannot be made into an object
--> src/lib.rs:2:21
|
2 | pub components: Vec<Box<dyn Clone>>,
| ^^^^^^^^^^^^^^^^^^^ `Clone` cannot be made into an object
|
= note: the trait cannot be made into an object because it requires `Self: Sized`
= note: for a trait to be "object safe" it needs to allow building a vtable to allow the call to be resolvable dynamically; for more information visit <https://doc.rust-lang.org/reference/items/traits.html#object-safety>
error: aborting due to previous error
For more information about this error, try `rustc --explain E0038`.
error: could not compile `gui`
To learn more, run the command again with --verbose.
This error means you can’t use this trait as a trait object in this way. If you’re interested in more details on object safety, see Rust RFC 255.
Implementing an Object-Oriented Design Pattern
The state pattern is an object-oriented design pattern. The crux of the pattern is that a value has some internal state, which is represented by a set of state objects, and the value’s behavior changes based on the internal state. The state objects share functionality: in Rust, of course, we use structs and traits rather than objects and inheritance. Each state object is responsible for its own behavior and for governing when it should change into another state. The value that holds a state object knows nothing about the different behavior of the states or when to transition between states.
Using the state pattern means when the business requirements of the program change, we won’t need to change the code of the value holding the state or the code that uses the value. We’ll only need to update the code inside one of the state objects to change its rules or perhaps add more state objects. Let’s look at an example of the state design pattern and how to use it in Rust.
We’ll implement a blog post workflow in an incremental way. The blog’s final functionality will look like this:
- A blog post starts as an empty draft.
- When the draft is done, a review of the post is requested.
- When the post is approved, it gets published.
- Only published blog posts return content to print, so unapproved posts can’t accidentally be published.
Any other changes attempted on a post should have no effect. For example, if we try to approve a draft blog post before we’ve requested a review, the post should remain an unpublished draft.
Listing 17-11 shows this workflow in code form: this is an example usage of the
API we’ll implement in a library crate named blog. This won’t compile yet
because we haven’t implemented the blog crate yet.
Filename: src/main.rs
use blog::Post;
fn main() {
let mut post = Post::new();
post.add_text("I ate a salad for lunch today");
assert_eq!("", post.content());
post.request_review();
assert_eq!("", post.content());
post.approve();
assert_eq!("I ate a salad for lunch today", post.content());
}
Listing 17-11: Code that demonstrates the desired
behavior we want our blog crate to have
We want to allow the user to create a new draft blog post with Post::new.
Then we want to allow text to be added to the blog post while it’s in the draft
state. If we try to get the post’s content immediately, before approval,
nothing should happen because the post is still a draft. We’ve added
assert_eq! in the code for demonstration purposes. An excellent unit test for
this would be to assert that a draft blog post returns an empty string from the
content method, but we’re not going to write tests for this example.
Next, we want to enable a request for a review of the post, and we want
content to return an empty string while waiting for the review. When the post
receives approval, it should get published, meaning the text of the post will
be returned when content is called.
Notice that the only type we’re interacting with from the crate is the Post
type. This type will use the state pattern and will hold a value that will be
one of three state objects representing the various states a post can be
in—draft, waiting for review, or published. Changing from one state to another
will be managed internally within the Post type. The states change in
response to the methods called by our library’s users on the Post instance,
but they don’t have to manage the state changes directly. Also, users can’t
make a mistake with the states, like publishing a post before it’s reviewed.
Defining Post and Creating a New Instance in the Draft State
Let’s get started on the implementation of the library! We know we need a
public Post struct that holds some content, so we’ll start with the
definition of the struct and an associated public new function to create an
instance of Post, as shown in Listing 17-12. We’ll also make a private
State trait. Then Post will hold a trait object of Box<dyn State>
inside an Option<T> in a private field named state. You’ll see why the
Option<T> is necessary in a bit.
Filename: src/lib.rs
pub struct Post {
state: Option<Box<dyn State>>,
content: String,
}
impl Post {
pub fn new() -> Post {
Post {
state: Some(Box::new(Draft {})),
content: String::new(),
}
}
}
trait State {}
struct Draft {}
impl State for Draft {}
Listing 17-12: Definition of a Post struct and a new
function that creates a new Post instance, a State trait, and a Draft
struct
The State trait defines the behavior shared by different post states, and the
Draft, PendingReview, and Published states will all implement the State
trait. For now, the trait doesn’t have any methods, and we’ll start by defining
just the Draft state because that is the state we want a post to start in.
When we create a new Post, we set its state field to a Some value that
holds a Box. This Box points to a new instance of the Draft struct. This
ensures whenever we create a new instance of Post, it will start out as a
draft. Because the state field of Post is private, there is no way to
create a Post in any other state! In the Post::new function, we set the
content field to a new, empty String.
Storing the Text of the Post Content
Listing 17-11 showed that we want to be able to call a method named
add_text and pass it a &str that is then added to the text content of the
blog post. We implement this as a method rather than exposing the content
field as pub. This means we can implement a method later that will control
how the content field’s data is read. The add_text method is pretty
straightforward, so let’s add the implementation in Listing 17-13 to the impl Post block:
Filename: src/lib.rs
pub struct Post {
state: Option<Box<dyn State>>,
content: String,
}
impl Post {
// --snip--
pub fn new() -> Post {
Post {
state: Some(Box::new(Draft {})),
content: String::new(),
}
}
pub fn add_text(&mut self, text: &str) {
self.content.push_str(text);
}
}
trait State {}
struct Draft {}
impl State for Draft {}
Listing 17-13: Implementing the add_text method to add
text to a post’s content
The add_text method takes a mutable reference to self, because we’re
changing the Post instance that we’re calling add_text on. We then call
push_str on the String in content and pass the text argument to add to
the saved content. This behavior doesn’t depend on the state the post is in,
so it’s not part of the state pattern. The add_text method doesn’t interact
with the state field at all, but it is part of the behavior we want to
support.
Ensuring the Content of a Draft Post Is Empty
Even after we’ve called add_text and added some content to our post, we still
want the content method to return an empty string slice because the post is
still in the draft state, as shown on line 7 of Listing 17-11. For now, let’s
implement the content method with the simplest thing that will fulfill this
requirement: always returning an empty string slice. We’ll change this later
once we implement the ability to change a post’s state so it can be published.
So far, posts can only be in the draft state, so the post content should always
be empty. Listing 17-14 shows this placeholder implementation:
Filename: src/lib.rs
pub struct Post {
state: Option<Box<dyn State>>,
content: String,
}
impl Post {
// --snip--
pub fn new() -> Post {
Post {
state: Some(Box::new(Draft {})),
content: String::new(),
}
}
pub fn add_text(&mut self, text: &str) {
self.content.push_str(text);
}
pub fn content(&self) -> &str {
""
}
}
trait State {}
struct Draft {}
impl State for Draft {}
Listing 17-14: Adding a placeholder implementation for
the content method on Post that always returns an empty string slice
With this added content method, everything in Listing 17-11 up to line 7
works as intended.
Requesting a Review of the Post Changes Its State
Next, we need to add functionality to request a review of a post, which should
change its state from Draft to PendingReview. Listing 17-15 shows this code:
Filename: src/lib.rs
pub struct Post {
state: Option<Box<dyn State>>,
content: String,
}
impl Post {
// --snip--
pub fn new() -> Post {
Post {
state: Some(Box::new(Draft {})),
content: String::new(),
}
}
pub fn add_text(&mut self, text: &str) {
self.content.push_str(text);
}
pub fn content(&self) -> &str {
""
}
pub fn request_review(&mut self) {
if let Some(s) = self.state.take() {
self.state = Some(s.request_review())
}
}
}
trait State {
fn request_review(self: Box<Self>) -> Box<dyn State>;
}
struct Draft {}
impl State for Draft {
fn request_review(self: Box<Self>) -> Box<dyn State> {
Box::new(PendingReview {})
}
}
struct PendingReview {}
impl State for PendingReview {
fn request_review(self: Box<Self>) -> Box<dyn State> {
self
}
}
Listing 17-15: Implementing request_review methods on
Post and the State trait
We give Post a public method named request_review that will take a mutable
reference to self. Then we call an internal request_review method on the
current state of Post, and this second request_review method consumes the
current state and returns a new state.
We’ve added the request_review method to the State trait; all types that
implement the trait will now need to implement the request_review method.
Note that rather than having self, &self, or &mut self as the first
parameter of the method, we have self: Box<Self>. This syntax means the
method is only valid when called on a Box holding the type. This syntax takes
ownership of Box<Self>, invalidating the old state so the state value of the
Post can transform into a new state.
To consume the old state, the request_review method needs to take ownership
of the state value. This is where the Option in the state field of Post
comes in: we call the take method to take the Some value out of the state
field and leave a None in its place, because Rust doesn’t let us have
unpopulated fields in structs. This lets us move the state value out of
Post rather than borrowing it. Then we’ll set the post’s state value to the
result of this operation.
We need to set state to None temporarily rather than setting it directly
with code like self.state = self.state.request_review(); to get ownership of
the state value. This ensures Post can’t use the old state value after
we’ve transformed it into a new state.
The request_review method on Draft needs to return a new, boxed instance of
a new PendingReview struct, which represents the state when a post is waiting
for a review. The PendingReview struct also implements the request_review
method but doesn’t do any transformations. Rather, it returns itself, because
when we request a review on a post already in the PendingReview state, it
should stay in the PendingReview state.
Now we can start seeing the advantages of the state pattern: the
request_review method on Post is the same no matter its state value. Each
state is responsible for its own rules.
We’ll leave the content method on Post as is, returning an empty string
slice. We can now have a Post in the PendingReview state as well as in the
Draft state, but we want the same behavior in the PendingReview state.
Listing 17-11 now works up to line 10!
Adding the approve Method that Changes the Behavior of content
The approve method will be similar to the request_review method: it will
set state to the value that the current state says it should have when that
state is approved, as shown in Listing 17-16:
Filename: src/lib.rs
pub struct Post {
state: Option<Box<dyn State>>,
content: String,
}
impl Post {
// --snip--
pub fn new() -> Post {
Post {
state: Some(Box::new(Draft {})),
content: String::new(),
}
}
pub fn add_text(&mut self, text: &str) {
self.content.push_str(text);
}
pub fn content(&self) -> &str {
""
}
pub fn request_review(&mut self) {
if let Some(s) = self.state.take() {
self.state = Some(s.request_review())
}
}
pub fn approve(&mut self) {
if let Some(s) = self.state.take() {
self.state = Some(s.approve())
}
}
}
trait State {
fn request_review(self: Box<Self>) -> Box<dyn State>;
fn approve(self: Box<Self>) -> Box<dyn State>;
}
struct Draft {}
impl State for Draft {
// --snip--
fn request_review(self: Box<Self>) -> Box<dyn State> {
Box::new(PendingReview {})
}
fn approve(self: Box<Self>) -> Box<dyn State> {
self
}
}
struct PendingReview {}
impl State for PendingReview {
// --snip--
fn request_review(self: Box<Self>) -> Box<dyn State> {
self
}
fn approve(self: Box<Self>) -> Box<dyn State> {
Box::new(Published {})
}
}
struct Published {}
impl State for Published {
fn request_review(self: Box<Self>) -> Box<dyn State> {
self
}
fn approve(self: Box<Self>) -> Box<dyn State> {
self
}
}
Listing 17-16: Implementing the approve method on
Post and the State trait
We add the approve method to the State trait and add a new struct that
implements State, the Published state.
Similar to request_review, if we call the approve method on a Draft, it
will have no effect because it will return self. When we call approve on
PendingReview, it returns a new, boxed instance of the Published struct.
The Published struct implements the State trait, and for both the
request_review method and the approve method, it returns itself, because
the post should stay in the Published state in those cases.
Now we need to update the content method on Post: if the state is
Published, we want to return the value in the post’s content field;
otherwise, we want to return an empty string slice, as shown in Listing 17-17:
Filename: src/lib.rs
pub struct Post {
state: Option<Box<dyn State>>,
content: String,
}
impl Post {
// --snip--
pub fn new() -> Post {
Post {
state: Some(Box::new(Draft {})),
content: String::new(),
}
}
pub fn add_text(&mut self, text: &str) {
self.content.push_str(text);
}
pub fn content(&self) -> &str {
self.state.as_ref().unwrap().content(self)
}
// --snip--
pub fn request_review(&mut self) {
if let Some(s) = self.state.take() {
self.state = Some(s.request_review())
}
}
pub fn approve(&mut self) {
if let Some(s) = self.state.take() {
self.state = Some(s.approve())
}
}
}
trait State {
fn request_review(self: Box<Self>) -> Box<dyn State>;
fn approve(self: Box<Self>) -> Box<dyn State>;
}
struct Draft {}
impl State for Draft {
fn request_review(self: Box<Self>) -> Box<dyn State> {
Box::new(PendingReview {})
}
fn approve(self: Box<Self>) -> Box<dyn State> {
self
}
}
struct PendingReview {}
impl State for PendingReview {
fn request_review(self: Box<Self>) -> Box<dyn State> {
self
}
fn approve(self: Box<Self>) -> Box<dyn State> {
Box::new(Published {})
}
}
struct Published {}
impl State for Published {
fn request_review(self: Box<Self>) -> Box<dyn State> {
self
}
fn approve(self: Box<Self>) -> Box<dyn State> {
self
}
}
Listing 17-17: Updating the content method on Post to
delegate to a content method on State
Because the goal is to keep all these rules inside the structs that implement
State, we call a content method on the value in state and pass the post
instance (that is, self) as an argument. Then we return the value that is
returned from using the content method on the state value.
We call the as_ref method on the Option because we want a reference to the
value inside the Option rather than ownership of the value. Because state
is an Option<Box<dyn State>>, when we call as_ref, an Option<&Box<dyn State>> is
returned. If we didn’t call as_ref, we would get an error because we can’t
move state out of the borrowed &self of the function parameter.
We then call the unwrap method, which we know will never panic, because we
know the methods on Post ensure that state will always contain a Some
value when those methods are done. This is one of the cases we talked about in
the “Cases In Which You Have More Information Than the
Compiler” section of Chapter 9 when we
know that a None value is never possible, even though the compiler isn’t able
to understand that.
At this point, when we call content on the &Box<dyn State>, deref coercion will
take effect on the & and the Box so the content method will ultimately be
called on the type that implements the State trait. That means we need to add
content to the State trait definition, and that is where we’ll put the
logic for what content to return depending on which state we have, as shown in
Listing 17-18:
Filename: src/lib.rs
pub struct Post {
state: Option<Box<dyn State>>,
content: String,
}
impl Post {
pub fn new() -> Post {
Post {
state: Some(Box::new(Draft {})),
content: String::new(),
}
}
pub fn add_text(&mut self, text: &str) {
self.content.push_str(text);
}
pub fn content(&self) -> &str {
self.state.as_ref().unwrap().content(self)
}
pub fn request_review(&mut self) {
if let Some(s) = self.state.take() {
self.state = Some(s.request_review())
}
}
pub fn approve(&mut self) {
if let Some(s) = self.state.take() {
self.state = Some(s.approve())
}
}
}
trait State {
// --snip--
fn request_review(self: Box<Self>) -> Box<dyn State>;
fn approve(self: Box<Self>) -> Box<dyn State>;
fn content<'a>(&self, post: &'a Post) -> &'a str {
""
}
}
// --snip--
struct Draft {}
impl State for Draft {
fn request_review(self: Box<Self>) -> Box<dyn State> {
Box::new(PendingReview {})
}
fn approve(self: Box<Self>) -> Box<dyn State> {
self
}
}
struct PendingReview {}
impl State for PendingReview {
fn request_review(self: Box<Self>) -> Box<dyn State> {
self
}
fn approve(self: Box<Self>) -> Box<dyn State> {
Box::new(Published {})
}
}
struct Published {}
impl State for Published {
// --snip--
fn request_review(self: Box<Self>) -> Box<dyn State> {
self
}
fn approve(self: Box<Self>) -> Box<dyn State> {
self
}
fn content<'a>(&self, post: &'a Post) -> &'a str {
&post.content
}
}
Listing 17-18: Adding the content method to the State
trait
We add a default implementation for the content method that returns an empty
string slice. That means we don’t need to implement content on the Draft
and PendingReview structs. The Published struct will override the content
method and return the value in post.content.
Note that we need lifetime annotations on this method, as we discussed in
Chapter 10. We’re taking a reference to a post as an argument and returning a
reference to part of that post, so the lifetime of the returned reference is
related to the lifetime of the post argument.
And we’re done—all of Listing 17-11 now works! We’ve implemented the state
pattern with the rules of the blog post workflow. The logic related to the
rules lives in the state objects rather than being scattered throughout Post.
Trade-offs of the State Pattern
We’ve shown that Rust is capable of implementing the object-oriented state
pattern to encapsulate the different kinds of behavior a post should have in
each state. The methods on Post know nothing about the various behaviors. The
way we organized the code, we have to look in only one place to know the
different ways a published post can behave: the implementation of the State
trait on the Published struct.
If we were to create an alternative implementation that didn’t use the state
pattern, we might instead use match expressions in the methods on Post or
even in the main code that checks the state of the post and changes behavior
in those places. That would mean we would have to look in several places to
understand all the implications of a post being in the published state! This
would only increase the more states we added: each of those match expressions
would need another arm.
With the state pattern, the Post methods and the places we use Post don’t
need match expressions, and to add a new state, we would only need to add a
new struct and implement the trait methods on that one struct.
The implementation using the state pattern is easy to extend to add more functionality. To see the simplicity of maintaining code that uses the state pattern, try a few of these suggestions:
- Add a
rejectmethod that changes the post’s state fromPendingReviewback toDraft. - Require two calls to
approvebefore the state can be changed toPublished. - Allow users to add text content only when a post is in the
Draftstate. Hint: have the state object responsible for what might change about the content but not responsible for modifying thePost.
One downside of the state pattern is that, because the states implement the
transitions between states, some of the states are coupled to each other. If we
add another state between PendingReview and Published, such as Scheduled,
we would have to change the code in PendingReview to transition to
Scheduled instead. It would be less work if PendingReview didn’t need to
change with the addition of a new state, but that would mean switching to
another design pattern.
Another downside is that we’ve duplicated some logic. To eliminate some of the
duplication, we might try to make default implementations for the
request_review and approve methods on the State trait that return self;
however, this would violate object safety, because the trait doesn’t know what
the concrete self will be exactly. We want to be able to use State as a
trait object, so we need its methods to be object safe.
Other duplication includes the similar implementations of the request_review
and approve methods on Post. Both methods delegate to the implementation of
the same method on the value in the state field of Option and set the new
value of the state field to the result. If we had a lot of methods on Post
that followed this pattern, we might consider defining a macro to eliminate the
repetition (see the “Macros” section in Chapter 19).
By implementing the state pattern exactly as it’s defined for object-oriented
languages, we’re not taking as full advantage of Rust’s strengths as we could.
Let’s look at some changes we can make to the blog crate that can make
invalid states and transitions into compile time errors.
Encoding States and Behavior as Types
We’ll show you how to rethink the state pattern to get a different set of trade-offs. Rather than encapsulating the states and transitions completely so outside code has no knowledge of them, we’ll encode the states into different types. Consequently, Rust’s type checking system will prevent attempts to use draft posts where only published posts are allowed by issuing a compiler error.
Let’s consider the first part of main in Listing 17-11:
Filename: src/main.rs
use blog::Post;
fn main() {
let mut post = Post::new();
post.add_text("I ate a salad for lunch today");
assert_eq!("", post.content());
post.request_review();
assert_eq!("", post.content());
post.approve();
assert_eq!("I ate a salad for lunch today", post.content());
}
We still enable the creation of new posts in the draft state using Post::new
and the ability to add text to the post’s content. But instead of having a
content method on a draft post that returns an empty string, we’ll make it so
draft posts don’t have the content method at all. That way, if we try to get
a draft post’s content, we’ll get a compiler error telling us the method
doesn’t exist. As a result, it will be impossible for us to accidentally
display draft post content in production, because that code won’t even compile.
Listing 17-19 shows the definition of a Post struct and a DraftPost struct,
as well as methods on each:
Filename: src/lib.rs
pub struct Post {
content: String,
}
pub struct DraftPost {
content: String,
}
impl Post {
pub fn new() -> DraftPost {
DraftPost {
content: String::new(),
}
}
pub fn content(&self) -> &str {
&self.content
}
}
impl DraftPost {
pub fn add_text(&mut self, text: &str) {
self.content.push_str(text);
}
}
Listing 17-19: A Post with a content method and a
DraftPost without a content method
Both the Post and DraftPost structs have a private content field that
stores the blog post text. The structs no longer have the state field because
we’re moving the encoding of the state to the types of the structs. The Post
struct will represent a published post, and it has a content method that
returns the content.
We still have a Post::new function, but instead of returning an instance of
Post, it returns an instance of DraftPost. Because content is private
and there aren’t any functions that return Post, it’s not possible to create
an instance of Post right now.
The DraftPost struct has an add_text method, so we can add text to
content as before, but note that DraftPost does not have a content method
defined! So now the program ensures all posts start as draft posts, and draft
posts don’t have their content available for display. Any attempt to get around
these constraints will result in a compiler error.
Implementing Transitions as Transformations into Different Types
So how do we get a published post? We want to enforce the rule that a draft
post has to be reviewed and approved before it can be published. A post in the
pending review state should still not display any content. Let’s implement
these constraints by adding another struct, PendingReviewPost, defining the
request_review method on DraftPost to return a PendingReviewPost, and
defining an approve method on PendingReviewPost to return a Post, as
shown in Listing 17-20:
Filename: src/lib.rs
pub struct Post {
content: String,
}
pub struct DraftPost {
content: String,
}
impl Post {
pub fn new() -> DraftPost {
DraftPost {
content: String::new(),
}
}
pub fn content(&self) -> &str {
&self.content
}
}
impl DraftPost {
// --snip--
pub fn add_text(&mut self, text: &str) {
self.content.push_str(text);
}
pub fn request_review(self) -> PendingReviewPost {
PendingReviewPost {
content: self.content,
}
}
}
pub struct PendingReviewPost {
content: String,
}
impl PendingReviewPost {
pub fn approve(self) -> Post {
Post {
content: self.content,
}
}
}
Listing 17-20: A PendingReviewPost that gets created by
calling request_review on DraftPost and an approve method that turns a
PendingReviewPost into a published Post
The request_review and approve methods take ownership of self, thus
consuming the DraftPost and PendingReviewPost instances and transforming
them into a PendingReviewPost and a published Post, respectively. This way,
we won’t have any lingering DraftPost instances after we’ve called
request_review on them, and so forth. The PendingReviewPost struct doesn’t
have a content method defined on it, so attempting to read its content
results in a compiler error, as with DraftPost. Because the only way to get a
published Post instance that does have a content method defined is to call
the approve method on a PendingReviewPost, and the only way to get a
PendingReviewPost is to call the request_review method on a DraftPost,
we’ve now encoded the blog post workflow into the type system.
But we also have to make some small changes to main. The request_review and
approve methods return new instances rather than modifying the struct they’re
called on, so we need to add more let post = shadowing assignments to save
the returned instances. We also can’t have the assertions about the draft and
pending review post’s contents be empty strings, nor do we need them: we can’t
compile code that tries to use the content of posts in those states any longer.
The updated code in main is shown in Listing 17-21:
Filename: src/main.rs
use blog::Post;
fn main() {
let mut post = Post::new();
post.add_text("I ate a salad for lunch today");
let post = post.request_review();
let post = post.approve();
assert_eq!("I ate a salad for lunch today", post.content());
}
Listing 17-21: Modifications to main to use the new
implementation of the blog post workflow
The changes we needed to make to main to reassign post mean that this
implementation doesn’t quite follow the object-oriented state pattern anymore:
the transformations between the states are no longer encapsulated entirely
within the Post implementation. However, our gain is that invalid states are
now impossible because of the type system and the type checking that happens at
compile time! This ensures that certain bugs, such as display of the content of
an unpublished post, will be discovered before they make it to production.
Try the tasks suggested for additional requirements that we mentioned at the
start of this section on the blog crate as it is after Listing 17-20 to see
what you think about the design of this version of the code. Note that some of
the tasks might be completed already in this design.
We’ve seen that even though Rust is capable of implementing object-oriented design patterns, other patterns, such as encoding state into the type system, are also available in Rust. These patterns have different trade-offs. Although you might be very familiar with object-oriented patterns, rethinking the problem to take advantage of Rust’s features can provide benefits, such as preventing some bugs at compile time. Object-oriented patterns won’t always be the best solution in Rust due to certain features, like ownership, that object-oriented languages don’t have.
Summary
No matter whether or not you think Rust is an object-oriented language after reading this chapter, you now know that you can use trait objects to get some object-oriented features in Rust. Dynamic dispatch can give your code some flexibility in exchange for a bit of runtime performance. You can use this flexibility to implement object-oriented patterns that can help your code’s maintainability. Rust also has other features, like ownership, that object-oriented languages don’t have. An object-oriented pattern won’t always be the best way to take advantage of Rust’s strengths, but is an available option.
Next, we’ll look at patterns, which are another of Rust’s features that enable lots of flexibility. We’ve looked at them briefly throughout the book but haven’t seen their full capability yet. Let’s go!
Patterns and Matching
Patterns are a special syntax in Rust for matching against the structure of
types, both complex and simple. Using patterns in conjunction with match
expressions and other constructs gives you more control over a program’s
control flow. A pattern consists of some combination of the following:
- Literals
- Destructured arrays, enums, structs, or tuples
- Variables
- Wildcards
- Placeholders
These components describe the shape of the data we’re working with, which we then match against values to determine whether our program has the correct data to continue running a particular piece of code.
To use a pattern, we compare it to some value. If the pattern matches the
value, we use the value parts in our code. Recall the match expressions in
Chapter 6 that used patterns, such as the coin-sorting machine example. If the
value fits the shape of the pattern, we can use the named pieces. If it
doesn’t, the code associated with the pattern won’t run.
This chapter is a reference on all things related to patterns. We’ll cover the valid places to use patterns, the difference between refutable and irrefutable patterns, and the different kinds of pattern syntax that you might see. By the end of the chapter, you’ll know how to use patterns to express many concepts in a clear way.
All the Places Patterns Can Be Used
Patterns pop up in a number of places in Rust, and you’ve been using them a lot without realizing it! This section discusses all the places where patterns are valid.
match Arms
As discussed in Chapter 6, we use patterns in the arms of match expressions.
Formally, match expressions are defined as the keyword match, a value to
match on, and one or more match arms that consist of a pattern and an
expression to run if the value matches that arm’s pattern, like this:
match VALUE {
PATTERN => EXPRESSION,
PATTERN => EXPRESSION,
PATTERN => EXPRESSION,
}
One requirement for match expressions is that they need to be exhaustive in
the sense that all possibilities for the value in the match expression must
be accounted for. One way to ensure you’ve covered every possibility is to have
a catchall pattern for the last arm: for example, a variable name matching any
value can never fail and thus covers every remaining case.
A particular pattern _ will match anything, but it never binds to a variable,
so it’s often used in the last match arm. The _ pattern can be useful when
you want to ignore any value not specified, for example. We’ll cover the _
pattern in more detail in the “Ignoring Values in a
Pattern” section later in this
chapter.
Conditional if let Expressions
In Chapter 6 we discussed how to use if let expressions mainly as a shorter
way to write the equivalent of a match that only matches one case.
Optionally, if let can have a corresponding else containing code to run if
the pattern in the if let doesn’t match.
Listing 18-1 shows that it’s also possible to mix and match if let, else if, and else if let expressions. Doing so gives us more flexibility than a
match expression in which we can express only one value to compare with the
patterns. Also, the conditions in a series of if let, else if, else if let arms aren’t required to relate to each other.
The code in Listing 18-1 shows a series of checks for several conditions that decide what the background color should be. For this example, we’ve created variables with hardcoded values that a real program might receive from user input.
Filename: src/main.rs
fn main() { let favorite_color: Option<&str> = None; let is_tuesday = false; let age: Result<u8, _> = "34".parse(); if let Some(color) = favorite_color { println!("Using your favorite color, {}, as the background", color); } else if is_tuesday { println!("Tuesday is green day!"); } else if let Ok(age) = age { if age > 30 { println!("Using purple as the background color"); } else { println!("Using orange as the background color"); } } else { println!("Using blue as the background color"); } }
Listing 18-1: Mixing if let, else if, else if let,
and else
If the user specifies a favorite color, that color is the background color. If today is Tuesday, the background color is green. If the user specifies their age as a string and we can parse it as a number successfully, the color is either purple or orange depending on the value of the number. If none of these conditions apply, the background color is blue.
This conditional structure lets us support complex requirements. With the
hardcoded values we have here, this example will print Using purple as the background color.
You can see that if let can also introduce shadowed variables in the same way
that match arms can: the line if let Ok(age) = age introduces a new
shadowed age variable that contains the value inside the Ok variant. This
means we need to place the if age > 30 condition within that block: we can’t
combine these two conditions into if let Ok(age) = age && age > 30. The
shadowed age we want to compare to 30 isn’t valid until the new scope starts
with the curly bracket.
The downside of using if let expressions is that the compiler doesn’t check
exhaustiveness, whereas with match expressions it does. If we omitted the
last else block and therefore missed handling some cases, the compiler would
not alert us to the possible logic bug.
while let Conditional Loops
Similar in construction to if let, the while let conditional loop allows a
while loop to run for as long as a pattern continues to match. The example in
Listing 18-2 shows a while let loop that uses a vector as a stack and prints
the values in the vector in the opposite order in which they were pushed.
fn main() { let mut stack = Vec::new(); stack.push(1); stack.push(2); stack.push(3); while let Some(top) = stack.pop() { println!("{}", top); } }
Listing 18-2: Using a while let loop to print values
for as long as stack.pop() returns Some
This example prints 3, 2, and then 1. The pop method takes the last element
out of the vector and returns Some(value). If the vector is empty, pop
returns None. The while loop continues running the code in its block as
long as pop returns Some. When pop returns None, the loop stops. We can
use while let to pop every element off our stack.
for Loops
In Chapter 3, we mentioned that the for loop is the most common loop
construction in Rust code, but we haven’t yet discussed the pattern that for
takes. In a for loop, the pattern is the value that directly follows the
keyword for, so in for x in y the x is the pattern.
Listing 18-3 demonstrates how to use a pattern in a for loop to destructure,
or break apart, a tuple as part of the for loop.
fn main() { let v = vec!['a', 'b', 'c']; for (index, value) in v.iter().enumerate() { println!("{} is at index {}", value, index); } }
Listing 18-3: Using a pattern in a for loop to
destructure a tuple
The code in Listing 18-3 will print the following:
$ cargo run
Compiling patterns v0.1.0 (file:///projects/patterns)
Finished dev [unoptimized + debuginfo] target(s) in 0.52s
Running `target/debug/patterns`
a is at index 0
b is at index 1
c is at index 2
We use the enumerate method to adapt an iterator to produce a value and that
value’s index in the iterator, placed into a tuple. The first value produced is
the tuple (0, 'a'). When this value is matched to the pattern (index, value), index will be 0 and value will be 'a', printing the first line
of the output.
let Statements
Prior to this chapter, we had only explicitly discussed using patterns with
match and if let, but in fact, we’ve used patterns in other places as well,
including in let statements. For example, consider this straightforward
variable assignment with let:
#![allow(unused)] fn main() { let x = 5; }
Throughout this book, we’ve used let like this hundreds of times, and
although you might not have realized it, you were using patterns! More
formally, a let statement looks like this:
let PATTERN = EXPRESSION;
In statements like let x = 5; with a variable name in the PATTERN slot, the
variable name is just a particularly simple form of a pattern. Rust compares
the expression against the pattern and assigns any names it finds. So in the
let x = 5; example, x is a pattern that means “bind what matches here to
the variable x.” Because the name x is the whole pattern, this pattern
effectively means “bind everything to the variable x, whatever the value is.”
To see the pattern matching aspect of let more clearly, consider Listing
18-4, which uses a pattern with let to destructure a tuple.
fn main() { let (x, y, z) = (1, 2, 3); }
Listing 18-4: Using a pattern to destructure a tuple and create three variables at once
Here, we match a tuple against a pattern. Rust compares the value (1, 2, 3)
to the pattern (x, y, z) and sees that the value matches the pattern, so Rust
binds 1 to x, 2 to y, and 3 to z. You can think of this tuple
pattern as nesting three individual variable patterns inside it.
If the number of elements in the pattern doesn’t match the number of elements in the tuple, the overall type won’t match and we’ll get a compiler error. For example, Listing 18-5 shows an attempt to destructure a tuple with three elements into two variables, which won’t work.
fn main() {
let (x, y) = (1, 2, 3);
}
Listing 18-5: Incorrectly constructing a pattern whose variables don’t match the number of elements in the tuple
Attempting to compile this code results in this type error:
$ cargo run
Compiling patterns v0.1.0 (file:///projects/patterns)
error[E0308]: mismatched types
--> src/main.rs:2:9
|
2 | let (x, y) = (1, 2, 3);
| ^^^^^^ --------- this expression has type `({integer}, {integer}, {integer})`
| |
| expected a tuple with 3 elements, found one with 2 elements
|
= note: expected tuple `({integer}, {integer}, {integer})`
found tuple `(_, _)`
error: aborting due to previous error
For more information about this error, try `rustc --explain E0308`.
error: could not compile `patterns`
To learn more, run the command again with --verbose.
If we wanted to ignore one or more of the values in the tuple, we could use _
or .., as you’ll see in the “Ignoring Values in a
Pattern” section. If the problem
is that we have too many variables in the pattern, the solution is to make the
types match by removing variables so the number of variables equals the number
of elements in the tuple.
Function Parameters
Function parameters can also be patterns. The code in Listing 18-6, which
declares a function named foo that takes one parameter named x of type
i32, should by now look familiar.
fn foo(x: i32) { // code goes here } fn main() {}
Listing 18-6: A function signature uses patterns in the parameters
The x part is a pattern! As we did with let, we could match a tuple in a
function’s arguments to the pattern. Listing 18-7 splits the values in a tuple
as we pass it to a function.
Filename: src/main.rs
fn print_coordinates(&(x, y): &(i32, i32)) { println!("Current location: ({}, {})", x, y); } fn main() { let point = (3, 5); print_coordinates(&point); }
Listing 18-7: A function with parameters that destructure a tuple
This code prints Current location: (3, 5). The values &(3, 5) match the
pattern &(x, y), so x is the value 3 and y is the value 5.
We can also use patterns in closure parameter lists in the same way as in function parameter lists, because closures are similar to functions, as discussed in Chapter 13.
At this point, you’ve seen several ways of using patterns, but patterns don’t work the same in every place we can use them. In some places, the patterns must be irrefutable; in other circumstances, they can be refutable. We’ll discuss these two concepts next.
Refutability: Whether a Pattern Might Fail to Match
Patterns come in two forms: refutable and irrefutable. Patterns that will match
for any possible value passed are irrefutable. An example would be x in the
statement let x = 5; because x matches anything and therefore cannot fail
to match. Patterns that can fail to match for some possible value are
refutable. An example would be Some(x) in the expression if let Some(x) = a_value because if the value in the a_value variable is None rather than
Some, the Some(x) pattern will not match.
Function parameters, let statements, and for loops can only accept
irrefutable patterns, because the program cannot do anything meaningful when
values don’t match. The if let and while let expressions accept
refutable and irrefutable patterns, but the compiler warns against
irrefutable patterns because by definition they’re intended to handle possible
failure: the functionality of a conditional is in its ability to perform
differently depending on success or failure.
In general, you shouldn’t have to worry about the distinction between refutable and irrefutable patterns; however, you do need to be familiar with the concept of refutability so you can respond when you see it in an error message. In those cases, you’ll need to change either the pattern or the construct you’re using the pattern with, depending on the intended behavior of the code.
Let’s look at an example of what happens when we try to use a refutable pattern
where Rust requires an irrefutable pattern and vice versa. Listing 18-8 shows a
let statement, but for the pattern we’ve specified Some(x), a refutable
pattern. As you might expect, this code will not compile.
fn main() {
let some_option_value: Option<i32> = None;
let Some(x) = some_option_value;
}
Listing 18-8: Attempting to use a refutable pattern with
let
If some_option_value was a None value, it would fail to match the pattern
Some(x), meaning the pattern is refutable. However, the let statement can
only accept an irrefutable pattern because there is nothing valid the code can
do with a None value. At compile time, Rust will complain that we’ve tried to
use a refutable pattern where an irrefutable pattern is required:
$ cargo run
Compiling patterns v0.1.0 (file:///projects/patterns)
error[E0005]: refutable pattern in local binding: `None` not covered
--> src/main.rs:3:9
|
3 | let Some(x) = some_option_value;
| ^^^^^^^ pattern `None` not covered
|
= note: `let` bindings require an "irrefutable pattern", like a `struct` or an `enum` with only one variant
= note: for more information, visit https://doc.rust-lang.org/book/ch18-02-refutability.html
= note: the matched value is of type `Option<i32>`
help: you might want to use `if let` to ignore the variant that isn't matched
|
3 | if let Some(x) = some_option_value { /* */ }
|
error: aborting due to previous error
For more information about this error, try `rustc --explain E0005`.
error: could not compile `patterns`
To learn more, run the command again with --verbose.
Because we didn’t cover (and couldn’t cover!) every valid value with the
pattern Some(x), Rust rightfully produces a compiler error.
To fix the problem where we have a refutable pattern where an irrefutable
pattern is needed, we can change the code that uses the pattern: instead of
using let, we can use if let. Then if the pattern doesn’t match, the code
will just skip the code in the curly brackets, giving it a way to continue
validly. Listing 18-9 shows how to fix the code in Listing 18-8.
fn main() { let some_option_value: Option<i32> = None; if let Some(x) = some_option_value { println!("{}", x); } }
Listing 18-9: Using if let and a block with refutable
patterns instead of let
We’ve given the code an out! This code is perfectly valid, although it means we
cannot use an irrefutable pattern without receiving an error. If we give if let a pattern that will always match, such as x, as shown in Listing 18-10,
the compiler will give a warning.
fn main() { if let x = 5 { println!("{}", x); }; }
Listing 18-10: Attempting to use an irrefutable pattern
with if let
Rust complains that it doesn’t make sense to use if let with an irrefutable
pattern:
$ cargo run
Compiling patterns v0.1.0 (file:///projects/patterns)
warning: irrefutable if-let pattern
--> src/main.rs:2:5
|
2 | / if let x = 5 {
3 | | println!("{}", x);
4 | | };
| |_____^
|
= note: `#[warn(irrefutable_let_patterns)]` on by default
warning: 1 warning emitted
Finished dev [unoptimized + debuginfo] target(s) in 0.39s
Running `target/debug/patterns`
5
For this reason, match arms must use refutable patterns, except for the last
arm, which should match any remaining values with an irrefutable pattern. Rust
allows us to use an irrefutable pattern in a match with only one arm, but
this syntax isn’t particularly useful and could be replaced with a simpler
let statement.
Now that you know where to use patterns and the difference between refutable and irrefutable patterns, let’s cover all the syntax we can use to create patterns.
Pattern Syntax
Throughout the book, you’ve seen examples of many kinds of patterns. In this section, we gather all the syntax valid in patterns and discuss why you might want to use each one.
Matching Literals
As you saw in Chapter 6, you can match patterns against literals directly. The following code gives some examples:
fn main() { let x = 1; match x { 1 => println!("one"), 2 => println!("two"), 3 => println!("three"), _ => println!("anything"), } }
This code prints one because the value in x is 1. This syntax is useful
when you want your code to take an action if it gets a particular concrete
value.
Matching Named Variables
Named variables are irrefutable patterns that match any value, and we’ve used
them many times in the book. However, there is a complication when you use
named variables in match expressions. Because match starts a new scope,
variables declared as part of a pattern inside the match expression will
shadow those with the same name outside the match construct, as is the case
with all variables. In Listing 18-11, we declare a variable named x with the
value Some(5) and a variable y with the value 10. We then create a
match expression on the value x. Look at the patterns in the match arms and
println! at the end, and try to figure out what the code will print before
running this code or reading further.
Filename: src/main.rs
fn main() { let x = Some(5); let y = 10; match x { Some(50) => println!("Got 50"), Some(y) => println!("Matched, y = {:?}", y), _ => println!("Default case, x = {:?}", x), } println!("at the end: x = {:?}, y = {:?}", x, y); }
Listing 18-11: A match expression with an arm that
introduces a shadowed variable y
Let’s walk through what happens when the match expression runs. The pattern
in the first match arm doesn’t match the defined value of x, so the code
continues.
The pattern in the second match arm introduces a new variable named y that
will match any value inside a Some value. Because we’re in a new scope inside
the match expression, this is a new y variable, not the y we declared at
the beginning with the value 10. This new y binding will match any value
inside a Some, which is what we have in x. Therefore, this new y binds to
the inner value of the Some in x. That value is 5, so the expression for
that arm executes and prints Matched, y = 5.
If x had been a None value instead of Some(5), the patterns in the first
two arms wouldn’t have matched, so the value would have matched to the
underscore. We didn’t introduce the x variable in the pattern of the
underscore arm, so the x in the expression is still the outer x that hasn’t
been shadowed. In this hypothetical case, the match would print Default case, x = None.
When the match expression is done, its scope ends, and so does the scope of
the inner y. The last println! produces at the end: x = Some(5), y = 10.
To create a match expression that compares the values of the outer x and
y, rather than introducing a shadowed variable, we would need to use a match
guard conditional instead. We’ll talk about match guards later in the “Extra
Conditionals with Match Guards” section.
Multiple Patterns
In match expressions, you can match multiple patterns using the | syntax,
which means or. For example, the following code matches the value of x
against the match arms, the first of which has an or option, meaning if the
value of x matches either of the values in that arm, that arm’s code will
run:
fn main() { let x = 1; match x { 1 | 2 => println!("one or two"), 3 => println!("three"), _ => println!("anything"), } }
This code prints one or two.
Matching Ranges of Values with ..=
The ..= syntax allows us to match to an inclusive range of values. In the
following code, when a pattern matches any of the values within the range, that
arm will execute:
fn main() { let x = 5; match x { 1..=5 => println!("one through five"), _ => println!("something else"), } }
If x is 1, 2, 3, 4, or 5, the first arm will match. This syntax is more
convenient than using the | operator to express the same idea; instead of
1..=5, we would have to specify 1 | 2 | 3 | 4 | 5 if we used |.
Specifying a range is much shorter, especially if we want to match, say, any
number between 1 and 1,000!
Ranges are only allowed with numeric values or char values, because the
compiler checks that the range isn’t empty at compile time. The only types for
which Rust can tell if a range is empty or not are char and numeric values.
Here is an example using ranges of char values:
fn main() { let x = 'c'; match x { 'a'..='j' => println!("early ASCII letter"), 'k'..='z' => println!("late ASCII letter"), _ => println!("something else"), } }
Rust can tell that c is within the first pattern’s range and prints early ASCII letter.
Destructuring to Break Apart Values
We can also use patterns to destructure structs, enums, tuples, and references to use different parts of these values. Let’s walk through each value.
Destructuring Structs
Listing 18-12 shows a Point struct with two fields, x and y, that we can
break apart using a pattern with a let statement.
Filename: src/main.rs
struct Point { x: i32, y: i32, } fn main() { let p = Point { x: 0, y: 7 }; let Point { x: a, y: b } = p; assert_eq!(0, a); assert_eq!(7, b); }
Listing 18-12: Destructuring a struct’s fields into separate variables
This code creates the variables a and b that match the values of the x
and y fields of the p struct. This example shows that the names of the
variables in the pattern don’t have to match the field names of the struct. But
it’s common to want the variable names to match the field names to make it
easier to remember which variables came from which fields.
Because having variable names match the fields is common and because writing
let Point { x: x, y: y } = p; contains a lot of duplication, there is a
shorthand for patterns that match struct fields: you only need to list the name
of the struct field, and the variables created from the pattern will have the
same names. Listing 18-13 shows code that behaves in the same way as the code
in Listing 18-12, but the variables created in the let pattern are x and
y instead of a and b.
Filename: src/main.rs
struct Point { x: i32, y: i32, } fn main() { let p = Point { x: 0, y: 7 }; let Point { x, y } = p; assert_eq!(0, x); assert_eq!(7, y); }
Listing 18-13: Destructuring struct fields using struct field shorthand
This code creates the variables x and y that match the x and y fields
of the p variable. The outcome is that the variables x and y contain the
values from the p struct.
We can also destructure with literal values as part of the struct pattern rather than creating variables for all the fields. Doing so allows us to test some of the fields for particular values while creating variables to destructure the other fields.
Listing 18-14 shows a match expression that separates Point values into
three cases: points that lie directly on the x axis (which is true when y = 0), on the y axis (x = 0), or neither.
Filename: src/main.rs
struct Point { x: i32, y: i32, } fn main() { let p = Point { x: 0, y: 7 }; match p { Point { x, y: 0 } => println!("On the x axis at {}", x), Point { x: 0, y } => println!("On the y axis at {}", y), Point { x, y } => println!("On neither axis: ({}, {})", x, y), } }
Listing 18-14: Destructuring and matching literal values in one pattern
The first arm will match any point that lies on the x axis by specifying that
the y field matches if its value matches the literal 0. The pattern still
creates an x variable that we can use in the code for this arm.
Similarly, the second arm matches any point on the y axis by specifying that
the x field matches if its value is 0 and creates a variable y for the
value of the y field. The third arm doesn’t specify any literals, so it
matches any other Point and creates variables for both the x and y fields.
In this example, the value p matches the second arm by virtue of x
containing a 0, so this code will print On the y axis at 7.
Destructuring Enums
We’ve destructured enums earlier in this book, for example, when we
destructured Option<i32> in Listing 6-5 in Chapter 6. One detail we haven’t
mentioned explicitly is that the pattern to destructure an enum should
correspond to the way the data stored within the enum is defined. As an
example, in Listing 18-15 we use the Message enum from Listing 6-2 and write
a match with patterns that will destructure each inner value.
Filename: src/main.rs
enum Message { Quit, Move { x: i32, y: i32 }, Write(String), ChangeColor(i32, i32, i32), } fn main() { let msg = Message::ChangeColor(0, 160, 255); match msg { Message::Quit => { println!("The Quit variant has no data to destructure.") } Message::Move { x, y } => { println!( "Move in the x direction {} and in the y direction {}", x, y ); } Message::Write(text) => println!("Text message: {}", text), Message::ChangeColor(r, g, b) => println!( "Change the color to red {}, green {}, and blue {}", r, g, b ), } }
Listing 18-15: Destructuring enum variants that hold different kinds of values
This code will print Change the color to red 0, green 160, and blue 255. Try
changing the value of msg to see the code from the other arms run.
For enum variants without any data, like Message::Quit, we can’t destructure
the value any further. We can only match on the literal Message::Quit value,
and no variables are in that pattern.
For struct-like enum variants, such as Message::Move, we can use a pattern
similar to the pattern we specify to match structs. After the variant name, we
place curly brackets and then list the fields with variables so we break apart
the pieces to use in the code for this arm. Here we use the shorthand form as
we did in Listing 18-13.
For tuple-like enum variants, like Message::Write that holds a tuple with one
element and Message::ChangeColor that holds a tuple with three elements, the
pattern is similar to the pattern we specify to match tuples. The number of
variables in the pattern must match the number of elements in the variant we’re
matching.
Destructuring Nested Structs and Enums
Until now, all our examples have been matching structs or enums that were one level deep. Matching can work on nested items too!
For example, we can refactor the code in Listing 18-15 to support RGB and HSV
colors in the ChangeColor message, as shown in Listing 18-16.
enum Color { Rgb(i32, i32, i32), Hsv(i32, i32, i32), } enum Message { Quit, Move { x: i32, y: i32 }, Write(String), ChangeColor(Color), } fn main() { let msg = Message::ChangeColor(Color::Hsv(0, 160, 255)); match msg { Message::ChangeColor(Color::Rgb(r, g, b)) => println!( "Change the color to red {}, green {}, and blue {}", r, g, b ), Message::ChangeColor(Color::Hsv(h, s, v)) => println!( "Change the color to hue {}, saturation {}, and value {}", h, s, v ), _ => (), } }
Listing 18-16: Matching on nested enums
The pattern of the first arm in the match expression matches a
Message::ChangeColor enum variant that contains a Color::Rgb variant; then
the pattern binds to the three inner i32 values. The pattern of the second
arm also matches a Message::ChangeColor enum variant, but the inner enum
matches the Color::Hsv variant instead. We can specify these complex
conditions in one match expression, even though two enums are involved.
Destructuring Structs and Tuples
We can mix, match, and nest destructuring patterns in even more complex ways. The following example shows a complicated destructure where we nest structs and tuples inside a tuple and destructure all the primitive values out:
fn main() { struct Point { x: i32, y: i32, } let ((feet, inches), Point { x, y }) = ((3, 10), Point { x: 3, y: -10 }); }
This code lets us break complex types into their component parts so we can use the values we’re interested in separately.
Destructuring with patterns is a convenient way to use pieces of values, such as the value from each field in a struct, separately from each other.
Ignoring Values in a Pattern
You’ve seen that it’s sometimes useful to ignore values in a pattern, such as
in the last arm of a match, to get a catchall that doesn’t actually do
anything but does account for all remaining possible values. There are a few
ways to ignore entire values or parts of values in a pattern: using the _
pattern (which you’ve seen), using the _ pattern within another pattern,
using a name that starts with an underscore, or using .. to ignore remaining
parts of a value. Let’s explore how and why to use each of these patterns.
Ignoring an Entire Value with _
We’ve used the underscore (_) as a wildcard pattern that will match any value
but not bind to the value. Although the underscore _ pattern is especially
useful as the last arm in a match expression, we can use it in any pattern,
including function parameters, as shown in Listing 18-17.
Filename: src/main.rs
fn foo(_: i32, y: i32) { println!("This code only uses the y parameter: {}", y); } fn main() { foo(3, 4); }
Listing 18-17: Using _ in a function signature
This code will completely ignore the value passed as the first argument, 3,
and will print This code only uses the y parameter: 4.
In most cases when you no longer need a particular function parameter, you would change the signature so it doesn’t include the unused parameter. Ignoring a function parameter can be especially useful in some cases, for example, when implementing a trait when you need a certain type signature but the function body in your implementation doesn’t need one of the parameters. The compiler will then not warn about unused function parameters, as it would if you used a name instead.
Ignoring Parts of a Value with a Nested _
We can also use _ inside another pattern to ignore just part of a value, for
example, when we want to test for only part of a value but have no use for the
other parts in the corresponding code we want to run. Listing 18-18 shows code
responsible for managing a setting’s value. The business requirements are that
the user should not be allowed to overwrite an existing customization of a
setting but can unset the setting and give it a value if it is currently unset.
fn main() { let mut setting_value = Some(5); let new_setting_value = Some(10); match (setting_value, new_setting_value) { (Some(_), Some(_)) => { println!("Can't overwrite an existing customized value"); } _ => { setting_value = new_setting_value; } } println!("setting is {:?}", setting_value); }
Listing 18-18: Using an underscore within patterns that
match Some variants when we don’t need to use the value inside the
Some
This code will print Can't overwrite an existing customized value and then
setting is Some(5). In the first match arm, we don’t need to match on or use
the values inside either Some variant, but we do need to test for the case
when setting_value and new_setting_value are the Some variant. In that
case, we print why we’re not changing setting_value, and it doesn’t get
changed.
In all other cases (if either setting_value or new_setting_value are
None) expressed by the _ pattern in the second arm, we want to allow
new_setting_value to become setting_value.
We can also use underscores in multiple places within one pattern to ignore particular values. Listing 18-19 shows an example of ignoring the second and fourth values in a tuple of five items.
fn main() { let numbers = (2, 4, 8, 16, 32); match numbers { (first, _, third, _, fifth) => { println!("Some numbers: {}, {}, {}", first, third, fifth) } } }
Listing 18-19: Ignoring multiple parts of a tuple
This code will print Some numbers: 2, 8, 32, and the values 4 and 16 will be
ignored.
Ignoring an Unused Variable by Starting Its Name with _
If you create a variable but don’t use it anywhere, Rust will usually issue a warning because that could be a bug. But sometimes it’s useful to create a variable you won’t use yet, such as when you’re prototyping or just starting a project. In this situation, you can tell Rust not to warn you about the unused variable by starting the name of the variable with an underscore. In Listing 18-20, we create two unused variables, but when we compile this code, we should only get a warning about one of them.
Filename: src/main.rs
fn main() { let _x = 5; let y = 10; }
Listing 18-20: Starting a variable name with an underscore to avoid getting unused variable warnings
Here we get a warning about not using the variable y, but we don’t get a
warning about not using the variable preceded by the underscore.
Note that there is a subtle difference between using only _ and using a name
that starts with an underscore. The syntax _x still binds the value to the
variable, whereas _ doesn’t bind at all. To show a case where this
distinction matters, Listing 18-21 will provide us with an error.
fn main() {
let s = Some(String::from("Hello!"));
if let Some(_s) = s {
println!("found a string");
}
println!("{:?}", s);
}
Listing 18-21: An unused variable starting with an underscore still binds the value, which might take ownership of the value
We’ll receive an error because the s value will still be moved into _s,
which prevents us from using s again. However, using the underscore by itself
doesn’t ever bind to the value. Listing 18-22 will compile without any errors
because s doesn’t get moved into _.
fn main() { let s = Some(String::from("Hello!")); if let Some(_) = s { println!("found a string"); } println!("{:?}", s); }
Listing 18-22: Using an underscore does not bind the value
This code works just fine because we never bind s to anything; it isn’t moved.
Ignoring Remaining Parts of a Value with ..
With values that have many parts, we can use the .. syntax to use only a few
parts and ignore the rest, avoiding the need to list underscores for each
ignored value. The .. pattern ignores any parts of a value that we haven’t
explicitly matched in the rest of the pattern. In Listing 18-23, we have a
Point struct that holds a coordinate in three-dimensional space. In the
match expression, we want to operate only on the x coordinate and ignore
the values in the y and z fields.
fn main() { struct Point { x: i32, y: i32, z: i32, } let origin = Point { x: 0, y: 0, z: 0 }; match origin { Point { x, .. } => println!("x is {}", x), } }
Listing 18-23: Ignoring all fields of a Point except
for x by using ..
We list the x value and then just include the .. pattern. This is quicker
than having to list y: _ and z: _, particularly when we’re working with
structs that have lots of fields in situations where only one or two fields are
relevant.
The syntax .. will expand to as many values as it needs to be. Listing 18-24
shows how to use .. with a tuple.
Filename: src/main.rs
fn main() { let numbers = (2, 4, 8, 16, 32); match numbers { (first, .., last) => { println!("Some numbers: {}, {}", first, last); } } }
Listing 18-24: Matching only the first and last values in a tuple and ignoring all other values
In this code, the first and last value are matched with first and last. The
.. will match and ignore everything in the middle.
However, using .. must be unambiguous. If it is unclear which values are
intended for matching and which should be ignored, Rust will give us an error.
Listing 18-25 shows an example of using .. ambiguously, so it will not
compile.
Filename: src/main.rs
fn main() {
let numbers = (2, 4, 8, 16, 32);
match numbers {
(.., second, ..) => {
println!("Some numbers: {}", second)
},
}
}
Listing 18-25: An attempt to use .. in an ambiguous
way
When we compile this example, we get this error:
$ cargo run
Compiling patterns v0.1.0 (file:///projects/patterns)
error: `..` can only be used once per tuple pattern
--> src/main.rs:5:22
|
5 | (.., second, ..) => {
| -- ^^ can only be used once per tuple pattern
| |
| previously used here
error: aborting due to previous error
error: could not compile `patterns`
To learn more, run the command again with --verbose.
It’s impossible for Rust to determine how many values in the tuple to ignore
before matching a value with second and then how many further values to
ignore thereafter. This code could mean that we want to ignore 2, bind
second to 4, and then ignore 8, 16, and 32; or that we want to ignore
2 and 4, bind second to 8, and then ignore 16 and 32; and so forth.
The variable name second doesn’t mean anything special to Rust, so we get a
compiler error because using .. in two places like this is ambiguous.
Extra Conditionals with Match Guards
A match guard is an additional if condition specified after the pattern in
a match arm that must also match, along with the pattern matching, for that
arm to be chosen. Match guards are useful for expressing more complex ideas
than a pattern alone allows.
The condition can use variables created in the pattern. Listing 18-26 shows a
match where the first arm has the pattern Some(x) and also has a match
guard of if x < 5.
fn main() { let num = Some(4); match num { Some(x) if x < 5 => println!("less than five: {}", x), Some(x) => println!("{}", x), None => (), } }
Listing 18-26: Adding a match guard to a pattern
This example will print less than five: 4. When num is compared to the
pattern in the first arm, it matches, because Some(4) matches Some(x). Then
the match guard checks whether the value in x is less than 5, and because
it is, the first arm is selected.
If num had been Some(10) instead, the match guard in the first arm would
have been false because 10 is not less than 5. Rust would then go to the second
arm, which would match because the second arm doesn’t have a match guard and
therefore matches any Some variant.
There is no way to express the if x < 5 condition within a pattern, so the
match guard gives us the ability to express this logic.
In Listing 18-11, we mentioned that we could use match guards to solve our
pattern-shadowing problem. Recall that a new variable was created inside the
pattern in the match expression instead of using the variable outside the
match. That new variable meant we couldn’t test against the value of the
outer variable. Listing 18-27 shows how we can use a match guard to fix this
problem.
Filename: src/main.rs
fn main() { let x = Some(5); let y = 10; match x { Some(50) => println!("Got 50"), Some(n) if n == y => println!("Matched, n = {}", n), _ => println!("Default case, x = {:?}", x), } println!("at the end: x = {:?}, y = {}", x, y); }
Listing 18-27: Using a match guard to test for equality with an outer variable
This code will now print Default case, x = Some(5). The pattern in the second
match arm doesn’t introduce a new variable y that would shadow the outer y,
meaning we can use the outer y in the match guard. Instead of specifying the
pattern as Some(y), which would have shadowed the outer y, we specify
Some(n). This creates a new variable n that doesn’t shadow anything because
there is no n variable outside the match.
The match guard if n == y is not a pattern and therefore doesn’t introduce
new variables. This y is the outer y rather than a new shadowed y, and
we can look for a value that has the same value as the outer y by comparing
n to y.
You can also use the or operator | in a match guard to specify multiple
patterns; the match guard condition will apply to all the patterns. Listing
18-28 shows the precedence of combining a match guard with a pattern that uses
|. The important part of this example is that the if y match guard applies
to 4, 5, and 6, even though it might look like if y only applies to
6.
fn main() { let x = 4; let y = false; match x { 4 | 5 | 6 if y => println!("yes"), _ => println!("no"), } }
Listing 18-28: Combining multiple patterns with a match guard
The match condition states that the arm only matches if the value of x is
equal to 4, 5, or 6 and if y is true. When this code runs, the
pattern of the first arm matches because x is 4, but the match guard if y
is false, so the first arm is not chosen. The code moves on to the second arm,
which does match, and this program prints no. The reason is that the if
condition applies to the whole pattern 4 | 5 | 6, not only to the last value
6. In other words, the precedence of a match guard in relation to a pattern
behaves like this:
(4 | 5 | 6) if y => ...
rather than this:
4 | 5 | (6 if y) => ...
After running the code, the precedence behavior is evident: if the match guard
were applied only to the final value in the list of values specified using the
| operator, the arm would have matched and the program would have printed
yes.
@ Bindings
The at operator (@) lets us create a variable that holds a value at the
same time we’re testing that value to see whether it matches a pattern. Listing
18-29 shows an example where we want to test that a Message::Hello id field
is within the range 3..=7. But we also want to bind the value to the variable
id_variable so we can use it in the code associated with the arm. We could
name this variable id, the same as the field, but for this example we’ll use
a different name.
fn main() { enum Message { Hello { id: i32 }, } let msg = Message::Hello { id: 5 }; match msg { Message::Hello { id: id_variable @ 3..=7, } => println!("Found an id in range: {}", id_variable), Message::Hello { id: 10..=12 } => { println!("Found an id in another range") } Message::Hello { id } => println!("Found some other id: {}", id), } }
Listing 18-29: Using @ to bind to a value in a pattern
while also testing it
This example will print Found an id in range: 5. By specifying id_variable @ before the range 3..=7, we’re capturing whatever value matched the range
while also testing that the value matched the range pattern.
In the second arm, where we only have a range specified in the pattern, the code
associated with the arm doesn’t have a variable that contains the actual value
of the id field. The id field’s value could have been 10, 11, or 12, but
the code that goes with that pattern doesn’t know which it is. The pattern code
isn’t able to use the value from the id field, because we haven’t saved the
id value in a variable.
In the last arm, where we’ve specified a variable without a range, we do have
the value available to use in the arm’s code in a variable named id. The
reason is that we’ve used the struct field shorthand syntax. But we haven’t
applied any test to the value in the id field in this arm, as we did with the
first two arms: any value would match this pattern.
Using @ lets us test a value and save it in a variable within one pattern.
Summary
Rust’s patterns are very useful in that they help distinguish between different
kinds of data. When used in match expressions, Rust ensures your patterns
cover every possible value, or your program won’t compile. Patterns in let
statements and function parameters make those constructs more useful, enabling
the destructuring of values into smaller parts at the same time as assigning to
variables. We can create simple or complex patterns to suit our needs.
Next, for the penultimate chapter of the book, we’ll look at some advanced aspects of a variety of Rust’s features.
Advanced Features
By now, you’ve learned the most commonly used parts of the Rust programming language. Before we do one more project in Chapter 20, we’ll look at a few aspects of the language you might run into every once in a while. You can use this chapter as a reference for when you encounter any unknowns when using Rust. The features you’ll learn to use in this chapter are useful in very specific situations. Although you might not reach for them often, we want to make sure you have a grasp of all the features Rust has to offer.
In this chapter, we’ll cover:
- Unsafe Rust: how to opt out of some of Rust’s guarantees and take responsibility for manually upholding those guarantees
- Advanced traits: associated types, default type parameters, fully qualified syntax, supertraits, and the newtype pattern in relation to traits
- Advanced types: more about the newtype pattern, type aliases, the never type, and dynamically sized types
- Advanced functions and closures: function pointers and returning closures
- Macros: ways to define code that defines more code at compile time
It’s a panoply of Rust features with something for everyone! Let’s dive in!
Unsafe Rust
All the code we’ve discussed so far has had Rust’s memory safety guarantees enforced at compile time. However, Rust has a second language hidden inside it that doesn’t enforce these memory safety guarantees: it’s called unsafe Rust and works just like regular Rust, but gives us extra superpowers.
Unsafe Rust exists because, by nature, static analysis is conservative. When the compiler tries to determine whether or not code upholds the guarantees, it’s better for it to reject some valid programs rather than accept some invalid programs. Although the code might be okay, if the Rust compiler doesn’t have enough information to be confident, it will reject the code. In these cases, you can use unsafe code to tell the compiler, “Trust me, I know what I’m doing.” The downside is that you use it at your own risk: if you use unsafe code incorrectly, problems due to memory unsafety, such as null pointer dereferencing, can occur.
Another reason Rust has an unsafe alter ego is that the underlying computer hardware is inherently unsafe. If Rust didn’t let you do unsafe operations, you couldn’t do certain tasks. Rust needs to allow you to do low-level systems programming, such as directly interacting with the operating system or even writing your own operating system. Working with low-level systems programming is one of the goals of the language. Let’s explore what we can do with unsafe Rust and how to do it.
Unsafe Superpowers
To switch to unsafe Rust, use the unsafe keyword and then start a new block
that holds the unsafe code. You can take five actions in unsafe Rust, called
unsafe superpowers, that you can’t in safe Rust. Those superpowers include
the ability to:
- Dereference a raw pointer
- Call an unsafe function or method
- Access or modify a mutable static variable
- Implement an unsafe trait
- Access fields of
unions
It’s important to understand that unsafe doesn’t turn off the borrow checker
or disable any other of Rust’s safety checks: if you use a reference in unsafe
code, it will still be checked. The unsafe keyword only gives you access to
these five features that are then not checked by the compiler for memory
safety. You’ll still get some degree of safety inside of an unsafe block.
In addition, unsafe does not mean the code inside the block is necessarily
dangerous or that it will definitely have memory safety problems: the intent is
that as the programmer, you’ll ensure the code inside an unsafe block will
access memory in a valid way.
People are fallible, and mistakes will happen, but by requiring these five
unsafe operations to be inside blocks annotated with unsafe you’ll know that
any errors related to memory safety must be within an unsafe block. Keep
unsafe blocks small; you’ll be thankful later when you investigate memory
bugs.
To isolate unsafe code as much as possible, it’s best to enclose unsafe code
within a safe abstraction and provide a safe API, which we’ll discuss later in
the chapter when we examine unsafe functions and methods. Parts of the standard
library are implemented as safe abstractions over unsafe code that has been
audited. Wrapping unsafe code in a safe abstraction prevents uses of unsafe
from leaking out into all the places that you or your users might want to use
the functionality implemented with unsafe code, because using a safe
abstraction is safe.
Let’s look at each of the five unsafe superpowers in turn. We’ll also look at some abstractions that provide a safe interface to unsafe code.
Dereferencing a Raw Pointer
In Chapter 4, in the “Dangling References” section, we mentioned that the compiler ensures references are always
valid. Unsafe Rust has two new types called raw pointers that are similar to
references. As with references, raw pointers can be immutable or mutable and
are written as *const T and *mut T, respectively. The asterisk isn’t the
dereference operator; it’s part of the type name. In the context of raw
pointers, immutable means that the pointer can’t be directly assigned to
after being dereferenced.
Different from references and smart pointers, raw pointers:
- Are allowed to ignore the borrowing rules by having both immutable and mutable pointers or multiple mutable pointers to the same location
- Aren’t guaranteed to point to valid memory
- Are allowed to be null
- Don’t implement any automatic cleanup
By opting out of having Rust enforce these guarantees, you can give up guaranteed safety in exchange for greater performance or the ability to interface with another language or hardware where Rust’s guarantees don’t apply.
Listing 19-1 shows how to create an immutable and a mutable raw pointer from references.
fn main() { let mut num = 5; let r1 = &num as *const i32; let r2 = &mut num as *mut i32; }
Listing 19-1: Creating raw pointers from references
Notice that we don’t include the unsafe keyword in this code. We can create
raw pointers in safe code; we just can’t dereference raw pointers outside an
unsafe block, as you’ll see in a bit.
We’ve created raw pointers by using as to cast an immutable and a mutable
reference into their corresponding raw pointer types. Because we created them
directly from references guaranteed to be valid, we know these particular raw
pointers are valid, but we can’t make that assumption about just any raw
pointer.
Next, we’ll create a raw pointer whose validity we can’t be so certain of. Listing 19-2 shows how to create a raw pointer to an arbitrary location in memory. Trying to use arbitrary memory is undefined: there might be data at that address or there might not, the compiler might optimize the code so there is no memory access, or the program might error with a segmentation fault. Usually, there is no good reason to write code like this, but it is possible.
fn main() { let address = 0x012345usize; let r = address as *const i32; }
Listing 19-2: Creating a raw pointer to an arbitrary memory address
Recall that we can create raw pointers in safe code, but we can’t dereference
raw pointers and read the data being pointed to. In Listing 19-3, we use the
dereference operator * on a raw pointer that requires an unsafe block.
fn main() { let mut num = 5; let r1 = &num as *const i32; let r2 = &mut num as *mut i32; unsafe { println!("r1 is: {}", *r1); println!("r2 is: {}", *r2); } }
Listing 19-3: Dereferencing raw pointers within an
unsafe block
Creating a pointer does no harm; it’s only when we try to access the value that it points at that we might end up dealing with an invalid value.
Note also that in Listing 19-1 and 19-3, we created *const i32 and *mut i32
raw pointers that both pointed to the same memory location, where num is
stored. If we instead tried to create an immutable and a mutable reference to
num, the code would not have compiled because Rust’s ownership rules don’t
allow a mutable reference at the same time as any immutable references. With
raw pointers, we can create a mutable pointer and an immutable pointer to the
same location and change data through the mutable pointer, potentially creating
a data race. Be careful!
With all of these dangers, why would you ever use raw pointers? One major use case is when interfacing with C code, as you’ll see in the next section, “Calling an Unsafe Function or Method.” Another case is when building up safe abstractions that the borrow checker doesn’t understand. We’ll introduce unsafe functions and then look at an example of a safe abstraction that uses unsafe code.
Calling an Unsafe Function or Method
The second type of operation that requires an unsafe block is calls to unsafe
functions. Unsafe functions and methods look exactly like regular functions and
methods, but they have an extra unsafe before the rest of the definition. The
unsafe keyword in this context indicates the function has requirements we
need to uphold when we call this function, because Rust can’t guarantee we’ve
met these requirements. By calling an unsafe function within an unsafe block,
we’re saying that we’ve read this function’s documentation and take
responsibility for upholding the function’s contracts.
Here is an unsafe function named dangerous that doesn’t do anything in its
body:
fn main() { unsafe fn dangerous() {} unsafe { dangerous(); } }
We must call the dangerous function within a separate unsafe block. If we
try to call dangerous without the unsafe block, we’ll get an error:
$ cargo run
Compiling unsafe-example v0.1.0 (file:///projects/unsafe-example)
error[E0133]: call to unsafe function is unsafe and requires unsafe function or block
--> src/main.rs:4:5
|
4 | dangerous();
| ^^^^^^^^^^^ call to unsafe function
|
= note: consult the function's documentation for information on how to avoid undefined behavior
error: aborting due to previous error
For more information about this error, try `rustc --explain E0133`.
error: could not compile `unsafe-example`
To learn more, run the command again with --verbose.
By inserting the unsafe block around our call to dangerous, we’re asserting
to Rust that we’ve read the function’s documentation, we understand how to use
it properly, and we’ve verified that we’re fulfilling the contract of the
function.
Bodies of unsafe functions are effectively unsafe blocks, so to perform other
unsafe operations within an unsafe function, we don’t need to add another
unsafe block.
Creating a Safe Abstraction over Unsafe Code
Just because a function contains unsafe code doesn’t mean we need to mark the
entire function as unsafe. In fact, wrapping unsafe code in a safe function is
a common abstraction. As an example, let’s study a function from the standard
library, split_at_mut, that requires some unsafe code and explore how we
might implement it. This safe method is defined on mutable slices: it takes one
slice and makes it two by splitting the slice at the index given as an
argument. Listing 19-4 shows how to use split_at_mut.
fn main() { let mut v = vec![1, 2, 3, 4, 5, 6]; let r = &mut v[..]; let (a, b) = r.split_at_mut(3); assert_eq!(a, &mut [1, 2, 3]); assert_eq!(b, &mut [4, 5, 6]); }
Listing 19-4: Using the safe split_at_mut
function
We can’t implement this function using only safe Rust. An attempt might look
something like Listing 19-5, which won’t compile. For simplicity, we’ll
implement split_at_mut as a function rather than a method and only for slices
of i32 values rather than for a generic type T.
fn split_at_mut(slice: &mut [i32], mid: usize) -> (&mut [i32], &mut [i32]) {
let len = slice.len();
assert!(mid <= len);
(&mut slice[..mid], &mut slice[mid..])
}
fn main() {
let mut vector = vec![1, 2, 3, 4, 5, 6];
let (left, right) = split_at_mut(&mut vector, 3);
}
Listing 19-5: An attempted implementation of
split_at_mut using only safe Rust
This function first gets the total length of the slice. Then it asserts that the index given as a parameter is within the slice by checking whether it’s less than or equal to the length. The assertion means that if we pass an index that is greater than the length to split the slice at, the function will panic before it attempts to use that index.
Then we return two mutable slices in a tuple: one from the start of the
original slice to the mid index and another from mid to the end of the
slice.
When we try to compile the code in Listing 19-5, we’ll get an error.
$ cargo run
Compiling unsafe-example v0.1.0 (file:///projects/unsafe-example)
error[E0499]: cannot borrow `*slice` as mutable more than once at a time
--> src/main.rs:6:30
|
1 | fn split_at_mut(slice: &mut [i32], mid: usize) -> (&mut [i32], &mut [i32]) {
| - let's call the lifetime of this reference `'1`
...
6 | (&mut slice[..mid], &mut slice[mid..])
| -------------------------^^^^^--------
| | | |
| | | second mutable borrow occurs here
| | first mutable borrow occurs here
| returning this value requires that `*slice` is borrowed for `'1`
error: aborting due to previous error
For more information about this error, try `rustc --explain E0499`.
error: could not compile `unsafe-example`
To learn more, run the command again with --verbose.
Rust’s borrow checker can’t understand that we’re borrowing different parts of the slice; it only knows that we’re borrowing from the same slice twice. Borrowing different parts of a slice is fundamentally okay because the two slices aren’t overlapping, but Rust isn’t smart enough to know this. When we know code is okay, but Rust doesn’t, it’s time to reach for unsafe code.
Listing 19-6 shows how to use an unsafe block, a raw pointer, and some calls
to unsafe functions to make the implementation of split_at_mut work.
use std::slice; fn split_at_mut(slice: &mut [i32], mid: usize) -> (&mut [i32], &mut [i32]) { let len = slice.len(); let ptr = slice.as_mut_ptr(); assert!(mid <= len); unsafe { ( slice::from_raw_parts_mut(ptr, mid), slice::from_raw_parts_mut(ptr.add(mid), len - mid), ) } } fn main() { let mut vector = vec![1, 2, 3, 4, 5, 6]; let (left, right) = split_at_mut(&mut vector, 3); }
Listing 19-6: Using unsafe code in the implementation of
the split_at_mut function
Recall from “The Slice Type” section in
Chapter 4 that slices are a pointer to some data and the length of the slice.
We use the len method to get the length of a slice and the as_mut_ptr
method to access the raw pointer of a slice. In this case, because we have a
mutable slice to i32 values, as_mut_ptr returns a raw pointer with the type
*mut i32, which we’ve stored in the variable ptr.
We keep the assertion that the mid index is within the slice. Then we get to
the unsafe code: the slice::from_raw_parts_mut function takes a raw pointer
and a length, and it creates a slice. We use this function to create a slice
that starts from ptr and is mid items long. Then we call the add
method on ptr with mid as an argument to get a raw pointer that starts at
mid, and we create a slice using that pointer and the remaining number of
items after mid as the length.
The function slice::from_raw_parts_mut is unsafe because it takes a raw
pointer and must trust that this pointer is valid. The add method on raw
pointers is also unsafe, because it must trust that the offset location is also
a valid pointer. Therefore, we had to put an unsafe block around our calls to
slice::from_raw_parts_mut and add so we could call them. By looking at
the code and by adding the assertion that mid must be less than or equal to
len, we can tell that all the raw pointers used within the unsafe block
will be valid pointers to data within the slice. This is an acceptable and
appropriate use of unsafe.
Note that we don’t need to mark the resulting split_at_mut function as
unsafe, and we can call this function from safe Rust. We’ve created a safe
abstraction to the unsafe code with an implementation of the function that uses
unsafe code in a safe way, because it creates only valid pointers from the
data this function has access to.
In contrast, the use of slice::from_raw_parts_mut in Listing 19-7 would
likely crash when the slice is used. This code takes an arbitrary memory
location and creates a slice 10,000 items long.
fn main() { use std::slice; let address = 0x01234usize; let r = address as *mut i32; let slice: &[i32] = unsafe { slice::from_raw_parts_mut(r, 10000) }; }
Listing 19-7: Creating a slice from an arbitrary memory location
We don’t own the memory at this arbitrary location, and there is no guarantee
that the slice this code creates contains valid i32 values. Attempting to use
slice as though it’s a valid slice results in undefined behavior.
Using extern Functions to Call External Code
Sometimes, your Rust code might need to interact with code written in another
language. For this, Rust has a keyword, extern, that facilitates the creation
and use of a Foreign Function Interface (FFI). An FFI is a way for a
programming language to define functions and enable a different (foreign)
programming language to call those functions.
Listing 19-8 demonstrates how to set up an integration with the abs function
from the C standard library. Functions declared within extern blocks are
always unsafe to call from Rust code. The reason is that other languages don’t
enforce Rust’s rules and guarantees, and Rust can’t check them, so
responsibility falls on the programmer to ensure safety.
Filename: src/main.rs
extern "C" { fn abs(input: i32) -> i32; } fn main() { unsafe { println!("Absolute value of -3 according to C: {}", abs(-3)); } }
Listing 19-8: Declaring and calling an extern function
defined in another language
Within the extern "C" block, we list the names and signatures of external
functions from another language we want to call. The "C" part defines which
application binary interface (ABI) the external function uses: the ABI
defines how to call the function at the assembly level. The "C" ABI is the
most common and follows the C programming language’s ABI.
Calling Rust Functions from Other Languages
We can also use
externto create an interface that allows other languages to call Rust functions. Instead of anexternblock, we add theexternkeyword and specify the ABI to use just before thefnkeyword. We also need to add a#[no_mangle]annotation to tell the Rust compiler not to mangle the name of this function. Mangling is when a compiler changes the name we’ve given a function to a different name that contains more information for other parts of the compilation process to consume but is less human readable. Every programming language compiler mangles names slightly differently, so for a Rust function to be nameable by other languages, we must disable the Rust compiler’s name mangling.In the following example, we make the
call_from_cfunction accessible from C code, after it’s compiled to a shared library and linked from C:#![allow(unused)] fn main() { #[no_mangle] pub extern "C" fn call_from_c() { println!("Just called a Rust function from C!"); } }This usage of
externdoes not requireunsafe.
Accessing or Modifying a Mutable Static Variable
Until now, we’ve not talked about global variables, which Rust does support but can be problematic with Rust’s ownership rules. If two threads are accessing the same mutable global variable, it can cause a data race.
In Rust, global variables are called static variables. Listing 19-9 shows an example declaration and use of a static variable with a string slice as a value.
Filename: src/main.rs
static HELLO_WORLD: &str = "Hello, world!"; fn main() { println!("name is: {}", HELLO_WORLD); }
Listing 19-9: Defining and using an immutable static variable
Static variables are similar to constants, which we discussed in the
“Differences Between Variables and
Constants”
section in Chapter 3. The names of static variables are in
SCREAMING_SNAKE_CASE by convention, and we must annotate the variable’s
type, which is &'static str in this example. Static variables can only store
references with the 'static lifetime, which means the Rust compiler can
figure out the lifetime; we don’t need to annotate it explicitly. Accessing an
immutable static variable is safe.
Constants and immutable static variables might seem similar, but a subtle difference is that values in a static variable have a fixed address in memory. Using the value will always access the same data. Constants, on the other hand, are allowed to duplicate their data whenever they’re used.
Another difference between constants and static variables is that static
variables can be mutable. Accessing and modifying mutable static variables is
unsafe. Listing 19-10 shows how to declare, access, and modify a mutable
static variable named COUNTER.
Filename: src/main.rs
static mut COUNTER: u32 = 0; fn add_to_count(inc: u32) { unsafe { COUNTER += inc; } } fn main() { add_to_count(3); unsafe { println!("COUNTER: {}", COUNTER); } }
Listing 19-10: Reading from or writing to a mutable static variable is unsafe
As with regular variables, we specify mutability using the mut keyword. Any
code that reads or writes from COUNTER must be within an unsafe block. This
code compiles and prints COUNTER: 3 as we would expect because it’s single
threaded. Having multiple threads access COUNTER would likely result in data
races.
With mutable data that is globally accessible, it’s difficult to ensure there are no data races, which is why Rust considers mutable static variables to be unsafe. Where possible, it’s preferable to use the concurrency techniques and thread-safe smart pointers we discussed in Chapter 16 so the compiler checks that data accessed from different threads is done safely.
Implementing an Unsafe Trait
Another use case for unsafe is implementing an unsafe trait. A trait is
unsafe when at least one of its methods has some invariant that the compiler
can’t verify. We can declare that a trait is unsafe by adding the unsafe
keyword before trait and marking the implementation of the trait as unsafe
too, as shown in Listing 19-11.
unsafe trait Foo { // methods go here } unsafe impl Foo for i32 { // method implementations go here } fn main() {}
Listing 19-11: Defining and implementing an unsafe trait
By using unsafe impl, we’re promising that we’ll uphold the invariants that
the compiler can’t verify.
As an example, recall the Sync and Send marker traits we discussed in the
“Extensible Concurrency with the Sync and Send
Traits”
section in Chapter 16: the compiler implements these traits automatically if
our types are composed entirely of Send and Sync types. If we implement a
type that contains a type that is not Send or Sync, such as raw pointers,
and we want to mark that type as Send or Sync, we must use unsafe. Rust
can’t verify that our type upholds the guarantees that it can be safely sent
across threads or accessed from multiple threads; therefore, we need to do
those checks manually and indicate as such with unsafe.
Accessing Fields of a Union
The final action that works only with unsafe is accessing fields of a
union. A union is similar to a struct, but only one declared field is
used in a particular instance at one time. Unions are primarily used to
interface with unions in C code. Accessing union fields is unsafe because Rust
can’t guarantee the type of the data currently being stored in the union
instance. You can learn more about unions in the reference.
When to Use Unsafe Code
Using unsafe to take one of the five actions (superpowers) just discussed
isn’t wrong or even frowned upon. But it is trickier to get unsafe code
correct because the compiler can’t help uphold memory safety. When you have a
reason to use unsafe code, you can do so, and having the explicit unsafe
annotation makes it easier to track down the source of problems when they occur.
Advanced Traits
We first covered traits in the “Traits: Defining Shared Behavior” section of Chapter 10, but as with lifetimes, we didn’t discuss the more advanced details. Now that you know more about Rust, we can get into the nitty-gritty.
Specifying Placeholder Types in Trait Definitions with Associated Types
Associated types connect a type placeholder with a trait such that the trait method definitions can use these placeholder types in their signatures. The implementor of a trait will specify the concrete type to be used in this type’s place for the particular implementation. That way, we can define a trait that uses some types without needing to know exactly what those types are until the trait is implemented.
We’ve described most of the advanced features in this chapter as being rarely needed. Associated types are somewhere in the middle: they’re used more rarely than features explained in the rest of the book but more commonly than many of the other features discussed in this chapter.
One example of a trait with an associated type is the Iterator trait that the
standard library provides. The associated type is named Item and stands in
for the type of the values the type implementing the Iterator trait is
iterating over. In “The Iterator Trait and the next
Method” section of
Chapter 13, we mentioned that the definition of the Iterator trait is as
shown in Listing 19-12.
pub trait Iterator {
type Item;
fn next(&mut self) -> Option<Self::Item>;
}
Listing 19-12: The definition of the Iterator trait
that has an associated type Item
The type Item is a placeholder type, and the next method’s definition shows
that it will return values of type Option<Self::Item>. Implementors of the
Iterator trait will specify the concrete type for Item, and the next
method will return an Option containing a value of that concrete type.
Associated types might seem like a similar concept to generics, in that the latter allow us to define a function without specifying what types it can handle. So why use associated types?
Let’s examine the difference between the two concepts with an example from
Chapter 13 that implements the Iterator trait on the Counter struct. In
Listing 13-21, we specified that the Item type was u32:
Filename: src/lib.rs
struct Counter {
count: u32,
}
impl Counter {
fn new() -> Counter {
Counter { count: 0 }
}
}
impl Iterator for Counter {
type Item = u32;
fn next(&mut self) -> Option<Self::Item> {
// --snip--
if self.count < 5 {
self.count += 1;
Some(self.count)
} else {
None
}
}
}
This syntax seems comparable to that of generics. So why not just define the
Iterator trait with generics, as shown in Listing 19-13?
pub trait Iterator<T> {
fn next(&mut self) -> Option<T>;
}
Listing 19-13: A hypothetical definition of the
Iterator trait using generics
The difference is that when using generics, as in Listing 19-13, we must
annotate the types in each implementation; because we can also implement
Iterator<String> for Counter or any other type, we could have multiple
implementations of Iterator for Counter. In other words, when a trait has a
generic parameter, it can be implemented for a type multiple times, changing
the concrete types of the generic type parameters each time. When we use the
next method on Counter, we would have to provide type annotations to
indicate which implementation of Iterator we want to use.
With associated types, we don’t need to annotate types because we can’t
implement a trait on a type multiple times. In Listing 19-12 with the
definition that uses associated types, we can only choose what the type of
Item will be once, because there can only be one impl Iterator for Counter.
We don’t have to specify that we want an iterator of u32 values everywhere
that we call next on Counter.
Default Generic Type Parameters and Operator Overloading
When we use generic type parameters, we can specify a default concrete type for
the generic type. This eliminates the need for implementors of the trait to
specify a concrete type if the default type works. The syntax for specifying a
default type for a generic type is <PlaceholderType=ConcreteType> when
declaring the generic type.
A great example of a situation where this technique is useful is with operator
overloading. Operator overloading is customizing the behavior of an operator
(such as +) in particular situations.
Rust doesn’t allow you to create your own operators or overload arbitrary
operators. But you can overload the operations and corresponding traits listed
in std::ops by implementing the traits associated with the operator. For
example, in Listing 19-14 we overload the + operator to add two Point
instances together. We do this by implementing the Add trait on a Point
struct:
Filename: src/main.rs
use std::ops::Add; #[derive(Debug, PartialEq)] struct Point { x: i32, y: i32, } impl Add for Point { type Output = Point; fn add(self, other: Point) -> Point { Point { x: self.x + other.x, y: self.y + other.y, } } } fn main() { assert_eq!( Point { x: 1, y: 0 } + Point { x: 2, y: 3 }, Point { x: 3, y: 3 } ); }
Listing 19-14: Implementing the Add trait to overload
the + operator for Point instances
The add method adds the x values of two Point instances and the y
values of two Point instances to create a new Point. The Add trait has an
associated type named Output that determines the type returned from the add
method.
The default generic type in this code is within the Add trait. Here is its
definition:
#![allow(unused)] fn main() { trait Add<Rhs=Self> { type Output; fn add(self, rhs: Rhs) -> Self::Output; } }
This code should look generally familiar: a trait with one method and an
associated type. The new part is Rhs=Self: this syntax is called default
type parameters. The Rhs generic type parameter (short for “right hand
side”) defines the type of the rhs parameter in the add method. If we don’t
specify a concrete type for Rhs when we implement the Add trait, the type
of Rhs will default to Self, which will be the type we’re implementing
Add on.
When we implemented Add for Point, we used the default for Rhs because we
wanted to add two Point instances. Let’s look at an example of implementing
the Add trait where we want to customize the Rhs type rather than using the
default.
We have two structs, Millimeters and Meters, holding values in different
units. We want to add values in millimeters to values in meters and have the
implementation of Add do the conversion correctly. We can implement Add for
Millimeters with Meters as the Rhs, as shown in Listing 19-15.
Filename: src/lib.rs
use std::ops::Add;
struct Millimeters(u32);
struct Meters(u32);
impl Add<Meters> for Millimeters {
type Output = Millimeters;
fn add(self, other: Meters) -> Millimeters {
Millimeters(self.0 + (other.0 * 1000))
}
}
Listing 19-15: Implementing the Add trait on
Millimeters to add Millimeters to Meters
To add Millimeters and Meters, we specify impl Add<Meters> to set the
value of the Rhs type parameter instead of using the default of Self.
You’ll use default type parameters in two main ways:
- To extend a type without breaking existing code
- To allow customization in specific cases most users won’t need
The standard library’s Add trait is an example of the second purpose:
usually, you’ll add two like types, but the Add trait provides the ability to
customize beyond that. Using a default type parameter in the Add trait
definition means you don’t have to specify the extra parameter most of the
time. In other words, a bit of implementation boilerplate isn’t needed, making
it easier to use the trait.
The first purpose is similar to the second but in reverse: if you want to add a type parameter to an existing trait, you can give it a default to allow extension of the functionality of the trait without breaking the existing implementation code.
Fully Qualified Syntax for Disambiguation: Calling Methods with the Same Name
Nothing in Rust prevents a trait from having a method with the same name as another trait’s method, nor does Rust prevent you from implementing both traits on one type. It’s also possible to implement a method directly on the type with the same name as methods from traits.
When calling methods with the same name, you’ll need to tell Rust which one you
want to use. Consider the code in Listing 19-16 where we’ve defined two traits,
Pilot and Wizard, that both have a method called fly. We then implement
both traits on a type Human that already has a method named fly implemented
on it. Each fly method does something different.
Filename: src/main.rs
trait Pilot { fn fly(&self); } trait Wizard { fn fly(&self); } struct Human; impl Pilot for Human { fn fly(&self) { println!("This is your captain speaking."); } } impl Wizard for Human { fn fly(&self) { println!("Up!"); } } impl Human { fn fly(&self) { println!("*waving arms furiously*"); } } fn main() {}
Listing 19-16: Two traits are defined to have a fly
method and are implemented on the Human type, and a fly method is
implemented on Human directly
When we call fly on an instance of Human, the compiler defaults to calling
the method that is directly implemented on the type, as shown in Listing 19-17.
Filename: src/main.rs
trait Pilot { fn fly(&self); } trait Wizard { fn fly(&self); } struct Human; impl Pilot for Human { fn fly(&self) { println!("This is your captain speaking."); } } impl Wizard for Human { fn fly(&self) { println!("Up!"); } } impl Human { fn fly(&self) { println!("*waving arms furiously*"); } } fn main() { let person = Human; person.fly(); }
Listing 19-17: Calling fly on an instance of
Human
Running this code will print *waving arms furiously*, showing that Rust
called the fly method implemented on Human directly.
To call the fly methods from either the Pilot trait or the Wizard trait,
we need to use more explicit syntax to specify which fly method we mean.
Listing 19-18 demonstrates this syntax.
Filename: src/main.rs
trait Pilot { fn fly(&self); } trait Wizard { fn fly(&self); } struct Human; impl Pilot for Human { fn fly(&self) { println!("This is your captain speaking."); } } impl Wizard for Human { fn fly(&self) { println!("Up!"); } } impl Human { fn fly(&self) { println!("*waving arms furiously*"); } } fn main() { let person = Human; Pilot::fly(&person); Wizard::fly(&person); person.fly(); }
Listing 19-18: Specifying which trait’s fly method we
want to call
Specifying the trait name before the method name clarifies to Rust which
implementation of fly we want to call. We could also write
Human::fly(&person), which is equivalent to the person.fly() that we used
in Listing 19-18, but this is a bit longer to write if we don’t need to
disambiguate.
Running this code prints the following:
$ cargo run
Compiling traits-example v0.1.0 (file:///projects/traits-example)
Finished dev [unoptimized + debuginfo] target(s) in 0.46s
Running `target/debug/traits-example`
This is your captain speaking.
Up!
*waving arms furiously*
Because the fly method takes a self parameter, if we had two types that
both implement one trait, Rust could figure out which implementation of a
trait to use based on the type of self.
However, associated functions that are part of traits don’t have a self
parameter. When two types in the same scope implement that trait, Rust can’t
figure out which type you mean unless you use fully qualified syntax. For
example, the Animal trait in Listing 19-19 has the associated function
baby_name, the implementation of Animal for the struct Dog, and the
associated function baby_name defined on Dog directly.
Filename: src/main.rs
trait Animal { fn baby_name() -> String; } struct Dog; impl Dog { fn baby_name() -> String { String::from("Spot") } } impl Animal for Dog { fn baby_name() -> String { String::from("puppy") } } fn main() { println!("A baby dog is called a {}", Dog::baby_name()); }
Listing 19-19: A trait with an associated function and a type with an associated function of the same name that also implements the trait
This code is for an animal shelter that wants to name all puppies Spot, which
is implemented in the baby_name associated function that is defined on Dog.
The Dog type also implements the trait Animal, which describes
characteristics that all animals have. Baby dogs are called puppies, and that
is expressed in the implementation of the Animal trait on Dog in the
baby_name function associated with the Animal trait.
In main, we call the Dog::baby_name function, which calls the associated
function defined on Dog directly. This code prints the following:
$ cargo run
Compiling traits-example v0.1.0 (file:///projects/traits-example)
Finished dev [unoptimized + debuginfo] target(s) in 0.54s
Running `target/debug/traits-example`
A baby dog is called a Spot
This output isn’t what we wanted. We want to call the baby_name function that
is part of the Animal trait that we implemented on Dog so the code prints
A baby dog is called a puppy. The technique of specifying the trait name that
we used in Listing 19-18 doesn’t help here; if we change main to the code in
Listing 19-20, we’ll get a compilation error.
Filename: src/main.rs
trait Animal {
fn baby_name() -> String;
}
struct Dog;
impl Dog {
fn baby_name() -> String {
String::from("Spot")
}
}
impl Animal for Dog {
fn baby_name() -> String {
String::from("puppy")
}
}
fn main() {
println!("A baby dog is called a {}", Animal::baby_name());
}
Listing 19-20: Attempting to call the baby_name
function from the Animal trait, but Rust doesn’t know which implementation to
use
Because Animal::baby_name is an associated function rather than a method, and
thus doesn’t have a self parameter, Rust can’t figure out which
implementation of Animal::baby_name we want. We’ll get this compiler error:
$ cargo run
Compiling traits-example v0.1.0 (file:///projects/traits-example)
error[E0283]: type annotations needed
--> src/main.rs:20:43
|
2 | fn baby_name() -> String;
| ------------------------- required by `Animal::baby_name`
...
20 | println!("A baby dog is called a {}", Animal::baby_name());
| ^^^^^^^^^^^^^^^^^ cannot infer type
|
= note: cannot satisfy `_: Animal`
error: aborting due to previous error
For more information about this error, try `rustc --explain E0283`.
error: could not compile `traits-example`
To learn more, run the command again with --verbose.
To disambiguate and tell Rust that we want to use the implementation of
Animal for Dog, we need to use fully qualified syntax. Listing 19-21
demonstrates how to use fully qualified syntax.
Filename: src/main.rs
trait Animal { fn baby_name() -> String; } struct Dog; impl Dog { fn baby_name() -> String { String::from("Spot") } } impl Animal for Dog { fn baby_name() -> String { String::from("puppy") } } fn main() { println!("A baby dog is called a {}", <Dog as Animal>::baby_name()); }
Listing 19-21: Using fully qualified syntax to specify
that we want to call the baby_name function from the Animal trait as
implemented on Dog
We’re providing Rust with a type annotation within the angle brackets, which
indicates we want to call the baby_name method from the Animal trait as
implemented on Dog by saying that we want to treat the Dog type as an
Animal for this function call. This code will now print what we want:
$ cargo run
Compiling traits-example v0.1.0 (file:///projects/traits-example)
Finished dev [unoptimized + debuginfo] target(s) in 0.48s
Running `target/debug/traits-example`
A baby dog is called a puppy
In general, fully qualified syntax is defined as follows:
<Type as Trait>::function(receiver_if_method, next_arg, ...);
For associated functions, there would not be a receiver: there would only be
the list of other arguments. You could use fully qualified syntax everywhere
that you call functions or methods. However, you’re allowed to omit any part of
this syntax that Rust can figure out from other information in the program. You
only need to use this more verbose syntax in cases where there are multiple
implementations that use the same name and Rust needs help to identify which
implementation you want to call.
Using Supertraits to Require One Trait’s Functionality Within Another Trait
Sometimes, you might need one trait to use another trait’s functionality. In this case, you need to rely on the dependent trait also being implemented. The trait you rely on is a supertrait of the trait you’re implementing.
For example, let’s say we want to make an OutlinePrint trait with an
outline_print method that will print a value framed in asterisks. That is,
given a Point struct that implements Display to result in (x, y), when we
call outline_print on a Point instance that has 1 for x and 3 for
y, it should print the following:
**********
* *
* (1, 3) *
* *
**********
In the implementation of outline_print, we want to use the Display trait’s
functionality. Therefore, we need to specify that the OutlinePrint trait will
work only for types that also implement Display and provide the functionality
that OutlinePrint needs. We can do that in the trait definition by specifying
OutlinePrint: Display. This technique is similar to adding a trait bound to
the trait. Listing 19-22 shows an implementation of the OutlinePrint trait.
Filename: src/main.rs
use std::fmt; trait OutlinePrint: fmt::Display { fn outline_print(&self) { let output = self.to_string(); let len = output.len(); println!("{}", "*".repeat(len + 4)); println!("*{}*", " ".repeat(len + 2)); println!("* {} *", output); println!("*{}*", " ".repeat(len + 2)); println!("{}", "*".repeat(len + 4)); } } fn main() {}
Listing 19-22: Implementing the OutlinePrint trait that
requires the functionality from Display
Because we’ve specified that OutlinePrint requires the Display trait, we
can use the to_string function that is automatically implemented for any type
that implements Display. If we tried to use to_string without adding a
colon and specifying the Display trait after the trait name, we’d get an
error saying that no method named to_string was found for the type &Self in
the current scope.
Let’s see what happens when we try to implement OutlinePrint on a type that
doesn’t implement Display, such as the Point struct:
Filename: src/main.rs
use std::fmt;
trait OutlinePrint: fmt::Display {
fn outline_print(&self) {
let output = self.to_string();
let len = output.len();
println!("{}", "*".repeat(len + 4));
println!("*{}*", " ".repeat(len + 2));
println!("* {} *", output);
println!("*{}*", " ".repeat(len + 2));
println!("{}", "*".repeat(len + 4));
}
}
struct Point {
x: i32,
y: i32,
}
impl OutlinePrint for Point {}
fn main() {
let p = Point { x: 1, y: 3 };
p.outline_print();
}
We get an error saying that Display is required but not implemented:
$ cargo run
Compiling traits-example v0.1.0 (file:///projects/traits-example)
error[E0277]: `Point` doesn't implement `std::fmt::Display`
--> src/main.rs:20:6
|
3 | trait OutlinePrint: fmt::Display {
| ------------ required by this bound in `OutlinePrint`
...
20 | impl OutlinePrint for Point {}
| ^^^^^^^^^^^^ `Point` cannot be formatted with the default formatter
|
= help: the trait `std::fmt::Display` is not implemented for `Point`
= note: in format strings you may be able to use `{:?}` (or {:#?} for pretty-print) instead
error: aborting due to previous error
For more information about this error, try `rustc --explain E0277`.
error: could not compile `traits-example`
To learn more, run the command again with --verbose.
To fix this, we implement Display on Point and satisfy the constraint that
OutlinePrint requires, like so:
Filename: src/main.rs
trait OutlinePrint: fmt::Display { fn outline_print(&self) { let output = self.to_string(); let len = output.len(); println!("{}", "*".repeat(len + 4)); println!("*{}*", " ".repeat(len + 2)); println!("* {} *", output); println!("*{}*", " ".repeat(len + 2)); println!("{}", "*".repeat(len + 4)); } } struct Point { x: i32, y: i32, } impl OutlinePrint for Point {} use std::fmt; impl fmt::Display for Point { fn fmt(&self, f: &mut fmt::Formatter) -> fmt::Result { write!(f, "({}, {})", self.x, self.y) } } fn main() { let p = Point { x: 1, y: 3 }; p.outline_print(); }
Then implementing the OutlinePrint trait on Point will compile
successfully, and we can call outline_print on a Point instance to display
it within an outline of asterisks.
Using the Newtype Pattern to Implement External Traits on External Types
In Chapter 10 in the “Implementing a Trait on a Type” section, we mentioned the orphan rule that states we’re allowed to implement a trait on a type as long as either the trait or the type are local to our crate. It’s possible to get around this restriction using the newtype pattern, which involves creating a new type in a tuple struct. (We covered tuple structs in the “Using Tuple Structs without Named Fields to Create Different Types” section of Chapter 5.) The tuple struct will have one field and be a thin wrapper around the type we want to implement a trait for. Then the wrapper type is local to our crate, and we can implement the trait on the wrapper. Newtype is a term that originates from the Haskell programming language. There is no runtime performance penalty for using this pattern, and the wrapper type is elided at compile time.
As an example, let’s say we want to implement Display on Vec<T>, which the
orphan rule prevents us from doing directly because the Display trait and the
Vec<T> type are defined outside our crate. We can make a Wrapper struct
that holds an instance of Vec<T>; then we can implement Display on
Wrapper and use the Vec<T> value, as shown in Listing 19-23.
Filename: src/main.rs
use std::fmt; struct Wrapper(Vec<String>); impl fmt::Display for Wrapper { fn fmt(&self, f: &mut fmt::Formatter) -> fmt::Result { write!(f, "[{}]", self.0.join(", ")) } } fn main() { let w = Wrapper(vec![String::from("hello"), String::from("world")]); println!("w = {}", w); }
Listing 19-23: Creating a Wrapper type around
Vec<String> to implement Display
The implementation of Display uses self.0 to access the inner Vec<T>,
because Wrapper is a tuple struct and Vec<T> is the item at index 0 in the
tuple. Then we can use the functionality of the Display type on Wrapper.
The downside of using this technique is that Wrapper is a new type, so it
doesn’t have the methods of the value it’s holding. We would have to implement
all the methods of Vec<T> directly on Wrapper such that the methods
delegate to self.0, which would allow us to treat Wrapper exactly like a
Vec<T>. If we wanted the new type to have every method the inner type has,
implementing the Deref trait (discussed in Chapter 15 in the “Treating Smart
Pointers Like Regular References with the Deref
Trait” section) on the Wrapper to return
the inner type would be a solution. If we don’t want the Wrapper type to have
all the methods of the inner type—for example, to restrict the Wrapper type’s
behavior—we would have to implement just the methods we do want manually.
Now you know how the newtype pattern is used in relation to traits; it’s also a useful pattern even when traits are not involved. Let’s switch focus and look at some advanced ways to interact with Rust’s type system.
Advanced Types
The Rust type system has some features that we’ve mentioned in this book but
haven’t yet discussed. We’ll start by discussing newtypes in general as we
examine why newtypes are useful as types. Then we’ll move on to type aliases, a
feature similar to newtypes but with slightly different semantics. We’ll also
discuss the ! type and dynamically sized types.
Note: The next section assumes you’ve read the earlier section “Using the Newtype Pattern to Implement External Traits on External Types.”
Using the Newtype Pattern for Type Safety and Abstraction
The newtype pattern is useful for tasks beyond those we’ve discussed so far,
including statically enforcing that values are never confused and indicating
the units of a value. You saw an example of using newtypes to indicate units in
Listing 19-15: recall that the Millimeters and Meters structs wrapped u32
values in a newtype. If we wrote a function with a parameter of type
Millimeters, we couldn’t compile a program that accidentally tried to call
that function with a value of type Meters or a plain u32.
Another use of the newtype pattern is in abstracting away some implementation details of a type: the new type can expose a public API that is different from the API of the private inner type if we used the new type directly to restrict the available functionality, for example.
Newtypes can also hide internal implementation. For example, we could provide a
People type to wrap a HashMap<i32, String> that stores a person’s ID
associated with their name. Code using People would only interact with the
public API we provide, such as a method to add a name string to the People
collection; that code wouldn’t need to know that we assign an i32 ID to names
internally. The newtype pattern is a lightweight way to achieve encapsulation
to hide implementation details, which we discussed in the “Encapsulation that
Hides Implementation
Details”
section of Chapter 17.
Creating Type Synonyms with Type Aliases
Along with the newtype pattern, Rust provides the ability to declare a type
alias to give an existing type another name. For this we use the type
keyword. For example, we can create the alias Kilometers to i32 like so:
fn main() { type Kilometers = i32; let x: i32 = 5; let y: Kilometers = 5; println!("x + y = {}", x + y); }
Now, the alias Kilometers is a synonym for i32; unlike the Millimeters
and Meters types we created in Listing 19-15, Kilometers is not a separate,
new type. Values that have the type Kilometers will be treated the same as
values of type i32:
fn main() { type Kilometers = i32; let x: i32 = 5; let y: Kilometers = 5; println!("x + y = {}", x + y); }
Because Kilometers and i32 are the same type, we can add values of both
types and we can pass Kilometers values to functions that take i32
parameters. However, using this method, we don’t get the type checking benefits
that we get from the newtype pattern discussed earlier.
The main use case for type synonyms is to reduce repetition. For example, we might have a lengthy type like this:
Box<dyn Fn() + Send + 'static>
Writing this lengthy type in function signatures and as type annotations all over the code can be tiresome and error prone. Imagine having a project full of code like that in Listing 19-24.
fn main() { let f: Box<dyn Fn() + Send + 'static> = Box::new(|| println!("hi")); fn takes_long_type(f: Box<dyn Fn() + Send + 'static>) { // --snip-- } fn returns_long_type() -> Box<dyn Fn() + Send + 'static> { // --snip-- Box::new(|| ()) } }
Listing 19-24: Using a long type in many places
A type alias makes this code more manageable by reducing the repetition. In
Listing 19-25, we’ve introduced an alias named Thunk for the verbose type and
can replace all uses of the type with the shorter alias Thunk.
fn main() { type Thunk = Box<dyn Fn() + Send + 'static>; let f: Thunk = Box::new(|| println!("hi")); fn takes_long_type(f: Thunk) { // --snip-- } fn returns_long_type() -> Thunk { // --snip-- Box::new(|| ()) } }
Listing 19-25: Introducing a type alias Thunk to reduce
repetition
This code is much easier to read and write! Choosing a meaningful name for a type alias can help communicate your intent as well (thunk is a word for code to be evaluated at a later time, so it’s an appropriate name for a closure that gets stored).
Type aliases are also commonly used with the Result<T, E> type for reducing
repetition. Consider the std::io module in the standard library. I/O
operations often return a Result<T, E> to handle situations when operations
fail to work. This library has a std::io::Error struct that represents all
possible I/O errors. Many of the functions in std::io will be returning
Result<T, E> where the E is std::io::Error, such as these functions in
the Write trait:
use std::fmt;
use std::io::Error;
pub trait Write {
fn write(&mut self, buf: &[u8]) -> Result<usize, Error>;
fn flush(&mut self) -> Result<(), Error>;
fn write_all(&mut self, buf: &[u8]) -> Result<(), Error>;
fn write_fmt(&mut self, fmt: fmt::Arguments) -> Result<(), Error>;
}
The Result<..., Error> is repeated a lot. As such, std::io has this type
alias declaration:
use std::fmt;
type Result<T> = std::result::Result<T, std::io::Error>;
pub trait Write {
fn write(&mut self, buf: &[u8]) -> Result<usize>;
fn flush(&mut self) -> Result<()>;
fn write_all(&mut self, buf: &[u8]) -> Result<()>;
fn write_fmt(&mut self, fmt: fmt::Arguments) -> Result<()>;
}
Because this declaration is in the std::io module, we can use the fully
qualified alias std::io::Result<T>—that is, a Result<T, E> with the E
filled in as std::io::Error. The Write trait function signatures end up
looking like this:
use std::fmt;
type Result<T> = std::result::Result<T, std::io::Error>;
pub trait Write {
fn write(&mut self, buf: &[u8]) -> Result<usize>;
fn flush(&mut self) -> Result<()>;
fn write_all(&mut self, buf: &[u8]) -> Result<()>;
fn write_fmt(&mut self, fmt: fmt::Arguments) -> Result<()>;
}
The type alias helps in two ways: it makes code easier to write and it gives
us a consistent interface across all of std::io. Because it’s an alias, it’s
just another Result<T, E>, which means we can use any methods that work on
Result<T, E> with it, as well as special syntax like the ? operator.
The Never Type that Never Returns
Rust has a special type named ! that’s known in type theory lingo as the
empty type because it has no values. We prefer to call it the never type
because it stands in the place of the return type when a function will never
return. Here is an example:
fn bar() -> ! {
// --snip--
panic!();
}
This code is read as “the function bar returns never.” Functions that return
never are called diverging functions. We can’t create values of the type !
so bar can never possibly return.
But what use is a type you can never create values for? Recall the code from Listing 2-5; we’ve reproduced part of it here in Listing 19-26.
use rand::Rng;
use std::cmp::Ordering;
use std::io;
fn main() {
println!("Guess the number!");
let secret_number = rand::thread_rng().gen_range(1..101);
println!("The secret number is: {}", secret_number);
loop {
println!("Please input your guess.");
let mut guess = String::new();
// --snip--
io::stdin()
.read_line(&mut guess)
.expect("Failed to read line");
let guess: u32 = match guess.trim().parse() {
Ok(num) => num,
Err(_) => continue,
};
println!("You guessed: {}", guess);
// --snip--
match guess.cmp(&secret_number) {
Ordering::Less => println!("Too small!"),
Ordering::Greater => println!("Too big!"),
Ordering::Equal => {
println!("You win!");
break;
}
}
}
}
Listing 19-26: A match with an arm that ends in
continue
At the time, we skipped over some details in this code. In Chapter 6 in “The
match Control Flow Operator” section, we discussed that match arms must all return the same type. So,
for example, the following code doesn’t work:
fn main() {
let guess = "3";
let guess = match guess.trim().parse() {
Ok(_) => 5,
Err(_) => "hello",
};
}
The type of guess in this code would have to be an integer and a string,
and Rust requires that guess have only one type. So what does continue
return? How were we allowed to return a u32 from one arm and have another arm
that ends with continue in Listing 19-26?
As you might have guessed, continue has a ! value. That is, when Rust
computes the type of guess, it looks at both match arms, the former with a
value of u32 and the latter with a ! value. Because ! can never have a
value, Rust decides that the type of guess is u32.
The formal way of describing this behavior is that expressions of type ! can
be coerced into any other type. We’re allowed to end this match arm with
continue because continue doesn’t return a value; instead, it moves control
back to the top of the loop, so in the Err case, we never assign a value to
guess.
The never type is useful with the panic! macro as well. Remember the unwrap
function that we call on Option<T> values to produce a value or panic? Here
is its definition:
enum Option<T> {
Some(T),
None,
}
use crate::Option::*;
impl<T> Option<T> {
pub fn unwrap(self) -> T {
match self {
Some(val) => val,
None => panic!("called `Option::unwrap()` on a `None` value"),
}
}
}
In this code, the same thing happens as in the match in Listing 19-26: Rust
sees that val has the type T and panic! has the type !, so the result
of the overall match expression is T. This code works because panic!
doesn’t produce a value; it ends the program. In the None case, we won’t be
returning a value from unwrap, so this code is valid.
One final expression that has the type ! is a loop:
fn main() {
print!("forever ");
loop {
print!("and ever ");
}
}
Here, the loop never ends, so ! is the value of the expression. However, this
wouldn’t be true if we included a break, because the loop would terminate
when it got to the break.
Dynamically Sized Types and the Sized Trait
Due to Rust’s need to know certain details, such as how much space to allocate for a value of a particular type, there is a corner of its type system that can be confusing: the concept of dynamically sized types. Sometimes referred to as DSTs or unsized types, these types let us write code using values whose size we can know only at runtime.
Let’s dig into the details of a dynamically sized type called str, which
we’ve been using throughout the book. That’s right, not &str, but str on
its own, is a DST. We can’t know how long the string is until runtime, meaning
we can’t create a variable of type str, nor can we take an argument of type
str. Consider the following code, which does not work:
fn main() {
let s1: str = "Hello there!";
let s2: str = "How's it going?";
}
Rust needs to know how much memory to allocate for any value of a particular
type, and all values of a type must use the same amount of memory. If Rust
allowed us to write this code, these two str values would need to take up the
same amount of space. But they have different lengths: s1 needs 12 bytes of
storage and s2 needs 15. This is why it’s not possible to create a variable
holding a dynamically sized type.
So what do we do? In this case, you already know the answer: we make the types
of s1 and s2 a &str rather than a str. Recall that in the “String
Slices” section of Chapter 4, we said the slice
data structure stores the starting position and the length of the slice.
So although a &T is a single value that stores the memory address of where
the T is located, a &str is two values: the address of the str and its
length. As such, we can know the size of a &str value at compile time: it’s
twice the length of a usize. That is, we always know the size of a &str, no
matter how long the string it refers to is. In general, this is the way in
which dynamically sized types are used in Rust: they have an extra bit of
metadata that stores the size of the dynamic information. The golden rule of
dynamically sized types is that we must always put values of dynamically sized
types behind a pointer of some kind.
We can combine str with all kinds of pointers: for example, Box<str> or
Rc<str>. In fact, you’ve seen this before but with a different dynamically
sized type: traits. Every trait is a dynamically sized type we can refer to by
using the name of the trait. In Chapter 17 in the “Using Trait Objects That
Allow for Values of Different
Types” section, we mentioned that to use traits as trait objects, we must
put them behind a pointer, such as &dyn Trait or Box<dyn Trait> (Rc<dyn Trait> would work too).
To work with DSTs, Rust has a particular trait called the Sized trait to
determine whether or not a type’s size is known at compile time. This trait is
automatically implemented for everything whose size is known at compile time.
In addition, Rust implicitly adds a bound on Sized to every generic function.
That is, a generic function definition like this:
fn generic<T>(t: T) {
// --snip--
}
is actually treated as though we had written this:
fn generic<T: Sized>(t: T) {
// --snip--
}
By default, generic functions will work only on types that have a known size at compile time. However, you can use the following special syntax to relax this restriction:
fn generic<T: ?Sized>(t: &T) {
// --snip--
}
A trait bound on ?Sized is the opposite of a trait bound on Sized: we would
read this as “T may or may not be Sized.” This syntax is only available for
Sized, not any other traits.
Also note that we switched the type of the t parameter from T to &T.
Because the type might not be Sized, we need to use it behind some kind of
pointer. In this case, we’ve chosen a reference.
Next, we’ll talk about functions and closures!
Advanced Functions and Closures
Next, we’ll explore some advanced features related to functions and closures, which include function pointers and returning closures.
Function Pointers
We’ve talked about how to pass closures to functions; you can also pass regular
functions to functions! This technique is useful when you want to pass a
function you’ve already defined rather than defining a new closure. Doing this
with function pointers will allow you to use functions as arguments to other
functions. Functions coerce to the type fn (with a lowercase f), not to be
confused with the Fn closure trait. The fn type is called a function
pointer. The syntax for specifying that a parameter is a function pointer is
similar to that of closures, as shown in Listing 19-27.
Filename: src/main.rs
fn add_one(x: i32) -> i32 { x + 1 } fn do_twice(f: fn(i32) -> i32, arg: i32) -> i32 { f(arg) + f(arg) } fn main() { let answer = do_twice(add_one, 5); println!("The answer is: {}", answer); }
Listing 19-27: Using the fn type to accept a function
pointer as an argument
This code prints The answer is: 12. We specify that the parameter f in
do_twice is an fn that takes one parameter of type i32 and returns an
i32. We can then call f in the body of do_twice. In main, we can pass
the function name add_one as the first argument to do_twice.
Unlike closures, fn is a type rather than a trait, so we specify fn as the
parameter type directly rather than declaring a generic type parameter with one
of the Fn traits as a trait bound.
Function pointers implement all three of the closure traits (Fn, FnMut, and
FnOnce), so you can always pass a function pointer as an argument for a
function that expects a closure. It’s best to write functions using a generic
type and one of the closure traits so your functions can accept either
functions or closures.
An example of where you would want to only accept fn and not closures is when
interfacing with external code that doesn’t have closures: C functions can
accept functions as arguments, but C doesn’t have closures.
As an example of where you could use either a closure defined inline or a named
function, let’s look at a use of map. To use the map function to turn a
vector of numbers into a vector of strings, we could use a closure, like this:
fn main() { let list_of_numbers = vec![1, 2, 3]; let list_of_strings: Vec<String> = list_of_numbers.iter().map(|i| i.to_string()).collect(); }
Or we could name a function as the argument to map instead of the closure,
like this:
fn main() { let list_of_numbers = vec![1, 2, 3]; let list_of_strings: Vec<String> = list_of_numbers.iter().map(ToString::to_string).collect(); }
Note that we must use the fully qualified syntax that we talked about earlier
in the “Advanced Traits” section because
there are multiple functions available named to_string. Here, we’re using the
to_string function defined in the ToString trait, which the standard
library has implemented for any type that implements Display.
We have another useful pattern that exploits an implementation detail of tuple
structs and tuple-struct enum variants. These types use () as initializer
syntax, which looks like a function call. The initializers are actually
implemented as functions returning an instance that’s constructed from their
arguments. We can use these initializer functions as function pointers that
implement the closure traits, which means we can specify the initializer
functions as arguments for methods that take closures, like so:
fn main() { enum Status { Value(u32), Stop, } let list_of_statuses: Vec<Status> = (0u32..20).map(Status::Value).collect(); }
Here we create Status::Value instances using each u32 value in the range
that map is called on by using the initializer function of Status::Value.
Some people prefer this style, and some people prefer to use closures. They
compile to the same code, so use whichever style is clearer to you.
Returning Closures
Closures are represented by traits, which means you can’t return closures
directly. In most cases where you might want to return a trait, you can instead
use the concrete type that implements the trait as the return value of the
function. But you can’t do that with closures because they don’t have a
concrete type that is returnable; you’re not allowed to use the function
pointer fn as a return type, for example.
The following code tries to return a closure directly, but it won’t compile:
fn returns_closure() -> dyn Fn(i32) -> i32 {
|x| x + 1
}
The compiler error is as follows:
$ cargo build
Compiling functions-example v0.1.0 (file:///projects/functions-example)
error[E0746]: return type cannot have an unboxed trait object
--> src/lib.rs:1:25
|
1 | fn returns_closure() -> dyn Fn(i32) -> i32 {
| ^^^^^^^^^^^^^^^^^^ doesn't have a size known at compile-time
|
= note: for information on `impl Trait`, see <https://doc.rust-lang.org/book/ch10-02-traits.html#returning-types-that-implement-traits>
help: use `impl Fn(i32) -> i32` as the return type, as all return paths are of type `[closure@src/lib.rs:2:5: 2:14]`, which implements `Fn(i32) -> i32`
|
1 | fn returns_closure() -> impl Fn(i32) -> i32 {
| ^^^^^^^^^^^^^^^^^^^
error: aborting due to previous error
For more information about this error, try `rustc --explain E0746`.
error: could not compile `functions-example`
To learn more, run the command again with --verbose.
The error references the Sized trait again! Rust doesn’t know how much space
it will need to store the closure. We saw a solution to this problem earlier.
We can use a trait object:
fn returns_closure() -> Box<dyn Fn(i32) -> i32> {
Box::new(|x| x + 1)
}
This code will compile just fine. For more about trait objects, refer to the section “Using Trait Objects That Allow for Values of Different Types” in Chapter 17.
Next, let’s look at macros!
Macros
We’ve used macros like println! throughout this book, but we haven’t fully
explored what a macro is and how it works. The term macro refers to a family
of features in Rust: declarative macros with macro_rules! and three kinds
of procedural macros:
- Custom
#[derive]macros that specify code added with thederiveattribute used on structs and enums - Attribute-like macros that define custom attributes usable on any item
- Function-like macros that look like function calls but operate on the tokens specified as their argument
We’ll talk about each of these in turn, but first, let’s look at why we even need macros when we already have functions.
The Difference Between Macros and Functions
Fundamentally, macros are a way of writing code that writes other code, which
is known as metaprogramming. In Appendix C, we discuss the derive
attribute, which generates an implementation of various traits for you. We’ve
also used the println! and vec! macros throughout the book. All of these
macros expand to produce more code than the code you’ve written manually.
Metaprogramming is useful for reducing the amount of code you have to write and maintain, which is also one of the roles of functions. However, macros have some additional powers that functions don’t.
A function signature must declare the number and type of parameters the
function has. Macros, on the other hand, can take a variable number of
parameters: we can call println!("hello") with one argument or
println!("hello {}", name) with two arguments. Also, macros are expanded
before the compiler interprets the meaning of the code, so a macro can, for
example, implement a trait on a given type. A function can’t, because it gets
called at runtime and a trait needs to be implemented at compile time.
The downside to implementing a macro instead of a function is that macro definitions are more complex than function definitions because you’re writing Rust code that writes Rust code. Due to this indirection, macro definitions are generally more difficult to read, understand, and maintain than function definitions.
Another important difference between macros and functions is that you must define macros or bring them into scope before you call them in a file, as opposed to functions you can define anywhere and call anywhere.
Declarative Macros with macro_rules! for General Metaprogramming
The most widely used form of macros in Rust is declarative macros. These are
also sometimes referred to as “macros by example,” “macro_rules! macros,” or
just plain “macros.” At their core, declarative macros allow you to write
something similar to a Rust match expression. As discussed in Chapter 6,
match expressions are control structures that take an expression, compare the
resulting value of the expression to patterns, and then run the code associated
with the matching pattern. Macros also compare a value to patterns that are
associated with particular code: in this situation, the value is the literal
Rust source code passed to the macro; the patterns are compared with the
structure of that source code; and the code associated with each pattern, when
matched, replaces the code passed to the macro. This all happens during
compilation.
To define a macro, you use the macro_rules! construct. Let’s explore how to
use macro_rules! by looking at how the vec! macro is defined. Chapter 8
covered how we can use the vec! macro to create a new vector with particular
values. For example, the following macro creates a new vector containing three
integers:
#![allow(unused)] fn main() { let v: Vec<u32> = vec![1, 2, 3]; }
We could also use the vec! macro to make a vector of two integers or a vector
of five string slices. We wouldn’t be able to use a function to do the same
because we wouldn’t know the number or type of values up front.
Listing 19-28 shows a slightly simplified definition of the vec! macro.
Filename: src/lib.rs
#[macro_export]
macro_rules! vec {
( $( $x:expr ),* ) => {
{
let mut temp_vec = Vec::new();
$(
temp_vec.push($x);
)*
temp_vec
}
};
}
Listing 19-28: A simplified version of the vec! macro
definition
Note: The actual definition of the
vec!macro in the standard library includes code to preallocate the correct amount of memory up front. That code is an optimization that we don’t include here to make the example simpler.
The #[macro_export] annotation indicates that this macro should be made
available whenever the crate in which the macro is defined is brought into
scope. Without this annotation, the macro can’t be brought into scope.
We then start the macro definition with macro_rules! and the name of the
macro we’re defining without the exclamation mark. The name, in this case
vec, is followed by curly brackets denoting the body of the macro definition.
The structure in the vec! body is similar to the structure of a match
expression. Here we have one arm with the pattern ( $( $x:expr ),* ),
followed by => and the block of code associated with this pattern. If the
pattern matches, the associated block of code will be emitted. Given that this
is the only pattern in this macro, there is only one valid way to match; any
other pattern will result in an error. More complex macros will have more than
one arm.
Valid pattern syntax in macro definitions is different than the pattern syntax covered in Chapter 18 because macro patterns are matched against Rust code structure rather than values. Let’s walk through what the pattern pieces in Listing 19-28 mean; for the full macro pattern syntax, see the reference.
First, a set of parentheses encompasses the whole pattern. A dollar sign ($)
is next, followed by a set of parentheses that captures values that match the
pattern within the parentheses for use in the replacement code. Within $() is
$x:expr, which matches any Rust expression and gives the expression the name
$x.
The comma following $() indicates that a literal comma separator character
could optionally appear after the code that matches the code in $(). The *
specifies that the pattern matches zero or more of whatever precedes the *.
When we call this macro with vec![1, 2, 3];, the $x pattern matches three
times with the three expressions 1, 2, and 3.
Now let’s look at the pattern in the body of the code associated with this arm:
temp_vec.push() within $()* is generated for each part that matches $()
in the pattern zero or more times depending on how many times the pattern
matches. The $x is replaced with each expression matched. When we call this
macro with vec![1, 2, 3];, the code generated that replaces this macro call
will be the following:
{
let mut temp_vec = Vec::new();
temp_vec.push(1);
temp_vec.push(2);
temp_vec.push(3);
temp_vec
}
We’ve defined a macro that can take any number of arguments of any type and can generate code to create a vector containing the specified elements.
There are some strange edge cases with macro_rules!. In the future, Rust will
have a second kind of declarative macro that will work in a similar fashion but
fix some of these edge cases. After that update, macro_rules! will be
effectively deprecated. With this in mind, as well as the fact that most Rust
programmers will use macros more than write macros, we won’t discuss
macro_rules! any further. To learn more about how to write macros, consult
the online documentation or other resources, such as “The Little Book of Rust
Macros”.
Procedural Macros for Generating Code from Attributes
The second form of macros is procedural macros, which act more like functions (and are a type of procedure). Procedural macros accept some code as an input, operate on that code, and produce some code as an output rather than matching against patterns and replacing the code with other code as declarative macros do.
The three kinds of procedural macros (custom derive, attribute-like, and function-like) all work in a similar fashion.
When creating procedural macros, the definitions must reside in their own crate
with a special crate type. This is for complex technical reasons that we hope
to eliminate in the future. Using procedural macros looks like the code in
Listing 19-29, where some_attribute is a placeholder for using a specific
macro.
Filename: src/lib.rs
use proc_macro;
#[some_attribute]
pub fn some_name(input: TokenStream) -> TokenStream {
}
Listing 19-29: An example of using a procedural macro
The function that defines a procedural macro takes a TokenStream as an input
and produces a TokenStream as an output. The TokenStream type is defined by
the proc_macro crate that is included with Rust and represents a sequence of
tokens. This is the core of the macro: the source code that the macro is
operating on makes up the input TokenStream, and the code the macro produces
is the output TokenStream. The function also has an attribute attached to it
that specifies which kind of procedural macro we’re creating. We can have
multiple kinds of procedural macros in the same crate.
Let’s look at the different kinds of procedural macros. We’ll start with a custom derive macro and then explain the small dissimilarities that make the other forms different.
How to Write a Custom derive Macro
Let’s create a crate named hello_macro that defines a trait named
HelloMacro with one associated function named hello_macro. Rather than
making our crate users implement the HelloMacro trait for each of their
types, we’ll provide a procedural macro so users can annotate their type with
#[derive(HelloMacro)] to get a default implementation of the hello_macro
function. The default implementation will print Hello, Macro! My name is TypeName! where TypeName is the name of the type on which this trait has
been defined. In other words, we’ll write a crate that enables another
programmer to write code like Listing 19-30 using our crate.
Filename: src/main.rs
use hello_macro::HelloMacro;
use hello_macro_derive::HelloMacro;
#[derive(HelloMacro)]
struct Pancakes;
fn main() {
Pancakes::hello_macro();
}
Listing 19-30: The code a user of our crate will be able to write when using our procedural macro
This code will print Hello, Macro! My name is Pancakes! when we’re done. The
first step is to make a new library crate, like this:
$ cargo new hello_macro --lib
Next, we’ll define the HelloMacro trait and its associated function:
Filename: src/lib.rs
pub trait HelloMacro {
fn hello_macro();
}
We have a trait and its function. At this point, our crate user could implement the trait to achieve the desired functionality, like so:
use hello_macro::HelloMacro;
struct Pancakes;
impl HelloMacro for Pancakes {
fn hello_macro() {
println!("Hello, Macro! My name is Pancakes!");
}
}
fn main() {
Pancakes::hello_macro();
}
However, they would need to write the implementation block for each type they
wanted to use with hello_macro; we want to spare them from having to do this
work.
Additionally, we can’t yet provide the hello_macro function with default
implementation that will print the name of the type the trait is implemented
on: Rust doesn’t have reflection capabilities, so it can’t look up the type’s
name at runtime. We need a macro to generate code at compile time.
The next step is to define the procedural macro. At the time of this writing,
procedural macros need to be in their own crate. Eventually, this restriction
might be lifted. The convention for structuring crates and macro crates is as
follows: for a crate named foo, a custom derive procedural macro crate is
called foo_derive. Let’s start a new crate called hello_macro_derive inside
our hello_macro project:
$ cargo new hello_macro_derive --lib
Our two crates are tightly related, so we create the procedural macro crate
within the directory of our hello_macro crate. If we change the trait
definition in hello_macro, we’ll have to change the implementation of the
procedural macro in hello_macro_derive as well. The two crates will need to
be published separately, and programmers using these crates will need to add
both as dependencies and bring them both into scope. We could instead have the
hello_macro crate use hello_macro_derive as a dependency and re-export the
procedural macro code. However, the way we’ve structured the project makes it
possible for programmers to use hello_macro even if they don’t want the
derive functionality.
We need to declare the hello_macro_derive crate as a procedural macro crate.
We’ll also need functionality from the syn and quote crates, as you’ll see
in a moment, so we need to add them as dependencies. Add the following to the
Cargo.toml file for hello_macro_derive:
Filename: hello_macro_derive/Cargo.toml
[lib]
proc-macro = true
[dependencies]
syn = "1.0"
quote = "1.0"
To start defining the procedural macro, place the code in Listing 19-31 into
your src/lib.rs file for the hello_macro_derive crate. Note that this code
won’t compile until we add a definition for the impl_hello_macro function.
Filename: hello_macro_derive/src/lib.rs
extern crate proc_macro;
use proc_macro::TokenStream;
use quote::quote;
use syn;
#[proc_macro_derive(HelloMacro)]
pub fn hello_macro_derive(input: TokenStream) -> TokenStream {
// Construct a representation of Rust code as a syntax tree
// that we can manipulate
let ast = syn::parse(input).unwrap();
// Build the trait implementation
impl_hello_macro(&ast)
}
Listing 19-31: Code that most procedural macro crates will require in order to process Rust code
Notice that we’ve split the code into the hello_macro_derive function, which
is responsible for parsing the TokenStream, and the impl_hello_macro
function, which is responsible for transforming the syntax tree: this makes
writing a procedural macro more convenient. The code in the outer function
(hello_macro_derive in this case) will be the same for almost every
procedural macro crate you see or create. The code you specify in the body of
the inner function (impl_hello_macro in this case) will be different
depending on your procedural macro’s purpose.
We’ve introduced three new crates: proc_macro, syn, and quote. The
proc_macro crate comes with Rust, so we didn’t need to add that to the
dependencies in Cargo.toml. The proc_macro crate is the compiler’s API that
allows us to read and manipulate Rust code from our code.
The syn crate parses Rust code from a string into a data structure that we
can perform operations on. The quote crate turns syn data structures back
into Rust code. These crates make it much simpler to parse any sort of Rust
code we might want to handle: writing a full parser for Rust code is no simple
task.
The hello_macro_derive function will be called when a user of our library
specifies #[derive(HelloMacro)] on a type. This is possible because we’ve
annotated the hello_macro_derive function here with proc_macro_derive and
specified the name, HelloMacro, which matches our trait name; this is the
convention most procedural macros follow.
The hello_macro_derive function first converts the input from a
TokenStream to a data structure that we can then interpret and perform
operations on. This is where syn comes into play. The parse function in
syn takes a TokenStream and returns a DeriveInput struct representing the
parsed Rust code. Listing 19-32 shows the relevant parts of the DeriveInput
struct we get from parsing the struct Pancakes; string:
DeriveInput {
// --snip--
ident: Ident {
ident: "Pancakes",
span: #0 bytes(95..103)
},
data: Struct(
DataStruct {
struct_token: Struct,
fields: Unit,
semi_token: Some(
Semi
)
}
)
}
Listing 19-32: The DeriveInput instance we get when
parsing the code that has the macro’s attribute in Listing 19-30
The fields of this struct show that the Rust code we’ve parsed is a unit struct
with the ident (identifier, meaning the name) of Pancakes. There are more
fields on this struct for describing all sorts of Rust code; check the syn
documentation for DeriveInput for more information.
Soon we’ll define the impl_hello_macro function, which is where we’ll build
the new Rust code we want to include. But before we do, note that the output
for our derive macro is also a TokenStream. The returned TokenStream is
added to the code that our crate users write, so when they compile their crate,
they’ll get the extra functionality that we provide in the modified
TokenStream.
You might have noticed that we’re calling unwrap to cause the
hello_macro_derive function to panic if the call to the syn::parse function
fails here. It’s necessary for our procedural macro to panic on errors because
proc_macro_derive functions must return TokenStream rather than Result to
conform to the procedural macro API. We’ve simplified this example by using
unwrap; in production code, you should provide more specific error messages
about what went wrong by using panic! or expect.
Now that we have the code to turn the annotated Rust code from a TokenStream
into a DeriveInput instance, let’s generate the code that implements the
HelloMacro trait on the annotated type, as shown in Listing 19-33.
Filename: hello_macro_derive/src/lib.rs
extern crate proc_macro;
use proc_macro::TokenStream;
use quote::quote;
use syn;
#[proc_macro_derive(HelloMacro)]
pub fn hello_macro_derive(input: TokenStream) -> TokenStream {
// Construct a representation of Rust code as a syntax tree
// that we can manipulate
let ast = syn::parse(input).unwrap();
// Build the trait implementation
impl_hello_macro(&ast)
}
fn impl_hello_macro(ast: &syn::DeriveInput) -> TokenStream {
let name = &ast.ident;
let gen = quote! {
impl HelloMacro for #name {
fn hello_macro() {
println!("Hello, Macro! My name is {}!", stringify!(#name));
}
}
};
gen.into()
}
Listing 19-33: Implementing the HelloMacro trait using
the parsed Rust code
We get an Ident struct instance containing the name (identifier) of the
annotated type using ast.ident. The struct in Listing 19-32 shows that when
we run the impl_hello_macro function on the code in Listing 19-30, the
ident we get will have the ident field with a value of "Pancakes". Thus,
the name variable in Listing 19-33 will contain an Ident struct instance
that, when printed, will be the string "Pancakes", the name of the struct in
Listing 19-30.
The quote! macro lets us define the Rust code that we want to return. The
compiler expects something different to the direct result of the quote!
macro’s execution, so we need to convert it to a TokenStream. We do this by
calling the into method, which consumes this intermediate representation and
returns a value of the required TokenStream type.
The quote! macro also provides some very cool templating mechanics: we can
enter #name, and quote! will replace it with the value in the variable
name. You can even do some repetition similar to the way regular macros work.
Check out the quote crate’s docs for a thorough introduction.
We want our procedural macro to generate an implementation of our HelloMacro
trait for the type the user annotated, which we can get by using #name. The
trait implementation has one function, hello_macro, whose body contains the
functionality we want to provide: printing Hello, Macro! My name is and then
the name of the annotated type.
The stringify! macro used here is built into Rust. It takes a Rust
expression, such as 1 + 2, and at compile time turns the expression into a
string literal, such as "1 + 2". This is different than format! or
println!, macros which evaluate the expression and then turn the result into
a String. There is a possibility that the #name input might be an
expression to print literally, so we use stringify!. Using stringify! also
saves an allocation by converting #name to a string literal at compile time.
At this point, cargo build should complete successfully in both hello_macro
and hello_macro_derive. Let’s hook up these crates to the code in Listing
19-30 to see the procedural macro in action! Create a new binary project in
your projects directory using cargo new pancakes. We need to add
hello_macro and hello_macro_derive as dependencies in the pancakes
crate’s Cargo.toml. If you’re publishing your versions of hello_macro and
hello_macro_derive to crates.io, they would be regular
dependencies; if not, you can specify them as path dependencies as follows:
[dependencies]
hello_macro = { path = "../hello_macro" }
hello_macro_derive = { path = "../hello_macro/hello_macro_derive" }
Put the code in Listing 19-30 into src/main.rs, and run cargo run: it
should print Hello, Macro! My name is Pancakes! The implementation of the
HelloMacro trait from the procedural macro was included without the
pancakes crate needing to implement it; the #[derive(HelloMacro)] added the
trait implementation.
Next, let’s explore how the other kinds of procedural macros differ from custom derive macros.
Attribute-like macros
Attribute-like macros are similar to custom derive macros, but instead of
generating code for the derive attribute, they allow you to create new
attributes. They’re also more flexible: derive only works for structs and
enums; attributes can be applied to other items as well, such as functions.
Here’s an example of using an attribute-like macro: say you have an attribute
named route that annotates functions when using a web application framework:
#[route(GET, "/")]
fn index() {
This #[route] attribute would be defined by the framework as a procedural
macro. The signature of the macro definition function would look like this:
#[proc_macro_attribute]
pub fn route(attr: TokenStream, item: TokenStream) -> TokenStream {
Here, we have two parameters of type TokenStream. The first is for the
contents of the attribute: the GET, "/" part. The second is the body of the
item the attribute is attached to: in this case, fn index() {} and the rest
of the function’s body.
Other than that, attribute-like macros work the same way as custom derive
macros: you create a crate with the proc-macro crate type and implement a
function that generates the code you want!
Function-like macros
Function-like macros define macros that look like function calls. Similarly to
macro_rules! macros, they’re more flexible than functions; for example, they
can take an unknown number of arguments. However, macro_rules! macros can be
defined only using the match-like syntax we discussed in the section
“Declarative Macros with macro_rules! for General Metaprogramming”
earlier. Function-like macros take a TokenStream parameter and their
definition manipulates that TokenStream using Rust code as the other two
types of procedural macros do. An example of a function-like macro is an sql!
macro that might be called like so:
let sql = sql!(SELECT * FROM posts WHERE id=1);
This macro would parse the SQL statement inside it and check that it’s
syntactically correct, which is much more complex processing than a
macro_rules! macro can do. The sql! macro would be defined like this:
#[proc_macro]
pub fn sql(input: TokenStream) -> TokenStream {
This definition is similar to the custom derive macro’s signature: we receive the tokens that are inside the parentheses and return the code we wanted to generate.
Summary
Whew! Now you have some Rust features in your toolbox that you won’t use often, but you’ll know they’re available in very particular circumstances. We’ve introduced several complex topics so that when you encounter them in error message suggestions or in other peoples’ code, you’ll be able to recognize these concepts and syntax. Use this chapter as a reference to guide you to solutions.
Next, we’ll put everything we’ve discussed throughout the book into practice and do one more project!
Final Project: Building a Multithreaded Web Server
It’s been a long journey, but we’ve reached the end of the book. In this chapter, we’ll build one more project together to demonstrate some of the concepts we covered in the final chapters, as well as recap some earlier lessons.
For our final project, we’ll make a web server that says “hello” and looks like Figure 20-1 in a web browser.
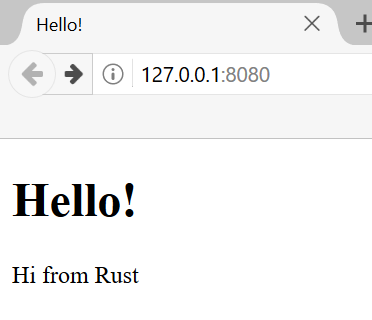
Figure 20-1: Our final shared project
Here is the plan to build the web server:
- Learn a bit about TCP and HTTP.
- Listen for TCP connections on a socket.
- Parse a small number of HTTP requests.
- Create a proper HTTP response.
- Improve the throughput of our server with a thread pool.
But before we get started, we should mention one detail: the method we’ll use won’t be the best way to build a web server with Rust. A number of production-ready crates are available on crates.io that provide more complete web server and thread pool implementations than we’ll build.
However, our intention in this chapter is to help you learn, not to take the easy route. Because Rust is a systems programming language, we can choose the level of abstraction we want to work with and can go to a lower level than is possible or practical in other languages. We’ll write the basic HTTP server and thread pool manually so you can learn the general ideas and techniques behind the crates you might use in the future.
Building a Single-Threaded Web Server
We’ll start by getting a single-threaded web server working. Before we begin, let’s look at a quick overview of the protocols involved in building web servers. The details of these protocols are beyond the scope of this book, but a brief overview will give you the information you need.
The two main protocols involved in web servers are the Hypertext Transfer Protocol (HTTP) and the Transmission Control Protocol (TCP). Both protocols are request-response protocols, meaning a client initiates requests and a server listens to the requests and provides a response to the client. The contents of those requests and responses are defined by the protocols.
TCP is the lower-level protocol that describes the details of how information gets from one server to another but doesn’t specify what that information is. HTTP builds on top of TCP by defining the contents of the requests and responses. It’s technically possible to use HTTP with other protocols, but in the vast majority of cases, HTTP sends its data over TCP. We’ll work with the raw bytes of TCP and HTTP requests and responses.
Listening to the TCP Connection
Our web server needs to listen to a TCP connection, so that’s the first part
we’ll work on. The standard library offers a std::net module that lets us do
this. Let’s make a new project in the usual fashion:
$ cargo new hello
Created binary (application) `hello` project
$ cd hello
Now enter the code in Listing 20-1 in src/main.rs to start. This code will
listen at the address 127.0.0.1:7878 for incoming TCP streams. When it gets
an incoming stream, it will print Connection established!.
Filename: src/main.rs
use std::net::TcpListener; fn main() { let listener = TcpListener::bind("127.0.0.1:7878").unwrap(); for stream in listener.incoming() { let stream = stream.unwrap(); println!("Connection established!"); } }
Listing 20-1: Listening for incoming streams and printing a message when we receive a stream
Using TcpListener, we can listen for TCP connections at the address
127.0.0.1:7878. In the address, the section before the colon is an IP address
representing your computer (this is the same on every computer and doesn’t
represent the authors’ computer specifically), and 7878 is the port. We’ve
chosen this port for two reasons: HTTP isn't normally accepted on this port, and
7878 is rust typed on a telephone.
The bind function in this scenario works like the new function in that it
will return a new TcpListener instance. The reason the function is called
bind is that in networking, connecting to a port to listen to is known as
“binding to a port.”
The bind function returns a Result<T, E>, which indicates that binding
might fail. For example, connecting to port 80 requires administrator
privileges (nonadministrators can listen only on ports higher than 1023), so if
we tried to connect to port 80 without being an administrator, binding wouldn’t
work. As another example, binding wouldn’t work if we ran two instances of our
program and so had two programs listening to the same port. Because we’re
writing a basic server just for learning purposes, we won’t worry about
handling these kinds of errors; instead, we use unwrap to stop the program if
errors happen.
The incoming method on TcpListener returns an iterator that gives us a
sequence of streams (more specifically, streams of type TcpStream). A single
stream represents an open connection between the client and the server. A
connection is the name for the full request and response process in which a
client connects to the server, the server generates a response, and the server
closes the connection. As such, TcpStream will read from itself to see what
the client sent and then allow us to write our response to the stream. Overall,
this for loop will process each connection in turn and produce a series of
streams for us to handle.
For now, our handling of the stream consists of calling unwrap to terminate
our program if the stream has any errors; if there aren’t any errors, the
program prints a message. We’ll add more functionality for the success case in
the next listing. The reason we might receive errors from the incoming method
when a client connects to the server is that we’re not actually iterating over
connections. Instead, we’re iterating over connection attempts. The
connection might not be successful for a number of reasons, many of them
operating system specific. For example, many operating systems have a limit to
the number of simultaneous open connections they can support; new connection
attempts beyond that number will produce an error until some of the open
connections are closed.
Let’s try running this code! Invoke cargo run in the terminal and then load
127.0.0.1:7878 in a web browser. The browser should show an error message
like “Connection reset,” because the server isn’t currently sending back any
data. But when you look at your terminal, you should see several messages that
were printed when the browser connected to the server!
Running `target/debug/hello`
Connection established!
Connection established!
Connection established!
Sometimes, you’ll see multiple messages printed for one browser request; the reason might be that the browser is making a request for the page as well as a request for other resources, like the favicon.ico icon that appears in the browser tab.
It could also be that the browser is trying to connect to the server multiple
times because the server isn’t responding with any data. When stream goes out
of scope and is dropped at the end of the loop, the connection is closed as
part of the drop implementation. Browsers sometimes deal with closed
connections by retrying, because the problem might be temporary. The important
factor is that we’ve successfully gotten a handle to a TCP connection!
Remember to stop the program by pressing ctrl-c
when you’re done running a particular version of the code. Then restart cargo run after you’ve made each set of code changes to make sure you’re running the
newest code.
Reading the Request
Let’s implement the functionality to read the request from the browser! To
separate the concerns of first getting a connection and then taking some action
with the connection, we’ll start a new function for processing connections. In
this new handle_connection function, we’ll read data from the TCP stream and
print it so we can see the data being sent from the browser. Change the code to
look like Listing 20-2.
Filename: src/main.rs
use std::io::prelude::*; use std::net::TcpListener; use std::net::TcpStream; fn main() { let listener = TcpListener::bind("127.0.0.1:7878").unwrap(); for stream in listener.incoming() { let stream = stream.unwrap(); handle_connection(stream); } } fn handle_connection(mut stream: TcpStream) { let mut buffer = [0; 1024]; stream.read(&mut buffer).unwrap(); println!("Request: {}", String::from_utf8_lossy(&buffer[..])); }
Listing 20-2: Reading from the TcpStream and printing
the data
We bring std::io::prelude into scope to get access to certain traits that let
us read from and write to the stream. In the for loop in the main function,
instead of printing a message that says we made a connection, we now call the
new handle_connection function and pass the stream to it.
In the handle_connection function, we’ve made the stream parameter mutable.
The reason is that the TcpStream instance keeps track of what data it returns
to us internally. It might read more data than we asked for and save that data
for the next time we ask for data. It therefore needs to be mut because its
internal state might change; usually, we think of “reading” as not needing
mutation, but in this case we need the mut keyword.
Next, we need to actually read from the stream. We do this in two steps:
first, we declare a buffer on the stack to hold the data that is read in.
We’ve made the buffer 1024 bytes in size, which is big enough to hold the
data of a basic request and sufficient for our purposes in this chapter. If
we wanted to handle requests of an arbitrary size, buffer management would
need to be more complicated; we’ll keep it simple for now. We pass the buffer
to stream.read, which will read bytes from the TcpStream and put them in
the buffer.
Second, we convert the bytes in the buffer to a string and print that string.
The String::from_utf8_lossy function takes a &[u8] and produces a String
from it. The “lossy” part of the name indicates the behavior of this function
when it sees an invalid UTF-8 sequence: it will replace the invalid sequence
with �, the U+FFFD REPLACEMENT CHARACTER. You might see replacement
characters for characters in the buffer that aren’t filled by request data.
Let’s try this code! Start the program and make a request in a web browser again. Note that we’ll still get an error page in the browser, but our program’s output in the terminal will now look similar to this:
$ cargo run
Compiling hello v0.1.0 (file:///projects/hello)
Finished dev [unoptimized + debuginfo] target(s) in 0.42s
Running `target/debug/hello`
Request: GET / HTTP/1.1
Host: 127.0.0.1:7878
User-Agent: Mozilla/5.0 (Windows NT 10.0; WOW64; rv:52.0) Gecko/20100101
Firefox/52.0
Accept: text/html,application/xhtml+xml,application/xml;q=0.9,*/*;q=0.8
Accept-Language: en-US,en;q=0.5
Accept-Encoding: gzip, deflate
Connection: keep-alive
Upgrade-Insecure-Requests: 1
������������������������������������
Depending on your browser, you might get slightly different output. Now that
we’re printing the request data, we can see why we get multiple connections
from one browser request by looking at the path after Request: GET. If the
repeated connections are all requesting /, we know the browser is trying to
fetch / repeatedly because it’s not getting a response from our program.
Let’s break down this request data to understand what the browser is asking of our program.
A Closer Look at an HTTP Request
HTTP is a text-based protocol, and a request takes this format:
Method Request-URI HTTP-Version CRLF
headers CRLF
message-body
The first line is the request line that holds information about what the
client is requesting. The first part of the request line indicates the method
being used, such as GET or POST, which describes how the client is making
this request. Our client used a GET request.
The next part of the request line is /, which indicates the Uniform Resource Identifier (URI) the client is requesting: a URI is almost, but not quite, the same as a Uniform Resource Locator (URL). The difference between URIs and URLs isn’t important for our purposes in this chapter, but the HTTP spec uses the term URI, so we can just mentally substitute URL for URI here.
The last part is the HTTP version the client uses, and then the request line
ends in a CRLF sequence. (CRLF stands for carriage return and line feed,
which are terms from the typewriter days!) The CRLF sequence can also be
written as \r\n, where \r is a carriage return and \n is a line feed. The
CRLF sequence separates the request line from the rest of the request data.
Note that when the CRLF is printed, we see a new line start rather than \r\n.
Looking at the request line data we received from running our program so far,
we see that GET is the method, / is the request URI, and HTTP/1.1 is the
version.
After the request line, the remaining lines starting from Host: onward are
headers. GET requests have no body.
Try making a request from a different browser or asking for a different address, such as 127.0.0.1:7878/test, to see how the request data changes.
Now that we know what the browser is asking for, let’s send back some data!
Writing a Response
Now we’ll implement sending data in response to a client request. Responses have the following format:
HTTP-Version Status-Code Reason-Phrase CRLF
headers CRLF
message-body
The first line is a status line that contains the HTTP version used in the response, a numeric status code that summarizes the result of the request, and a reason phrase that provides a text description of the status code. After the CRLF sequence are any headers, another CRLF sequence, and the body of the response.
Here is an example response that uses HTTP version 1.1, has a status code of 200, an OK reason phrase, no headers, and no body:
HTTP/1.1 200 OK\r\n\r\n
The status code 200 is the standard success response. The text is a tiny
successful HTTP response. Let’s write this to the stream as our response to a
successful request! From the handle_connection function, remove the
println! that was printing the request data and replace it with the code in
Listing 20-3.
Filename: src/main.rs
use std::io::prelude::*; use std::net::TcpListener; use std::net::TcpStream; fn main() { let listener = TcpListener::bind("127.0.0.1:7878").unwrap(); for stream in listener.incoming() { let stream = stream.unwrap(); handle_connection(stream); } } fn handle_connection(mut stream: TcpStream) { let mut buffer = [0; 1024]; stream.read(&mut buffer).unwrap(); let response = "HTTP/1.1 200 OK\r\n\r\n"; stream.write(response.as_bytes()).unwrap(); stream.flush().unwrap(); }
Listing 20-3: Writing a tiny successful HTTP response to the stream
The first new line defines the response variable that holds the success
message’s data. Then we call as_bytes on our response to convert the string
data to bytes. The write method on stream takes a &[u8] and sends those
bytes directly down the connection.
Because the write operation could fail, we use unwrap on any error result
as before. Again, in a real application you would add error handling here.
Finally, flush will wait and prevent the program from continuing until all
the bytes are written to the connection; TcpStream contains an internal
buffer to minimize calls to the underlying operating system.
With these changes, let’s run our code and make a request. We’re no longer printing any data to the terminal, so we won’t see any output other than the output from Cargo. When you load 127.0.0.1:7878 in a web browser, you should get a blank page instead of an error. You’ve just hand-coded an HTTP request and response!
Returning Real HTML
Let’s implement the functionality for returning more than a blank page. Create a new file, hello.html, in the root of your project directory, not in the src directory. You can input any HTML you want; Listing 20-4 shows one possibility.
Filename: hello.html
<!DOCTYPE html>
<html lang="en">
<head>
<meta charset="utf-8">
<title>Hello!</title>
</head>
<body>
<h1>Hello!</h1>
<p>Hi from Rust</p>
</body>
</html>
Listing 20-4: A sample HTML file to return in a response
This is a minimal HTML5 document with a heading and some text. To return this
from the server when a request is received, we’ll modify handle_connection as
shown in Listing 20-5 to read the HTML file, add it to the response as a body,
and send it.
Filename: src/main.rs
use std::fs; // --snip-- use std::io::prelude::*; use std::net::TcpListener; use std::net::TcpStream; fn main() { let listener = TcpListener::bind("127.0.0.1:7878").unwrap(); for stream in listener.incoming() { let stream = stream.unwrap(); handle_connection(stream); } } fn handle_connection(mut stream: TcpStream) { let mut buffer = [0; 1024]; stream.read(&mut buffer).unwrap(); let contents = fs::read_to_string("hello.html").unwrap(); let response = format!( "HTTP/1.1 200 OK\r\nContent-Length: {}\r\n\r\n{}", contents.len(), contents ); stream.write(response.as_bytes()).unwrap(); stream.flush().unwrap(); }
Listing 20-5: Sending the contents of hello.html as the body of the response
We’ve added a line at the top to bring the standard library’s filesystem module into scope. The code for reading the contents of a file to a string should look familiar; we used it in Chapter 12 when we read the contents of a file for our I/O project in Listing 12-4.
Next, we use format! to add the file’s contents as the body of the success
response. To ensure a valid HTTP response, we add the Content-Length header
which is set to the size of our response body, in this case the size of hello.html.
Run this code with cargo run and load 127.0.0.1:7878 in your browser; you
should see your HTML rendered!
Currently, we’re ignoring the request data in buffer and just sending back
the contents of the HTML file unconditionally. That means if you try requesting
127.0.0.1:7878/something-else in your browser, you’ll still get back this
same HTML response. Our server is very limited and is not what most web servers
do. We want to customize our responses depending on the request and only send
back the HTML file for a well-formed request to /.
Validating the Request and Selectively Responding
Right now, our web server will return the HTML in the file no matter what the
client requested. Let’s add functionality to check that the browser is
requesting / before returning the HTML file and return an error if the
browser requests anything else. For this we need to modify handle_connection,
as shown in Listing 20-6. This new code checks the content of the request
received against what we know a request for / looks like and adds if and
else blocks to treat requests differently.
Filename: src/main.rs
use std::fs; use std::io::prelude::*; use std::net::TcpListener; use std::net::TcpStream; fn main() { let listener = TcpListener::bind("127.0.0.1:7878").unwrap(); for stream in listener.incoming() { let stream = stream.unwrap(); handle_connection(stream); } } // --snip-- fn handle_connection(mut stream: TcpStream) { let mut buffer = [0; 1024]; stream.read(&mut buffer).unwrap(); let get = b"GET / HTTP/1.1\r\n"; if buffer.starts_with(get) { let contents = fs::read_to_string("hello.html").unwrap(); let response = format!( "HTTP/1.1 200 OK\r\nContent-Length: {}\r\n\r\n{}", contents.len(), contents ); stream.write(response.as_bytes()).unwrap(); stream.flush().unwrap(); } else { // some other request } }
Listing 20-6: Matching the request and handling requests to / differently from other requests
First, we hardcode the data corresponding to the / request into the get
variable. Because we’re reading raw bytes into the buffer, we transform get
into a byte string by adding the b"" byte string syntax at the start of the
content data. Then we check whether buffer starts with the bytes in get. If
it does, it means we’ve received a well-formed request to /, which is the
success case we’ll handle in the if block that returns the contents of our
HTML file.
If buffer does not start with the bytes in get, it means we’ve received
some other request. We’ll add code to the else block in a moment to respond
to all other requests.
Run this code now and request 127.0.0.1:7878; you should get the HTML in hello.html. If you make any other request, such as 127.0.0.1:7878/something-else, you’ll get a connection error like those you saw when running the code in Listing 20-1 and Listing 20-2.
Now let’s add the code in Listing 20-7 to the else block to return a response
with the status code 404, which signals that the content for the request was
not found. We’ll also return some HTML for a page to render in the browser
indicating the response to the end user.
Filename: src/main.rs
use std::fs; use std::io::prelude::*; use std::net::TcpListener; use std::net::TcpStream; fn main() { let listener = TcpListener::bind("127.0.0.1:7878").unwrap(); for stream in listener.incoming() { let stream = stream.unwrap(); handle_connection(stream); } } fn handle_connection(mut stream: TcpStream) { let mut buffer = [0; 1024]; stream.read(&mut buffer).unwrap(); let get = b"GET / HTTP/1.1\r\n"; if buffer.starts_with(get) { let contents = fs::read_to_string("hello.html").unwrap(); let response = format!( "HTTP/1.1 200 OK\r\nContent-Length: {}\r\n\r\n{}", contents.len(), contents ); stream.write(response.as_bytes()).unwrap(); stream.flush().unwrap(); // --snip-- } else { let status_line = "HTTP/1.1 404 NOT FOUND"; let contents = fs::read_to_string("404.html").unwrap(); let response = format!( "{}\r\nContent-Length: {}\r\n\r\n{}", status_line, contents.len(), contents ); stream.write(response.as_bytes()).unwrap(); stream.flush().unwrap(); } }
Listing 20-7: Responding with status code 404 and an error page if anything other than / was requested
Here, our response has a status line with status code 404 and the reason
phrase NOT FOUND. The body of the response will be the HTML in the file
404.html. You’ll need to create a 404.html file next to hello.html for
the error page; again feel free to use any HTML you want or use the example
HTML in Listing 20-8.
Filename: 404.html
<!DOCTYPE html>
<html lang="en">
<head>
<meta charset="utf-8">
<title>Hello!</title>
</head>
<body>
<h1>Oops!</h1>
<p>Sorry, I don't know what you're asking for.</p>
</body>
</html>
Listing 20-8: Sample content for the page to send back with any 404 response
With these changes, run your server again. Requesting 127.0.0.1:7878 should return the contents of hello.html, and any other request, like 127.0.0.1:7878/foo, should return the error HTML from 404.html.
A Touch of Refactoring
At the moment the if and else blocks have a lot of repetition: they’re both
reading files and writing the contents of the files to the stream. The only
differences are the status line and the filename. Let’s make the code more
concise by pulling out those differences into separate if and else lines
that will assign the values of the status line and the filename to variables;
we can then use those variables unconditionally in the code to read the file
and write the response. Listing 20-9 shows the resulting code after replacing
the large if and else blocks.
Filename: src/main.rs
use std::fs; use std::io::prelude::*; use std::net::TcpListener; use std::net::TcpStream; fn main() { let listener = TcpListener::bind("127.0.0.1:7878").unwrap(); for stream in listener.incoming() { let stream = stream.unwrap(); handle_connection(stream); } } // --snip-- fn handle_connection(mut stream: TcpStream) { // --snip-- let mut buffer = [0; 1024]; stream.read(&mut buffer).unwrap(); let get = b"GET / HTTP/1.1\r\n"; let (status_line, filename) = if buffer.starts_with(get) { ("HTTP/1.1 200 OK", "hello.html") } else { ("HTTP/1.1 404 NOT FOUND", "404.html") }; let contents = fs::read_to_string(filename).unwrap(); let response = format!( "{}\r\nContent-Length: {}\r\n\r\n{}", status_line, contents.len(), contents ); stream.write(response.as_bytes()).unwrap(); stream.flush().unwrap(); }
Listing 20-9: Refactoring the if and else blocks to
contain only the code that differs between the two cases
Now the if and else blocks only return the appropriate values for the
status line and filename in a tuple; we then use destructuring to assign these
two values to status_line and filename using a pattern in the let
statement, as discussed in Chapter 18.
The previously duplicated code is now outside the if and else blocks and
uses the status_line and filename variables. This makes it easier to see
the difference between the two cases, and it means we have only one place to
update the code if we want to change how the file reading and response writing
work. The behavior of the code in Listing 20-9 will be the same as that in
Listing 20-8.
Awesome! We now have a simple web server in approximately 40 lines of Rust code that responds to one request with a page of content and responds to all other requests with a 404 response.
Currently, our server runs in a single thread, meaning it can only serve one request at a time. Let’s examine how that can be a problem by simulating some slow requests. Then we’ll fix it so our server can handle multiple requests at once.
Turning Our Single-Threaded Server into a Multithreaded Server
Right now, the server will process each request in turn, meaning it won’t process a second connection until the first is finished processing. If the server received more and more requests, this serial execution would be less and less optimal. If the server receives a request that takes a long time to process, subsequent requests will have to wait until the long request is finished, even if the new requests can be processed quickly. We’ll need to fix this, but first, we’ll look at the problem in action.
Simulating a Slow Request in the Current Server Implementation
We’ll look at how a slow-processing request can affect other requests made to our current server implementation. Listing 20-10 implements handling a request to /sleep with a simulated slow response that will cause the server to sleep for 5 seconds before responding.
Filename: src/main.rs
use std::fs; use std::io::prelude::*; use std::net::TcpListener; use std::net::TcpStream; use std::thread; use std::time::Duration; // --snip-- fn main() { let listener = TcpListener::bind("127.0.0.1:7878").unwrap(); for stream in listener.incoming() { let stream = stream.unwrap(); handle_connection(stream); } } fn handle_connection(mut stream: TcpStream) { // --snip-- let mut buffer = [0; 1024]; stream.read(&mut buffer).unwrap(); let get = b"GET / HTTP/1.1\r\n"; let sleep = b"GET /sleep HTTP/1.1\r\n"; let (status_line, filename) = if buffer.starts_with(get) { ("HTTP/1.1 200 OK", "hello.html") } else if buffer.starts_with(sleep) { thread::sleep(Duration::from_secs(5)); ("HTTP/1.1 200 OK", "hello.html") } else { ("HTTP/1.1 404 NOT FOUND", "404.html") }; // --snip-- let contents = fs::read_to_string(filename).unwrap(); let response = format!( "{}\r\nContent-Length: {}\r\n\r\n{}", status_line, contents.len(), contents ); stream.write(response.as_bytes()).unwrap(); stream.flush().unwrap(); }
Listing 20-10: Simulating a slow request by recognizing /sleep and sleeping for 5 seconds
This code is a bit messy, but it’s good enough for simulation purposes. We
created a second request sleep, whose data our server recognizes. We added an
else if after the if block to check for the request to /sleep. When that
request is received, the server will sleep for 5 seconds before rendering the
successful HTML page.
You can see how primitive our server is: real libraries would handle the recognition of multiple requests in a much less verbose way!
Start the server using cargo run. Then open two browser windows: one for
http://127.0.0.1:7878/ and the other for http://127.0.0.1:7878/sleep. If
you enter the / URI a few times, as before, you’ll see it respond quickly.
But if you enter /sleep and then load /, you’ll see that / waits until
sleep has slept for its full 5 seconds before loading.
There are multiple ways we could change how our web server works to avoid having more requests back up behind a slow request; the one we’ll implement is a thread pool.
Improving Throughput with a Thread Pool
A thread pool is a group of spawned threads that are waiting and ready to handle a task. When the program receives a new task, it assigns one of the threads in the pool to the task, and that thread will process the task. The remaining threads in the pool are available to handle any other tasks that come in while the first thread is processing. When the first thread is done processing its task, it’s returned to the pool of idle threads, ready to handle a new task. A thread pool allows you to process connections concurrently, increasing the throughput of your server.
We’ll limit the number of threads in the pool to a small number to protect us from Denial of Service (DoS) attacks; if we had our program create a new thread for each request as it came in, someone making 10 million requests to our server could create havoc by using up all our server’s resources and grinding the processing of requests to a halt.
Rather than spawning unlimited threads, we’ll have a fixed number of threads
waiting in the pool. As requests come in, they’ll be sent to the pool for
processing. The pool will maintain a queue of incoming requests. Each of the
threads in the pool will pop off a request from this queue, handle the request,
and then ask the queue for another request. With this design, we can process
N requests concurrently, where N is the number of threads. If each thread
is responding to a long-running request, subsequent requests can still back up
in the queue, but we’ve increased the number of long-running requests we can
handle before reaching that point.
This technique is just one of many ways to improve the throughput of a web server. Other options you might explore are the fork/join model and the single-threaded async I/O model. If you’re interested in this topic, you can read more about other solutions and try to implement them in Rust; with a low-level language like Rust, all of these options are possible.
Before we begin implementing a thread pool, let’s talk about what using the pool should look like. When you’re trying to design code, writing the client interface first can help guide your design. Write the API of the code so it’s structured in the way you want to call it; then implement the functionality within that structure rather than implementing the functionality and then designing the public API.
Similar to how we used test-driven development in the project in Chapter 12, we’ll use compiler-driven development here. We’ll write the code that calls the functions we want, and then we’ll look at errors from the compiler to determine what we should change next to get the code to work.
Code Structure If We Could Spawn a Thread for Each Request
First, let’s explore how our code might look if it did create a new thread for
every connection. As mentioned earlier, this isn’t our final plan due to the
problems with potentially spawning an unlimited number of threads, but it is a
starting point. Listing 20-11 shows the changes to make to main to spawn a
new thread to handle each stream within the for loop.
Filename: src/main.rs
use std::fs; use std::io::prelude::*; use std::net::TcpListener; use std::net::TcpStream; use std::thread; use std::time::Duration; fn main() { let listener = TcpListener::bind("127.0.0.1:7878").unwrap(); for stream in listener.incoming() { let stream = stream.unwrap(); thread::spawn(|| { handle_connection(stream); }); } } fn handle_connection(mut stream: TcpStream) { let mut buffer = [0; 1024]; stream.read(&mut buffer).unwrap(); let get = b"GET / HTTP/1.1\r\n"; let sleep = b"GET /sleep HTTP/1.1\r\n"; let (status_line, filename) = if buffer.starts_with(get) { ("HTTP/1.1 200 OK", "hello.html") } else if buffer.starts_with(sleep) { thread::sleep(Duration::from_secs(5)); ("HTTP/1.1 200 OK", "hello.html") } else { ("HTTP/1.1 404 NOT FOUND", "404.html") }; let contents = fs::read_to_string(filename).unwrap(); let response = format!( "{}\r\nContent-Length: {}\r\n\r\n{}", status_line, contents.len(), contents ); stream.write(response.as_bytes()).unwrap(); stream.flush().unwrap(); }
Listing 20-11: Spawning a new thread for each stream
As you learned in Chapter 16, thread::spawn will create a new thread and then
run the code in the closure in the new thread. If you run this code and load
/sleep in your browser, then / in two more browser tabs, you’ll indeed see
that the requests to / don’t have to wait for /sleep to finish. But as we
mentioned, this will eventually overwhelm the system because you’d be making
new threads without any limit.
Creating a Similar Interface for a Finite Number of Threads
We want our thread pool to work in a similar, familiar way so switching from
threads to a thread pool doesn’t require large changes to the code that uses
our API. Listing 20-12 shows the hypothetical interface for a ThreadPool
struct we want to use instead of thread::spawn.
Filename: src/main.rs
use std::fs;
use std::io::prelude::*;
use std::net::TcpListener;
use std::net::TcpStream;
use std::thread;
use std::time::Duration;
fn main() {
let listener = TcpListener::bind("127.0.0.1:7878").unwrap();
let pool = ThreadPool::new(4);
for stream in listener.incoming() {
let stream = stream.unwrap();
pool.execute(|| {
handle_connection(stream);
});
}
}
fn handle_connection(mut stream: TcpStream) {
let mut buffer = [0; 1024];
stream.read(&mut buffer).unwrap();
let get = b"GET / HTTP/1.1\r\n";
let sleep = b"GET /sleep HTTP/1.1\r\n";
let (status_line, filename) = if buffer.starts_with(get) {
("HTTP/1.1 200 OK", "hello.html")
} else if buffer.starts_with(sleep) {
thread::sleep(Duration::from_secs(5));
("HTTP/1.1 200 OK", "hello.html")
} else {
("HTTP/1.1 404 NOT FOUND", "404.html")
};
let contents = fs::read_to_string(filename).unwrap();
let response = format!(
"{}\r\nContent-Length: {}\r\n\r\n{}",
status_line,
contents.len(),
contents
);
stream.write(response.as_bytes()).unwrap();
stream.flush().unwrap();
}
Listing 20-12: Our ideal ThreadPool interface
We use ThreadPool::new to create a new thread pool with a configurable number
of threads, in this case four. Then, in the for loop, pool.execute has a
similar interface as thread::spawn in that it takes a closure the pool should
run for each stream. We need to implement pool.execute so it takes the
closure and gives it to a thread in the pool to run. This code won’t yet
compile, but we’ll try so the compiler can guide us in how to fix it.
Building the ThreadPool Struct Using Compiler Driven Development
Make the changes in Listing 20-12 to src/main.rs, and then let’s use the
compiler errors from cargo check to drive our development. Here is the first
error we get:
$ cargo check
Checking hello v0.1.0 (file:///projects/hello)
error[E0433]: failed to resolve: use of undeclared type `ThreadPool`
--> src/main.rs:10:16
|
10 | let pool = ThreadPool::new(4);
| ^^^^^^^^^^ use of undeclared type `ThreadPool`
error: aborting due to previous error
For more information about this error, try `rustc --explain E0433`.
error: could not compile `hello`
To learn more, run the command again with --verbose.
Great! This error tells us we need a ThreadPool type or module, so we’ll
build one now. Our ThreadPool implementation will be independent of the kind
of work our web server is doing. So, let’s switch the hello crate from a
binary crate to a library crate to hold our ThreadPool implementation. After
we change to a library crate, we could also use the separate thread pool
library for any work we want to do using a thread pool, not just for serving
web requests.
Create a src/lib.rs that contains the following, which is the simplest
definition of a ThreadPool struct that we can have for now:
Filename: src/lib.rs
pub struct ThreadPool;
Then create a new directory, src/bin, and move the binary crate rooted in
src/main.rs into src/bin/main.rs. Doing so will make the library crate the
primary crate in the hello directory; we can still run the binary in
src/bin/main.rs using cargo run. After moving the main.rs file, edit it
to bring the library crate in and bring ThreadPool into scope by adding the
following code to the top of src/bin/main.rs:
Filename: src/bin/main.rs
use hello::ThreadPool;
use std::fs;
use std::io::prelude::*;
use std::net::TcpListener;
use std::net::TcpStream;
use std::thread;
use std::time::Duration;
fn main() {
let listener = TcpListener::bind("127.0.0.1:7878").unwrap();
let pool = ThreadPool::new(4);
for stream in listener.incoming() {
let stream = stream.unwrap();
pool.execute(|| {
handle_connection(stream);
});
}
}
fn handle_connection(mut stream: TcpStream) {
let mut buffer = [0; 1024];
stream.read(&mut buffer).unwrap();
let get = b"GET / HTTP/1.1\r\n";
let sleep = b"GET /sleep HTTP/1.1\r\n";
let (status_line, filename) = if buffer.starts_with(get) {
("HTTP/1.1 200 OK", "hello.html")
} else if buffer.starts_with(sleep) {
thread::sleep(Duration::from_secs(5));
("HTTP/1.1 200 OK", "hello.html")
} else {
("HTTP/1.1 404 NOT FOUND", "404.html")
};
let contents = fs::read_to_string(filename).unwrap();
let response = format!(
"{}\r\nContent-Length: {}\r\n\r\n{}",
status_line,
contents.len(),
contents
);
stream.write(response.as_bytes()).unwrap();
stream.flush().unwrap();
}
This code still won’t work, but let’s check it again to get the next error that we need to address:
$ cargo check
Checking hello v0.1.0 (file:///projects/hello)
error[E0599]: no function or associated item named `new` found for struct `ThreadPool` in the current scope
--> src/bin/main.rs:11:28
|
11 | let pool = ThreadPool::new(4);
| ^^^ function or associated item not found in `ThreadPool`
error: aborting due to previous error
For more information about this error, try `rustc --explain E0599`.
error: could not compile `hello`
To learn more, run the command again with --verbose.
This error indicates that next we need to create an associated function named
new for ThreadPool. We also know that new needs to have one parameter
that can accept 4 as an argument and should return a ThreadPool instance.
Let’s implement the simplest new function that will have those
characteristics:
Filename: src/lib.rs
pub struct ThreadPool;
impl ThreadPool {
pub fn new(size: usize) -> ThreadPool {
ThreadPool
}
}
We chose usize as the type of the size parameter, because we know that a
negative number of threads doesn’t make any sense. We also know we’ll use this
4 as the number of elements in a collection of threads, which is what the
usize type is for, as discussed in the “Integer Types” section of Chapter 3.
Let’s check the code again:
$ cargo check
Checking hello v0.1.0 (file:///projects/hello)
error[E0599]: no method named `execute` found for struct `ThreadPool` in the current scope
--> src/bin/main.rs:16:14
|
16 | pool.execute(|| {
| ^^^^^^^ method not found in `ThreadPool`
error: aborting due to previous error
For more information about this error, try `rustc --explain E0599`.
error: could not compile `hello`
To learn more, run the command again with --verbose.
Now the error occurs because we don’t have an execute method on ThreadPool.
Recall from the “Creating a Similar Interface for a Finite Number of
Threads” section that we decided our thread pool should have an interface
similar to thread::spawn. In addition, we’ll implement the execute function
so it takes the closure it’s given and gives it to an idle thread in the pool
to run.
We’ll define the execute method on ThreadPool to take a closure as a
parameter. Recall from the “Storing Closures Using Generic Parameters and the
Fn Traits” section in Chapter 13 that we can take closures as parameters with
three different traits: Fn, FnMut, and FnOnce. We need to decide which
kind of closure to use here. We know we’ll end up doing something similar to
the standard library thread::spawn implementation, so we can look at what
bounds the signature of thread::spawn has on its parameter. The documentation
shows us the following:
pub fn spawn<F, T>(f: F) -> JoinHandle<T>
where
F: FnOnce() -> T + Send + 'static,
T: Send + 'static
The F type parameter is the one we’re concerned with here; the T type
parameter is related to the return value, and we’re not concerned with that. We
can see that spawn uses FnOnce as the trait bound on F. This is probably
what we want as well, because we’ll eventually pass the argument we get in
execute to spawn. We can be further confident that FnOnce is the trait we
want to use because the thread for running a request will only execute that
request’s closure one time, which matches the Once in FnOnce.
The F type parameter also has the trait bound Send and the lifetime bound
'static, which are useful in our situation: we need Send to transfer the
closure from one thread to another and 'static because we don’t know how long
the thread will take to execute. Let’s create an execute method on
ThreadPool that will take a generic parameter of type F with these bounds:
Filename: src/lib.rs
pub struct ThreadPool;
impl ThreadPool {
// --snip--
pub fn new(size: usize) -> ThreadPool {
ThreadPool
}
pub fn execute<F>(&self, f: F)
where
F: FnOnce() + Send + 'static,
{
}
}
We still use the () after FnOnce because this FnOnce represents a closure
that takes no parameters and returns the unit type (). Just like function
definitions, the return type can be omitted from the signature, but even if we
have no parameters, we still need the parentheses.
Again, this is the simplest implementation of the execute method: it does
nothing, but we’re trying only to make our code compile. Let’s check it again:
$ cargo check
Checking hello v0.1.0 (file:///projects/hello)
Finished dev [unoptimized + debuginfo] target(s) in 0.24s
It compiles! But note that if you try cargo run and make a request in the
browser, you’ll see the errors in the browser that we saw at the beginning of
the chapter. Our library isn’t actually calling the closure passed to execute
yet!
Note: A saying you might hear about languages with strict compilers, such as Haskell and Rust, is “if the code compiles, it works.” But this saying is not universally true. Our project compiles, but it does absolutely nothing! If we were building a real, complete project, this would be a good time to start writing unit tests to check that the code compiles and has the behavior we want.
Validating the Number of Threads in new
We aren’t doing anything with the parameters to new and execute. Let’s
implement the bodies of these functions with the behavior we want. To start,
let’s think about new. Earlier we chose an unsigned type for the size
parameter, because a pool with a negative number of threads makes no sense.
However, a pool with zero threads also makes no sense, yet zero is a perfectly
valid usize. We’ll add code to check that size is greater than zero before
we return a ThreadPool instance and have the program panic if it receives a
zero by using the assert! macro, as shown in Listing 20-13.
Filename: src/lib.rs
pub struct ThreadPool;
impl ThreadPool {
/// Create a new ThreadPool.
///
/// The size is the number of threads in the pool.
///
/// # Panics
///
/// The `new` function will panic if the size is zero.
pub fn new(size: usize) -> ThreadPool {
assert!(size > 0);
ThreadPool
}
// --snip--
pub fn execute<F>(&self, f: F)
where
F: FnOnce() + Send + 'static,
{
}
}
Listing 20-13: Implementing ThreadPool::new to panic if
size is zero
We’ve added some documentation for our ThreadPool with doc comments. Note
that we followed good documentation practices by adding a section that calls
out the situations in which our function can panic, as discussed in Chapter 14.
Try running cargo doc --open and clicking the ThreadPool struct to see what
the generated docs for new look like!
Instead of adding the assert! macro as we’ve done here, we could make new
return a Result like we did with Config::new in the I/O project in Listing
12-9. But we’ve decided in this case that trying to create a thread pool
without any threads should be an unrecoverable error. If you’re feeling
ambitious, try to write a version of new with the following signature to
compare both versions:
pub fn new(size: usize) -> Result<ThreadPool, PoolCreationError> {
Creating Space to Store the Threads
Now that we have a way to know we have a valid number of threads to store in
the pool, we can create those threads and store them in the ThreadPool struct
before returning it. But how do we “store” a thread? Let’s take another look at
the thread::spawn signature:
pub fn spawn<F, T>(f: F) -> JoinHandle<T>
where
F: FnOnce() -> T + Send + 'static,
T: Send + 'static
The spawn function returns a JoinHandle<T>, where T is the type that the
closure returns. Let’s try using JoinHandle too and see what happens. In our
case, the closures we’re passing to the thread pool will handle the connection
and not return anything, so T will be the unit type ().
The code in Listing 20-14 will compile but doesn’t create any threads yet.
We’ve changed the definition of ThreadPool to hold a vector of
thread::JoinHandle<()> instances, initialized the vector with a capacity of
size, set up a for loop that will run some code to create the threads, and
returned a ThreadPool instance containing them.
Filename: src/lib.rs
use std::thread;
pub struct ThreadPool {
threads: Vec<thread::JoinHandle<()>>,
}
impl ThreadPool {
// --snip--
/// Create a new ThreadPool.
///
/// The size is the number of threads in the pool.
///
/// # Panics
///
/// The `new` function will panic if the size is zero.
pub fn new(size: usize) -> ThreadPool {
assert!(size > 0);
let mut threads = Vec::with_capacity(size);
for _ in 0..size {
// create some threads and store them in the vector
}
ThreadPool { threads }
}
// --snip--
pub fn execute<F>(&self, f: F)
where
F: FnOnce() + Send + 'static,
{
}
}
Listing 20-14: Creating a vector for ThreadPool to hold
the threads
We’ve brought std::thread into scope in the library crate, because we’re
using thread::JoinHandle as the type of the items in the vector in
ThreadPool.
Once a valid size is received, our ThreadPool creates a new vector that can
hold size items. We haven’t used the with_capacity function in this book
yet, which performs the same task as Vec::new but with an important
difference: it preallocates space in the vector. Because we know we need to
store size elements in the vector, doing this allocation up front is slightly
more efficient than using Vec::new, which resizes itself as elements are
inserted.
When you run cargo check again, you’ll get a few more warnings, but it should
succeed.
A Worker Struct Responsible for Sending Code from the ThreadPool to a Thread
We left a comment in the for loop in Listing 20-14 regarding the creation of
threads. Here, we’ll look at how we actually create threads. The standard
library provides thread::spawn as a way to create threads, and
thread::spawn expects to get some code the thread should run as soon as the
thread is created. However, in our case, we want to create the threads and have
them wait for code that we’ll send later. The standard library’s
implementation of threads doesn’t include any way to do that; we have to
implement it manually.
We’ll implement this behavior by introducing a new data structure between the
ThreadPool and the threads that will manage this new behavior. We’ll call
this data structure Worker, which is a common term in pooling
implementations. Think of people working in the kitchen at a restaurant: the
workers wait until orders come in from customers, and then they’re responsible
for taking those orders and filling them.
Instead of storing a vector of JoinHandle<()> instances in the thread pool,
we’ll store instances of the Worker struct. Each Worker will store a single
JoinHandle<()> instance. Then we’ll implement a method on Worker that will
take a closure of code to run and send it to the already running thread for
execution. We’ll also give each worker an id so we can distinguish between
the different workers in the pool when logging or debugging.
Let’s make the following changes to what happens when we create a ThreadPool.
We’ll implement the code that sends the closure to the thread after we have
Worker set up in this way:
- Define a
Workerstruct that holds anidand aJoinHandle<()>. - Change
ThreadPoolto hold a vector ofWorkerinstances. - Define a
Worker::newfunction that takes anidnumber and returns aWorkerinstance that holds theidand a thread spawned with an empty closure. - In
ThreadPool::new, use theforloop counter to generate anid, create a newWorkerwith thatid, and store the worker in the vector.
If you’re up for a challenge, try implementing these changes on your own before looking at the code in Listing 20-15.
Ready? Here is Listing 20-15 with one way to make the preceding modifications.
Filename: src/lib.rs
use std::thread;
pub struct ThreadPool {
workers: Vec<Worker>,
}
impl ThreadPool {
// --snip--
/// Create a new ThreadPool.
///
/// The size is the number of threads in the pool.
///
/// # Panics
///
/// The `new` function will panic if the size is zero.
pub fn new(size: usize) -> ThreadPool {
assert!(size > 0);
let mut workers = Vec::with_capacity(size);
for id in 0..size {
workers.push(Worker::new(id));
}
ThreadPool { workers }
}
// --snip--
pub fn execute<F>(&self, f: F)
where
F: FnOnce() + Send + 'static,
{
}
}
struct Worker {
id: usize,
thread: thread::JoinHandle<()>,
}
impl Worker {
fn new(id: usize) -> Worker {
let thread = thread::spawn(|| {});
Worker { id, thread }
}
}
Listing 20-15: Modifying ThreadPool to hold Worker
instances instead of holding threads directly
We’ve changed the name of the field on ThreadPool from threads to workers
because it’s now holding Worker instances instead of JoinHandle<()>
instances. We use the counter in the for loop as an argument to
Worker::new, and we store each new Worker in the vector named workers.
External code (like our server in src/bin/main.rs) doesn’t need to know the
implementation details regarding using a Worker struct within ThreadPool,
so we make the Worker struct and its new function private. The
Worker::new function uses the id we give it and stores a JoinHandle<()>
instance that is created by spawning a new thread using an empty closure.
This code will compile and will store the number of Worker instances we
specified as an argument to ThreadPool::new. But we’re still not processing
the closure that we get in execute. Let’s look at how to do that next.
Sending Requests to Threads via Channels
Now we’ll tackle the problem that the closures given to thread::spawn do
absolutely nothing. Currently, we get the closure we want to execute in the
execute method. But we need to give thread::spawn a closure to run when we
create each Worker during the creation of the ThreadPool.
We want the Worker structs that we just created to fetch code to run from a
queue held in the ThreadPool and send that code to its thread to run.
In Chapter 16, you learned about channels—a simple way to communicate between
two threads—that would be perfect for this use case. We’ll use a channel to
function as the queue of jobs, and execute will send a job from the
ThreadPool to the Worker instances, which will send the job to its thread.
Here is the plan:
- The
ThreadPoolwill create a channel and hold on to the sending side of the channel. - Each
Workerwill hold on to the receiving side of the channel. - We’ll create a new
Jobstruct that will hold the closures we want to send down the channel. - The
executemethod will send the job it wants to execute down the sending side of the channel. - In its thread, the
Workerwill loop over its receiving side of the channel and execute the closures of any jobs it receives.
Let’s start by creating a channel in ThreadPool::new and holding the sending
side in the ThreadPool instance, as shown in Listing 20-16. The Job struct
doesn’t hold anything for now but will be the type of item we’re sending down
the channel.
Filename: src/lib.rs
use std::thread;
// --snip--
use std::sync::mpsc;
pub struct ThreadPool {
workers: Vec<Worker>,
sender: mpsc::Sender<Job>,
}
struct Job;
impl ThreadPool {
// --snip--
/// Create a new ThreadPool.
///
/// The size is the number of threads in the pool.
///
/// # Panics
///
/// The `new` function will panic if the size is zero.
pub fn new(size: usize) -> ThreadPool {
assert!(size > 0);
let (sender, receiver) = mpsc::channel();
let mut workers = Vec::with_capacity(size);
for id in 0..size {
workers.push(Worker::new(id));
}
ThreadPool { workers, sender }
}
// --snip--
pub fn execute<F>(&self, f: F)
where
F: FnOnce() + Send + 'static,
{
}
}
struct Worker {
id: usize,
thread: thread::JoinHandle<()>,
}
impl Worker {
fn new(id: usize) -> Worker {
let thread = thread::spawn(|| {});
Worker { id, thread }
}
}
Listing 20-16: Modifying ThreadPool to store the
sending end of a channel that sends Job instances
In ThreadPool::new, we create our new channel and have the pool hold the
sending end. This will successfully compile, still with warnings.
Let’s try passing a receiving end of the channel into each worker as the thread
pool creates the channel. We know we want to use the receiving end in the
thread that the workers spawn, so we’ll reference the receiver parameter in
the closure. The code in Listing 20-17 won’t quite compile yet.
Filename: src/lib.rs
use std::sync::mpsc;
use std::thread;
pub struct ThreadPool {
workers: Vec<Worker>,
sender: mpsc::Sender<Job>,
}
struct Job;
impl ThreadPool {
// --snip--
/// Create a new ThreadPool.
///
/// The size is the number of threads in the pool.
///
/// # Panics
///
/// The `new` function will panic if the size is zero.
pub fn new(size: usize) -> ThreadPool {
assert!(size > 0);
let (sender, receiver) = mpsc::channel();
let mut workers = Vec::with_capacity(size);
for id in 0..size {
workers.push(Worker::new(id, receiver));
}
ThreadPool { workers, sender }
}
// --snip--
pub fn execute<F>(&self, f: F)
where
F: FnOnce() + Send + 'static,
{
}
}
// --snip--
struct Worker {
id: usize,
thread: thread::JoinHandle<()>,
}
impl Worker {
fn new(id: usize, receiver: mpsc::Receiver<Job>) -> Worker {
let thread = thread::spawn(|| {
receiver;
});
Worker { id, thread }
}
}
Listing 20-17: Passing the receiving end of the channel to the workers
We’ve made some small and straightforward changes: we pass the receiving end of
the channel into Worker::new, and then we use it inside the closure.
When we try to check this code, we get this error:
$ cargo check
Checking hello v0.1.0 (file:///projects/hello)
error[E0382]: use of moved value: `receiver`
--> src/lib.rs:27:42
|
22 | let (sender, receiver) = mpsc::channel();
| -------- move occurs because `receiver` has type `std::sync::mpsc::Receiver<Job>`, which does not implement the `Copy` trait
...
27 | workers.push(Worker::new(id, receiver));
| ^^^^^^^^ value moved here, in previous iteration of loop
error: aborting due to previous error
For more information about this error, try `rustc --explain E0382`.
error: could not compile `hello`
To learn more, run the command again with --verbose.
The code is trying to pass receiver to multiple Worker instances. This
won’t work, as you’ll recall from Chapter 16: the channel implementation that
Rust provides is multiple producer, single consumer. This means we can’t
just clone the consuming end of the channel to fix this code. Even if we could,
that is not the technique we would want to use; instead, we want to distribute
the jobs across threads by sharing the single receiver among all the workers.
Additionally, taking a job off the channel queue involves mutating the
receiver, so the threads need a safe way to share and modify receiver;
otherwise, we might get race conditions (as covered in Chapter 16).
Recall the thread-safe smart pointers discussed in Chapter 16: to share
ownership across multiple threads and allow the threads to mutate the value, we
need to use Arc<Mutex<T>>. The Arc type will let multiple workers own the
receiver, and Mutex will ensure that only one worker gets a job from the
receiver at a time. Listing 20-18 shows the changes we need to make.
Filename: src/lib.rs
use std::sync::mpsc;
use std::thread;
use std::sync::Arc;
use std::sync::Mutex;
// --snip--
pub struct ThreadPool {
workers: Vec<Worker>,
sender: mpsc::Sender<Job>,
}
struct Job;
impl ThreadPool {
// --snip--
/// Create a new ThreadPool.
///
/// The size is the number of threads in the pool.
///
/// # Panics
///
/// The `new` function will panic if the size is zero.
pub fn new(size: usize) -> ThreadPool {
assert!(size > 0);
let (sender, receiver) = mpsc::channel();
let receiver = Arc::new(Mutex::new(receiver));
let mut workers = Vec::with_capacity(size);
for id in 0..size {
workers.push(Worker::new(id, Arc::clone(&receiver)));
}
ThreadPool { workers, sender }
}
// --snip--
pub fn execute<F>(&self, f: F)
where
F: FnOnce() + Send + 'static,
{
}
}
// --snip--
struct Worker {
id: usize,
thread: thread::JoinHandle<()>,
}
impl Worker {
fn new(id: usize, receiver: Arc<Mutex<mpsc::Receiver<Job>>>) -> Worker {
// --snip--
let thread = thread::spawn(|| {
receiver;
});
Worker { id, thread }
}
}
Listing 20-18: Sharing the receiving end of the channel
among the workers using Arc and Mutex
In ThreadPool::new, we put the receiving end of the channel in an Arc and a
Mutex. For each new worker, we clone the Arc to bump the reference count so
the workers can share ownership of the receiving end.
With these changes, the code compiles! We’re getting there!
Implementing the execute Method
Let’s finally implement the execute method on ThreadPool. We’ll also change
Job from a struct to a type alias for a trait object that holds the type of
closure that execute receives. As discussed in the “Creating Type Synonyms
with Type Aliases”
section of Chapter 19, type aliases allow us to make long types shorter. Look
at Listing 20-19.
Filename: src/lib.rs
use std::sync::mpsc;
use std::sync::Arc;
use std::sync::Mutex;
use std::thread;
pub struct ThreadPool {
workers: Vec<Worker>,
sender: mpsc::Sender<Job>,
}
// --snip--
type Job = Box<dyn FnOnce() + Send + 'static>;
impl ThreadPool {
// --snip--
/// Create a new ThreadPool.
///
/// The size is the number of threads in the pool.
///
/// # Panics
///
/// The `new` function will panic if the size is zero.
pub fn new(size: usize) -> ThreadPool {
assert!(size > 0);
let (sender, receiver) = mpsc::channel();
let receiver = Arc::new(Mutex::new(receiver));
let mut workers = Vec::with_capacity(size);
for id in 0..size {
workers.push(Worker::new(id, Arc::clone(&receiver)));
}
ThreadPool { workers, sender }
}
pub fn execute<F>(&self, f: F)
where
F: FnOnce() + Send + 'static,
{
let job = Box::new(f);
self.sender.send(job).unwrap();
}
}
// --snip--
struct Worker {
id: usize,
thread: thread::JoinHandle<()>,
}
impl Worker {
fn new(id: usize, receiver: Arc<Mutex<mpsc::Receiver<Job>>>) -> Worker {
let thread = thread::spawn(|| {
receiver;
});
Worker { id, thread }
}
}
Listing 20-19: Creating a Job type alias for a Box
that holds each closure and then sending the job down the channel
After creating a new Job instance using the closure we get in execute, we
send that job down the sending end of the channel. We’re calling unwrap on
send for the case that sending fails. This might happen if, for example, we
stop all our threads from executing, meaning the receiving end has stopped
receiving new messages. At the moment, we can’t stop our threads from
executing: our threads continue executing as long as the pool exists. The
reason we use unwrap is that we know the failure case won’t happen, but the
compiler doesn’t know that.
But we’re not quite done yet! In the worker, our closure being passed to
thread::spawn still only references the receiving end of the channel.
Instead, we need the closure to loop forever, asking the receiving end of the
channel for a job and running the job when it gets one. Let’s make the change
shown in Listing 20-20 to Worker::new.
Filename: src/lib.rs
use std::sync::mpsc;
use std::sync::Arc;
use std::sync::Mutex;
use std::thread;
pub struct ThreadPool {
workers: Vec<Worker>,
sender: mpsc::Sender<Job>,
}
type Job = Box<dyn FnOnce() + Send + 'static>;
impl ThreadPool {
/// Create a new ThreadPool.
///
/// The size is the number of threads in the pool.
///
/// # Panics
///
/// The `new` function will panic if the size is zero.
pub fn new(size: usize) -> ThreadPool {
assert!(size > 0);
let (sender, receiver) = mpsc::channel();
let receiver = Arc::new(Mutex::new(receiver));
let mut workers = Vec::with_capacity(size);
for id in 0..size {
workers.push(Worker::new(id, Arc::clone(&receiver)));
}
ThreadPool { workers, sender }
}
pub fn execute<F>(&self, f: F)
where
F: FnOnce() + Send + 'static,
{
let job = Box::new(f);
self.sender.send(job).unwrap();
}
}
struct Worker {
id: usize,
thread: thread::JoinHandle<()>,
}
// --snip--
impl Worker {
fn new(id: usize, receiver: Arc<Mutex<mpsc::Receiver<Job>>>) -> Worker {
let thread = thread::spawn(move || loop {
let job = receiver.lock().unwrap().recv().unwrap();
println!("Worker {} got a job; executing.", id);
job();
});
Worker { id, thread }
}
}
Listing 20-20: Receiving and executing the jobs in the worker’s thread
Here, we first call lock on the receiver to acquire the mutex, and then we
call unwrap to panic on any errors. Acquiring a lock might fail if the mutex
is in a poisoned state, which can happen if some other thread panicked while
holding the lock rather than releasing the lock. In this situation, calling
unwrap to have this thread panic is the correct action to take. Feel free to
change this unwrap to an expect with an error message that is meaningful to
you.
If we get the lock on the mutex, we call recv to receive a Job from the
channel. A final unwrap moves past any errors here as well, which might occur
if the thread holding the sending side of the channel has shut down, similar to
how the send method returns Err if the receiving side shuts down.
The call to recv blocks, so if there is no job yet, the current thread will
wait until a job becomes available. The Mutex<T> ensures that only one
Worker thread at a time is trying to request a job.
With the implementation of this trick, our thread pool is in a working state!
Give it a cargo run and make some requests:
$ cargo run
Compiling hello v0.1.0 (file:///projects/hello)
warning: field is never read: `workers`
--> src/lib.rs:7:5
|
7 | workers: Vec<Worker>,
| ^^^^^^^^^^^^^^^^^^^^
|
= note: `#[warn(dead_code)]` on by default
warning: field is never read: `id`
--> src/lib.rs:48:5
|
48 | id: usize,
| ^^^^^^^^^
warning: field is never read: `thread`
--> src/lib.rs:49:5
|
49 | thread: thread::JoinHandle<()>,
| ^^^^^^^^^^^^^^^^^^^^^^^^^^^^^^
warning: 3 warnings emitted
Finished dev [unoptimized + debuginfo] target(s) in 1.40s
Running `target/debug/main`
Worker 0 got a job; executing.
Worker 2 got a job; executing.
Worker 1 got a job; executing.
Worker 3 got a job; executing.
Worker 0 got a job; executing.
Worker 2 got a job; executing.
Worker 1 got a job; executing.
Worker 3 got a job; executing.
Worker 0 got a job; executing.
Worker 2 got a job; executing.
Success! We now have a thread pool that executes connections asynchronously. There are never more than four threads created, so our system won’t get overloaded if the server receives a lot of requests. If we make a request to /sleep, the server will be able to serve other requests by having another thread run them.
Note: if you open /sleep in multiple browser windows simultaneously, they might load one at a time in 5 second intervals. Some web browsers execute multiple instances of the same request sequentially for caching reasons. This limitation is not caused by our web server.
After learning about the while let loop in Chapter 18, you might be wondering
why we didn’t write the worker thread code as shown in Listing 20-21.
Filename: src/lib.rs
use std::sync::mpsc;
use std::sync::Arc;
use std::sync::Mutex;
use std::thread;
pub struct ThreadPool {
workers: Vec<Worker>,
sender: mpsc::Sender<Job>,
}
type Job = Box<dyn FnOnce() + Send + 'static>;
impl ThreadPool {
/// Create a new ThreadPool.
///
/// The size is the number of threads in the pool.
///
/// # Panics
///
/// The `new` function will panic if the size is zero.
pub fn new(size: usize) -> ThreadPool {
assert!(size > 0);
let (sender, receiver) = mpsc::channel();
let receiver = Arc::new(Mutex::new(receiver));
let mut workers = Vec::with_capacity(size);
for id in 0..size {
workers.push(Worker::new(id, Arc::clone(&receiver)));
}
ThreadPool { workers, sender }
}
pub fn execute<F>(&self, f: F)
where
F: FnOnce() + Send + 'static,
{
let job = Box::new(f);
self.sender.send(job).unwrap();
}
}
struct Worker {
id: usize,
thread: thread::JoinHandle<()>,
}
// --snip--
impl Worker {
fn new(id: usize, receiver: Arc<Mutex<mpsc::Receiver<Job>>>) -> Worker {
let thread = thread::spawn(move || {
while let Ok(job) = receiver.lock().unwrap().recv() {
println!("Worker {} got a job; executing.", id);
job();
}
});
Worker { id, thread }
}
}
Listing 20-21: An alternative implementation of
Worker::new using while let
This code compiles and runs but doesn’t result in the desired threading
behavior: a slow request will still cause other requests to wait to be
processed. The reason is somewhat subtle: the Mutex struct has no public
unlock method because the ownership of the lock is based on the lifetime of
the MutexGuard<T> within the LockResult<MutexGuard<T>> that the lock
method returns. At compile time, the borrow checker can then enforce the rule
that a resource guarded by a Mutex cannot be accessed unless we hold the
lock. But this implementation can also result in the lock being held longer
than intended if we don’t think carefully about the lifetime of the
MutexGuard<T>.
The code in Listing 20-20 that uses let job = receiver.lock().unwrap().recv().unwrap(); works because with let, any
temporary values used in the expression on the right hand side of the equals
sign are immediately dropped when the let statement ends. However, while let (and if let and match) does not drop temporary values until the end of
the associated block. In Listing 20-21, the lock remains held for the duration
of the call to job(), meaning other workers cannot receive jobs.
Graceful Shutdown and Cleanup
The code in Listing 20-20 is responding to requests asynchronously through the
use of a thread pool, as we intended. We get some warnings about the workers,
id, and thread fields that we’re not using in a direct way that reminds us
we’re not cleaning up anything. When we use the less elegant ctrl-c method to halt the main thread, all other
threads are stopped immediately as well, even if they’re in the middle of
serving a request.
Now we’ll implement the Drop trait to call join on each of the threads in
the pool so they can finish the requests they’re working on before closing.
Then we’ll implement a way to tell the threads they should stop accepting new
requests and shut down. To see this code in action, we’ll modify our server to
accept only two requests before gracefully shutting down its thread pool.
Implementing the Drop Trait on ThreadPool
Let’s start with implementing Drop on our thread pool. When the pool is
dropped, our threads should all join to make sure they finish their work.
Listing 20-22 shows a first attempt at a Drop implementation; this code won’t
quite work yet.
Filename: src/lib.rs
use std::sync::mpsc;
use std::sync::Arc;
use std::sync::Mutex;
use std::thread;
pub struct ThreadPool {
workers: Vec<Worker>,
sender: mpsc::Sender<Job>,
}
type Job = Box<dyn FnOnce() + Send + 'static>;
impl ThreadPool {
/// Create a new ThreadPool.
///
/// The size is the number of threads in the pool.
///
/// # Panics
///
/// The `new` function will panic if the size is zero.
pub fn new(size: usize) -> ThreadPool {
assert!(size > 0);
let (sender, receiver) = mpsc::channel();
let receiver = Arc::new(Mutex::new(receiver));
let mut workers = Vec::with_capacity(size);
for id in 0..size {
workers.push(Worker::new(id, Arc::clone(&receiver)));
}
ThreadPool { workers, sender }
}
pub fn execute<F>(&self, f: F)
where
F: FnOnce() + Send + 'static,
{
let job = Box::new(f);
self.sender.send(job).unwrap();
}
}
impl Drop for ThreadPool {
fn drop(&mut self) {
for worker in &mut self.workers {
println!("Shutting down worker {}", worker.id);
worker.thread.join().unwrap();
}
}
}
struct Worker {
id: usize,
thread: thread::JoinHandle<()>,
}
impl Worker {
fn new(id: usize, receiver: Arc<Mutex<mpsc::Receiver<Job>>>) -> Worker {
let thread = thread::spawn(move || loop {
let job = receiver.lock().unwrap().recv().unwrap();
println!("Worker {} got a job; executing.", id);
job();
});
Worker { id, thread }
}
}
Listing 20-22: Joining each thread when the thread pool goes out of scope
First, we loop through each of the thread pool workers. We use &mut for
this because self is a mutable reference, and we also need to be able to
mutate worker. For each worker, we print a message saying that this
particular worker is shutting down, and then we call join on that worker’s
thread. If the call to join fails, we use unwrap to make Rust panic and go
into an ungraceful shutdown.
Here is the error we get when we compile this code:
$ cargo check
Checking hello v0.1.0 (file:///projects/hello)
error[E0507]: cannot move out of `worker.thread` which is behind a mutable reference
--> src/lib.rs:52:13
|
52 | worker.thread.join().unwrap();
| ^^^^^^^^^^^^^ move occurs because `worker.thread` has type `JoinHandle<()>`, which does not implement the `Copy` trait
error: aborting due to previous error
For more information about this error, try `rustc --explain E0507`.
error: could not compile `hello`
To learn more, run the command again with --verbose.
The error tells us we can’t call join because we only have a mutable borrow
of each worker and join takes ownership of its argument. To solve this
issue, we need to move the thread out of the Worker instance that owns
thread so join can consume the thread. We did this in Listing 17-15: if
Worker holds an Option<thread::JoinHandle<()>> instead, we can call the
take method on the Option to move the value out of the Some variant and
leave a None variant in its place. In other words, a Worker that is running
will have a Some variant in thread, and when we want to clean up a
Worker, we’ll replace Some with None so the Worker doesn’t have a
thread to run.
So we know we want to update the definition of Worker like this:
Filename: src/lib.rs
use std::sync::mpsc;
use std::sync::Arc;
use std::sync::Mutex;
use std::thread;
pub struct ThreadPool {
workers: Vec<Worker>,
sender: mpsc::Sender<Job>,
}
type Job = Box<dyn FnOnce() + Send + 'static>;
impl ThreadPool {
/// Create a new ThreadPool.
///
/// The size is the number of threads in the pool.
///
/// # Panics
///
/// The `new` function will panic if the size is zero.
pub fn new(size: usize) -> ThreadPool {
assert!(size > 0);
let (sender, receiver) = mpsc::channel();
let receiver = Arc::new(Mutex::new(receiver));
let mut workers = Vec::with_capacity(size);
for id in 0..size {
workers.push(Worker::new(id, Arc::clone(&receiver)));
}
ThreadPool { workers, sender }
}
pub fn execute<F>(&self, f: F)
where
F: FnOnce() + Send + 'static,
{
let job = Box::new(f);
self.sender.send(job).unwrap();
}
}
impl Drop for ThreadPool {
fn drop(&mut self) {
for worker in &mut self.workers {
println!("Shutting down worker {}", worker.id);
worker.thread.join().unwrap();
}
}
}
struct Worker {
id: usize,
thread: Option<thread::JoinHandle<()>>,
}
impl Worker {
fn new(id: usize, receiver: Arc<Mutex<mpsc::Receiver<Job>>>) -> Worker {
let thread = thread::spawn(move || loop {
let job = receiver.lock().unwrap().recv().unwrap();
println!("Worker {} got a job; executing.", id);
job();
});
Worker { id, thread }
}
}
Now let’s lean on the compiler to find the other places that need to change. Checking this code, we get two errors:
$ cargo check
Checking hello v0.1.0 (file:///projects/hello)
error[E0599]: no method named `join` found for enum `Option<JoinHandle<()>>` in the current scope
--> src/lib.rs:52:27
|
52 | worker.thread.join().unwrap();
| ^^^^ method not found in `Option<JoinHandle<()>>`
error[E0308]: mismatched types
--> src/lib.rs:72:22
|
72 | Worker { id, thread }
| ^^^^^^
| |
| expected enum `Option`, found struct `JoinHandle`
| help: try using a variant of the expected enum: `Some(thread)`
|
= note: expected enum `Option<JoinHandle<()>>`
found struct `JoinHandle<_>`
error: aborting due to 2 previous errors
Some errors have detailed explanations: E0308, E0599.
For more information about an error, try `rustc --explain E0308`.
error: could not compile `hello`
To learn more, run the command again with --verbose.
Let’s address the second error, which points to the code at the end of
Worker::new; we need to wrap the thread value in Some when we create a
new Worker. Make the following changes to fix this error:
Filename: src/lib.rs
use std::sync::mpsc;
use std::sync::Arc;
use std::sync::Mutex;
use std::thread;
pub struct ThreadPool {
workers: Vec<Worker>,
sender: mpsc::Sender<Job>,
}
type Job = Box<dyn FnOnce() + Send + 'static>;
impl ThreadPool {
/// Create a new ThreadPool.
///
/// The size is the number of threads in the pool.
///
/// # Panics
///
/// The `new` function will panic if the size is zero.
pub fn new(size: usize) -> ThreadPool {
assert!(size > 0);
let (sender, receiver) = mpsc::channel();
let receiver = Arc::new(Mutex::new(receiver));
let mut workers = Vec::with_capacity(size);
for id in 0..size {
workers.push(Worker::new(id, Arc::clone(&receiver)));
}
ThreadPool { workers, sender }
}
pub fn execute<F>(&self, f: F)
where
F: FnOnce() + Send + 'static,
{
let job = Box::new(f);
self.sender.send(job).unwrap();
}
}
impl Drop for ThreadPool {
fn drop(&mut self) {
for worker in &mut self.workers {
println!("Shutting down worker {}", worker.id);
worker.thread.join().unwrap();
}
}
}
struct Worker {
id: usize,
thread: Option<thread::JoinHandle<()>>,
}
impl Worker {
fn new(id: usize, receiver: Arc<Mutex<mpsc::Receiver<Job>>>) -> Worker {
// --snip--
let thread = thread::spawn(move || loop {
let job = receiver.lock().unwrap().recv().unwrap();
println!("Worker {} got a job; executing.", id);
job();
});
Worker {
id,
thread: Some(thread),
}
}
}
The first error is in our Drop implementation. We mentioned earlier that we
intended to call take on the Option value to move thread out of worker.
The following changes will do so:
Filename: src/lib.rs
use std::sync::mpsc;
use std::sync::Arc;
use std::sync::Mutex;
use std::thread;
pub struct ThreadPool {
workers: Vec<Worker>,
sender: mpsc::Sender<Job>,
}
type Job = Box<dyn FnOnce() + Send + 'static>;
impl ThreadPool {
/// Create a new ThreadPool.
///
/// The size is the number of threads in the pool.
///
/// # Panics
///
/// The `new` function will panic if the size is zero.
pub fn new(size: usize) -> ThreadPool {
assert!(size > 0);
let (sender, receiver) = mpsc::channel();
let receiver = Arc::new(Mutex::new(receiver));
let mut workers = Vec::with_capacity(size);
for id in 0..size {
workers.push(Worker::new(id, Arc::clone(&receiver)));
}
ThreadPool { workers, sender }
}
pub fn execute<F>(&self, f: F)
where
F: FnOnce() + Send + 'static,
{
let job = Box::new(f);
self.sender.send(job).unwrap();
}
}
impl Drop for ThreadPool {
fn drop(&mut self) {
for worker in &mut self.workers {
println!("Shutting down worker {}", worker.id);
if let Some(thread) = worker.thread.take() {
thread.join().unwrap();
}
}
}
}
struct Worker {
id: usize,
thread: Option<thread::JoinHandle<()>>,
}
impl Worker {
fn new(id: usize, receiver: Arc<Mutex<mpsc::Receiver<Job>>>) -> Worker {
let thread = thread::spawn(move || loop {
let job = receiver.lock().unwrap().recv().unwrap();
println!("Worker {} got a job; executing.", id);
job();
});
Worker {
id,
thread: Some(thread),
}
}
}
As discussed in Chapter 17, the take method on Option takes the Some
variant out and leaves None in its place. We’re using if let to destructure
the Some and get the thread; then we call join on the thread. If a worker’s
thread is already None, we know that worker has already had its thread
cleaned up, so nothing happens in that case.
Signaling to the Threads to Stop Listening for Jobs
With all the changes we’ve made, our code compiles without any warnings. But
the bad news is this code doesn’t function the way we want it to yet. The key
is the logic in the closures run by the threads of the Worker instances: at
the moment, we call join, but that won’t shut down the threads because they
loop forever looking for jobs. If we try to drop our ThreadPool with our
current implementation of drop, the main thread will block forever waiting
for the first thread to finish.
To fix this problem, we’ll modify the threads so they listen for either a Job
to run or a signal that they should stop listening and exit the infinite loop.
Instead of Job instances, our channel will send one of these two enum
variants.
Filename: src/lib.rs
use std::sync::mpsc;
use std::sync::Arc;
use std::sync::Mutex;
use std::thread;
pub struct ThreadPool {
workers: Vec<Worker>,
sender: mpsc::Sender<Job>,
}
type Job = Box<dyn FnOnce() + Send + 'static>;
enum Message {
NewJob(Job),
Terminate,
}
impl ThreadPool {
/// Create a new ThreadPool.
///
/// The size is the number of threads in the pool.
///
/// # Panics
///
/// The `new` function will panic if the size is zero.
pub fn new(size: usize) -> ThreadPool {
assert!(size > 0);
let (sender, receiver) = mpsc::channel();
let receiver = Arc::new(Mutex::new(receiver));
let mut workers = Vec::with_capacity(size);
for id in 0..size {
workers.push(Worker::new(id, Arc::clone(&receiver)));
}
ThreadPool { workers, sender }
}
pub fn execute<F>(&self, f: F)
where
F: FnOnce() + Send + 'static,
{
let job = Box::new(f);
self.sender.send(job).unwrap();
}
}
impl Drop for ThreadPool {
fn drop(&mut self) {
for worker in &mut self.workers {
println!("Shutting down worker {}", worker.id);
if let Some(thread) = worker.thread.take() {
thread.join().unwrap();
}
}
}
}
struct Worker {
id: usize,
thread: Option<thread::JoinHandle<()>>,
}
impl Worker {
fn new(id: usize, receiver: Arc<Mutex<mpsc::Receiver<Job>>>) -> Worker {
let thread = thread::spawn(move || loop {
let job = receiver.lock().unwrap().recv().unwrap();
println!("Worker {} got a job; executing.", id);
job();
});
Worker {
id,
thread: Some(thread),
}
}
}
This Message enum will either be a NewJob variant that holds the Job the
thread should run, or it will be a Terminate variant that will cause the
thread to exit its loop and stop.
We need to adjust the channel to use values of type Message rather than type
Job, as shown in Listing 20-23.
Filename: src/lib.rs
use std::sync::mpsc;
use std::sync::Arc;
use std::sync::Mutex;
use std::thread;
pub struct ThreadPool {
workers: Vec<Worker>,
sender: mpsc::Sender<Message>,
}
// --snip--
type Job = Box<dyn FnOnce() + Send + 'static>;
enum Message {
NewJob(Job),
Terminate,
}
impl ThreadPool {
// --snip--
/// Create a new ThreadPool.
///
/// The size is the number of threads in the pool.
///
/// # Panics
///
/// The `new` function will panic if the size is zero.
pub fn new(size: usize) -> ThreadPool {
assert!(size > 0);
let (sender, receiver) = mpsc::channel();
let receiver = Arc::new(Mutex::new(receiver));
let mut workers = Vec::with_capacity(size);
for id in 0..size {
workers.push(Worker::new(id, Arc::clone(&receiver)));
}
ThreadPool { workers, sender }
}
pub fn execute<F>(&self, f: F)
where
F: FnOnce() + Send + 'static,
{
let job = Box::new(f);
self.sender.send(Message::NewJob(job)).unwrap();
}
}
// --snip--
impl Drop for ThreadPool {
fn drop(&mut self) {
for worker in &mut self.workers {
println!("Shutting down worker {}", worker.id);
if let Some(thread) = worker.thread.take() {
thread.join().unwrap();
}
}
}
}
struct Worker {
id: usize,
thread: Option<thread::JoinHandle<()>>,
}
impl Worker {
fn new(id: usize, receiver: Arc<Mutex<mpsc::Receiver<Message>>>) -> Worker {
let thread = thread::spawn(move || loop {
let message = receiver.lock().unwrap().recv().unwrap();
match message {
Message::NewJob(job) => {
println!("Worker {} got a job; executing.", id);
job();
}
Message::Terminate => {
println!("Worker {} was told to terminate.", id);
break;
}
}
});
Worker {
id,
thread: Some(thread),
}
}
}
Listing 20-23: Sending and receiving Message values and
exiting the loop if a Worker receives Message::Terminate
To incorporate the Message enum, we need to change Job to Message in two
places: the definition of ThreadPool and the signature of Worker::new. The
execute method of ThreadPool needs to send jobs wrapped in the
Message::NewJob variant. Then, in Worker::new where a Message is received
from the channel, the job will be processed if the NewJob variant is
received, and the thread will break out of the loop if the Terminate variant
is received.
With these changes, the code will compile and continue to function in the same
way as it did after Listing 20-20. But we’ll get a warning because we aren’t
creating any messages of the Terminate variety. Let’s fix this warning by
changing our Drop implementation to look like Listing 20-24.
Filename: src/lib.rs
use std::sync::mpsc;
use std::sync::Arc;
use std::sync::Mutex;
use std::thread;
pub struct ThreadPool {
workers: Vec<Worker>,
sender: mpsc::Sender<Message>,
}
type Job = Box<dyn FnOnce() + Send + 'static>;
enum Message {
NewJob(Job),
Terminate,
}
impl ThreadPool {
/// Create a new ThreadPool.
///
/// The size is the number of threads in the pool.
///
/// # Panics
///
/// The `new` function will panic if the size is zero.
pub fn new(size: usize) -> ThreadPool {
assert!(size > 0);
let (sender, receiver) = mpsc::channel();
let receiver = Arc::new(Mutex::new(receiver));
let mut workers = Vec::with_capacity(size);
for id in 0..size {
workers.push(Worker::new(id, Arc::clone(&receiver)));
}
ThreadPool { workers, sender }
}
pub fn execute<F>(&self, f: F)
where
F: FnOnce() + Send + 'static,
{
let job = Box::new(f);
self.sender.send(Message::NewJob(job)).unwrap();
}
}
impl Drop for ThreadPool {
fn drop(&mut self) {
println!("Sending terminate message to all workers.");
for _ in &self.workers {
self.sender.send(Message::Terminate).unwrap();
}
println!("Shutting down all workers.");
for worker in &mut self.workers {
println!("Shutting down worker {}", worker.id);
if let Some(thread) = worker.thread.take() {
thread.join().unwrap();
}
}
}
}
struct Worker {
id: usize,
thread: Option<thread::JoinHandle<()>>,
}
impl Worker {
fn new(id: usize, receiver: Arc<Mutex<mpsc::Receiver<Message>>>) -> Worker {
let thread = thread::spawn(move || loop {
let message = receiver.lock().unwrap().recv().unwrap();
match message {
Message::NewJob(job) => {
println!("Worker {} got a job; executing.", id);
job();
}
Message::Terminate => {
println!("Worker {} was told to terminate.", id);
break;
}
}
});
Worker {
id,
thread: Some(thread),
}
}
}
Listing 20-24: Sending Message::Terminate to the
workers before calling join on each worker thread
We’re now iterating over the workers twice: once to send one Terminate
message for each worker and once to call join on each worker’s thread. If we
tried to send a message and join immediately in the same loop, we couldn’t
guarantee that the worker in the current iteration would be the one to get the
message from the channel.
To better understand why we need two separate loops, imagine a scenario with
two workers. If we used a single loop to iterate through each worker, on the
first iteration a terminate message would be sent down the channel and join
called on the first worker’s thread. If that first worker was busy processing a
request at that moment, the second worker would pick up the terminate message
from the channel and shut down. We would be left waiting on the first worker to
shut down, but it never would because the second thread picked up the terminate
message. Deadlock!
To prevent this scenario, we first put all of our Terminate messages on the
channel in one loop; then we join on all the threads in another loop. Each
worker will stop receiving requests on the channel once it gets a terminate
message. So, we can be sure that if we send the same number of terminate
messages as there are workers, each worker will receive a terminate message
before join is called on its thread.
To see this code in action, let’s modify main to accept only two requests
before gracefully shutting down the server, as shown in Listing 20-25.
Filename: src/bin/main.rs
use hello::ThreadPool;
use std::fs;
use std::io::prelude::*;
use std::net::TcpListener;
use std::net::TcpStream;
use std::thread;
use std::time::Duration;
fn main() {
let listener = TcpListener::bind("127.0.0.1:7878").unwrap();
let pool = ThreadPool::new(4);
for stream in listener.incoming().take(2) {
let stream = stream.unwrap();
pool.execute(|| {
handle_connection(stream);
});
}
println!("Shutting down.");
}
fn handle_connection(mut stream: TcpStream) {
let mut buffer = [0; 1024];
stream.read(&mut buffer).unwrap();
let get = b"GET / HTTP/1.1\r\n";
let sleep = b"GET /sleep HTTP/1.1\r\n";
let (status_line, filename) = if buffer.starts_with(get) {
("HTTP/1.1 200 OK", "hello.html")
} else if buffer.starts_with(sleep) {
thread::sleep(Duration::from_secs(5));
("HTTP/1.1 200 OK", "hello.html")
} else {
("HTTP/1.1 404 NOT FOUND", "404.html")
};
let contents = fs::read_to_string(filename).unwrap();
let response = format!(
"{}\r\nContent-Length: {}\r\n\r\n{}",
status_line,
contents.len(),
contents
);
stream.write(response.as_bytes()).unwrap();
stream.flush().unwrap();
}
Listing 20-25: Shut down the server after serving two requests by exiting the loop
You wouldn’t want a real-world web server to shut down after serving only two requests. This code just demonstrates that the graceful shutdown and cleanup is in working order.
The take method is defined in the Iterator trait and limits the iteration
to the first two items at most. The ThreadPool will go out of scope at the
end of main, and the drop implementation will run.
Start the server with cargo run, and make three requests. The third request
should error, and in your terminal you should see output similar to this:
$ cargo run
Compiling hello v0.1.0 (file:///projects/hello)
Finished dev [unoptimized + debuginfo] target(s) in 1.0s
Running `target/debug/main`
Worker 0 got a job; executing.
Worker 3 got a job; executing.
Shutting down.
Sending terminate message to all workers.
Shutting down all workers.
Shutting down worker 0
Worker 1 was told to terminate.
Worker 2 was told to terminate.
Worker 0 was told to terminate.
Worker 3 was told to terminate.
Shutting down worker 1
Shutting down worker 2
Shutting down worker 3
You might see a different ordering of workers and messages printed. We can see
how this code works from the messages: workers 0 and 3 got the first two
requests, and then on the third request, the server stopped accepting
connections. When the ThreadPool goes out of scope at the end of main, its
Drop implementation kicks in, and the pool tells all workers to terminate.
The workers each print a message when they see the terminate message, and then
the thread pool calls join to shut down each worker thread.
Notice one interesting aspect of this particular execution: the ThreadPool
sent the terminate messages down the channel, and before any worker received
the messages, we tried to join worker 0. Worker 0 had not yet received the
terminate message, so the main thread blocked waiting for worker 0 to finish.
In the meantime, each of the workers received the termination messages. When
worker 0 finished, the main thread waited for the rest of the workers to
finish. At that point, they had all received the termination message and were
able to shut down.
Congrats! We’ve now completed our project; we have a basic web server that uses a thread pool to respond asynchronously. We’re able to perform a graceful shutdown of the server, which cleans up all the threads in the pool.
Here’s the full code for reference:
Filename: src/bin/main.rs
use hello::ThreadPool;
use std::fs;
use std::io::prelude::*;
use std::net::TcpListener;
use std::net::TcpStream;
use std::thread;
use std::time::Duration;
fn main() {
let listener = TcpListener::bind("127.0.0.1:7878").unwrap();
let pool = ThreadPool::new(4);
for stream in listener.incoming() {
let stream = stream.unwrap();
pool.execute(|| {
handle_connection(stream);
});
}
println!("Shutting down.");
}
fn handle_connection(mut stream: TcpStream) {
let mut buffer = [0; 1024];
stream.read(&mut buffer).unwrap();
let get = b"GET / HTTP/1.1\r\n";
let sleep = b"GET /sleep HTTP/1.1\r\n";
let (status_line, filename) = if buffer.starts_with(get) {
("HTTP/1.1 200 OK", "hello.html")
} else if buffer.starts_with(sleep) {
thread::sleep(Duration::from_secs(5));
("HTTP/1.1 200 OK", "hello.html")
} else {
("HTTP/1.1 404 NOT FOUND", "404.html")
};
let contents = fs::read_to_string(filename).unwrap();
let response = format!(
"{}\r\nContent-Length: {}\r\n\r\n{}",
status_line,
contents.len(),
contents
);
stream.write(response.as_bytes()).unwrap();
stream.flush().unwrap();
}
Filename: src/lib.rs
use std::sync::mpsc;
use std::sync::Arc;
use std::sync::Mutex;
use std::thread;
pub struct ThreadPool {
workers: Vec<Worker>,
sender: mpsc::Sender<Message>,
}
type Job = Box<dyn FnOnce() + Send + 'static>;
enum Message {
NewJob(Job),
Terminate,
}
impl ThreadPool {
/// Create a new ThreadPool.
///
/// The size is the number of threads in the pool.
///
/// # Panics
///
/// The `new` function will panic if the size is zero.
pub fn new(size: usize) -> ThreadPool {
assert!(size > 0);
let (sender, receiver) = mpsc::channel();
let receiver = Arc::new(Mutex::new(receiver));
let mut workers = Vec::with_capacity(size);
for id in 0..size {
workers.push(Worker::new(id, Arc::clone(&receiver)));
}
ThreadPool { workers, sender }
}
pub fn execute<F>(&self, f: F)
where
F: FnOnce() + Send + 'static,
{
let job = Box::new(f);
self.sender.send(Message::NewJob(job)).unwrap();
}
}
impl Drop for ThreadPool {
fn drop(&mut self) {
println!("Sending terminate message to all workers.");
for _ in &self.workers {
self.sender.send(Message::Terminate).unwrap();
}
println!("Shutting down all workers.");
for worker in &mut self.workers {
println!("Shutting down worker {}", worker.id);
if let Some(thread) = worker.thread.take() {
thread.join().unwrap();
}
}
}
}
struct Worker {
id: usize,
thread: Option<thread::JoinHandle<()>>,
}
impl Worker {
fn new(id: usize, receiver: Arc<Mutex<mpsc::Receiver<Message>>>) -> Worker {
let thread = thread::spawn(move || loop {
let message = receiver.lock().unwrap().recv().unwrap();
match message {
Message::NewJob(job) => {
println!("Worker {} got a job; executing.", id);
job();
}
Message::Terminate => {
println!("Worker {} was told to terminate.", id);
break;
}
}
});
Worker {
id,
thread: Some(thread),
}
}
}
We could do more here! If you want to continue enhancing this project, here are some ideas:
- Add more documentation to
ThreadPooland its public methods. - Add tests of the library’s functionality.
- Change calls to
unwrapto more robust error handling. - Use
ThreadPoolto perform some task other than serving web requests. - Find a thread pool crate on crates.io and implement a similar web server using the crate instead. Then compare its API and robustness to the thread pool we implemented.
Summary
Well done! You’ve made it to the end of the book! We want to thank you for joining us on this tour of Rust. You’re now ready to implement your own Rust projects and help with other peoples’ projects. Keep in mind that there is a welcoming community of other Rustaceans who would love to help you with any challenges you encounter on your Rust journey.
Appendix
The following sections contain reference material you may find useful in your Rust journey.
Appendix A: Keywords
The following list contains keywords that are reserved for current or future use by the Rust language. As such, they cannot be used as identifiers (except as raw identifiers as we’ll discuss in the “Raw Identifiers” section), including names of functions, variables, parameters, struct fields, modules, crates, constants, macros, static values, attributes, types, traits, or lifetimes.
Keywords Currently in Use
The following keywords currently have the functionality described.
as- perform primitive casting, disambiguate the specific trait containing an item, or rename items inuseandextern cratestatementsasync- return aFutureinstead of blocking the current threadawait- suspend execution until the result of aFutureis readybreak- exit a loop immediatelyconst- define constant items or constant raw pointerscontinue- continue to the next loop iterationcrate- link an external crate or a macro variable representing the crate in which the macro is defineddyn- dynamic dispatch to a trait objectelse- fallback forifandif letcontrol flow constructsenum- define an enumerationextern- link an external crate, function, or variablefalse- Boolean false literalfn- define a function or the function pointer typefor- loop over items from an iterator, implement a trait, or specify a higher-ranked lifetimeif- branch based on the result of a conditional expressionimpl- implement inherent or trait functionalityin- part offorloop syntaxlet- bind a variableloop- loop unconditionallymatch- match a value to patternsmod- define a modulemove- make a closure take ownership of all its capturesmut- denote mutability in references, raw pointers, or pattern bindingspub- denote public visibility in struct fields,implblocks, or modulesref- bind by referencereturn- return from functionSelf- a type alias for the type we are defining or implementingself- method subject or current modulestatic- global variable or lifetime lasting the entire program executionstruct- define a structuresuper- parent module of the current moduletrait- define a traittrue- Boolean true literaltype- define a type alias or associated typeunion- define a union and is only a keyword when used in a union declarationunsafe- denote unsafe code, functions, traits, or implementationsuse- bring symbols into scopewhere- denote clauses that constrain a typewhile- loop conditionally based on the result of an expression
Keywords Reserved for Future Use
The following keywords do not have any functionality but are reserved by Rust for potential future use.
abstractbecomeboxdofinalmacrooverrideprivtrytypeofunsizedvirtualyield
Raw Identifiers
Raw identifiers are the syntax that lets you use keywords where they wouldn’t
normally be allowed. You use a raw identifier by prefixing a keyword with r#.
For example, match is a keyword. If you try to compile the following function
that uses match as its name:
Filename: src/main.rs
fn match(needle: &str, haystack: &str) -> bool {
haystack.contains(needle)
}
you’ll get this error:
error: expected identifier, found keyword `match`
--> src/main.rs:4:4
|
4 | fn match(needle: &str, haystack: &str) -> bool {
| ^^^^^ expected identifier, found keyword
The error shows that you can’t use the keyword match as the function
identifier. To use match as a function name, you need to use the raw
identifier syntax, like this:
Filename: src/main.rs
fn r#match(needle: &str, haystack: &str) -> bool { haystack.contains(needle) } fn main() { assert!(r#match("foo", "foobar")); }
This code will compile without any errors. Note the r# prefix on the function
name in its definition as well as where the function is called in main.
Raw identifiers allow you to use any word you choose as an identifier, even if
that word happens to be a reserved keyword. In addition, raw identifiers allow
you to use libraries written in a different Rust edition than your crate uses.
For example, try isn’t a keyword in the 2015 edition but is in the 2018
edition. If you depend on a library that’s written using the 2015 edition and
has a try function, you’ll need to use the raw identifier syntax, r#try in
this case, to call that function from your 2018 edition code. See Appendix
E for more information on editions.
Appendix B: Operators and Symbols
This appendix contains a glossary of Rust’s syntax, including operators and other symbols that appear by themselves or in the context of paths, generics, trait bounds, macros, attributes, comments, tuples, and brackets.
Operators
Table B-1 contains the operators in Rust, an example of how the operator would appear in context, a short explanation, and whether that operator is overloadable. If an operator is overloadable, the relevant trait to use to overload that operator is listed.
Table B-1: Operators
| Operator | Example | Explanation | Overloadable? |
|---|---|---|---|
! | ident!(...), ident!{...}, ident![...] | Macro expansion | |
! | !expr | Bitwise or logical complement | Not |
!= | var != expr | Nonequality comparison | PartialEq |
% | expr % expr | Arithmetic remainder | Rem |
%= | var %= expr | Arithmetic remainder and assignment | RemAssign |
& | &expr, &mut expr | Borrow | |
& | &type, &mut type, &'a type, &'a mut type | Borrowed pointer type | |
& | expr & expr | Bitwise AND | BitAnd |
&= | var &= expr | Bitwise AND and assignment | BitAndAssign |
&& | expr && expr | Short-circuiting logical AND | |
* | expr * expr | Arithmetic multiplication | Mul |
*= | var *= expr | Arithmetic multiplication and assignment | MulAssign |
* | *expr | Dereference | |
* | *const type, *mut type | Raw pointer | |
+ | trait + trait, 'a + trait | Compound type constraint | |
+ | expr + expr | Arithmetic addition | Add |
+= | var += expr | Arithmetic addition and assignment | AddAssign |
, | expr, expr | Argument and element separator | |
- | - expr | Arithmetic negation | Neg |
- | expr - expr | Arithmetic subtraction | Sub |
-= | var -= expr | Arithmetic subtraction and assignment | SubAssign |
-> | fn(...) -> type, |...| -> type | Function and closure return type | |
. | expr.ident | Member access | |
.. | .., expr.., ..expr, expr..expr | Right-exclusive range literal | |
..= | ..=expr, expr..=expr | Right-inclusive range literal | |
.. | ..expr | Struct literal update syntax | |
.. | variant(x, ..), struct_type { x, .. } | “And the rest” pattern binding | |
... | expr...expr | In a pattern: inclusive range pattern | |
/ | expr / expr | Arithmetic division | Div |
/= | var /= expr | Arithmetic division and assignment | DivAssign |
: | pat: type, ident: type | Constraints | |
: | ident: expr | Struct field initializer | |
: | 'a: loop {...} | Loop label | |
; | expr; | Statement and item terminator | |
; | [...; len] | Part of fixed-size array syntax | |
<< | expr << expr | Left-shift | Shl |
<<= | var <<= expr | Left-shift and assignment | ShlAssign |
< | expr < expr | Less than comparison | PartialOrd |
<= | expr <= expr | Less than or equal to comparison | PartialOrd |
= | var = expr, ident = type | Assignment/equivalence | |
== | expr == expr | Equality comparison | PartialEq |
=> | pat => expr | Part of match arm syntax | |
> | expr > expr | Greater than comparison | PartialOrd |
>= | expr >= expr | Greater than or equal to comparison | PartialOrd |
>> | expr >> expr | Right-shift | Shr |
>>= | var >>= expr | Right-shift and assignment | ShrAssign |
@ | ident @ pat | Pattern binding | |
^ | expr ^ expr | Bitwise exclusive OR | BitXor |
^= | var ^= expr | Bitwise exclusive OR and assignment | BitXorAssign |
| | pat | pat | Pattern alternatives | |
| | expr | expr | Bitwise OR | BitOr |
|= | var |= expr | Bitwise OR and assignment | BitOrAssign |
|| | expr || expr | Short-circuiting logical OR | |
? | expr? | Error propagation |
Non-operator Symbols
The following list contains all non-letters that don’t function as operators; that is, they don’t behave like a function or method call.
Table B-2 shows symbols that appear on their own and are valid in a variety of locations.
Table B-2: Stand-Alone Syntax
| Symbol | Explanation |
|---|---|
'ident | Named lifetime or loop label |
...u8, ...i32, ...f64, ...usize, etc. | Numeric literal of specific type |
"..." | String literal |
r"...", r#"..."#, r##"..."##, etc. | Raw string literal, escape characters not processed |
b"..." | Byte string literal; constructs a [u8] instead of a string |
br"...", br#"..."#, br##"..."##, etc. | Raw byte string literal, combination of raw and byte string literal |
'...' | Character literal |
b'...' | ASCII byte literal |
|...| expr | Closure |
! | Always empty bottom type for diverging functions |
_ | “Ignored” pattern binding; also used to make integer literals readable |
Table B-3 shows symbols that appear in the context of a path through the module hierarchy to an item.
Table B-3: Path-Related Syntax
| Symbol | Explanation |
|---|---|
ident::ident | Namespace path |
::path | Path relative to the crate root (i.e., an explicitly absolute path) |
self::path | Path relative to the current module (i.e., an explicitly relative path). |
super::path | Path relative to the parent of the current module |
type::ident, <type as trait>::ident | Associated constants, functions, and types |
<type>::... | Associated item for a type that cannot be directly named (e.g., <&T>::..., <[T]>::..., etc.) |
trait::method(...) | Disambiguating a method call by naming the trait that defines it |
type::method(...) | Disambiguating a method call by naming the type for which it’s defined |
<type as trait>::method(...) | Disambiguating a method call by naming the trait and type |
Table B-4 shows symbols that appear in the context of using generic type parameters.
Table B-4: Generics
| Symbol | Explanation |
|---|---|
path<...> | Specifies parameters to generic type in a type (e.g., Vec<u8>) |
path::<...>, method::<...> | Specifies parameters to generic type, function, or method in an expression; often referred to as turbofish (e.g., "42".parse::<i32>()) |
fn ident<...> ... | Define generic function |
struct ident<...> ... | Define generic structure |
enum ident<...> ... | Define generic enumeration |
impl<...> ... | Define generic implementation |
for<...> type | Higher-ranked lifetime bounds |
type<ident=type> | A generic type where one or more associated types have specific assignments (e.g., Iterator<Item=T>) |
Table B-5 shows symbols that appear in the context of constraining generic type parameters with trait bounds.
Table B-5: Trait Bound Constraints
| Symbol | Explanation |
|---|---|
T: U | Generic parameter T constrained to types that implement U |
T: 'a | Generic type T must outlive lifetime 'a (meaning the type cannot transitively contain any references with lifetimes shorter than 'a) |
T : 'static | Generic type T contains no borrowed references other than 'static ones |
'b: 'a | Generic lifetime 'b must outlive lifetime 'a |
T: ?Sized | Allow generic type parameter to be a dynamically sized type |
'a + trait, trait + trait | Compound type constraint |
Table B-6 shows symbols that appear in the context of calling or defining macros and specifying attributes on an item.
Table B-6: Macros and Attributes
| Symbol | Explanation |
|---|---|
#[meta] | Outer attribute |
#![meta] | Inner attribute |
$ident | Macro substitution |
$ident:kind | Macro capture |
$(…)… | Macro repetition |
ident!(...), ident!{...}, ident![...] | Macro invocation |
Table B-7 shows symbols that create comments.
Table B-7: Comments
| Symbol | Explanation |
|---|---|
// | Line comment |
//! | Inner line doc comment |
/// | Outer line doc comment |
/*...*/ | Block comment |
/*!...*/ | Inner block doc comment |
/**...*/ | Outer block doc comment |
Table B-8 shows symbols that appear in the context of using tuples.
Table B-8: Tuples
| Symbol | Explanation |
|---|---|
() | Empty tuple (aka unit), both literal and type |
(expr) | Parenthesized expression |
(expr,) | Single-element tuple expression |
(type,) | Single-element tuple type |
(expr, ...) | Tuple expression |
(type, ...) | Tuple type |
expr(expr, ...) | Function call expression; also used to initialize tuple structs and tuple enum variants |
expr.0, expr.1, etc. | Tuple indexing |
Table B-9 shows the contexts in which curly braces are used.
Table B-9: Curly Brackets
| Context | Explanation |
|---|---|
{...} | Block expression |
Type {...} | struct literal |
Table B-10 shows the contexts in which square brackets are used.
Table B-10: Square Brackets
| Context | Explanation |
|---|---|
[...] | Array literal |
[expr; len] | Array literal containing len copies of expr |
[type; len] | Array type containing len instances of type |
expr[expr] | Collection indexing. Overloadable (Index, IndexMut) |
expr[..], expr[a..], expr[..b], expr[a..b] | Collection indexing pretending to be collection slicing, using Range, RangeFrom, RangeTo, or RangeFull as the “index” |
Appendix C: Derivable Traits
In various places in the book, we’ve discussed the derive attribute, which
you can apply to a struct or enum definition. The derive attribute generates
code that will implement a trait with its own default implementation on the
type you’ve annotated with the derive syntax.
In this appendix, we provide a reference of all the traits in the standard
library that you can use with derive. Each section covers:
- What operators and methods deriving this trait will enable
- What the implementation of the trait provided by
derivedoes - What implementing the trait signifies about the type
- The conditions in which you’re allowed or not allowed to implement the trait
- Examples of operations that require the trait
If you want different behavior from that provided by the derive attribute,
consult the standard library documentation
for each trait for details of how to manually implement them.
The rest of the traits defined in the standard library can’t be implemented on
your types using derive. These traits don’t have sensible default behavior,
so it’s up to you to implement them in the way that makes sense for what you’re
trying to accomplish.
An example of a trait that can’t be derived is Display, which handles
formatting for end users. You should always consider the appropriate way to
display a type to an end user. What parts of the type should an end user be
allowed to see? What parts would they find relevant? What format of the data
would be most relevant to them? The Rust compiler doesn’t have this insight, so
it can’t provide appropriate default behavior for you.
The list of derivable traits provided in this appendix is not comprehensive:
libraries can implement derive for their own traits, making the list of
traits you can use derive with truly open-ended. Implementing derive
involves using a procedural macro, which is covered in the
“Macros” section of Chapter 19.
Debug for Programmer Output
The Debug trait enables debug formatting in format strings, which you
indicate by adding :? within {} placeholders.
The Debug trait allows you to print instances of a type for debugging
purposes, so you and other programmers using your type can inspect an instance
at a particular point in a program’s execution.
The Debug trait is required, for example, in use of the assert_eq! macro.
This macro prints the values of instances given as arguments if the equality
assertion fails so programmers can see why the two instances weren’t equal.
PartialEq and Eq for Equality Comparisons
The PartialEq trait allows you to compare instances of a type to check for
equality and enables use of the == and != operators.
Deriving PartialEq implements the eq method. When PartialEq is derived on
structs, two instances are equal only if all fields are equal, and the
instances are not equal if any fields are not equal. When derived on enums,
each variant is equal to itself and not equal to the other variants.
The PartialEq trait is required, for example, with the use of the
assert_eq! macro, which needs to be able to compare two instances of a type
for equality.
The Eq trait has no methods. Its purpose is to signal that for every value of
the annotated type, the value is equal to itself. The Eq trait can only be
applied to types that also implement PartialEq, although not all types that
implement PartialEq can implement Eq. One example of this is floating point
number types: the implementation of floating point numbers states that two
instances of the not-a-number (NaN) value are not equal to each other.
An example of when Eq is required is for keys in a HashMap<K, V> so the
HashMap<K, V> can tell whether two keys are the same.
PartialOrd and Ord for Ordering Comparisons
The PartialOrd trait allows you to compare instances of a type for sorting
purposes. A type that implements PartialOrd can be used with the <, >,
<=, and >= operators. You can only apply the PartialOrd trait to types
that also implement PartialEq.
Deriving PartialOrd implements the partial_cmp method, which returns an
Option<Ordering> that will be None when the values given don’t produce an
ordering. An example of a value that doesn’t produce an ordering, even though
most values of that type can be compared, is the not-a-number (NaN) floating
point value. Calling partial_cmp with any floating point number and the NaN
floating point value will return None.
When derived on structs, PartialOrd compares two instances by comparing the
value in each field in the order in which the fields appear in the struct
definition. When derived on enums, variants of the enum declared earlier in the
enum definition are considered less than the variants listed later.
The PartialOrd trait is required, for example, for the gen_range method
from the rand crate that generates a random value in the range specified by a
range expression.
The Ord trait allows you to know that for any two values of the annotated
type, a valid ordering will exist. The Ord trait implements the cmp method,
which returns an Ordering rather than an Option<Ordering> because a valid
ordering will always be possible. You can only apply the Ord trait to types
that also implement PartialOrd and Eq (and Eq requires PartialEq). When
derived on structs and enums, cmp behaves the same way as the derived
implementation for partial_cmp does with PartialOrd.
An example of when Ord is required is when storing values in a BTreeSet<T>,
a data structure that stores data based on the sort order of the values.
Clone and Copy for Duplicating Values
The Clone trait allows you to explicitly create a deep copy of a value, and
the duplication process might involve running arbitrary code and copying heap
data. See the “Ways Variables and Data Interact:
Clone” section in
Chapter 4 for more information on Clone.
Deriving Clone implements the clone method, which when implemented for the
whole type, calls clone on each of the parts of the type. This means all the
fields or values in the type must also implement Clone to derive Clone.
An example of when Clone is required is when calling the to_vec method on a
slice. The slice doesn’t own the type instances it contains, but the vector
returned from to_vec will need to own its instances, so to_vec calls
clone on each item. Thus, the type stored in the slice must implement Clone.
The Copy trait allows you to duplicate a value by only copying bits stored on
the stack; no arbitrary code is necessary. See the “Stack-Only Data:
Copy” section in Chapter 4 for more
information on Copy.
The Copy trait doesn’t define any methods to prevent programmers from
overloading those methods and violating the assumption that no arbitrary code
is being run. That way, all programmers can assume that copying a value will be
very fast.
You can derive Copy on any type whose parts all implement Copy. A type that
implements Copy must also implement Clone, because a type that implements
Copy has a trivial implementation of Clone that performs the same task as
Copy.
The Copy trait is rarely required; types that implement Copy have
optimizations available, meaning you don’t have to call clone, which makes
the code more concise.
Everything possible with Copy you can also accomplish with Clone, but the
code might be slower or have to use clone in places.
Hash for Mapping a Value to a Value of Fixed Size
The Hash trait allows you to take an instance of a type of arbitrary size and
map that instance to a value of fixed size using a hash function. Deriving
Hash implements the hash method. The derived implementation of the hash
method combines the result of calling hash on each of the parts of the type,
meaning all fields or values must also implement Hash to derive Hash.
An example of when Hash is required is in storing keys in a HashMap<K, V>
to store data efficiently.
Default for Default Values
The Default trait allows you to create a default value for a type. Deriving
Default implements the default function. The derived implementation of the
default function calls the default function on each part of the type,
meaning all fields or values in the type must also implement Default to
derive Default.
The Default::default function is commonly used in combination with the struct
update syntax discussed in the “Creating Instances From Other Instances With
Struct Update
Syntax”
section in Chapter 5. You can customize a few fields of a struct and then
set and use a default value for the rest of the fields by using
..Default::default().
The Default trait is required when you use the method unwrap_or_default on
Option<T> instances, for example. If the Option<T> is None, the method
unwrap_or_default will return the result of Default::default for the type
T stored in the Option<T>.
Appendix D - Useful Development Tools
In this appendix, we talk about some useful development tools that the Rust project provides. We’ll look at automatic formatting, quick ways to apply warning fixes, a linter, and integrating with IDEs.
Automatic Formatting with rustfmt
The rustfmt tool reformats your code according to the community code style.
Many collaborative projects use rustfmt to prevent arguments about which
style to use when writing Rust: everyone formats their code using the tool.
To install rustfmt, enter the following:
$ rustup component add rustfmt
This command gives you rustfmt and cargo-fmt, similar to how Rust gives you
both rustc and cargo. To format any Cargo project, enter the following:
$ cargo fmt
Running this command reformats all the Rust code in the current crate. This
should only change the code style, not the code semantics. For more information
on rustfmt, see its documentation.
Fix Your Code with rustfix
The rustfix tool is included with Rust installations and can automatically fix some compiler warnings. If you’ve written code in Rust, you’ve probably seen compiler warnings. For example, consider this code:
Filename: src/main.rs
fn do_something() {} fn main() { for i in 0..100 { do_something(); } }
Here, we’re calling the do_something function 100 times, but we never use the
variable i in the body of the for loop. Rust warns us about that:
$ cargo build
Compiling myprogram v0.1.0 (file:///projects/myprogram)
warning: unused variable: `i`
--> src/main.rs:4:9
|
4 | for i in 1..100 {
| ^ help: consider using `_i` instead
|
= note: #[warn(unused_variables)] on by default
Finished dev [unoptimized + debuginfo] target(s) in 0.50s
The warning suggests that we use _i as a name instead: the underscore
indicates that we intend for this variable to be unused. We can automatically
apply that suggestion using the rustfix tool by running the command cargo fix:
$ cargo fix
Checking myprogram v0.1.0 (file:///projects/myprogram)
Fixing src/main.rs (1 fix)
Finished dev [unoptimized + debuginfo] target(s) in 0.59s
When we look at src/main.rs again, we’ll see that cargo fix has changed the
code:
Filename: src/main.rs
fn do_something() {} fn main() { for _i in 0..100 { do_something(); } }
The for loop variable is now named _i, and the warning no longer appears.
You can also use the cargo fix command to transition your code between
different Rust editions. Editions are covered in Appendix E.
More Lints with Clippy
The Clippy tool is a collection of lints to analyze your code so you can catch common mistakes and improve your Rust code.
To install Clippy, enter the following:
$ rustup component add clippy
To run Clippy’s lints on any Cargo project, enter the following:
$ cargo clippy
For example, say you write a program that uses an approximation of a mathematical constant, such as pi, as this program does:
Filename: src/main.rs
fn main() { let x = 3.1415; let r = 8.0; println!("the area of the circle is {}", x * r * r); }
Running cargo clippy on this project results in this error:
error: approximate value of `f{32, 64}::consts::PI` found. Consider using it directly
--> src/main.rs:2:13
|
2 | let x = 3.1415;
| ^^^^^^
|
= note: #[deny(clippy::approx_constant)] on by default
= help: for further information visit https://rust-lang-nursery.github.io/rust-clippy/master/index.html#approx_constant
This error lets you know that Rust has this constant defined more precisely and
that your program would be more correct if you used the constant instead. You
would then change your code to use the PI constant. The following code
doesn’t result in any errors or warnings from Clippy:
Filename: src/main.rs
fn main() { let x = std::f64::consts::PI; let r = 8.0; println!("the area of the circle is {}", x * r * r); }
For more information on Clippy, see its documentation.
IDE Integration Using the Rust Language Server
To help IDE integration, the Rust project distributes the Rust Language
Server (rls). This tool speaks the Language Server
Protocol, which is a specification for IDEs and programming
languages to communicate with each other. Different clients can use the rls,
such as the Rust plug-in for Visual Studio Code.
To install the rls, enter the following:
$ rustup component add rls
Then install the language server support in your particular IDE; you’ll gain abilities such as autocompletion, jump to definition, and inline errors.
For more information on the rls, see its documentation.
Appendix E - Editions
In Chapter 1, you saw that cargo new adds a bit of metadata to your
Cargo.toml file about an edition. This appendix talks about what that means!
The Rust language and compiler have a six-week release cycle, meaning users get a constant stream of new features. Other programming languages release larger changes less often; Rust releases smaller updates more frequently. After a while, all of these tiny changes add up. But from release to release, it can be difficult to look back and say, “Wow, between Rust 1.10 and Rust 1.31, Rust has changed a lot!”
Every two or three years, the Rust team produces a new Rust edition. Each edition brings together the features that have landed into a clear package with fully updated documentation and tooling. New editions ship as part of the usual six-week release process.
Editions serve different purposes for different people:
- For active Rust users, a new edition brings together incremental changes into an easy-to-understand package.
- For non-users, a new edition signals that some major advancements have landed, which might make Rust worth another look.
- For those developing Rust, a new edition provides a rallying point for the project as a whole.
At the time of this writing, two Rust editions are available: Rust 2015 and Rust 2018. This book is written using Rust 2018 edition idioms.
The edition key in Cargo.toml indicates which edition the compiler should
use for your code. If the key doesn’t exist, Rust uses 2015 as the edition
value for backward compatibility reasons.
Each project can opt in to an edition other than the default 2015 edition. Editions can contain incompatible changes, such as including a new keyword that conflicts with identifiers in code. However, unless you opt in to those changes, your code will continue to compile even as you upgrade the Rust compiler version you use.
All Rust compiler versions support any edition that existed prior to that compiler’s release, and they can link crates of any supported editions together. Edition changes only affect the way the compiler initially parses code. Therefore, if you’re using Rust 2015 and one of your dependencies uses Rust 2018, your project will compile and be able to use that dependency. The opposite situation, where your project uses Rust 2018 and a dependency uses Rust 2015, works as well.
To be clear: most features will be available on all editions. Developers using any Rust edition will continue to see improvements as new stable releases are made. However, in some cases, mainly when new keywords are added, some new features might only be available in later editions. You will need to switch editions if you want to take advantage of such features.
For more details, the Edition
Guide is a complete book
about editions that enumerates the differences between editions and explains
how to automatically upgrade your code to a new edition via cargo fix.
Appendix F: Translations of the Book
For resources in languages other than English. Most are still in progress; see the Translations label to help or let us know about a new translation!
- Português (BR)
- Português (PT)
- 简体中文
- Українська
- Español, alternate
- Italiano
- Русский
- 한국어
- 日本語
- Français
- Polski
- עברית
- Cebuano
- Tagalog
- Esperanto
- ελληνική
- Svenska
- Farsi
- Deutsch
- Turkish, online
Appendix G - How Rust is Made and “Nightly Rust”
This appendix is about how Rust is made and how that affects you as a Rust developer.
Stability Without Stagnation
As a language, Rust cares a lot about the stability of your code. We want Rust to be a rock-solid foundation you can build on, and if things were constantly changing, that would be impossible. At the same time, if we can’t experiment with new features, we may not find out important flaws until after their release, when we can no longer change things.
Our solution to this problem is what we call “stability without stagnation”, and our guiding principle is this: you should never have to fear upgrading to a new version of stable Rust. Each upgrade should be painless, but should also bring you new features, fewer bugs, and faster compile times.
Choo, Choo! Release Channels and Riding the Trains
Rust development operates on a train schedule. That is, all development is
done on the master branch of the Rust repository. Releases follow a software
release train model, which has been used by Cisco IOS and other software
projects. There are three release channels for Rust:
- Nightly
- Beta
- Stable
Most Rust developers primarily use the stable channel, but those who want to try out experimental new features may use nightly or beta.
Here’s an example of how the development and release process works: let’s
assume that the Rust team is working on the release of Rust 1.5. That release
happened in December of 2015, but it will provide us with realistic version
numbers. A new feature is added to Rust: a new commit lands on the master
branch. Each night, a new nightly version of Rust is produced. Every day is a
release day, and these releases are created by our release infrastructure
automatically. So as time passes, our releases look like this, once a night:
nightly: * - - * - - *
Every six weeks, it’s time to prepare a new release! The beta branch of the
Rust repository branches off from the master branch used by nightly. Now,
there are two releases:
nightly: * - - * - - *
|
beta: *
Most Rust users do not use beta releases actively, but test against beta in their CI system to help Rust discover possible regressions. In the meantime, there’s still a nightly release every night:
nightly: * - - * - - * - - * - - *
|
beta: *
Let’s say a regression is found. Good thing we had some time to test the beta
release before the regression snuck into a stable release! The fix is applied
to master, so that nightly is fixed, and then the fix is backported to the
beta branch, and a new release of beta is produced:
nightly: * - - * - - * - - * - - * - - *
|
beta: * - - - - - - - - *
Six weeks after the first beta was created, it’s time for a stable release! The
stable branch is produced from the beta branch:
nightly: * - - * - - * - - * - - * - - * - * - *
|
beta: * - - - - - - - - *
|
stable: *
Hooray! Rust 1.5 is done! However, we’ve forgotten one thing: because the six
weeks have gone by, we also need a new beta of the next version of Rust, 1.6.
So after stable branches off of beta, the next version of beta branches
off of nightly again:
nightly: * - - * - - * - - * - - * - - * - * - *
| |
beta: * - - - - - - - - * *
|
stable: *
This is called the “train model” because every six weeks, a release “leaves the station”, but still has to take a journey through the beta channel before it arrives as a stable release.
Rust releases every six weeks, like clockwork. If you know the date of one Rust release, you can know the date of the next one: it’s six weeks later. A nice aspect of having releases scheduled every six weeks is that the next train is coming soon. If a feature happens to miss a particular release, there’s no need to worry: another one is happening in a short time! This helps reduce pressure to sneak possibly unpolished features in close to the release deadline.
Thanks to this process, you can always check out the next build of Rust and
verify for yourself that it’s easy to upgrade to: if a beta release doesn’t
work as expected, you can report it to the team and get it fixed before the
next stable release happens! Breakage in a beta release is relatively rare, but
rustc is still a piece of software, and bugs do exist.
Unstable Features
There’s one more catch with this release model: unstable features. Rust uses a
technique called “feature flags” to determine what features are enabled in a
given release. If a new feature is under active development, it lands on
master, and therefore, in nightly, but behind a feature flag. If you, as a
user, wish to try out the work-in-progress feature, you can, but you must be
using a nightly release of Rust and annotate your source code with the
appropriate flag to opt in.
If you’re using a beta or stable release of Rust, you can’t use any feature flags. This is the key that allows us to get practical use with new features before we declare them stable forever. Those who wish to opt into the bleeding edge can do so, and those who want a rock-solid experience can stick with stable and know that their code won’t break. Stability without stagnation.
This book only contains information about stable features, as in-progress features are still changing, and surely they’ll be different between when this book was written and when they get enabled in stable builds. You can find documentation for nightly-only features online.
Rustup and the Role of Rust Nightly
Rustup makes it easy to change between different release channels of Rust, on a global or per-project basis. By default, you’ll have stable Rust installed. To install nightly, for example:
$ rustup toolchain install nightly
You can see all of the toolchains (releases of Rust and associated
components) you have installed with rustup as well. Here’s an example on one
of your authors’ Windows computer:
> rustup toolchain list
stable-x86_64-pc-windows-msvc (default)
beta-x86_64-pc-windows-msvc
nightly-x86_64-pc-windows-msvc
As you can see, the stable toolchain is the default. Most Rust users use stable
most of the time. You might want to use stable most of the time, but use
nightly on a specific project, because you care about a cutting-edge feature.
To do so, you can use rustup override in that project’s directory to set the
nightly toolchain as the one rustup should use when you’re in that directory:
$ cd ~/projects/needs-nightly
$ rustup override set nightly
Now, every time you call rustc or cargo inside of
~/projects/needs-nightly, rustup will make sure that you are using nightly
Rust, rather than your default of stable Rust. This comes in handy when you
have a lot of Rust projects!
The RFC Process and Teams
So how do you learn about these new features? Rust’s development model follows a Request For Comments (RFC) process. If you’d like an improvement in Rust, you can write up a proposal, called an RFC.
Anyone can write RFCs to improve Rust, and the proposals are reviewed and discussed by the Rust team, which is comprised of many topic subteams. There’s a full list of the teams on Rust’s website, which includes teams for each area of the project: language design, compiler implementation, infrastructure, documentation, and more. The appropriate team reads the proposal and the comments, writes some comments of their own, and eventually, there’s consensus to accept or reject the feature.
If the feature is accepted, an issue is opened on the Rust repository, and
someone can implement it. The person who implements it very well may not be the
person who proposed the feature in the first place! When the implementation is
ready, it lands on the master branch behind a feature gate, as we discussed
in the “Unstable Features” section.
After some time, once Rust developers who use nightly releases have been able to try out the new feature, team members will discuss the feature, how it’s worked out on nightly, and decide if it should make it into stable Rust or not. If the decision is to move forward, the feature gate is removed, and the feature is now considered stable! It rides the trains into a new stable release of Rust.